Ed Nisley's Blog: Shop notes, electronics, firmware, machinery, 3D printing, laser cuttery, and curiosities. Contents: 100% human thinking, 0% AI slop.
These QC20 earbuds came in the Android flavor, also known as the CTIA/AHJ “standard”:
Bose QC20 Earphones
The 3.5 mm plug connections:
Tip = left audio
Ring 1 = right audio
Ring 2 = ground
Sleeve = microphone and button signals
The blue Mode button on the side of the splitter box switches the noise cancelling between “some” and “silent”. The latter works surprisingly well; it can knock our vacuum cleaner down to a bearable level.
The three black buttons place resistive loads on the otherwise open-circuit microphone connection:
Volume + = 220 Ω
Answer/End = 56 Ω
Volume – = 520 Ω
Now, if only I had a device that would do something with those signals …
nnn = a unique, but not necessarily sequential, number
y = last digit of year
mm = month
dd = day
That produces these entries in my NAS hard drive full of bicycle action camera “footage”:
ll /mnt/video/Fly6/DCIM/
total 0
drwxr-xr-x 2 ed root 0 2015-12-10 14:18 10051210
drwxr-xr-x 2 ed root 0 2015-12-21 12:47 10051221
drwxr-xr-x 2 ed root 0 2015-12-24 20:26 10151224
drwxr-xr-x 2 ed root 0 2015-12-25 14:42 10251225
drwxr-xr-x 2 ed root 0 2015-12-26 15:26 10351226
drwxr-xr-x 2 ed root 0 2015-12-31 16:37 10451231
drwxr-xr-x 2 ed root 0 2016-01-16 16:56 10560115
drwxr-xr-x 2 ed root 0 2016-01-16 16:56 10660116
drwxr-xr-x 2 ed root 0 2016-01-31 13:28 10760131
drwxr-xr-x 2 ed root 0 2016-02-04 12:59 10860204
drwxr-xr-x 2 ed root 0 2016-02-07 17:05 10960207
drwxr-xr-x 2 ed root 0 2016-02-20 13:08 11060220
drwxr-xr-x 2 ed root 0 2016-02-21 12:03 11160221
drwxr-xr-x 2 ed root 0 2016-02-22 14:02 11260222
drwxr-xr-x 2 ed root 0 2016-03-06 18:16 11360306
drwxr-xr-x 2 ed root 0 2016-03-07 14:33 11460307
drwxr-xr-x 2 ed root 0 2016-03-08 14:57 11560308
drwxr-xr-x 2 ed root 0 2016-03-09 13:48 11660309
drwxr-xr-x 2 ed root 0 2016-03-10 11:24 11760310
drwxr-xr-x 2 ed root 0 2016-03-11 13:51 11860311
drwxr-xr-x 2 ed root 0 2016-03-12 16:04 11960312
drwxr-xr-x 2 ed root 0 2015-11-22 17:02 12051122
drwxr-xr-x 2 ed root 0 2015-11-25 19:14 12151125
drwxr-xr-x 2 ed root 0 2015-11-29 17:42 12251129
drwxr-xr-x 2 ed root 0 2015-11-30 16:53 12351130
drwxr-xr-x 2 ed root 0 2015-12-05 16:35 12451205
drwxr-xr-x 2 ed root 0 2015-12-07 16:53 12551207
drwxr-xr-x 2 ed root 0 2015-12-08 14:05 12690102
Annoyingly, the first three digits are not in ascending order of date, perhaps because the firmware recycles numbers previously used for now-deleted directories.
The year digit 9 in the last directory (12690102) came from the camera’s default 2009 startup date. You set the camera’s clock by editing its configuration file and rebooting that sucker, which I hadn’t done when I got a new Fly6 as a warranty replacement for the old one; apparently the battery shook itself loose after half a year of riding.
Deleting the directories created last November and December goes a little something like this:
rm -rf /mnt/video/Fly6/DCIM/???51[12]*
You probably want to dry-run that with a directory listing command (perhaps ls -al) just to be sure it will wipe out what you want and nothing else.
Within each directory, the file names follow a more rigid hhmmnnnn format:
hh = hour
mm = minute
nnnn = ascending sequence number
Which produces a set of files like this:
ll /mnt/video/Fly6/DCIM/11960312/
total 6.6G
-rwxr-xr-x 1 ed root 607M 2057-09-06 19:40 13120005.AVI
-rwxr-xr-x 1 ed root 810M 2057-09-06 19:40 13190006.AVI
-rwxr-xr-x 1 ed root 962M 2057-09-06 19:40 13290007.AVI
-rwxr-xr-x 1 ed root 573M 2057-09-06 19:40 13390008.AVI
-rwxr-xr-x 1 ed root 523M 2057-09-06 19:40 13470009.AVI
-rwxr-xr-x 1 ed root 596M 2057-09-06 19:40 13570010.AVI
-rwxr-xr-x 1 ed root 672M 2057-09-06 19:40 14070011.AVI
-rwxr-xr-x 1 ed root 716M 2057-09-06 19:40 14150012.AVI
-rwxr-xr-x 1 ed root 505M 2057-09-06 19:40 14250013.AVI
-rwxr-xr-x 1 ed root 497M 2057-09-06 19:40 14350014.AVI
-rwxr-xr-x 1 ed root 221M 2057-09-06 19:40 14450015.AVI
The NAS drive does not, for reasons I cannot explain, record the actual file creation timestamp; touch-ing the file afterward does update the timestamp correctly. So it goes.
The camera attempts to write the files in 10:00 minute chunks, but, because it deletes files (or, perhaps, entire directories) one-by-one in FIFO style, the actual file duration / size seems limited by the space made available by the deletions. The default 8 GB MicroSD card has something like 6.6 GB available and holds a bit under two hours of video; I should bump that to a 16 GB card to get a complete record of longer rides.
With three identical Raspberry Pi streaming players tootling around the house, it finally dawned on me that they should fetch their Python program directly from The Definitive Source, rather than a local copy.
Tweak the auto-startup in /etc/rc.local:
mount -o ro mollusk:/mnt/bulkdata/Project\ Files/Streaming\ Media\ Player/Firmware/ /mnt/part
sudo -u pi python /mnt/part/Streamer.py &
There’s probably a way to redirect all of the stdout and stderr results to a file for debugging, but the obvious method doesn’t work:
sudo -u pi sh -c "python /mnt/part/Streamer.py 2>&1 > /tmp/st.log" &
That redirects stdout from the subprocess call to set up the mixer, but doesn’t catch Python’s print output.
Using the Python logging library would get most of the way to the goal, although stdout from things like the mixer would still vanish.
Continuing with the network theme, one could netboot the RPi players, but that requires more sysadmin hackery than I’m willing to do, what with the good being the enemy of the best.
A monitor sound bar seems good enough for streaming background music and suchlike, with the benefit of eliminating the external USB audio converter and reducing the cable tangle:
Dell AC511 USB Soundbar – Dell Image 318-2885r3
That’s a Dell AC511 USB SoundBar (their choice of capitalization); I mooched the image from their description, because I cannot take a good picture of a dead-black device.
Depending on the description you read, it’s good for maybe 1.5 W, which is about all you can get directly from a USB port: 5 V at well under 500 mA. The audio output required no configuration at all: unplug the Behringer USB converter, plug this in, reboot that sucker, and It Just Worked. Sounds pretty good for as little power as it produces, too; organ music will never reach gut-pounding levels.
The far end of the bar sports a headphone output jack and a line-in jack, so apparently it can handle audio input, despite that not appearing in the online doc. Bonus!
The knob on this end spins endlessly while spitting out USB volume control events that, presumably, work seamlessly with an ordinary Windows setup. It’ll take a bit more effort with a headless Raspberry Pi.
In this case, the Name field seems reasonably unique, and, seeing as how the collection of devices required to do this thing keeps growing, I renamed the old /etc/udev/rules.d/KeyPad.rules to Streamer.rules and dropped the new rule in there to keep everything together:
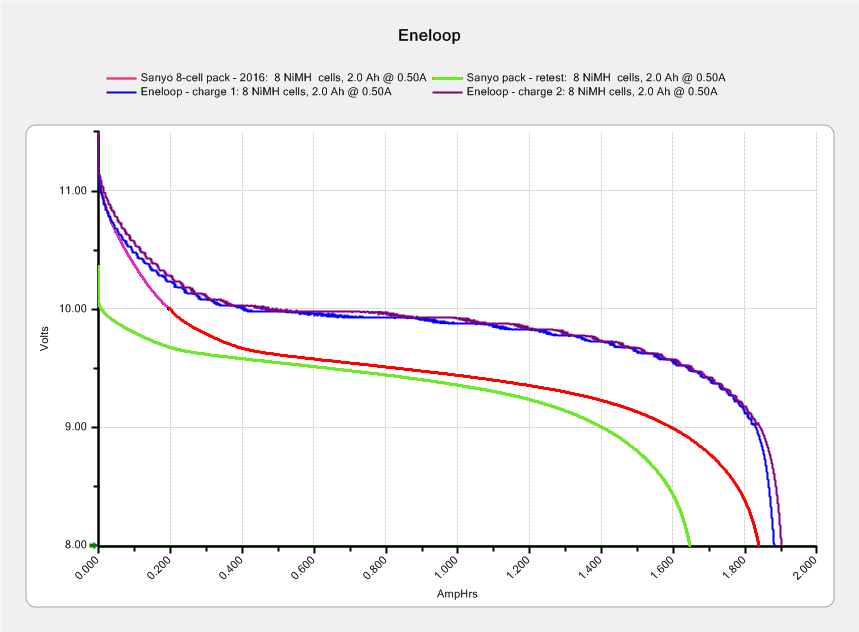
The two upper curves show the first two charges for those eight cells back in 2010.
The lower curve(s) started out with the wrong endpoint voltage (purple part of the middle curve), so I restarted the test (green curve) and edited the graph image to splice the two curves together into the purple/red curve.
Although the capacity measured in mA·h isn’t much lower, the voltage depression reduces the available energy and trips the “low battery” alarm much earlier. In round numbers, the old cells were good for a few pictures, even hot off the charger, and didn’t have much energy left without being recharged before use.
A quartet of Panasonic Eneloop Pro cells just arrived from BatterySpace, a nominally reputable supplier, all sporting a 14-05 date code suggesting they’re just shy of two years old. The packaging claims 85% charge retention after a year, so they should have a bit more than half of their rated 2.45 A·h “minimum” (or 2.55 mA·h “typical”, depending on whether you trust the label on the cell or the big print on the package) capacity remaining (although we don’t know the original state of charge, done from “solar power”). The lower curves say they arrived with 1 A·h remaining:
Panasonic Eneloop – First Charge
However, the terminal voltage on those bottom curves would have any reasonable device reporting them as dead flat almost instantly, so you really can’t store Eneloops for two years: no surprise there.
One pass through the 400 mA Sony charger produced the upper curves, with the dotted red curve from Cell A lagging in the middle. After that test, another pass through the charger brought Cell A back (upper solid red line) with the others, so I’ll assume it took a while to wake up.
A pair of these in the camera will produce 2.2 V through 2.2 A·h, far better than the aged-out Sanyo Eneloops.
Charging them at 400 mA = C/6 certainly counts as a slow charge. I’ve been charging the Sanyo cells in slow chargers in the hope that they’ll remain happier over the long term.
It seems that two years is about as long as the NP-FS11 batteries last, as shown by the two lower curves from the ones I rebuilt in December 2013 with cells from 2011:
Sony NP-FS11 2011-2016 Packs
The two middle curves with those same colors show the “back then” performance of those batteries: they’re shot in both total capacity and terminal voltage.
I bought enough cells back in 2011 to leave two cells unused until now, which I built into a pack and charged. The green curve in the middle shows the result: those cells haven’t lost anything over the last five (!) years, as their performance still matches the other two batteries when they were new.
The red curves come from a pair of batteries made with fresh new cells from batteryspace.com. They’re nominally 650 mA·h cells, so the NP-FS11 configuration (two parallel cells) should produce 1300 mA·h; surprisingly, they show 1500 mA·h with a nice voltage curve.
So, although the 2011 cells work as well as their (now defunct) siblings, that pack can’t deliver the same capacity as the new cells. I expect I’ll rebuild it with 2016 cells in about a year.
For whatever it’s worth, rebuilding these batteries goes much faster when I don’t have to saw them open. The Kapton tape wrapped around the case halves secures them well enough; there’s no need for fancy gluing.
NP-FS11 Battery Rebuilds – 2016-03
Yeah, I should make better labels. It’s hard to form a deep emotional attachment to the poor things, though.
Here’s a case where something performs better than expected; I don’t always buy cheap junk from the usual eBay vendor…
Being a Linux box, a Raspberry Pi requires a tidy shutdown, but, because it uses so little power after that, I decided to forego a power switch and just blip the CPU reset line to start it up again. Canakit cases require a bit of flush-cutter hackage to accommodate a crude socket atop the RUN header:
Canakit RPi Case – reset switch – header clearance
The switch originally had three terminals, but turned out to be SPST NO with one unused pin. Flush cutters and some hot melt glue to the rescue:
Canakit RPi Case – reset switch – interior
The end result looks OK, modulo a few scuffs on the shiny black plastic:
Canakit RPi Case – reset switch – exterior
Yeah, a clumsy swipe could wipe that actuator right off the top; we’ll see how long it lasts…