The Smell of Molten Projects in the Morning

Ed Nisley's Blog: Shop notes, electronics, firmware, machinery, 3D printing, laser cuttery, and curiosities. Contents: 100% human thinking, 0% AI slop.

Author: Ed

  • TEC Drawing Kit: Reconditioned Cover

    TEC Drawing Kit: Reconditioned Cover

    Our Young Engineer recently rebuilt the cover of a “vintage” drawing kit, with fabric pockets for protractors & scales and real leather hinges, thereby raising a long-procrastinated project to the top of my to-do list:

    TEC Drawing Set - top old
    TEC Drawing Set – top old

    I know my father used it when he took drafting after high school in 1929. His penmanship and drawing ability were up to par well before that.

    The inside sports a TEC logo:

    TEC Drawing Set - open old
    TEC Drawing Set – open old

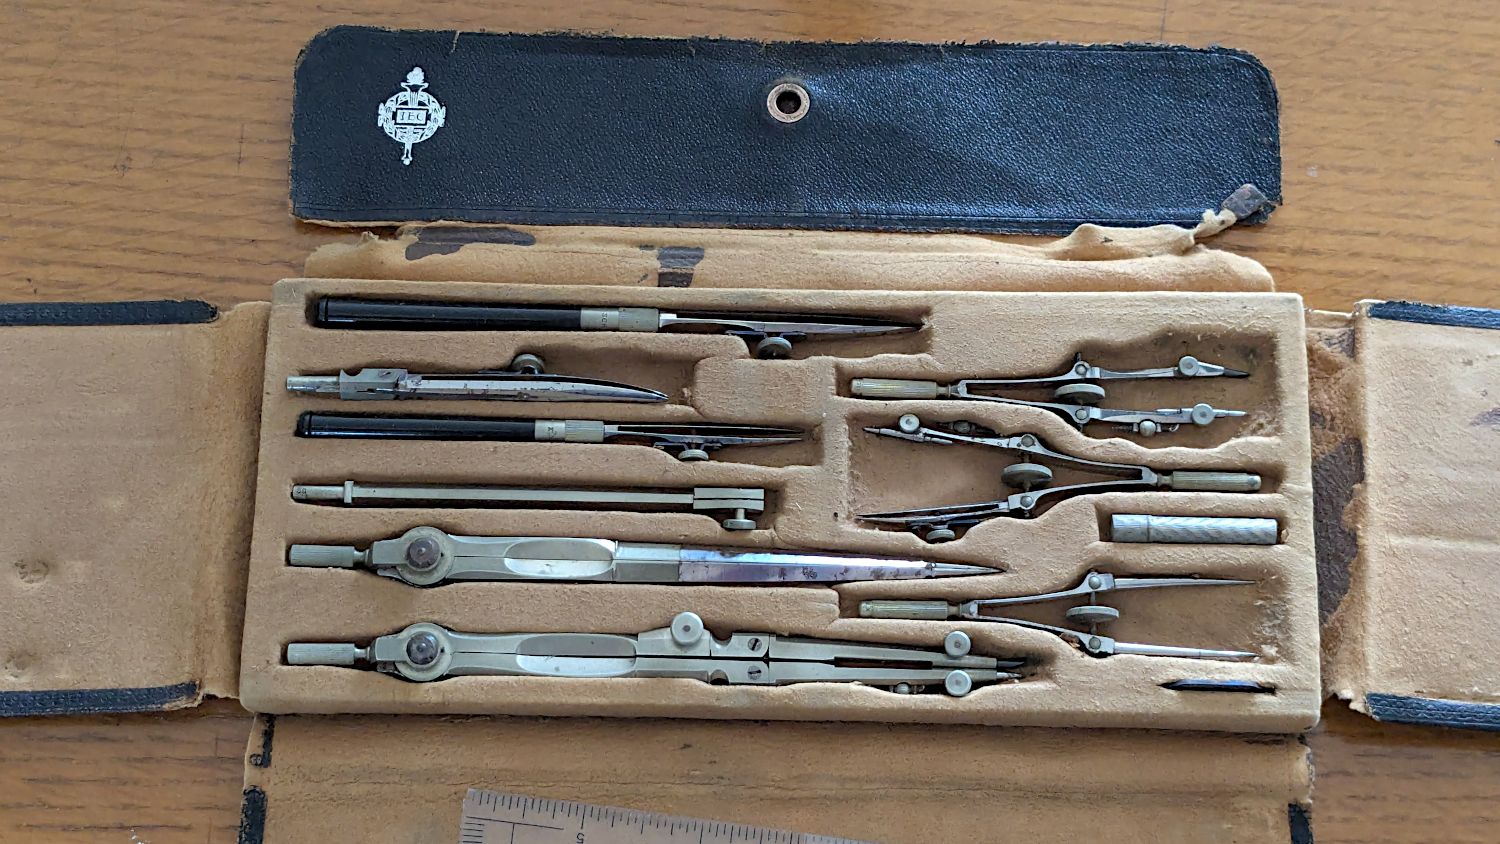
    Some searching revealed it’s a No. 718 Drafting Set from the Technical Supply Company of Scranton and appeared in their 1913 catalog:

    TEC Brand Catalog p68
    TEC Brand Catalog p68

    The printing on the inside of the flap differs, but the logo has TEC in the middle.

    My father did not attend college and, in the teeth of The Great Depression, $26.50 was certainly too spendy for his family:

    CPI Calculator - 1929 to 2025
    CPI Calculator – 1929 to 2025

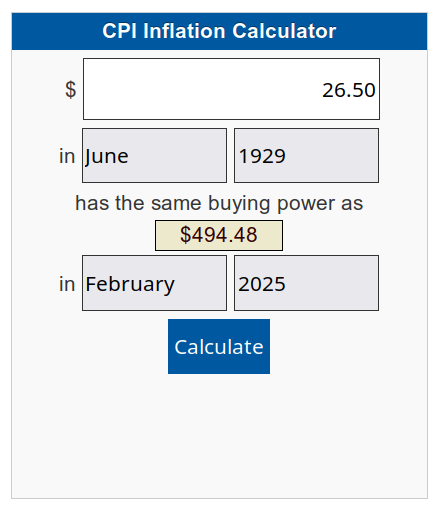
    When the catalog was printed in 1913, No. 718 cost the equivalent of $862.82. Nowadays, similar sets once again cost about twenty bucks on eBay, which tells you something about economics.

    None of that information changes what I know.

    Having recently touched a roll of Kraft-Tex while shelving some boxes, this seemed reasonable:

    TEC Drawing Set - top new
    TEC Drawing Set – top new

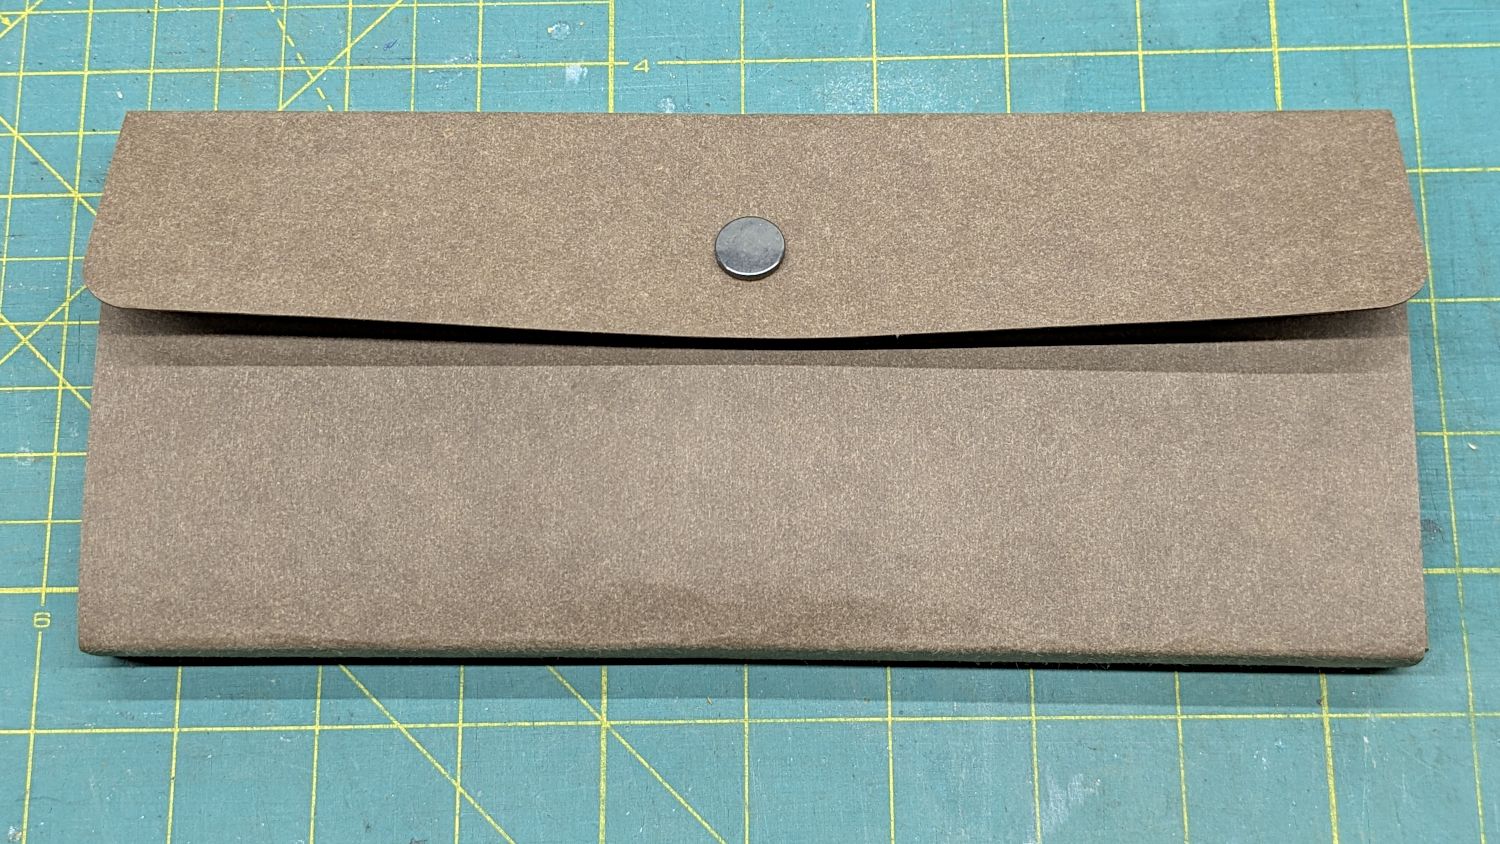
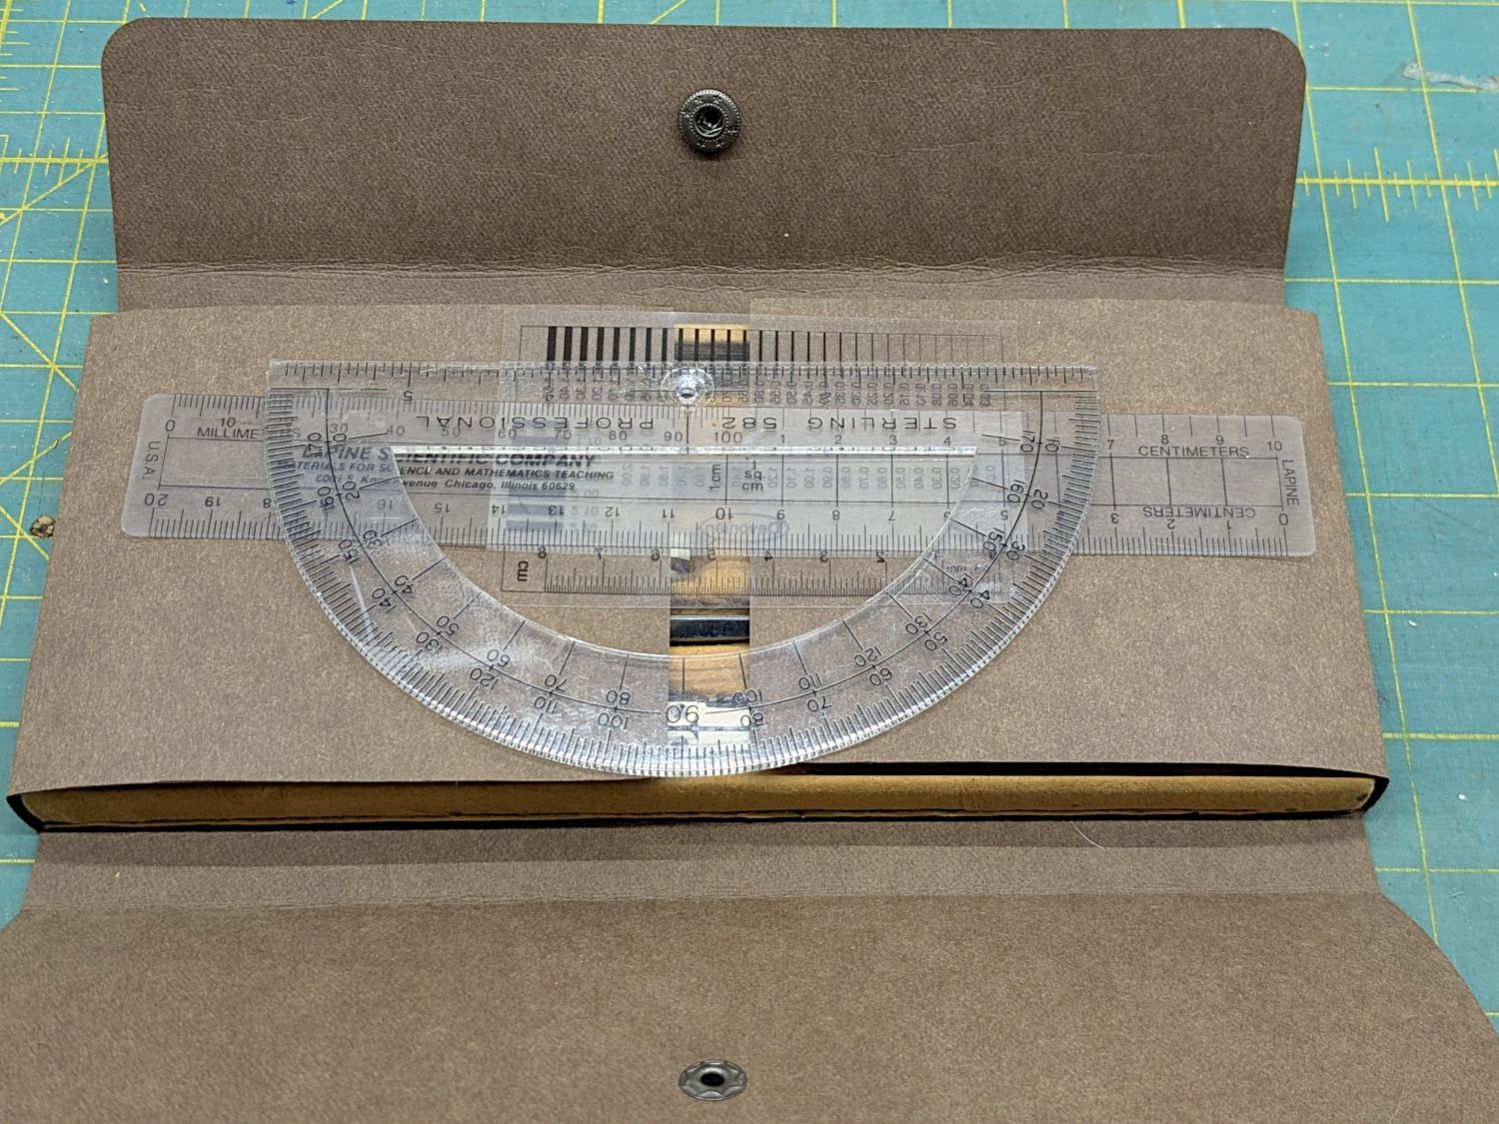
    It lacks pockets for the tools I’ve added:

    TEC Drawing Set - scales new
    TEC Drawing Set – scales new

    In retrospect, I should have used two leather snaps, but three would be excessive.

    I folded the Kraft-Tex flat across a steel scale to make the first folds around the base, then finger-crimped folds at the top of the base with subsequent crisping around the scale:

    TEC Drawing Set - open new
    TEC Drawing Set – open new

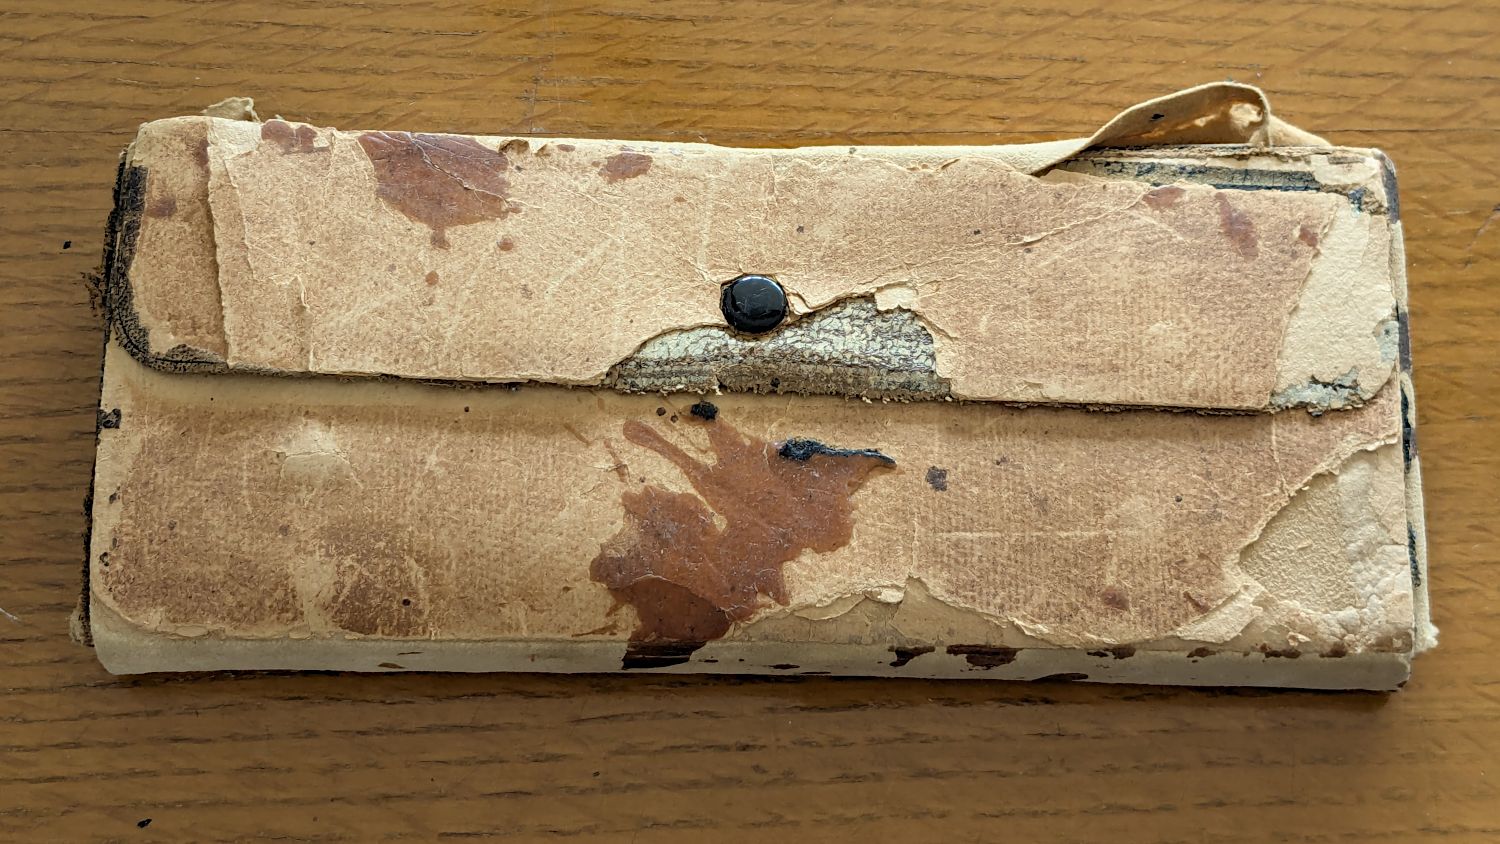
    The underside of the original case seemed stable:

    TEC Drawing Set - case bottom
    TEC Drawing Set – case bottom

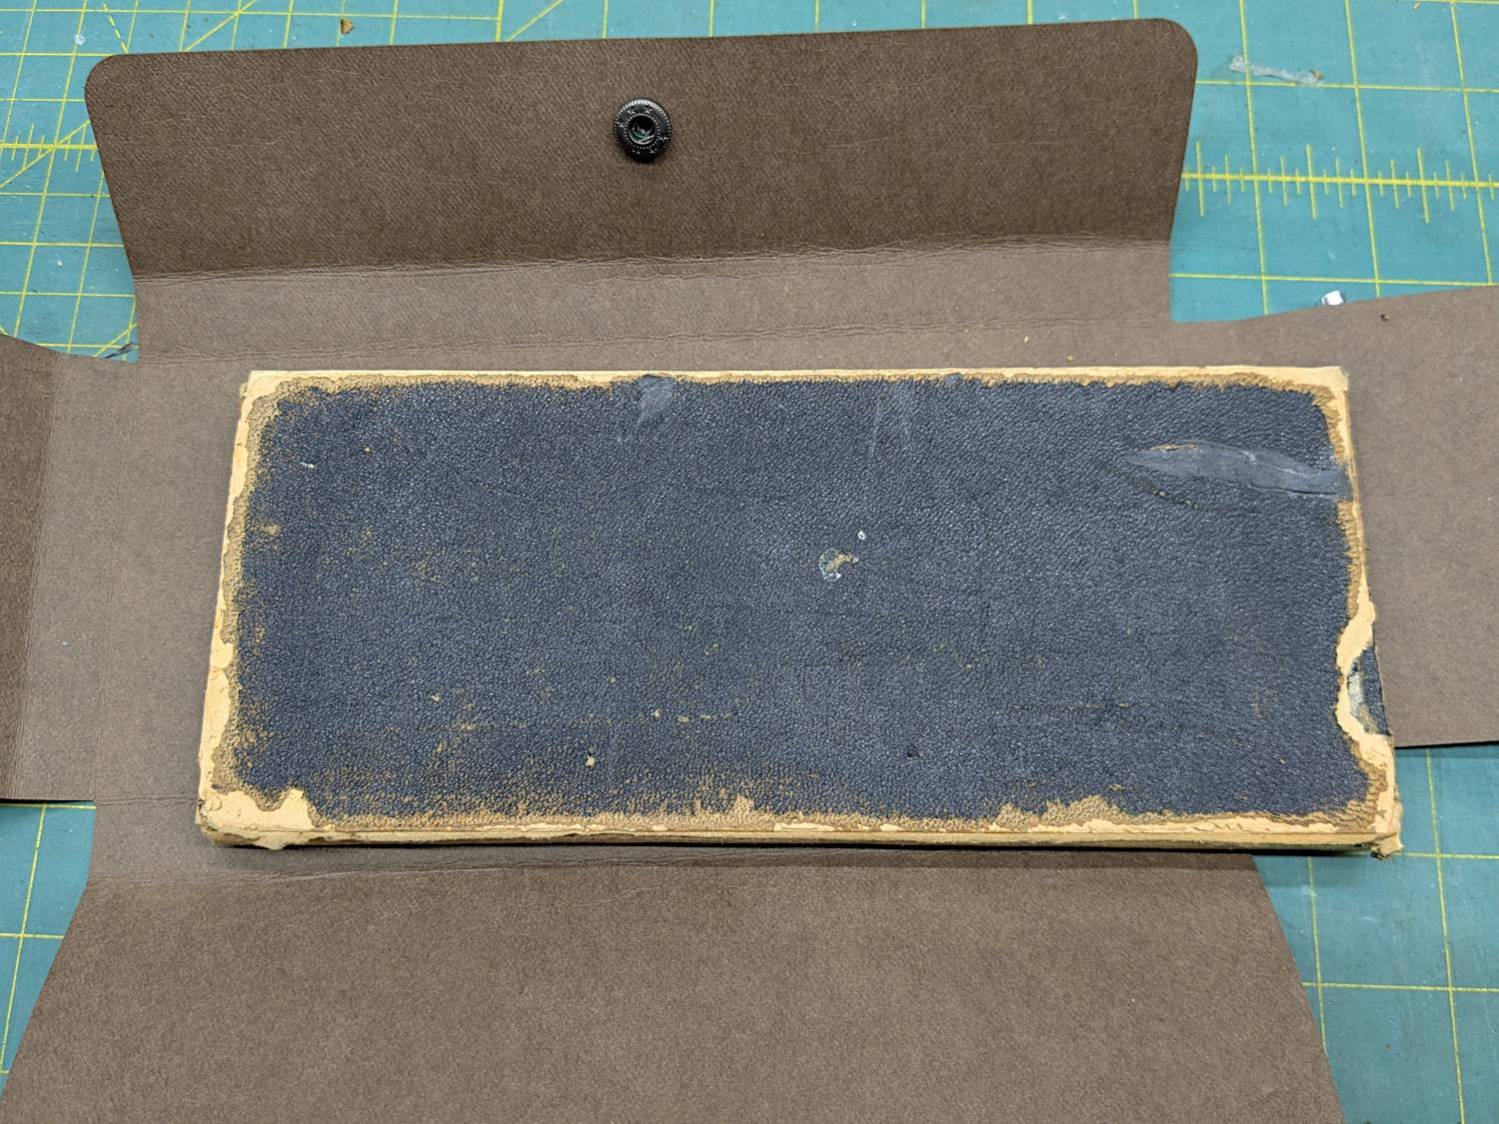
    This may be sacrilege, but I saw no point in peeling the bottom just to cover it up,so I stuck the Kraft-Tex in place with a rectangle of adhesive sheet.

    It doesn’t look the same, but it still gives me a warm feeling.

    It still has the tiny wrench needed to adjust all its screws:

    TEC Drawing Set - wrench
    TEC Drawing Set – wrench

    It’s on 0.1 inch graph paper and is 40 mil = 1 mm thick, should you want to make your own. The blades taper down to essentially a knife edge, which is why it’s made from hard blue steel.

    I remember being fascinated by that little pig when I was a pup.

    Putting some scraps to good use, I stuck a cushion in the anvil for the next time I punch down a leather snap:

    Leather Snap kit - cushioned anvil
    Leather Snap kit – cushioned anvil

    The LightBurn SVG layout as a GitHub Gist:

    Loading
    Sorry, something went wrong. Reload?
    Sorry, we cannot display this file.
    Sorry, this file is invalid so it cannot be displayed.
  • Road Construction: New Lamp Bases

    Road Construction: New Lamp Bases

    Seen in the equipment marshalling yard for the new traffic circle at the intersection of Raymond Avenue and Rt 376 / Hooker Avenue:

    Street Lamp Base - excavated
    Street Lamp Base – excavated

    The backstory:

    Apparently they excavated around the smashed bases and sawed off the conduits:

    Street Lamp Base - sawed conduit
    Street Lamp Base – sawed conduit

    Then they yoinked the concrete cylinders, installed new bases, re-connected the conduits, cast more concrete, and installed the posts:

    Street Lamp Base - Rombout House Ln - detail
    Street Lamp Base – Rombout House Ln – detail

    I think the two “Signal” box covers flush with the surface on either side of Rombout House Lane lie just beyond the edges of what will eventually be the repaved road at the intersection.

    Street Lamp Base - Rombout House Ln - overview
    Street Lamp Base – Rombout House Ln – overview

    Given how much damage the base at that intersection encountered, my visualization of the Cosmic All says that pole will not survive the year unless they install a few well-spaced bollards.

    There’s another pole on the other side of the road I expect will have a full-on collision, too.

  • LED Strip Lights: Window Moulding Mounts

    LED Strip Lights: Window Moulding Mounts

    The object of the game being to tilt the LED strip lights at (maybe) 30° to put more light higher on the wall and further out on the ceiling, with the overriding constraint of no visible holes. Given their eventual home atop the window moulding along the front wall of the Living Sewing Room, these seemed adequate:

    LED Bar Lamp Mount - solid model
    LED Bar Lamp Mount – solid model

    The hole on the angled part fits an M4 brass insert and the recessed holes capture the washer-like head of a sharp-point lath screw.

    Two pairs applied to the lights sitting atop the Fabric Cabinets served to verify the fit:

    LED strip light - moulding mount - on cabinet
    LED strip light – moulding mount – on cabinet

    They’re held firmly by the aluminum extrusion and don’t need a bigger footprint to remain stable.

    So I made another six, stuck on ⅞ inch strips of aluminized Mylar (cut from a bag in much better condition), and drilled holes where they can’t be seen:

    LED strip light - moulding mount - installed
    LED strip light – moulding mount – installed

    It’s almost too bright in there with 3 × 40 W of LED lights washing the wall and ceiling:

    LED strip light - moulding mount - lit
    LED strip light – moulding mount – lit

    I don’t like the cold 6000 K color temperature, but Mary doesn’t mind it. They fill the Sewing Table with shadowless / glareless light, although that kind of light makes the place look like a store.

    I think moving the strip lower and away from the wall could hide the entire mount from view.

    Contrary to what I expected, the Mylar reflectors must be at least an inch tall to avoid Baily’s Beads seen from across the room:

    LED strip light - short reflector
    LED strip light – short reflector

    With all that in mind, we’ll run these for a while to shake out any other improvements.

    The OpenSCAD source code as a GitHub Gist:

    // LED light bar mounts
    // Ed Nisley – KE4ZNU
    // 2025-03-16
    include <BOSL2/std.scad>
    Layout = "Show"; // [Show,Build,ScrewMount,BarMount]
    BaseAngle = 30; // [0:50]
    /* [Hidden] */
    ID = 0;
    OD = 1;
    LENGTH = 2;
    Protusion = 0.1;
    NumSides = 3*4;
    Radius = 1.5;
    $fn = NumSides;
    MouldWidth = 18.0; // nominal (3/4) * INCH, but lots of paint slop
    MouldScrew = [4.7,12.0,2.6]; // clearance, head OD, head thick
    Insert = [4.0,5.5,6.0 + 3.0]; // heat-set brass without pilot end
    BarClip = [33.0,15.0,11.0]; // snaps around led base
    ScrewBlockOA = [MouldWidth,MouldScrew[OD] + 2*Radius + 2.0,10.0];
    BarBlockOA = [BarClip.x*cos(BaseAngle),15.0,BarClip.x*sin(BaseAngle) + 2*ScrewBlockOA.z];
    Gap = 2.0 + max(ScrewBlockOA.y,BarBlockOA.y);
    //———-
    // Define shapes
    module ScrewMount() {
    difference(){
    cuboid(ScrewBlockOA,anchor=BOTTOM,rounding=Radius,except=[FRONT,BOTTOM,LEFT]);
    up(ScrewBlockOA.z – MouldScrew[LENGTH])
    zrot(180/NumSides)
    cylinder(d=MouldScrew[OD],h=MouldScrew[LENGTH] + Protusion);
    down(Protusion)
    cylinder(d=MouldScrew[ID],h=2*ScrewBlockOA.z);
    }
    }
    module BarMount() {
    difference() {
    cuboid(BarBlockOA,anchor=CENTER,rounding=Radius,edges=RIGHT);
    yrot(BaseAngle)
    cube([3*BarBlockOA.x,2*BarBlockOA.y,BarBlockOA.z],anchor=BOTTOM);
    yrot(BaseAngle)
    cylinder(d=Insert[OD],h=2*Insert[LENGTH],anchor=CENTER);
    }
    }
    module Mount() {
    union() {
    right(ScrewBlockOA.x/2) back(ScrewBlockOA.y/2)
    ScrewMount();
    right(BarBlockOA.x/2) fwd(BarBlockOA.y/2) up(BarBlockOA.z/2)
    BarMount();
    }
    }
    //———-
    // Build things
    if (Layout == "ScrewMount")
    ScrewMount();
    if (Layout == "BarMount")
    BarMount();
    if (Layout == "Show")
    Mount();
    if (Layout == "Build") {
    yflip_copy(Gap) Mount();
    }

  • Katamari Damacy: Hook-and-Loop Edition

    Katamari Damacy: Hook-and-Loop Edition

    Found this in a box of unrelated stuff:

    Hook-n-Loop accumulation
    Hook-n-Loop accumulation

    Based on past experience, the longer it hangs there, the bigger it will become.

    My packing skillz obviously suffered a blackout during the move …

  • LED Strip Lights: Shade Adhesive

    LED Strip Lights: Shade Adhesive

    This is a quick-and-ugly test to see how well aluminized Mylar will work as a reflective shade for some LED light bars eventually washing the Living / Sewing room ceiling with enough light to brighten the Sewing Table:

    LED strip light - Mylar reflector - ugly fit
    LED strip light – Mylar reflector – ugly fit

    The key question: how well adhesive adheres Mylar to the pleasantly warm aluminum extrusion serving as the heatsink for 40 W of LEDs:

    LED strip light - Mylar reflector - adhesive strips
    LED strip light – Mylar reflector – adhesive strips

    Perhaps surprisingly, those ½ inch strips come from an A4 sheet by way of a paper cutter.

    As with the Mylar shades over the COB LED strips in the laser, the LEDs remain through the aluminized layer:

    LED strip light - Mylar reflector - overexposed
    LED strip light – Mylar reflector – overexposed

    The LED bars will be directly visible, so bouncing the direct light against the wall reduces glare and puts it to good use.

    The Mylar strips are 1 inch wide, cut with a utility knife against a straightedge, although ⅞ inch seems adequate. The last LED over on the right sits at the endcap, so I will (try to) tuck the Mylar ends under the caps for a cleaner fit.

    The bars have two 4 foot strips of LEDs in series, with a lump of circuitry buried in the aluminum extrusion that seems be a bridge rectifier and a small electrolytic capacitor. There’s not nearly enough capacitance to knock down the 120 Hz flicker and I have an uneasy expectation of stroboscopic effects on the sewing machines.

    This is a test. […] This is only a test.

    Now, to model angle brackets fitting the strips to the window moulding.

  • Price Scanner FAIL: Plausible Deniability

    Price Scanner FAIL: Plausible Deniability

    I always suspect there’s a reason behind a missing price label on a shelf, so I waved a half-gallon of milk under a nearby price scanner:

    Shop-Rite Scanner FAIL
    Shop-Rite Scanner FAIL

    If you’re thinking that white rectangle doesn’t look like a price, you’re right:

    Shop-Rite Scanner FAIL - Warning pop-up
    Shop-Rite Scanner FAIL – Warning pop-up

    A 10 digit Phone number?

    I’m don’t know what a “PPC number” is, although the UPC on the milk carton seems perfectly normal:

    Shop-Rite Scanner FAIL - offending bar code
    Shop-Rite Scanner FAIL – offending bar code

    Admittedly, the number starts with a zero and has 12 digits, so it’s definitely not what the price scanner wants. On the other paw, why is a price scanner not looking for a UPC?

    The placard below the display is amusing:

    Shop-Rite Scanner FAIL - DCNY Requiring Scanner Accuracy
    Shop-Rite Scanner FAIL – DCNY Requiring Scanner Accuracy

    Gray’s variant of Hanlon’s Razor: “Any sufficiently advanced incompetence is indistinguishable from malice.”

    No, I neither asked why the scanners didn’t work nor made a phone call, as I’m old enough to know better.

  • Subpixel Zoo: Wall Hanging

    Subpixel Zoo: Wall Hanging

    Having herded all the denizens of the Subpixel Zoo into one LightBurn workspace, framing them seemed appropriate:

    SubPixel Zoo - wall hanging
    SubPixel Zoo – wall hanging

    We had some 18×24 inch frames which fit a standard construction paper size. The paper colors aren’t nearly as vivid as a real artist would want, but they’ll suffice for my simple needs.

    Lay out a template and decide 180 mm blocks fill the frame:

    SubPixels - LightBurn 18x24 template
    SubPixels – LightBurn 18×24 template

    Offse the blocks 2 mm outward for cutting clearance and make a fixture:

    SubPixels - LightBurn 18x24 fixture
    SubPixels – LightBurn 18×24 fixture

    The outer rectangle matches a blank sheet of corrugated cardboard cut by hand to fit the platform. The inner rectangle marks a line around the 18×24 inch position of the paper, giving me a mark within which I can center the paper well enough by eyeballometric approximation.

    Cutting the blocks and marking the lines produces the template:

    SubPixel Zoo - laser fixture and chaff
    SubPixel Zoo – laser fixture and chaff

    It’s held in place by four finger-crushingly strong magnets. If I ever do this again, I’ll throttle back on the power for the corner targets, because the laser cannot reach the top speed marking the outline, so it cut through the top layer of cardboard at the targets.

    The layers for the 8×8 versions have 170 mm blocks with all the colors properly separated:

    SubPixels - LightBurn 8x8 layers
    SubPixels – LightBurn 8×8 layers

    Embiggen the blocks to 180×180 mm, rotate them to their new orientation, then snap them into copies of the new template:

    SubPixels - LightBurn 18x24 layers
    SubPixels – LightBurn 18×24 layers

    I can only envision these things in the landscape orientation that will fit the laser platform, but you could build them in their final portrait orientation and rotate the result.

    I put the template pattern in the middle of the LightBurn workspace and use Print and Cut to align the fixture with the corner targets. Then it’s just a sequence of laying a sheet of paper on the fixture, selecting the corresponding layout, hitting P to snap the layout to the center of the workspace, and Firing The Laser.

    It’s not nearly as pretty as Mary’s quilts, but now I have a wall decoration of my very own.