The Smell of Molten Projects in the Morning

Ed Nisley's Blog: Shop notes, electronics, firmware, machinery, 3D printing, laser cuttery, and curiosities. Contents: 100% human thinking, 0% AI slop.

Author: Ed

  • Tek A6302 Current Probe: Offset Resistor Tweakage

    A package deal of two Tektronix A6302 current probes arrived from eBay, with one probe having a small crack across its case (shown in the description and bought accordingly).

    The other probe worked fine and was quite clean inside:

    A6302 B055461 - major sections
    A6302 B055461 – major sections

    The cracked one couldn’t be balanced, with the twiddlepot on the AM503 amp unable to bring the signal down to 0 V from a positive offset on any of the ranges.

    The current transformer might have suffered some stress on the upper-left corner of the main part (in the probe body), but it doesn’t have any obvious damage:

    A6302 B032444 - ball - current transformer in place
    A6302 B032444 – ball – current transformer in place

    The small ball to the left of the transfomer lid provides the slide detent; it’s an ordinary 3/32 = 0.094 inch bearing. Which, as it happens, is a Good Thing, because there’s another one exactly like it somewhere in the litter under the Electronics Workbench.

    Protip: follow the disassembly procedure in the instruction manual and do it over a towel or, at least, a shallow dish. You have been warned.

    Extracting the transformer from the body revealed a numeric value I didn’t recognize at the time:

    A6302 B032444 - current transformer
    A6302 B032444 – current transformer

    The top slide contacts looked awful, but they’re actually covered in semi-dried contact grease and cleaned up easily:

    A6302 B032444 - slide contacts
    A6302 B032444 – slide contacts

    Swapping the “bad” transformer into the P6302 probe I got a while ago showed it wouldn’t balance, either, but the offset was far off into negative voltages. Putting the “good” transformer into the “bad” probe produced a similar too-positive offset. Conclusion: the transformer was probably good and Something Else was wrong.

    Spending more time with the manuals produced this hint in the AM503 Amplifier circuit description:

    AM503 manual - Hall offset - probe resistor selection
    AM503 manual – Hall offset – probe resistor selection

    Fortunately, the AM503 probe connector has pin labels:

    Tek AM503 Amplifier - Probe Connector - pin ID
    Tek AM503 Amplifier – Probe Connector – pin ID

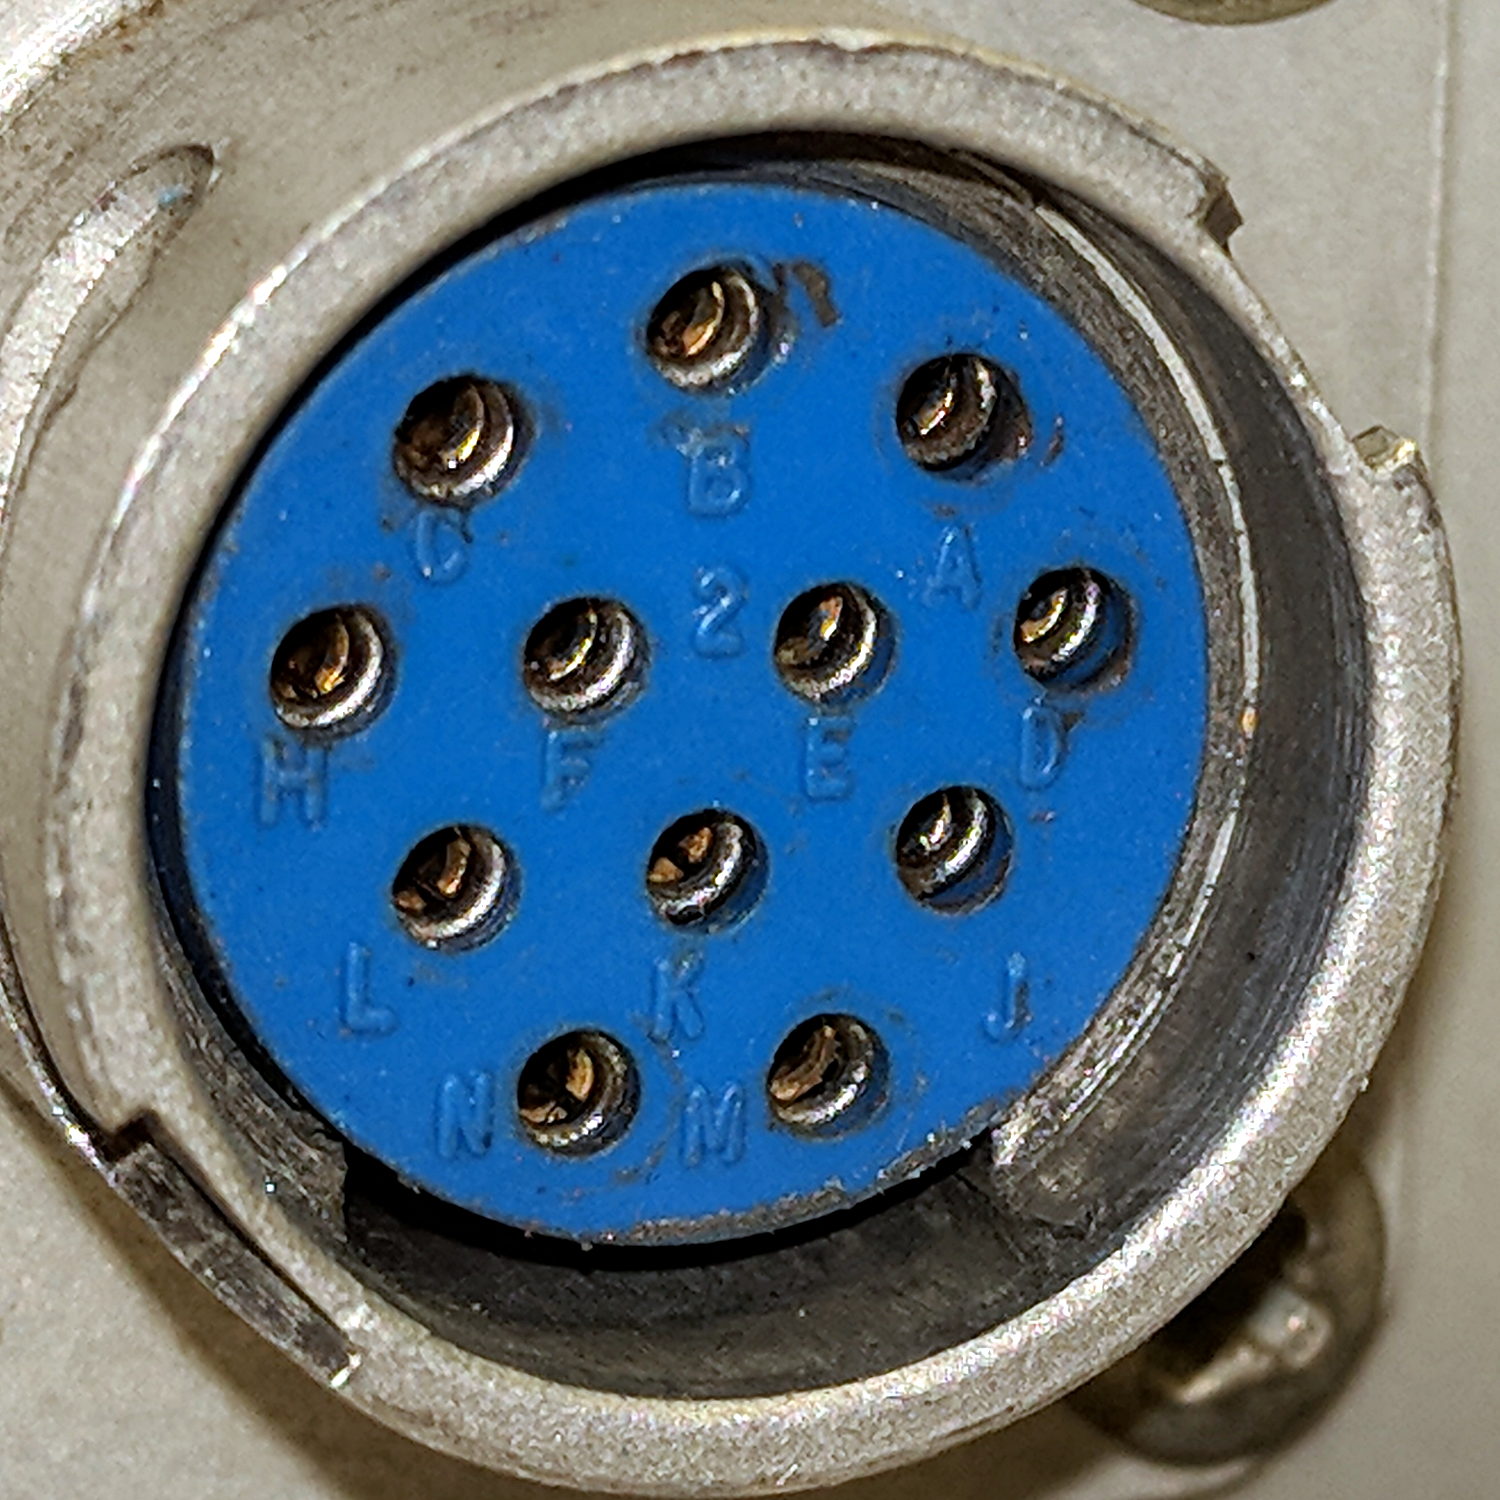
    Note the absence of pins G and I, probably to eliminate any confusion with “ground” and “one”, respectively.

    Continuity checking reveals the left end of the 34.8 kΩ resistor connects to pin H:

    A6302 B032444 - PCB 34.8k offset R
    A6302 B032444 – PCB 34.8k offset R

    Huh. Even a blind pig occasionally finds a truffle: where have we seen that value before? Apparently Tek measured each transformer / Hall sensor and wrote the appropriate offset resistor value exactly where it’d do the most good.

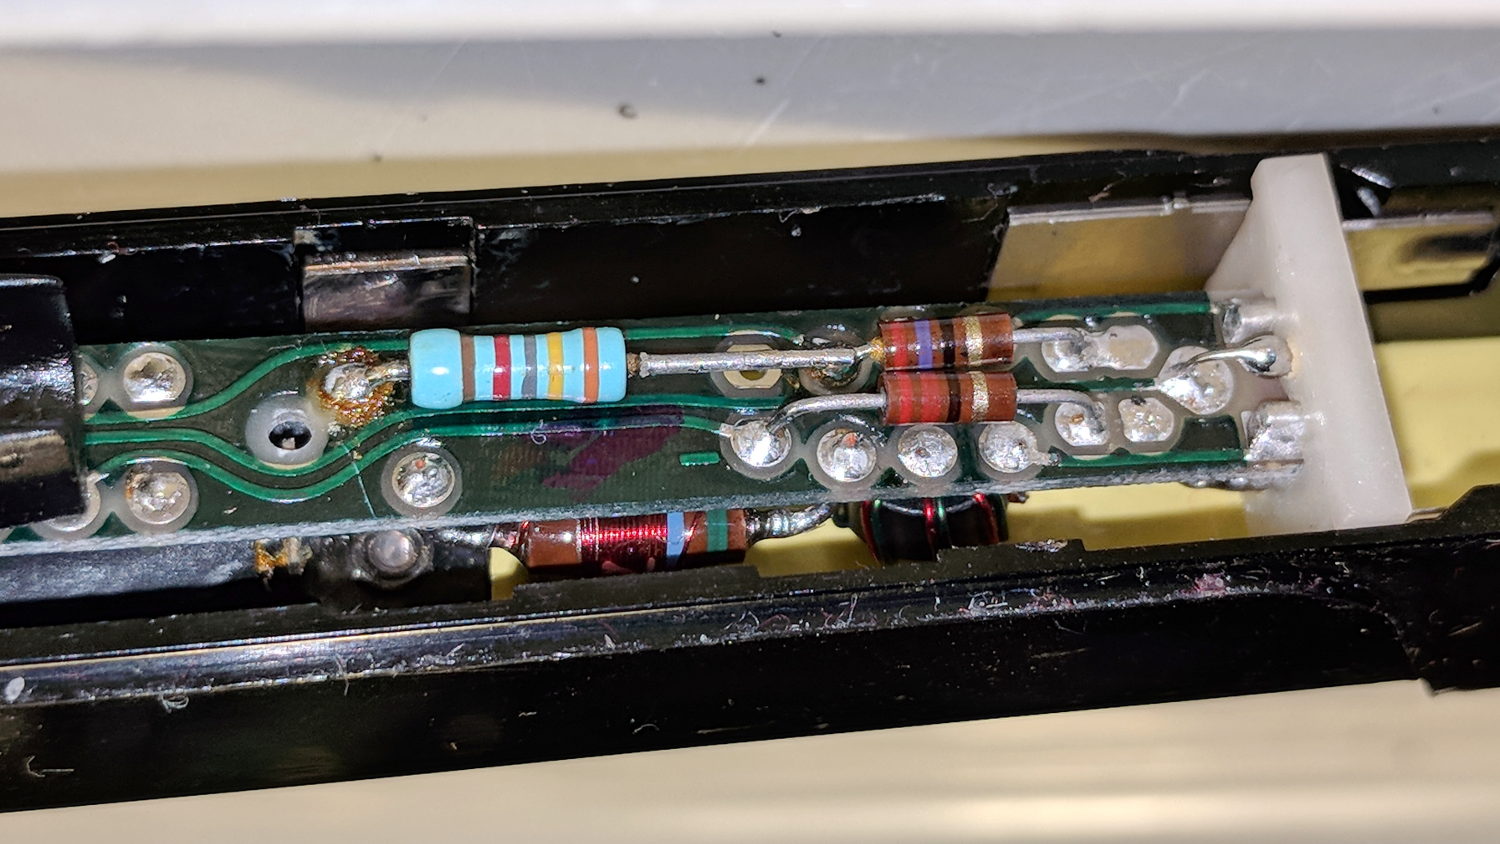
    Although I don’t pretend to know why the transformer offset has changed, if Tek can select a resistor to correct the offset, so can I:

    A6302 B032444 - PCB - tweaked 82k offset R
    A6302 B032444 – PCB – tweaked 82k offset R

    The 82 kΩ value roughly centers the offset twiddlepot span around 0 V; it’s the result of a binary search through the resistor drawers, rather than a complex calculation.

    With the resistor in place and the probe reassembled in reverse order, everything works the way it should:

    Tek A6302 - 82k ohm offset - 50 mA
    Tek A6302 – 82k ohm offset – 50 mA

    The lower trace is a square wave from the scope’s arb waveform generator into a (likely counterfeit) Fotek DC-DC solid-state relay, with the bench supply dialed to 5.7 V to put 5 V across a hulking 100 Ω power resistor, thus 50 mA through the probe. The purple trace comes from the repaired probe, with the other one turned off for pedagogic purposes:

    Tek A6302 Calibration Setup
    Tek A6302 Calibration Setup

    That wasn’t easy, but seems to solve the problem.

    Dang, I loves me some good Tek current probe action …


  • Ortlieb Backroller Pack Drop

    Although the pair of Ortlieb Back-Roller packs on Mary’s bike make her look like a long-distance tourist, we’re actually on our way to her garden plot:

    AS30V-0285
    AS30V-0285

    The left-side pack suddenly seemed unusually floppy:

    AS30V-0300
    AS30V-0300

    One second later:

    AS30V-0360
    AS30V-0360

    Another second and it’s visible under my right hand:

    AS30V-0420
    AS30V-0420

    The view from her bike at about the same time:

    Ortlieb-0158
    Ortlieb-0158

    I’m expecting to fall to my right, but it’d have been better if I hadn’t kicked the bag:

    Ortlieb-0169
    Ortlieb-0169

    The pack went under the rear wheel and out the far side:

    Ortlieb-0185
    Ortlieb-0185

    Where it came to rest in the middle of the trail:

    Ortlib pack drop - aftermath
    Ortlib pack drop – aftermath

    Elapsed time from the first picture: just under 5 s.

    Did you notice the other cyclist in the other pictures? She’s why I veered so hard to my right!

    A pair of these latches hold the pack onto the rear rack:

    Ortlieb pack drop - QL latch detail
    Ortlieb pack drop – QL latch detail

    When they’re properly engaged, they look like this:

    Ortlieb pack drop - QL latch - secure
    Ortlieb pack drop – QL latch – secure

    When they’re not, they look like this:

    Ortlieb pack drop - QL latch - whoopsie
    Ortlieb pack drop – QL latch – whoopsie

    Which is obvious in the picture and inconspicuous in real life.

    The strap emerging from the top of the latch serves as both a carrying handle and latch release: pull upward to open the latches and release them from the bar, lift to remove the pack, and carry it away as you go. Installing the pack proceeds in reverse: lower the pack onto the rack bar, release the handle, and the latches engage.

    Unless the pack is empty enough to not quite fully open the latches as you carry it, in which case the closed latches simply rest on the bar. We’ve both made that mistake and I generally give her packs a quick glance to ensure sure they’re latched. In this case, the plastic drawer atop the racks (carrying seedling pots on their way to the garden) completely concealed the pack latches.

    Tree roots have been creasing the asphalt along that section of the rail trail: the bike finally bounced hard enough to lift the drawer and fall off the rack rod.

    Memo to Self: In addition to the visual check, lift the packs using the strap across the middle holding the rolled-down top in place. Remember, don’t check by lifting the carrying handle, because it just releases the latches; another easy mistake to make.

    Whew!

  • Copying Action Camera Video: Now With UUIDs

    Having tired of manually decoding UDEV’s essentially random device names produced for the various USB action cameras and card readers, I put the device UUIDs in /etc/fstab and let the device names fall where they may:

    UUID=B40C6DD40C6D9262	/mnt/video	ntfs	noauto,uid=ed 0 0
    UUID=0FC4-01AB	/mnt/Fly6	vfat	noauto,nodiratime,uid=ed	0	0
    UUID=0000-0001	/mnt/M20	vfat	noauto,nodiratime,uid=ed	0	0
    LABEL=AS30V	/mnt/AS30V	exfat	noauto,nodiratime,uid=ed	0	0
    

    You get those by plugging everything in, running blkid, and sorting out the results.

    The 64 GB MicroSD card from the Sony AS30V camera uses Microsoft’s proprietary exfat file system, which apparently doesn’t associate a UUID/GUID with the entire device, so you must use a partition label. The Official SD Card Formatter doesn’t (let you) set one, so:

    exfatlabel /dev/sdd1 AS30V
    

    It turns out you can include spaces in the partition label, but there’s no way to escape them (that I know of) in /etc/fstab, so being succinct counts for more than being explanatory.

    One could name the partition in the Windows device properties pane, which would make sense if one knew it was necessary while the Token Windows Laptop was booted with the card in place.

    I think this is easier then trying to persuade UDEV to create known device names based on the USB hardware characteristics, because those will depend on which USB card / device / reader I use. I can force the UUIDs to be whatever I want, because they’re just bits in the disk image.

    With all that in place, you plug in All. The. Gadgets. and run the script (as seen below). The general idea is to verify the bulk video drive mounted OK, attempt to mount each memory card and fire off a corresponding rsync copy, wait until they’re all done, tidy the target filenames, then delete all the source files to get ready for the next ride.

    Funneling all three copies to a single USB hard drive probably isn’t the smartest thing, but the overall write ticks along at 18 MB/s, which is Good Enough for my simple needs. If the drive thrashes itself to death, I won’t do it again; I expect it won’t fail until well outside the 1 year limited warranty.

    If any of the rsync copies fail, then nothing gets deleted. I’m a little queasy about automagically deleting files, but it’s really just video with very little value. Should something horrible happen, I’d do the copies by hand, taking great care to not screw up.

    After all, how many pictures like this do we need?

    Ed signalling on Raymond
    Ed signalling on Raymond

    The Bash script as a GitHub Gist:

    UUID=B40C6DD40C6D9262 /mnt/video ntfs noauto,uid=ed 0 0
    UUID=0FC4-01AB /mnt/Fly6 vfat noauto,nodiratime,uid=ed 0 0
    UUID=0000-0001 /mnt/M20 vfat noauto,nodiratime,uid=ed 0 0
    LABEL=AS30V /mnt/AS30V exfat noauto,nodiratime,uid=ed 0 0
    view raw fstab hosted with ❤ by GitHub
    #!/bin/bash
    # This uses too many bashisms for dash
    thisdate=$(date –rfc-3339=date)
    echo Date is $thisdate
    date
    # MicroSD / readers / USB drive defined in fstab
    # … with UUID or PARTID as appropriate
    echo Mounting bulk video drive
    sudo mount /mnt/video
    if [ $? -ne 0 ]; then
    echo '** Cannot mount video storage drive'
    exit
    fi
    # Show starting space available
    df -h /mnt/video
    #– Sony AS30V
    printf "\n— AS30V\n"
    as30v=/mnt/AS30V
    sudo mount $as30v
    if [ $? -eq 0 ]; then
    echo " start AS30V transfer on $as30v"
    mkdir /mnt/video/AS30V/$thisdate
    rsync -ahu –progress –exclude "*THM" $as30v/MP_ROOT/100ANV01/ /mnt/video/AS30V/$thisdate &
    pid1=$!
    echo " PID is $pid1"
    else
    echo " skipping"
    as30v=
    fi
    #– Cycliq Fly6
    printf "\n— Fly6\n"
    fly6=/mnt/Fly6
    sudo mount $fly6
    if [ $? -eq 0 ]; then
    echo " start Fly6 transfer on $fly6"
    rsync -ahu –progress $fly6 /mnt/video &
    pid2=$!
    echo " PID is $pid2"
    else
    echo " skipping"
    fly6=
    fi
    #– SJCAM M20
    printf "\n— M20\n"
    m20=/mnt/M20
    sudo mount $m20
    if [ $? -eq 0 ]; then
    echo " start M20 transfer on $m20"
    mkdir /mnt/video/M20/$thisdate
    # See if any still images exist to avoid error messages
    n=$( ls $m20/DCIM/Photo/* 2> /dev/null | wc -l )
    if [ $n -gt 0 ] ; then
    echo " copy M20 photos first"
    rsync -ahu –progress $m20/DCIM/Photo/ /mnt/video/M20/$thisdate
    fi
    rsync -ahu –progress $m20/DCIM/Movie/ /mnt/video/M20/$thisdate &
    pid3=$!
    echo " PID is $pid3"
    else
    echo " skipping"
    m20=
    fi
    printf "\n—– Waiting for all rsync terminations\n"
    rc=0
    for p in $pid1 $pid2 $pid3 ; do
    wait -n
    rc=$(( rc+$? ))
    echo RC so far: $rc
    done
    date
    if [ $rc -eq 0 ] ; then
    echo '—– Final cleanups'
    echo Fix capitalized extensions
    find /mnt/video -name \*AVI -print0 | xargs -0 rename -v -f 's/AVI/avi/'
    find /mnt/video -name \*MP4 -print0 | xargs -0 rename -v -f 's/MP4/mp4/'
    if [ "$as30v" ]; then
    echo Remove files on $as30v
    rm $as30v/MP_ROOT/100ANV01/*
    sudo umount $as30v
    fi
    if [ "$fly6" ]; then
    echo Remove files on $fly6
    rm -rf $fly6/DCIM/*
    sudo umount $fly6
    fi
    if [ "$m20" ]; then
    echo Remove files on $m20
    rm $m20/DCIM/Movie/* $m20/DCIM/Photo/*
    sudo umount $m20
    fi
    echo '—– Space remaining on video drive'
    df -h /mnt/video
    sudo umount /mnt/video
    echo Done!
    else
    echo Whoopsie! Total RC: $rc
    fi
    view raw savevideo.sh hosted with ❤ by GitHub
  • Rt 376 at Red Oaks Mill: Re-repaving

    For unknown reasons, NYS DOT milled away some of the newly laid asphalt north of Red Oaks Mill:

    Rt 376 Red Oaks Mill - New Pavement Milling
    Rt 376 Red Oaks Mill – New Pavement Milling

    Then laid it down again:

    Rt 376 Red Oaks Mill - New Pavement - 2018-06-14
    Rt 376 Red Oaks Mill – New Pavement – 2018-06-14

    As far as we can tell, there’s absolutely no difference, other than the opportunity for a huge longitudinal crack between the shoulder and the travel lane.

    My guess: the contractor shorted them an inch of asphalt, got caught, and had to do it over again.

    It’s only NYS Bike Route 9, so you can’t expect much in the way of bicycle-friendly design or build quality.

  • Monthly Image: Maple Tree Fungus

    Repaving the driveway truncated the roots of a maple tree and, this year, produced a handsome pair of fungii:

    Fungus - top view
    Fungus – top view

    Seen from the side, they’re even more complex:

    Fungus - side view
    Fungus – side view

    They’re firm and perfectly healthy, but the tree is likely doomed.

  • Side Mirror Turn Signal

    I hoped this bit of roadside debris would yield a shiny new amber LED and driver:

    Car mirror - shattered housing
    Car mirror – shattered housing

    But, alas, it uses an ordinary WY5W incandescent bulb:

    Car mirror - turn signal
    Car mirror – turn signal

    That whole assembly seems to be the replaceable unit, as the lens is firmly snapped-and-glued to the housing. The white shell used to hold the wires, but those vanished when the collision ripped the mirror off the car.

    After I pried off the shattered lens and extracted the bulb, I found a broken filament.

    Ah, well, now we won’t be riding through plastic shards along the shoulder.

  • Siglent SDS2304X Oscilloscope: Homebrew Front Cover

    Both my Tek 2215A and HP 54602 oscilloscopes came with snap-on front covers to protect all those delicate knobs and connectors. Not so the Siglent SDS2304X, which is basically a flat shoebox with a handle: the case has no features for a cover to snap onto, Siglent doesn’t offer a padded carrying case, and it’s too thick big for any of the laptop bags around here.

    I’ve been lugging it to Squidwrench meetings and can easily visualize a gash across the LCD panel or a knob rammed against a door frame.

    So I trimmed a pair of foam angles, punched holes to fit around the knobs along the right edge, cut up a cardboard tray from the heap, and duct-taped the whole mess together:

    Siglent SDS2304X Oscilloscope - crude front cover - interior
    Siglent SDS2304X Oscilloscope – crude front cover – interior

    The cover is equally ugly from the outside:

    Siglent SDS2304X Oscilloscope - crude front cover - installed
    Siglent SDS2304X Oscilloscope – crude front cover – installed

    A Velcro bellyband around the whole affair / through the handle holds it together.

    I considered 3D printing a set of corners and screwing them to a flat plastic plate, but came to my senses just in time.