Spotted on a utility ride to a local shop:

We decided an employee of the adjacent “nail spa” has been making the best of a bad situation.
If it was easy to quit, there’d surely still be a few smokers …
The Smell of Molten Projects in the Morning
Ed Nisley's Blog: Shop notes, electronics, firmware, machinery, 3D printing, laser cuttery, and curiosities. Contents: 100% human thinking, 0% AI slop.
Spotted on a utility ride to a local shop:
We decided an employee of the adjacent “nail spa” has been making the best of a bad situation.
If it was easy to quit, there’d surely still be a few smokers …
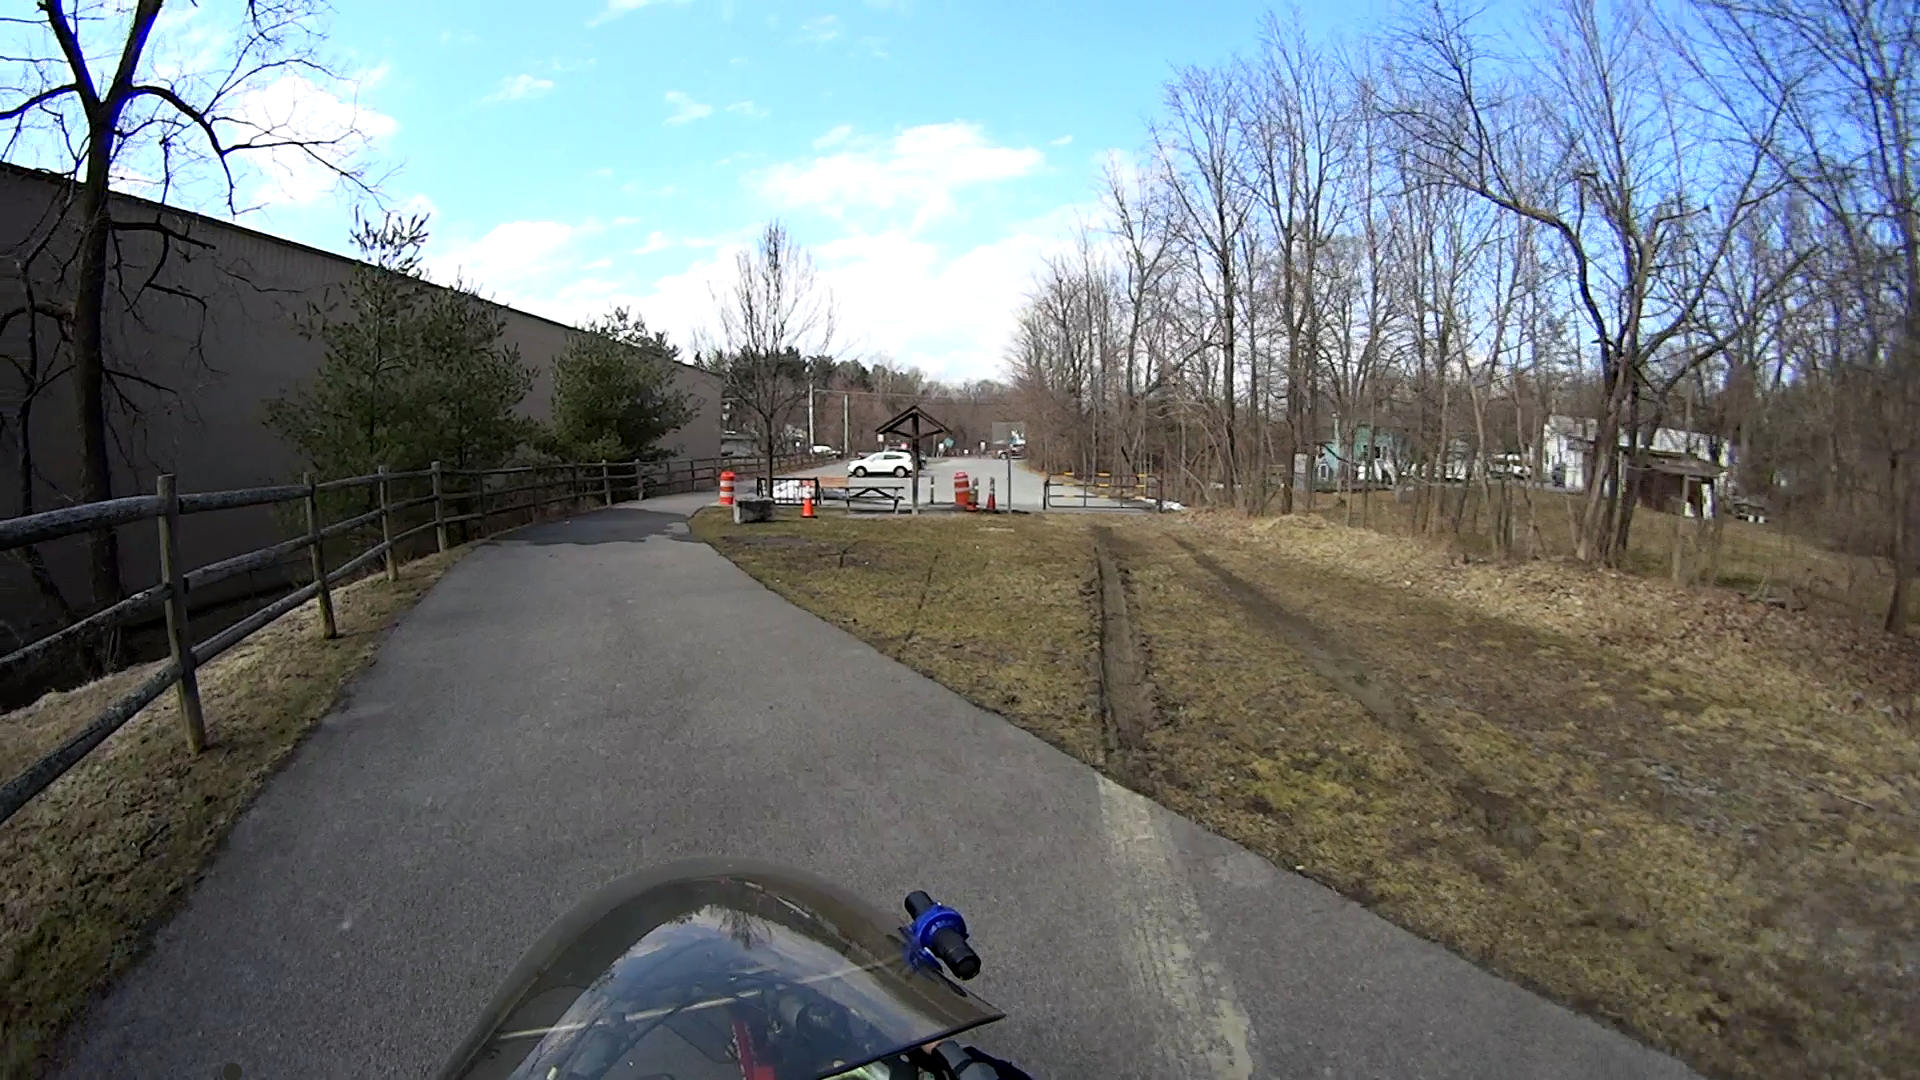
Five different agencies can drive through the Dutchess Rail Trail’s Overocker Rd trailhead vehicle gate:
Well, four of them can, because whoever snapped the barely visible small lock around the long-shackle lock (horizontal, to the right) is SOL:
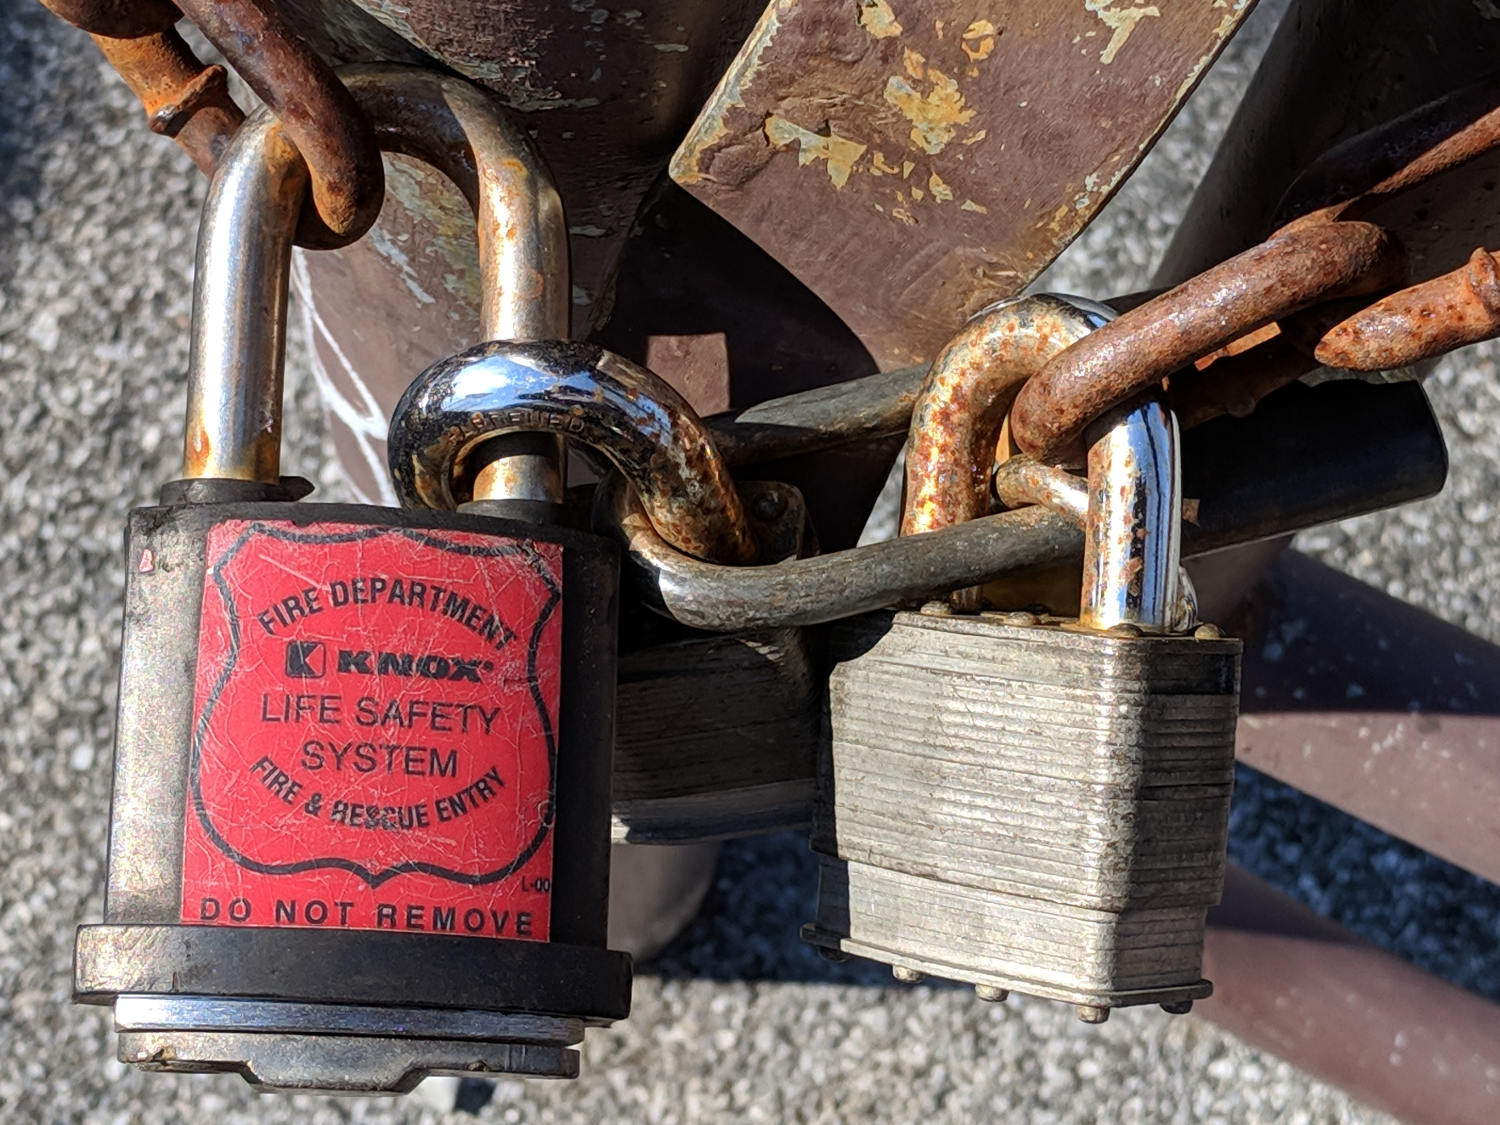
Perhaps they’re from the DC W&WWA?
The last time we rode past the Diddel Rd trailhead, there were zero locks on the (unchained) vehicle gate; evidently somebody forgot to relock the gate on the way out.
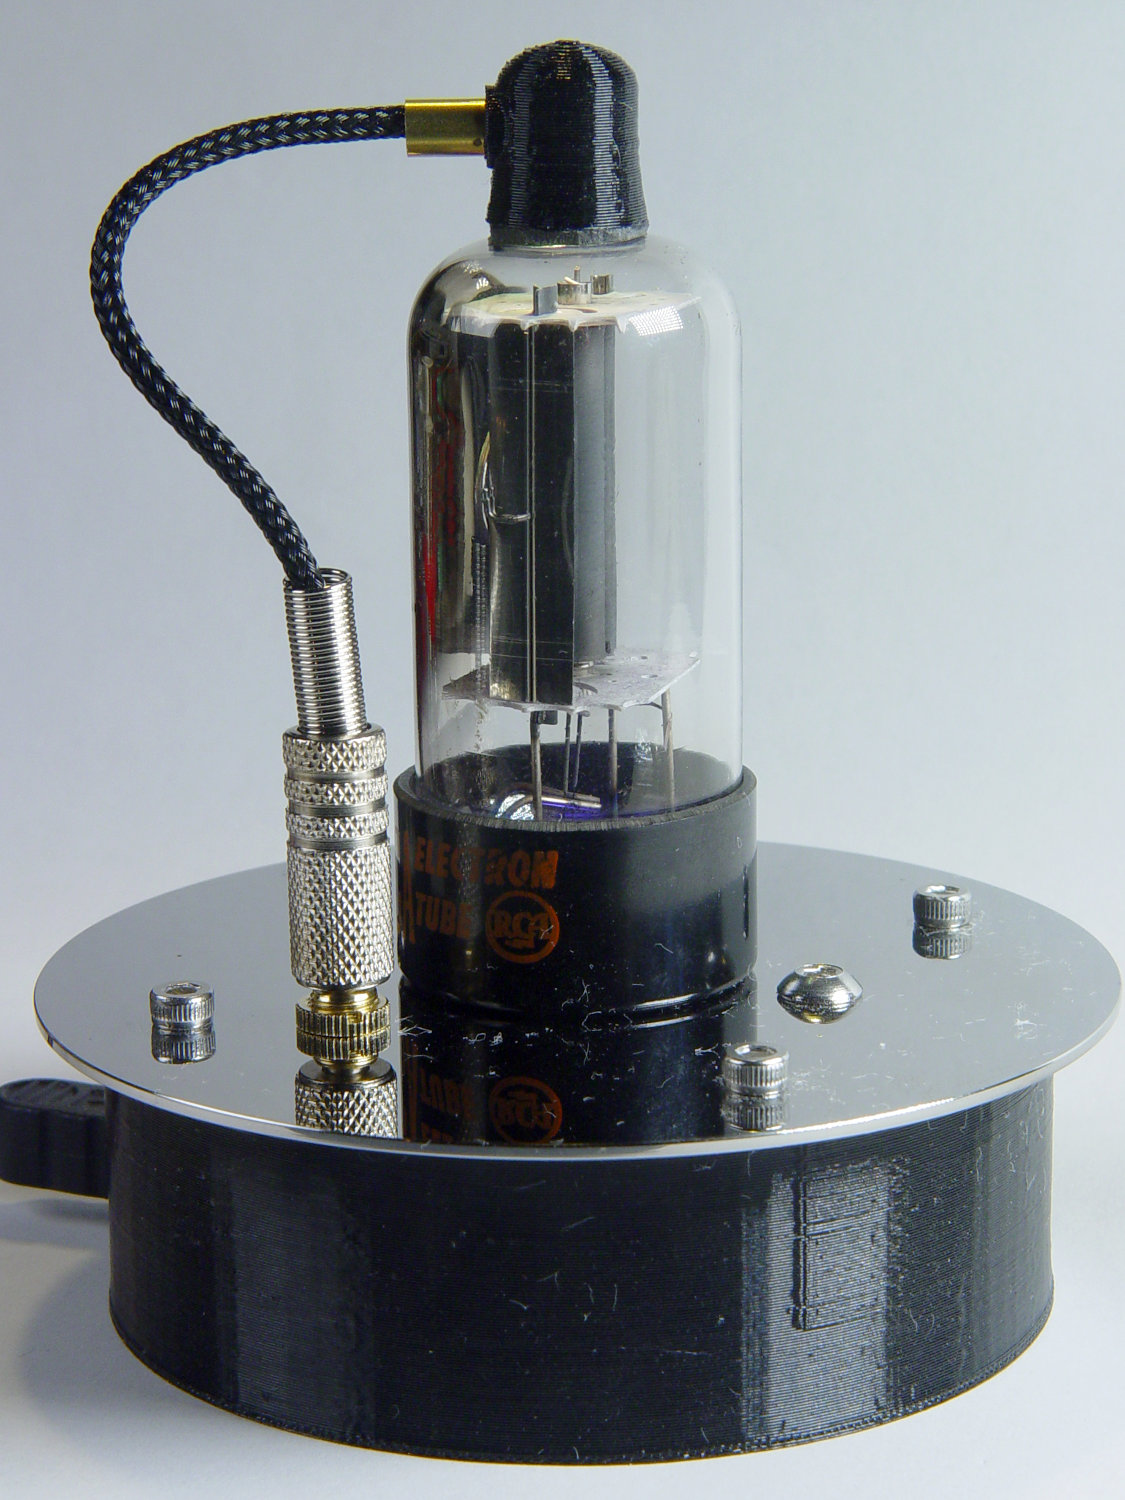
With the wrecked 5U4GB safely in the trash, I popped a smaller, somewhat less stately triode from the Big Box o’ Hollow-State Electronics and wired it up with a pair of SK6812 RGBW LEDs:
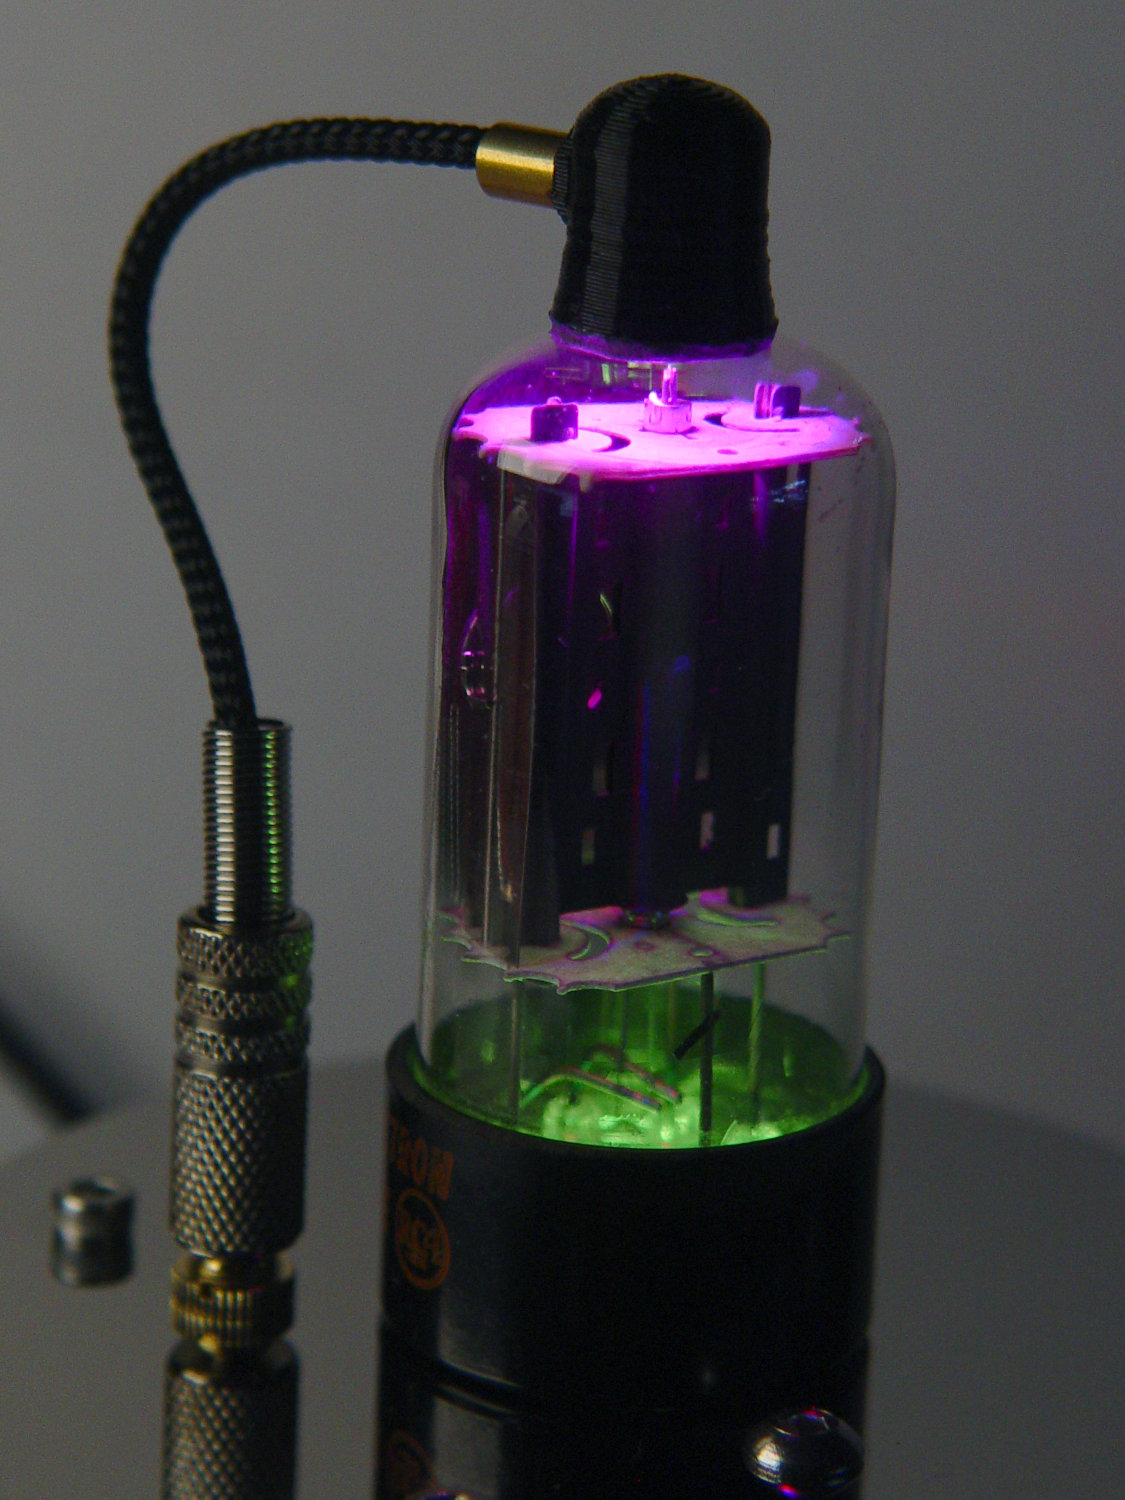
The tube’s markings have long since vanished, but, at this late date, all that matters is an intact glass envelope!
After two years, the ordinary white foam tape holding the knockoff Arduino Nano lost most of its sticktivity and easily popped off the 3D printed base:
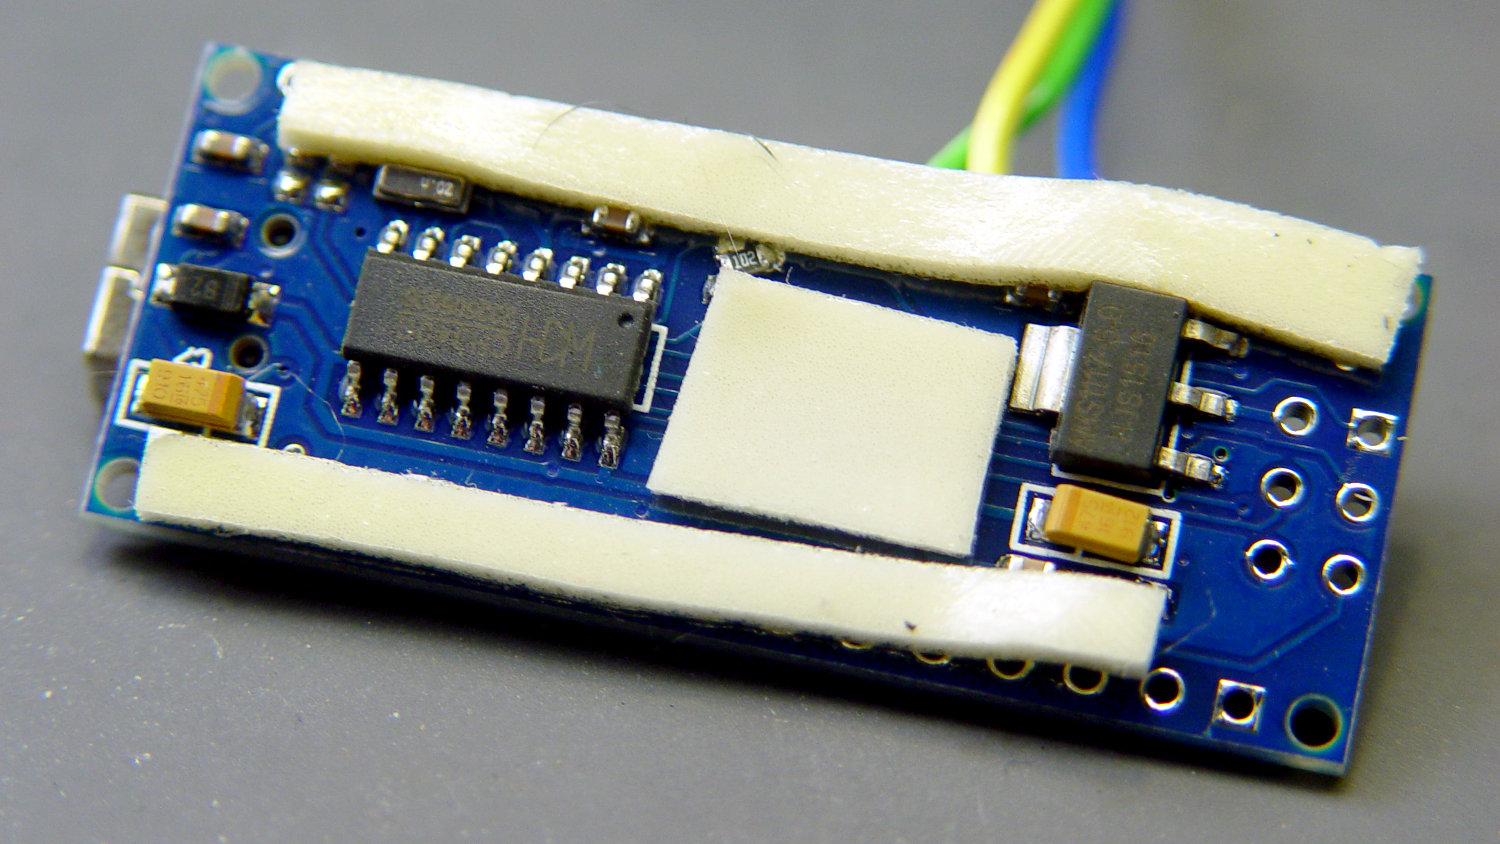
Two layers of 3M outdoor-rated foam tape clear the bottom-side components and, based on current evidence, its stickiness should stick forever more:

The alert reader will notice the mis-soldered 1 kΩ SMT resistor above-and-right of the CH340 USB interface chip. I think those two resistors are the isolators between the 328P microcontroller and the CH340, letting you use the TX and RX lines as ordinary I/O without killing either chip.
Despite the mis-soldering, it evidently passed their QC and works fine. Seeing as how I didn’t notice it until just now, it’ll remain in place until I must open the lamp base for some other reason, which may never happen.
The data output is now on pin A5, to match the rest of the glowing widgetry:

Blobs of hot melt glue affix the SK6812 and wiring to the socket:

The original “plate cap” wiring ran directly through a hole in the hard drive platter, which I embiggened for a 3.5 mm panel-mount headphone jack. The knurled metal plug looms next to this smaller tube, but it looks better (in a techie sense) than the raw hole:
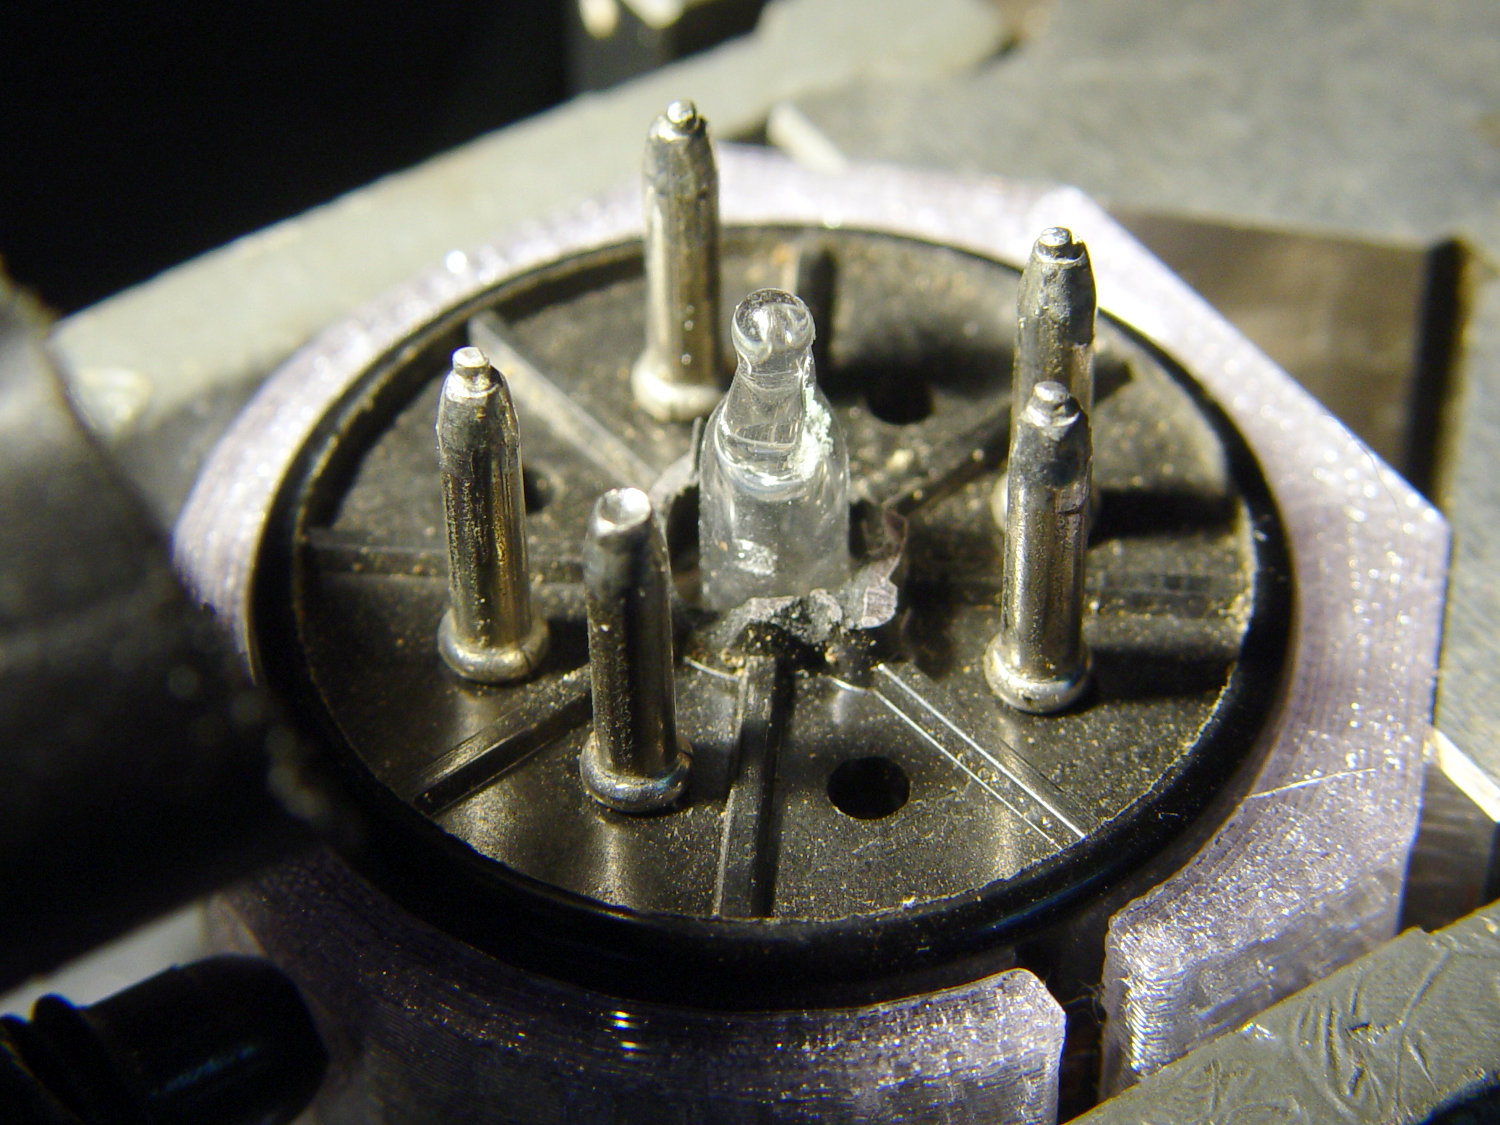
Octal tubes have an opaque Bakelite base, so I devoted some Quality Shop Time™ to the post:

Although I’d made a shell drill for 5U4’s base, this base was so crumbly I simply joysticked the spinning cutter around to knock off the rest of the post:
The shell drill would open the bottom to admit a bit more light. I may do that to see if it makes any visible difference.
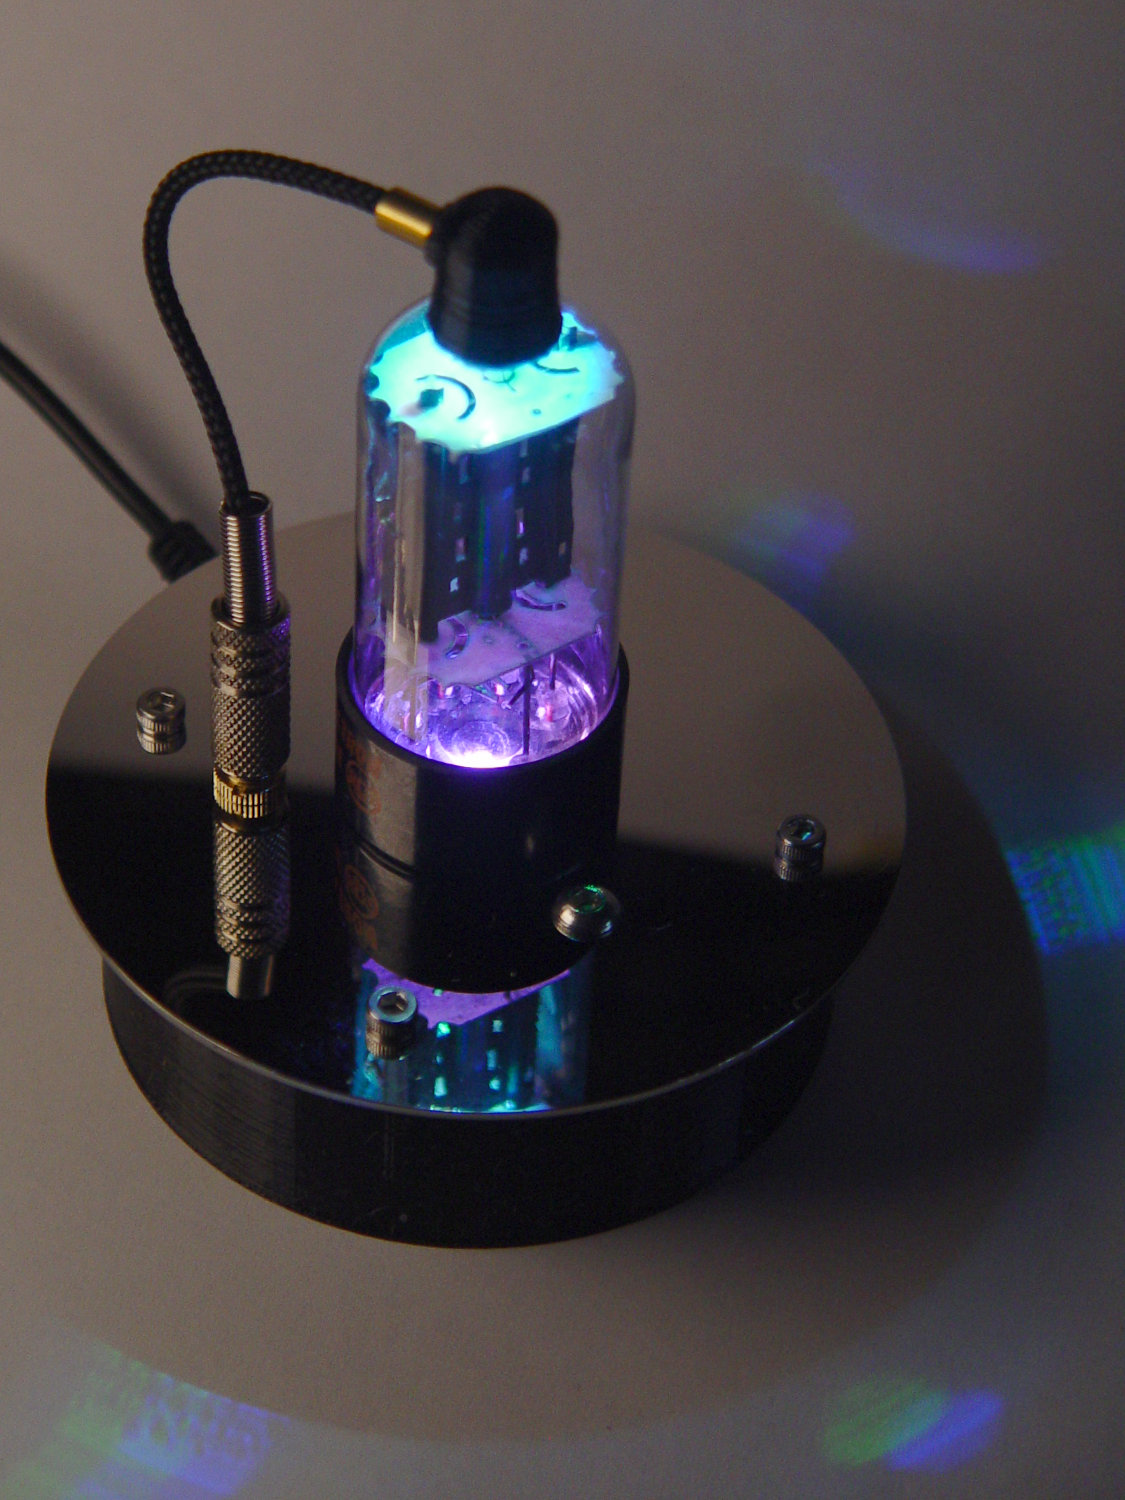
I didn’t expect the serrations in the top mica plate to cast interesting patterns around the platter:
Memo to Self: use the shell drill to avoid nicking the evacuation tip!
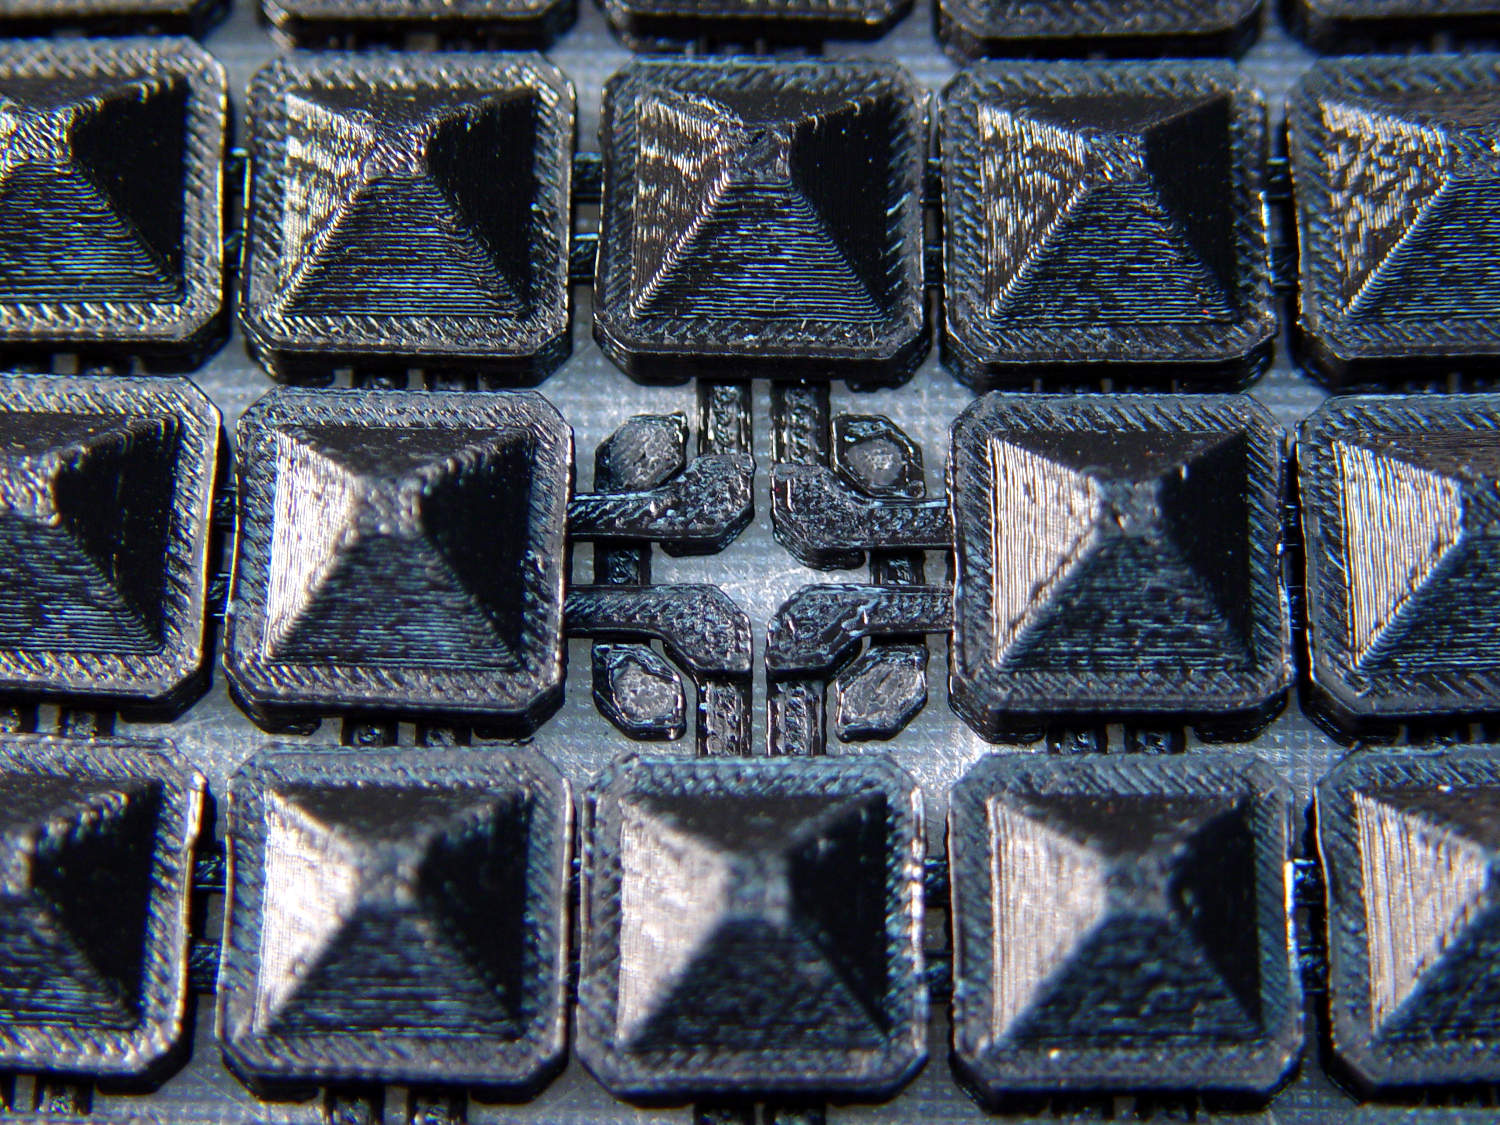
While dropping some recent 3D printed odds-n-ends into the show-n-tell box, I discovered the large sheet of square chain mail armor had a missing link:

Fortunately, the link fell off in the box and I recovered all the pieces for a failure analysis:
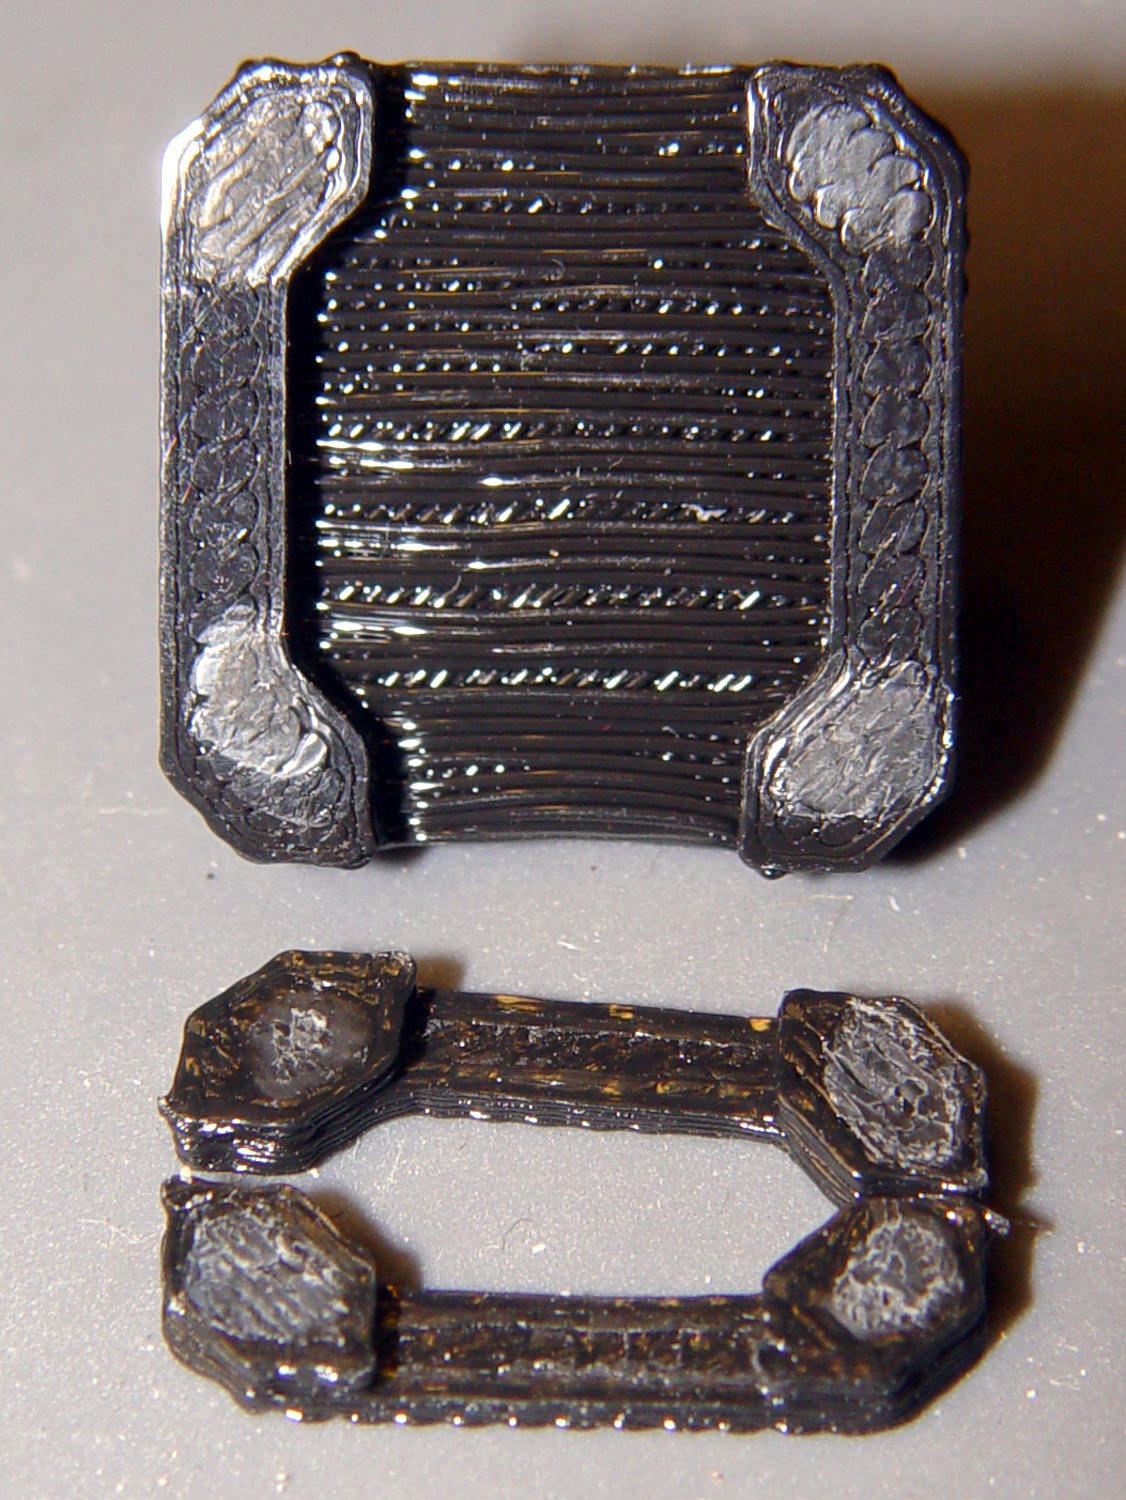
I’d glued the PLA together with IPS #4, a hellish mixture of plastic solvents including methylene chloride, one of the few chemicals able to chew into PLA, but there’s not much penetration or bonding going on.
Let’s try that again with a bit more solvent.
First, slide the bars into place:
I applied four solvent drops in two passes to give it time to work its way in, put four matching drops on the armor cap, squished the cap in place, tweaked the bar alignment, then applied pressure while contemplating the whichness of the why for half a minute while the solvent worked its magic.
Things look pretty good once more:
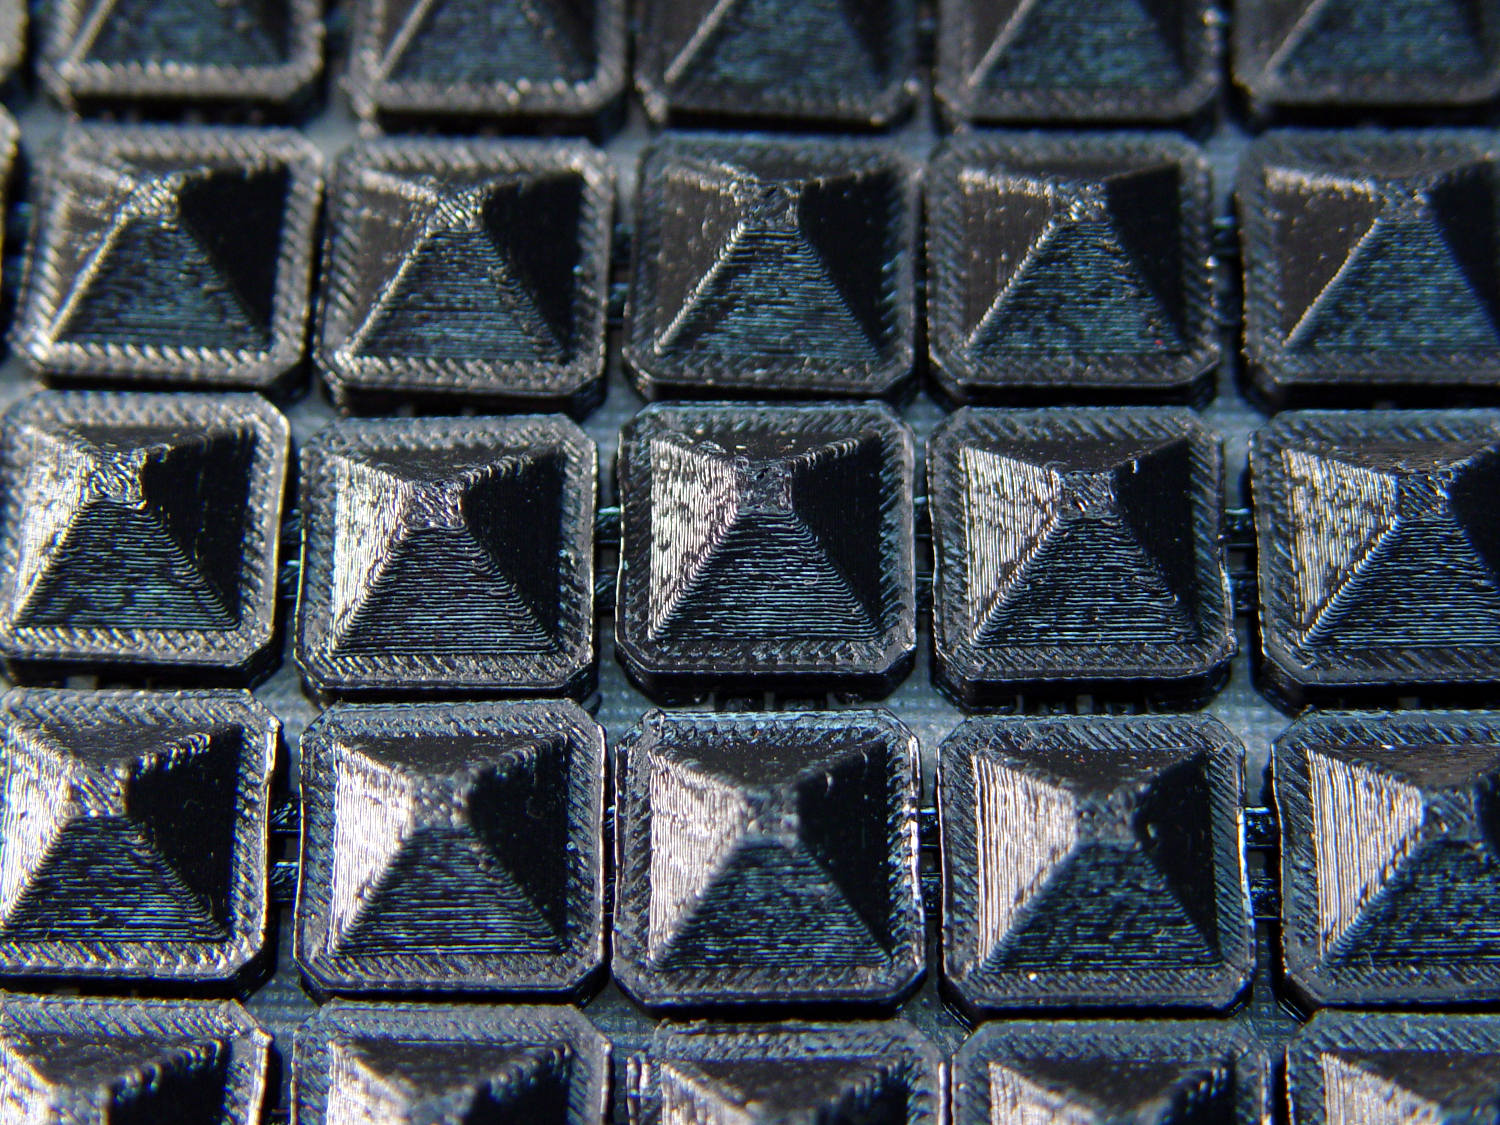
There’s no way to determine the repair’s goodness, other than by deliberately trying to snap off a bar, so I’ll just put it back in the box and hope for the best.
This table must sit across the threshold of a walk-in / sit-down shower, with the shower curtain draped across the table to keep the water inside.
Starting with another patio side table, as before, I installed a quartet of 5 mm stainless screws to lock the top panels in place and convert the table into a rigid assembly:

Because the shower floor is slightly higher than the bathroom floor, I conjured a set of foot pads to raise the outside legs:

The sloping top surface on the pads compensates for the angle on the end of the table legs:
I think the leg mold produces legs for several different tables, with the end angle being Close Enough™ for most purposes. Most likely, it’d wear flat in a matter of days on an actual patio.
Using good 3M outdoor-rated foam tape should eliminate the need for fiddly screw holes and more hardware:
The feet fit reasonably well:
They may need nonskid tape on those flat bottoms, but that’s in the nature of fine tuning.
And, as with the narrow table, it may need foam blocks to raise the top surface to arm level. Perhaps a pair of Yoga Blocks will come in handy for large adjustments.
The OpenSCAD source code as a GitHub Gist:
| // Patio Side Table Feet | |
| // Ed Nisley – KE4ZNU | |
| // 2019-03 | |
| /* [Layout Options] */ | |
| Layout = "Build"; // [Show,Build] | |
| /* [Extrusion Parameters] */ | |
| ThreadWidth = 0.40; | |
| ThreadThick = 0.25; | |
| HoleWindage = 0.2; | |
| Protrusion = 0.1; | |
| //—– | |
| // Dimensions | |
| TapeThick = 1.0; // 3M double-stick outdoor tape | |
| LegWall = [2.5,3.5]; // leg walls are not the same in X and Y! | |
| LegBase = [36.0,19.0]; // flat on floor | |
| LegOuter = [31.0,19.0]; // perpendicular to leg axis | |
| LegInner = [28.5,11.5]; // … ditto | |
| LegAngle = 90 – 53; // vertical to leg | |
| LegRecess = [LegInner.x,LegInner.y,LegInner.x*tan(LegAngle)]; | |
| PadWedge = 2; // to fit end of leg | |
| PadRadius = 4.0; // rounding radius for nice corners | |
| PadBase = [LegBase.x + 2*PadRadius,LegBase.y + 2*PadRadius,5.0]; | |
| PadSides = 6*4; | |
| BathStep = 20; // offset between shower bottom and floor | |
| /* [Hidden] */ | |
| EmbossDepth = 1*ThreadThick; // recess depth | |
| DebossHeight = 1*ThreadThick + Protrusion; // text height + Protrusion into part | |
| //—– | |
| // Useful routines | |
| function IntegerMultiple(Size,Unit) = Unit * ceil(Size / Unit); | |
| module PolyCyl(Dia,Height,ForceSides=0) { // based on nophead's polyholes | |
| Sides = (ForceSides != 0) ? ForceSides : (ceil(Dia) + 2); | |
| FixDia = Dia / cos(180/Sides); | |
| cylinder(r=(FixDia + HoleWindage)/2, | |
| h=Height, | |
| $fn=Sides); | |
| } | |
| //—– | |
| // Foot pad | |
| module FootPad(Riser = 0.0) { | |
| difference() { | |
| union() { | |
| hull() | |
| for (i=[-1,1], j=[-1,1]) { | |
| translate([i*(PadBase.x/2 – PadRadius),j*(PadBase.y/2 – PadRadius),0]) | |
| cylinder(r=PadRadius,h=1,$fn=PadSides); | |
| translate([i*(PadBase.x/2 – PadRadius), | |
| j*(PadBase.y/2 – PadRadius), | |
| Riser + PadBase.z – PadRadius – (i-1)*PadWedge/2]) | |
| sphere(r=PadRadius/cos(180/PadSides),$fn=PadSides); | |
| } | |
| translate([PadRadius – PadBase.x/2,0,Riser + PadBase.z]) | |
| rotate([0,LegAngle,0]) | |
| translate([LegRecess.x/2,0,(LegRecess.z – Protrusion)/2 ]) | |
| cube(LegRecess – [2*TapeThick,0,2*TapeThick],center=true); | |
| } | |
| translate([0,0,-2*PadBase.z]) // remove anything under Z=0 | |
| cube(4*PadBase,center=true); | |
| cube([17,12,2*DebossHeight],center=true); | |
| } | |
| mirror([1,0,0]) | |
| linear_extrude(height=EmbossDepth) | |
| translate([0,0,0]) | |
| text(text=str(Riser),size=10,spacing=1.05, | |
| font="Arial:style=Bold", | |
| valign="center",halign="center"); | |
| } | |
| //—– | |
| // Build things | |
| if (Layout == "Build") { | |
| if (true) { | |
| translate([-0.7*PadBase.x,-0.7*PadBase.y,0]) | |
| FootPad(0); | |
| translate([-0.7*PadBase.x,+0.7*PadBase.y,0]) | |
| FootPad(0); | |
| } | |
| translate([+0.7*PadBase.x,-0.7*PadBase.y,0]) | |
| FootPad(BathStep); | |
| translate([+0.7*PadBase.x,+0.7*PadBase.y,0]) | |
| FootPad(BathStep); | |
| } | |
| if (Layout == "Show") | |
| FootPad(); |
For reasons not relevant here, I recently conjured a pair of tables to support an injured arm (ours are OK!) in the bathroom: one table fitting in the narrow space adjacent to a toilet and the other across the threshold of a walk-in / sit-down shower.
The raw material came from a plastic side table intended for outdoor use:

That’s the Patriotic Blue version, which seemed the least offensive of the colors on offer at the local store.
The plastic pieces unsnap easily enough:
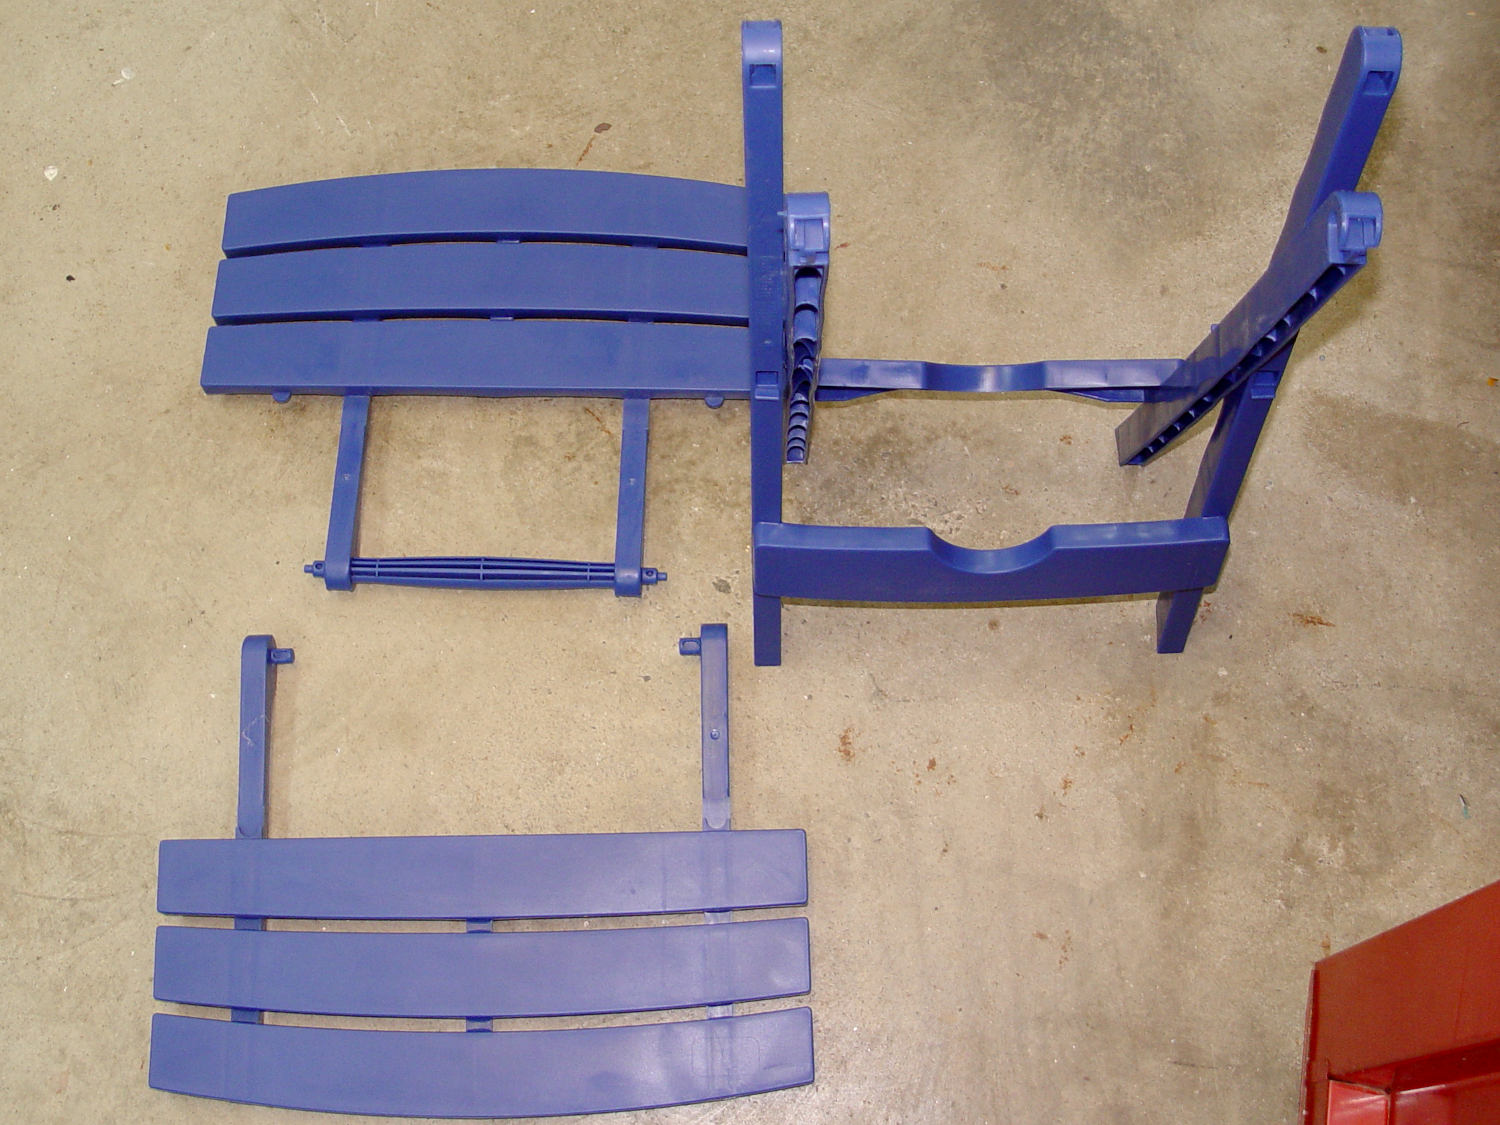
The legs also come apart by pulling outward at the crossover points. You may need to clean the flashing from all the joints, as they’re only as finished as absolutely necessary.
A table about half the width seemed about right, so I sawed the two top plates off their struts, then angled the strut ends to match the new leg angle:
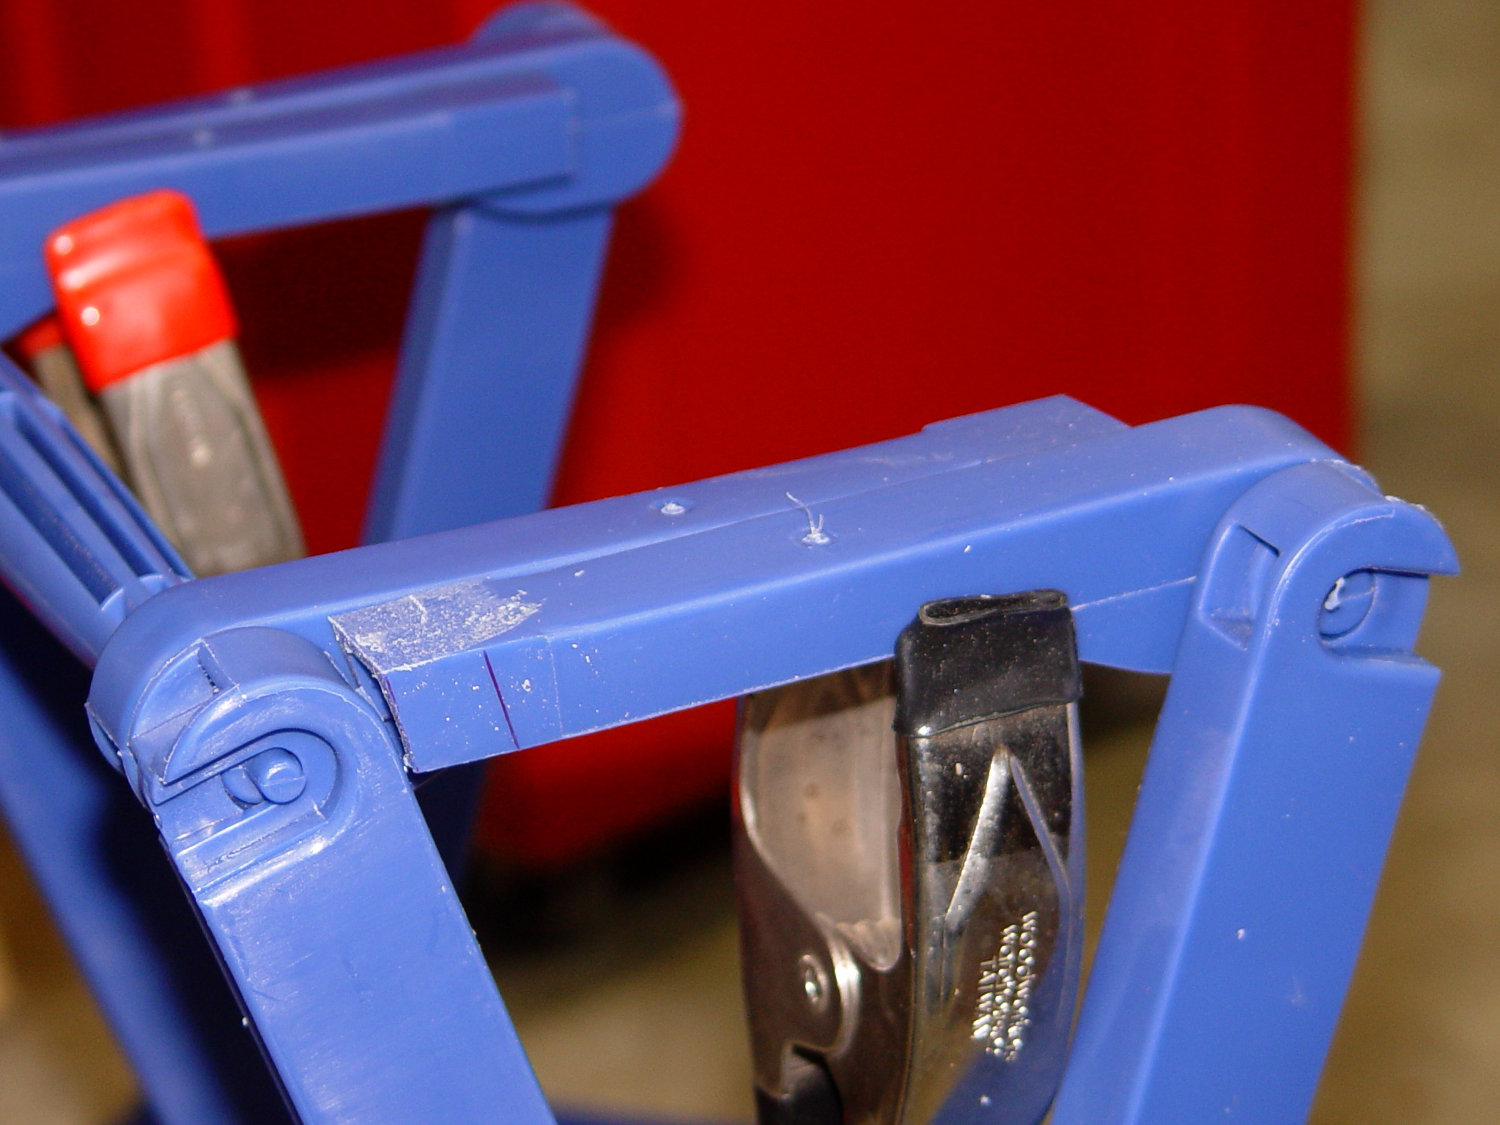
Because it’s now completely floppy, I drilled holes for 5 mm screws through the struts:

In the process, I discovered stainless steel nyloc nuts tend to gall on stainless steel screws:
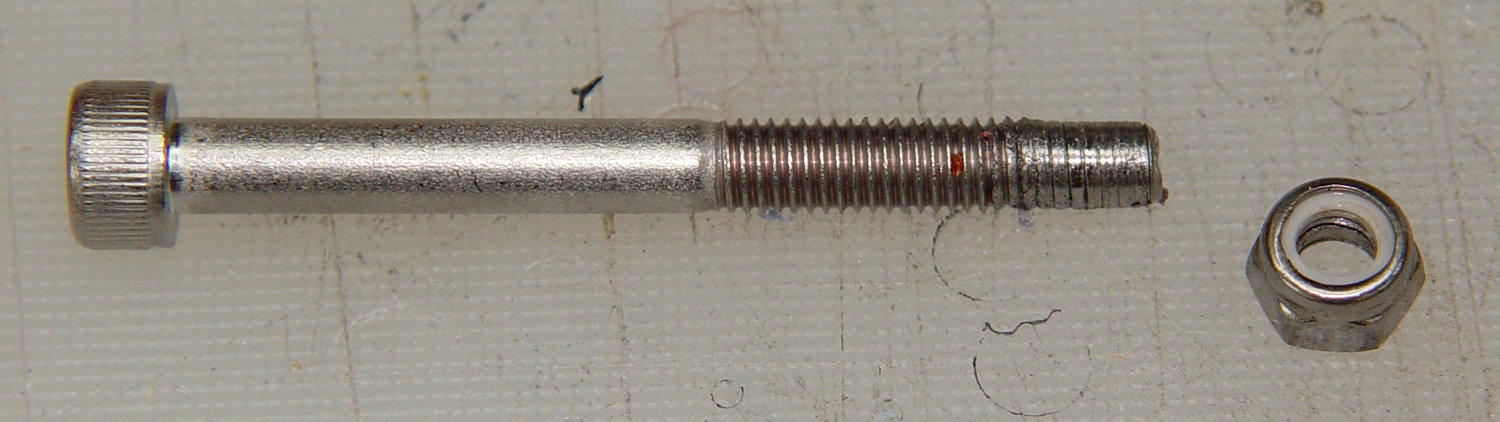
I lost a pair of screws + nuts before I got a clue and began adding a drop of machine oil to each screw before tightening the nuts. Haven’t had that problem with the 3 mm SS screws, so there’s always something new to learn.
With all the screws in place, the half-table becomes a rigid contraption:

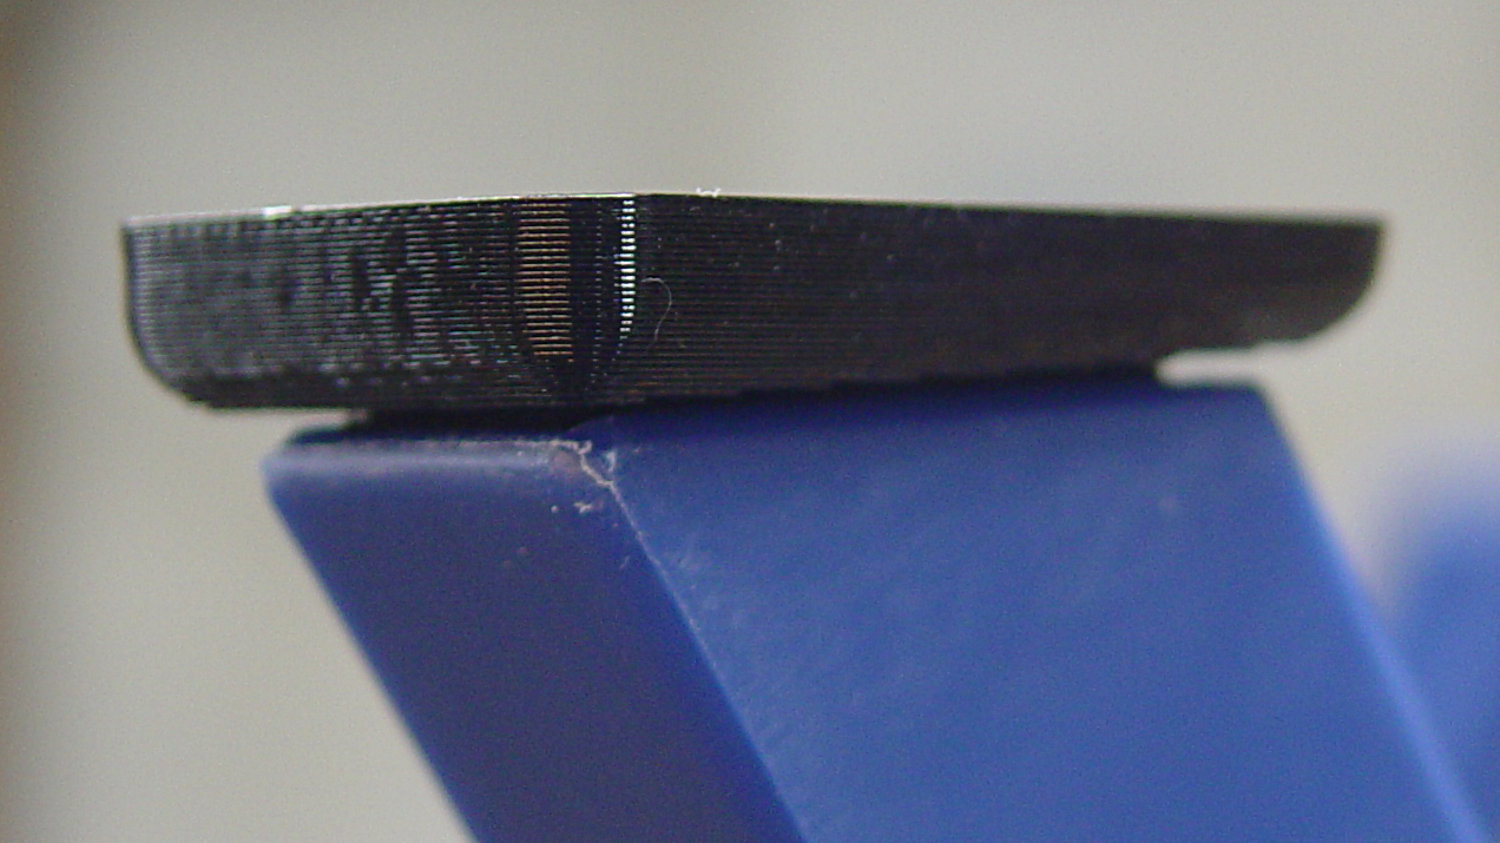
The top looks like it’s suffering from severe barrel distortion, but it really started out looking that way:

The slat sides are all curved, except the far edge that was once in the middle of the table and now fits against the wall.
It may be slightly too short, but we can stack foam slabs on the top, probably held in place with cable ties.
Memo to Self: lube all the stainless steel screws!
A loud rat-a-tat-a-tat drew our attention to a Pileated Woodpecker excavating a tree along Rt 376:
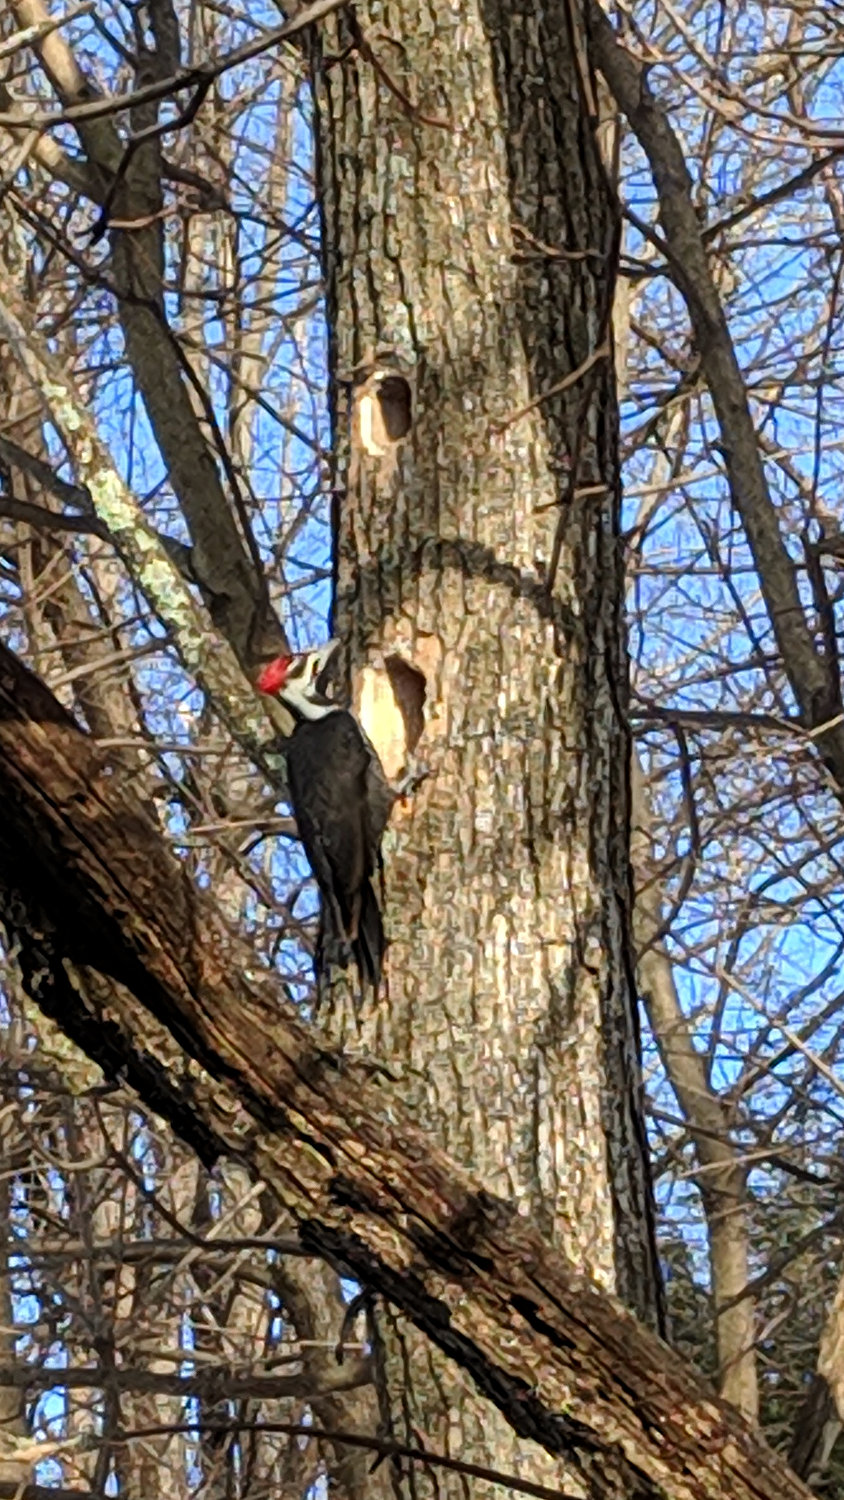
Pileated woodpeckers sculpt their holes with great care, often inspecting their work for smoothness and, perhaps, lunch:
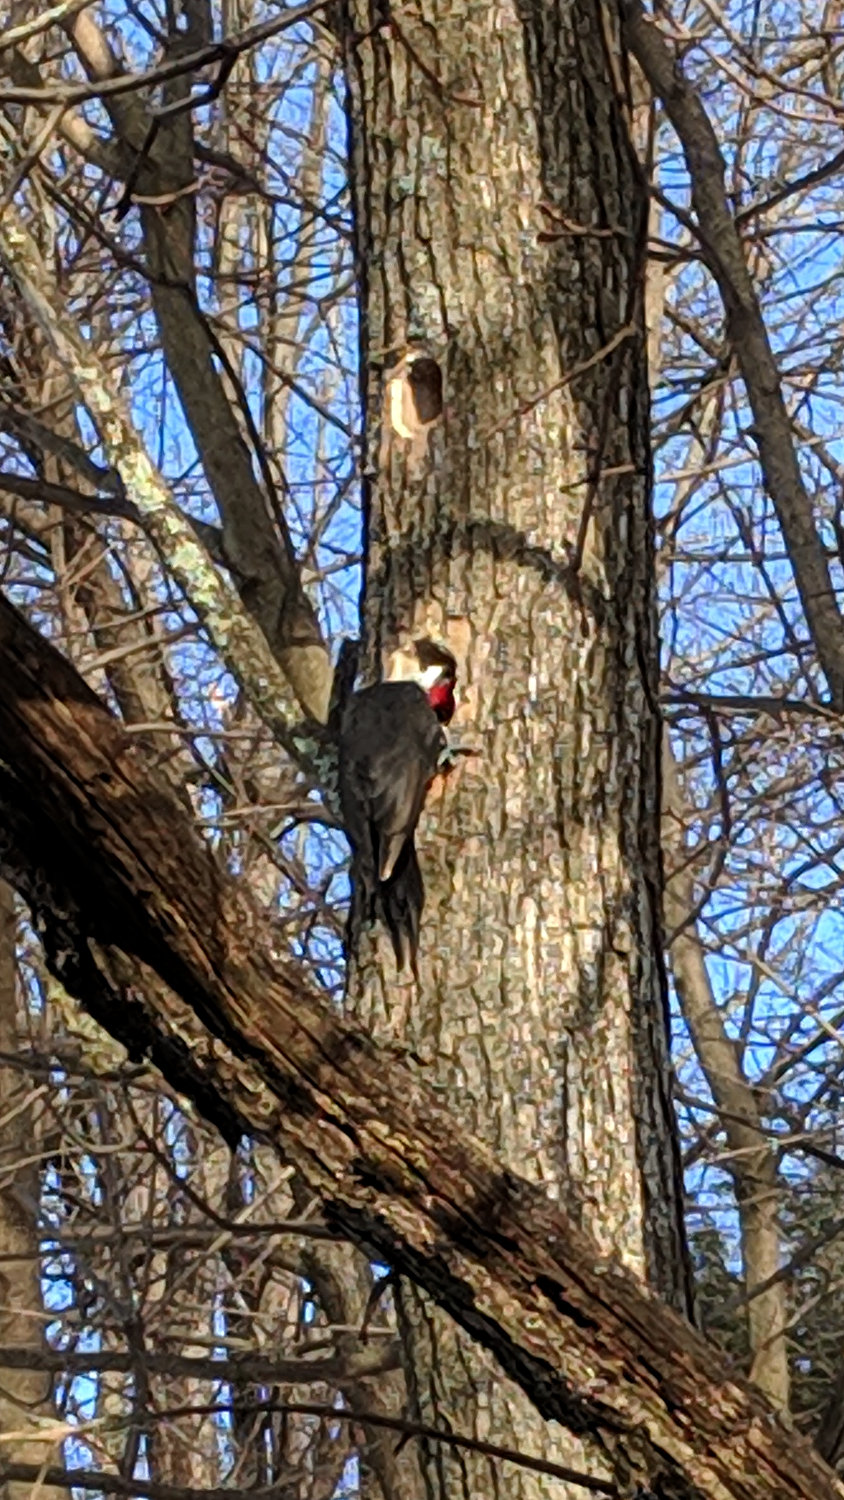
Those holes go deep enough inside the tree to serve as shelters for smaller birds during storms.
We occasionally see and hear them, as well as their smaller relatives, remodeling trees around the house. Good hunting!
Taken with the Pixel XL zoomed all the way tight, cropped and sharpened a smidge.
