The Smell of Molten Projects in the Morning

Ed Nisley's Blog: Shop notes, electronics, firmware, machinery, 3D printing, laser cuttery, and curiosities. Contents: 100% human thinking, 0% AI slop.

Author: Ed

  • Beware the Domain Squatters

    A squatter has taken over a defunct domain at the far end of a link buried somewhere in the 3800 posts you find here. In place of the useful page I saw, you’ll see this stylin’ popover:

    Domain Squat - engineeration dot com
    Domain Squat – engineeration dot com

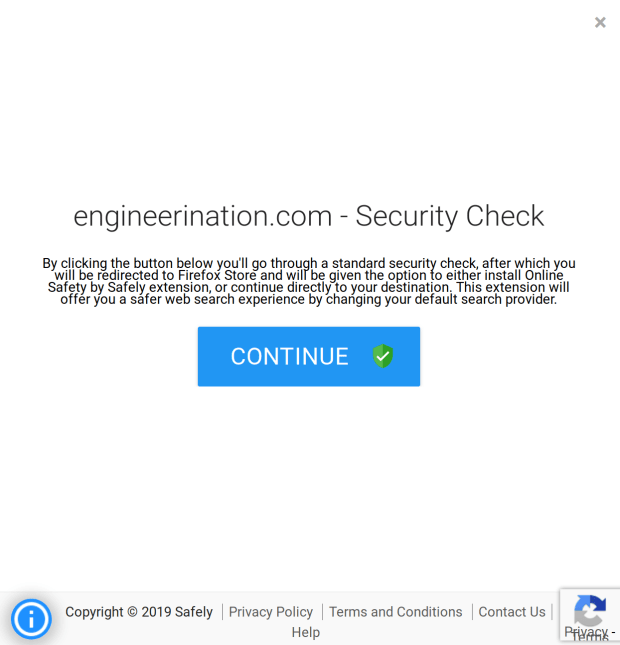
    The “standard security check” is a nice touch, although you should keep in mind the Dilbert cartoon about unexpected side effects.

    The actual URL, which I will not make clickable, includes the domain ffgetsplendidapps, which tells you just about everything you need to know about what’s going on.

    Because they’re squatting, “continue directly to your destination” means being dumped into a Google search after they’ve meddled with your browser & system configuration. Clicking the inconspicuous × in the upper right closes the popover and dumps you into the search, perhaps before doing anything.

    I have no good (i.e., automated) way to find broken links and, as far as I know, there is no way to automatically detect domain squatting, so you’re on your own.

    Trust, but verify!

  • Warm-White LED Strip: FAIL

    The roll of warm-white LEDs I used for the first sewing machine lights has evidently aged out:

    Failed warm-white LED strip
    Failed warm-white LED strip

    They’ve been wrapped on their original roll, tucked in an antistatic bag, for the last five years, so it’s not as if they’ve been constantly abused.

    All the cool-white LEDs on an adjacent roll in the same bag still work perfectly, so you’re looking at inherent vice.

    I harvested the three longest functional sections and dumped the remainder in the electronics recycling box.

    COB LEDs provide much more light, if only because they run at higher power densities, and seem to be much better cost-performers:

    Juki TL-2010Q COB LED - installed - rear view
    Juki TL-2010Q COB LED – installed – rear view

    Admittedly, I haven’t looked at the RGB LED strips in a while, either.

  • Baofeng UV-5R Squelch Settings

    The Baofeng UV-5R radios on our bikes seem absurdly sensitive to intermodulation interference, particularly on rides across the Walkway Over the Hudson, which has a glorious view of the repeaters and paging transmitters atop Illinois Mountain:

    Walkway Over The Hudson - Illinois Mountain Antennas
    Walkway Over The Hudson – Illinois Mountain Antennas

    A better view of the assortment on the right:

    Illinois Mountain - North Antennas
    Illinois Mountain – North Antennas

    And on the left:

    Illinois Mountain - South Antennas
    Illinois Mountain – South Antennas

    Not shown: the Sheriff’s Office transmitter behind us on the left and the Vassar Brothers Hospital / MidHudson pagers on either side at eye level. There’s plenty of RFI boresighted on the Walkway.

    Anyhow, none of the Baofeng squelch settings had any effect, which turned out to be a known problem. The default range VHF covered a whopping 6 dB and the UHF wasn’t much better at 18 dB, both at very low RF power levels.

    We use the radios in simplex mode, generally within line of sight, so I changed the Service Settings to get really aggressive squelch:

    Baofeng UV-5R - Improved Squelch Settings
    Baofeng UV-5R – Improved Squelch Settings

    I have no way to calibrate the new signal levels, but I’d previously cranked the squelch up to 9 (it doesn’t go any higher) and, left unchanged, the new level makes all the previous interference Go Away™. Another ride over the Walkway with the squelch set to 4 also passed in blissful silence.

    If the BF-F9 levels mean anything on a UV-5R, that’s about -100 dBm, 20 dB over the previous -120 dBm at squelch = 9.

    The new squelch levels may be too tight for any other use, which doesn’t matter for these radios. As of now, our rides are quiet.

    [Update: Setting the squelch to 5 may be necessary for the Walkway, as we both heard a few squawks and bleeps while riding eastbound on a Monday afternoon. ]

  • Pedestrian Hazard on the Hudson Valley Rail Trail

    I ride slowly and ding my bell when overtaking pedestrians on the Hudson Valley Rail Trail, but this group of walkers paid almost no attention as I rode toward New Paltz:

    HVRT New Paltz - Canada geese - Eastbound - 2019-07-16
    HVRT New Paltz – Canada geese – Eastbound – 2019-07-16

    I contented myself by practicing my slow-riding skills while they ambled along and, eventually, moved far to the left.

    A few hours later, they seemed to be having a picnic in the grass:

    HVRT New Paltz - Canada geese - Westbound - 2019-07-16
    HVRT New Paltz – Canada geese – Westbound – 2019-07-16

    We parted as friends, which is always pleasant.

  • Vacuum Tube LEDs: Failed Tape, Failed USB Cable

    While packing the vacuum tube LEDs for the HV Open Mad Science Fair, I noticed the knockoff Arduino Nano inside one had come unstuck from the base. It seems the double-stick foam tape I’d used had lost its sticky:

    Vacuum Tube LEDs - unstuck foam tape
    Vacuum Tube LEDs – unstuck foam tape

    Replacing it with my now-standard black 3M outdoor rated tape ought to solve the problem forever more.

    For whatever it’s worth, the SK6812 RGBW LEDs have had exactly zero failures in the last two years or so; I finally turned off the test fixture.

    Before reassembling the light, I plugged the USB cable into the bench supply and watched the Nano reset erratically. Careful poking showed the USB cable was intermittent, so I carved it up:

    Failed USB cable - autopsy
    Failed USB cable – autopsy

    As far as I can tell, the black wire (supply common) was cut mostly all the way through, with just a few strands remaining, before I peeled the insulation back.

    A closer look at the solder joints doesn’t inspire much confidence in their QC:

    Failed USB cable - solder joints
    Failed USB cable – solder joints

    If those pads tarnished along with their solder blobs, the overmolded plastic isn’t the right stuff for the job. If they started life like that … ick.

    I must up my cable spend, although I have no confidence doing so will improve the quality.

  • Monthly Science: Organ Pipe Mud Dauber Emergence

    An industrious pair of Organ Pipe Mud Dauber Wasps assembled their nest last August:

    Organ Pipe Mud Dauber Wasp Nest - side view
    Organ Pipe Mud Dauber Wasp Nest – side view

    Their offspring began emerging in early July, with our first picture on 3 July. I’ll leave the image file dates in place so you can reach your own conclusions:

    IMG_20190703_184657 - Organ Pipe Mud Dauber Nest - right
    IMG_20190703_184657 – Organ Pipe Mud Dauber Nest – right

    We think a titmouse (a known predator) pecked some holes, including the upper hole on the middle tube, as they seemed to expose solid (and presumably inedible) chitin from the outside:

    IMG_20190703_184647 - Organ Pipe Mud Dauber Nest - left
    IMG_20190703_184647 – Organ Pipe Mud Dauber Nest – left

    More holes appeared in a few days:

    IMG_20190709_172632 - Organ Pipe Mud Dauber Nest - right
    IMG_20190709_172632 – Organ Pipe Mud Dauber Nest – right

    The irregular spacing along each tube suggests they don’t emerge in the reverse order of installation:

    IMG_20190709_172623 - Organ Pipe Mud Dauber Nest - left
    IMG_20190709_172623 – Organ Pipe Mud Dauber Nest – left

    Three days later:

    IMG_20190712_181634 - Organ Pipe Mud Dauber Nest - right
    IMG_20190712_181634 – Organ Pipe Mud Dauber Nest – right
    IMG_20190712_181625 - Organ Pipe Mud Dauber Nest - left
    IMG_20190712_181625 – Organ Pipe Mud Dauber Nest – left

    Two weeks after the first holes appeared:

    IMG_20190717_172908 - Organ Pipe Mud Dauber Nest - right
    IMG_20190717_172908 – Organ Pipe Mud Dauber Nest – right
    IMG_20190717_172922 - Organ Pipe Mud Dauber Nest - left
    IMG_20190717_172922 – Organ Pipe Mud Dauber Nest – left

    No more holes have appeared since then, so it seems one young wasp emerges every few days.

    This nest produced about a dozen wasps, with perhaps as many launch failures. We’ll (try to) remove it and examine the contents in a few months.

    We expect they’ll start building nests all over the house in another month …

    Update: Fortunately for us, no nests appeared before the first freeze, so the wasps are holed up elsewhere for the winter.

  • NuTone 8663RP Bathroom Vent Fan Bushing

    The NuTone 8663RP (for future reference) vent fan in the Black Bathroom began making horrible grinding sounds and, after a day or two, stopped turning. Pulling it out showed the impeller had slipped downward on the motor shaft:

    Bath Vent Fan - impeller shift
    Bath Vent Fan – impeller shift

    Which meant the impeller was now resting on the steel frame:

    Bath Vent Fan - impeller interference
    Bath Vent Fan – impeller interference

    Curiously, there’s no retainer under the impeller preventing it from sliding downward, other than good intentions and a friction fit. Nothing lasts, although it’s been working for the last two decades, so I guess it doesn’t owe me much.

    My first thought was to build a steel or aluminum collar with a setscrew to hold the thing up, but I decided to try a simple bushing made of UHMW polyethylene between the motor and the impeller.

    Turning it to the proper length required a test fit, then another session on a mandrel made from some aluminum tubing:

    Bath Vent Fan - bushing trim
    Bath Vent Fan – bushing trim

    The snout came out just long enough to clear the motor frame, resting the impeller’s weight atop the bearing around the shaft:

    Bath Vent Fan - bushing installation
    Bath Vent Fan – bushing installation

    It’s hard to see between the impeller blades, but there’s actually a bit of clearance underneath:

    Bath Vent Fan - bushing installed
    Bath Vent Fan – bushing installed

    Which left just barely enough room on the top for the retaining clip:

    Bath Vent Fan - shaft clip - detail
    Bath Vent Fan – shaft clip – detail

    I had high hopes for the UHMW, but it seems any contact between the rotating impeller and the stationary bearing transmits enough sound to be annoying.

    So I must break down and build a collar, although it’s off the critical path right now.

    As far as I can tell from the pictures, dropping $50 on a new fan unit will get me exactly the same problem. Whether it would last for two decades before failing is an open question, but my experience with freezer fans suggests what we have is as good as it gets and making a bushing is the least-awful way to proceed.