The Smell of Molten Projects in the Morning

Ed Nisley's Blog: Shop notes, electronics, firmware, machinery, 3D printing, laser cuttery, and curiosities. Contents: 100% human thinking, 0% AI slop.

Author: Ed

  • Atreus Keyboard: LED Thoughts

    Atreus Keyboard: LED Thoughts

    Having helped grossly over-fund the Atreus Kickstarter earlier this year, a small box arrived pretty much on-time:

    Atreus keyboard - overview
    Atreus keyboard – overview

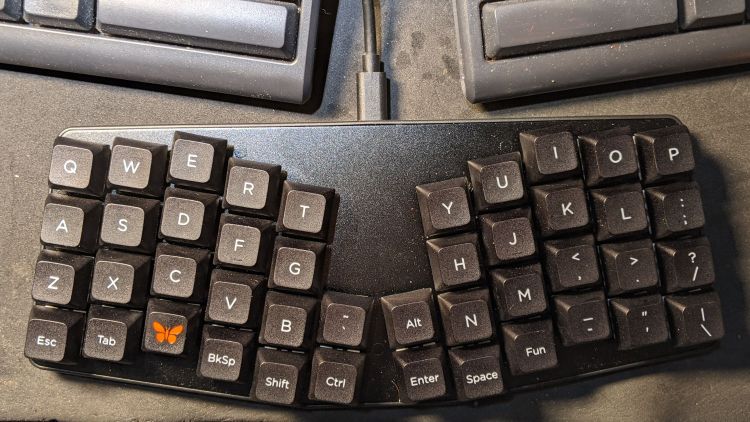
    I did get the blank keycap set, but have yet to screw up sufficient courage to install them. The caps sit atop the stock Kailh (pronounced, I think, kale) BOX Brown soft tactile switches; they’re clicky, yet not offensively loud.

    Removing a dozen screws lets you take it apart, revealing all the electronics on the underside of the PCB:

    Atreus keyboard - PCB overview
    Atreus keyboard – PCB overview

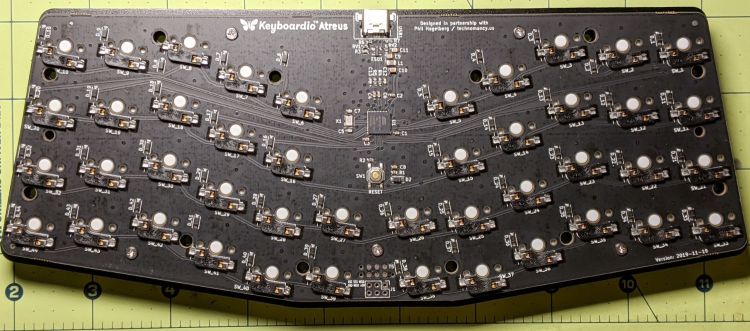
    The central section holds most of the active ingredients:

    Atreus keyboard - USB 32U4 Reset - detail
    Atreus keyboard – USB 32U4 Reset – detail

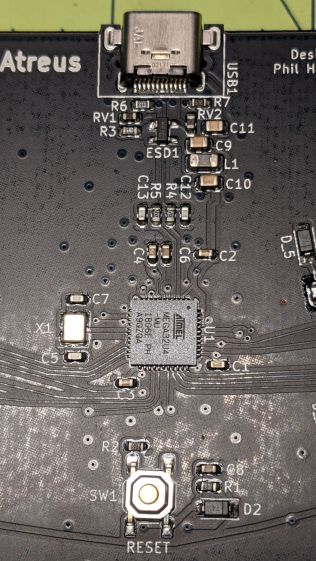
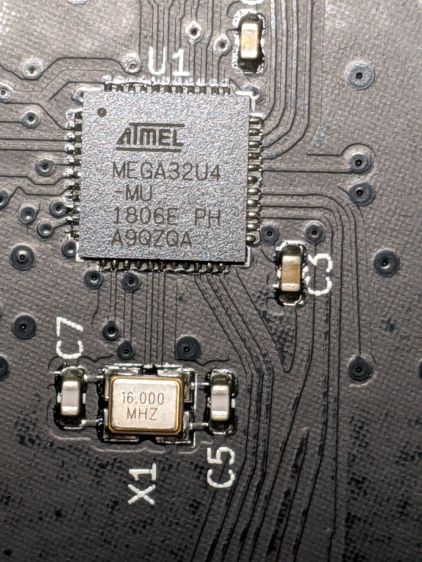
    The Atmel MEGA32U4 microcontroller runs a slightly customized version of QMK:

    Atreus keyboard - 32U4 - detail
    Atreus keyboard – 32U4 – detail

    Of interest is the JTAG header at the front center of the PCB:

    Atreus keyboard - JTAG header
    Atreus keyboard – JTAG header

    I have yet to delve into the code, but I think those signals aren’t involved with the key matrix and one might be available to drive an addressable RGB LED.

    For future reference, they’re tucked into the lower left corner of the chip (the mauled format comes from the original PDF):

    Atmel 32U4 - JTAG pins
    Atmel 32U4 – JTAG pins

    The alternate functions:

    • SCK = PB1
    • MOSI = PB2
    • MISO = PB3

    I don’t need exotic lighting, but indicating which key layer is active would be helpful.

    Love the key feel, even though I still haven’t hit the B key more than 25% of the time.

  • MOSFET Astable: NP-BX1 Rundown

    MOSFET Astable: NP-BX1 Rundown

    After eight months from a full charge, an old NP-BX1 lithium battery has come to this:

    Astable green - NP-BX1 - 2.31 V
    Astable green – NP-BX1 – 2.31 V

    The astable still ticks along at 1.4 seconds per blink, but the green LED barely lights up from a 2.1 V battery:

    Astable green - NP-BX1 - 12 mV 100 ohm
    Astable green – NP-BX1 – 12 mV 100 ohm

    A pulse of 12 mV across the 100 Ω resistor puts the LED current at a mere 120 µA: no wonder the poor thing wasn’t visible in ordinary room light.

    Another full charge restored its vigor for another couple of seasons.

  • Roadside Overgrowth: Life Finds a Way

    Roadside Overgrowth: Life Finds a Way

    A few years ago, this traffic splitter had a magnificent overgrowth goin’ on:

    Traffic splitter bushes - Vassar Rd at Pine Tree Dr - Streetview 2018-07
    Traffic splitter bushes – Vassar Rd at Pine Tree Dr – Streetview 2018-07

    Eventually, somebody (perhaps the NYS DOT) cut the bushes off at their bases and probably hit them with defoliant to keep them down:

    Traffic splitter stumps - Vassar Rd at Pine Tree Dr - 2020-11
    Traffic splitter stumps – Vassar Rd at Pine Tree Dr – 2020-11

    I don’t know that the stems cracked the concrete, but they surely eased the slabs apart.

    The signpost had a substantial bush at its base:

    Traffic splitter stumps - signpost - Vassar Rd at Pine Tree Dr - 2020-11
    Traffic splitter stumps – signpost – Vassar Rd at Pine Tree Dr – 2020-11

    It’s tough to keep civilization running ahead of Mother Nature

  • Privacy Preferences: Broken As Intended

    Privacy Preferences: Broken As Intended

    The Chase website seems to be fine, except:

    Chase Privacy Settings - not working
    Chase Privacy Settings – not working

    Huh.

    Follow the money: being a bank / credit card / fintech company, it’s safe to assume they sell your sensitive bits and have zero incentive to let you limit their actions in any way.

    A week later, that part of their site remains broken, presumably as intended.

  • Mini-lathe DRO Battery Lifetime

    Mini-lathe DRO Battery Lifetime

    It seems 390/389 alkaline button cells can power the mini-lathe’s DROs for about a year:

    Mini-lathe DRO battery replacement - 11 months
    Mini-lathe DRO battery replacement – 11 months

    Given that the replacement cells all come from the same batch, they’re aging on the shelf as well as in the DROs.

    Once again, I replaced both of them.

  • Epson R380 CISS Waste Ink Tank Replacement

    Epson R380 CISS Waste Ink Tank Replacement

    Transferring the printers to a new “server” provided an opportunity to dump another king’s ransom of waste ink down the drain, whereupon the tank cracked under finger pressure:

    Epson R380 - fractured CISS waste tank
    Epson R380 – fractured CISS waste tank

    The black smudge on the far side is an ink stain on adhesive left over from the hook-n-loop strip formerly holding it to the printer.

    It looks to be an ordinary polypropylene tube, nothing fancy, and, after a decade, it really doesn’t owe me anything.

    Scrounge a suitable bottle from one of the Big Boxes o’ Containers, run a bead of JB Weld Plasticbonder around the shoulder matching the discarded lid, jam on an original waste ink tank cap, and let the urethane goo cure while rotating slowly in the lathe to avoid unsightly dribbles:

    Epson R380 - DIY waste tank - epoxy curing
    Epson R380 – DIY waste tank – epoxy curing

    The goo surely won’t bond to the polyethylene bottle, but it’s likely better than anything else in my inventory. We shall see.

    Drill a hole for the hose, ignore the chips left inside the tank due to a sequence error, stick the original hook-n-loop tape in place, replace the drip-catcher rags, and install:

    Epson R380 - DIY waste tank - installed
    Epson R380 – DIY waste tank – installed

    The red silicone tape encourages the cap to remain in place against the urethane adhesive. One fewer endcap = one less seal.

    The cap need not be removable, as you just squeeze the tube slightly to squirt the aforementioned king’s ransom down the drain.

    It ought to last until I finally scrap out the printer.

  • CUPS Whoopsie

    CUPS Whoopsie

    No CUPS server setup can be considered complete without sending a print job to the wrong printer:

    HPLJ1200 - CUPS Pinball Panic - detail
    HPLJ1200 – CUPS Pinball Panic – detail

    Which wouldn’t be quite so bad if the printer weren’t ever so much faster than I am:

    HPLJ1200 - CUPS Pinball Panic - output pileup
    HPLJ1200 – CUPS Pinball Panic – output pileup

    It turns out an ordinary clothes iron can flatten those pages. Set it to “silk”, spread packing paper on the ironing board to intercept the toner, iron a few millimeters of pages at a time, and feed them back into the printer.

    Back in the day, laser-specific printer paper came with a grain arranged so it wouldn’t curl when you fed it into the printer with the proper side up. Those days are gone; I’ve tried both ways and they both curl.

    Protip: When CUPS thinks it’s done with the job and the Web interface shows nothing’s going on, it’s handed the job to the server’s printing subsystem, which continues spooling data to the printer. Choking off the bitstream requires one command-line invocation on the server connected to the printer:

    cancel -a
    

    A paper jam gives you enough time to figure all that out.