If you regard your new CNC 3018-Pro Router kit as a box of parts which could, with some adjustments and additional parts, become a small CNC router, you’re on the right track.
In my case, the aluminum extrusions arrived somewhat squashed inside their well-padded foam shipping carton, which leads me to believe the factory responsible for tapping the bolt holes in the ends must be a fairly nasty place. In any event, the hammerhead T-nuts for the gantry struts simply didn’t fit into some sections of the slots, although they worked fine elsewhere.
So, file a smidge off the rounded sides of a few nuts:
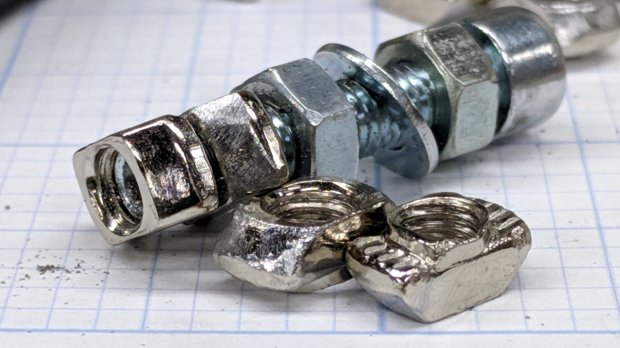
Which let them slide into place and rotate properly despite the bent channel:

The assembly instructions used a word I’d never encountered before:

Turns out ubiety is exactly correct, but … raise your hand if you’ve ever heard it in polite conversation. Thought so.
I’ve not noticed any harm from rounding off the position to 46 mm; just position both struts the same distance from the rear crossbar and it’s all good.
The struts behind the CAMTool CNC-V3.3 electronics board were also squashed, prompting a bit more filing:

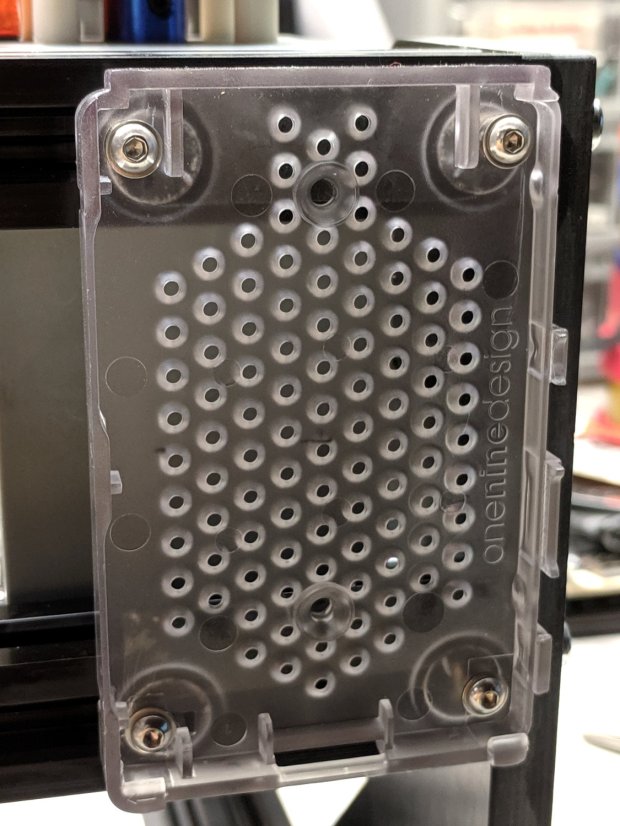
The CAMTool board is basically an Arduino-class microcontroller preloaded with GRBL 1.1f and surrounded with spindle / stepper driver circuits.
As with the MPCNC, I’ll dribble G-Code into it from a Raspberry Pi. Alas, the struts behind the CAMTool board are on 75 mm centers, but the Pi cases on hand have feet on 72-ish mm centers. Pay no attention to the surroundings, just drill the holes in the right spots:

Add more T-nuts and short button head screws, with rubber pads between the case and the struts:
It’s coming together!

Comments
10 responses to “CNC 3018-Pro: Assembly Tweaks”
I thought of my K40 laser engraver as a box of parts instead of expecting a turnkey working unit, which was the right approach with that unit as well. I also picked up a new vocabulary word (no, I’d never come across “ubiety” before either) from some strangely translated instructions, in this case an ultraviolet LED-based “counterfeit detection pen”, which would let me determine if currency was “stumer”, which also turns out to be a correct usage.
Does a 40 W CO₂ laser have sufficient grunt to cut 1/8 inch = 4 mm acrylic at a reasonable pace? I’d expect it to “engrave” a surface pattern well enough, but don’t have a good grasp of the power-vs-cutting-vs-speed tradeoff.
Is this your first post about this kit, or did I overlook some that I should go back and read?
How did you pick this particular model out of the different variants available? I’ve been wanting a desktop CNC mill and wasn’t aware that this was a thing yet; so I’m ready to place my order immediately and, from what I see, would make the same model selection that you did. But I’m interested to hear your thoughts.
This is new news; it arrived a while ago and I’ve finally gotten things kinda-sorta working. More writeups to come.
I intend to use it for engraving and maybe drag cutting, rather than even light-duty milling. Although it’s less bendy than the MPCNC, I’m sure there’s a reason the demo picture shows it milling a pink foam block. There’s no spindle speed control and no provision for a chuck, so it’s no good for drilling.
The package seems to be generically available from a bunch of low-end sellers; I picked Sainsmart / Genmitsu (“sold by Sainsmart Official”) because they seem reasonably sold. The fact that a mysterious $40 “coupon” appeared along with it clinched the deal, although I’m pretty sure I was the subject of an A/B test sequence. Got a pack of needle-nose D-bits I’ll likely never use, too.
Will you be circling back to making some cuts with this? I’m on the edge of my seat to hear whether it’s a low-capacity tool or just a toy!
If all goes well, I’ll use it as a drag engraver, not a router: no cutting. It has just enough work area to cover a CD, which is about all I need at the moment.
IMO, it’s little more than a toy: more rigid than the much larger MPCNC, less rigid than the Sherline. The spindle motor is an open-frame DC motor with a nice fan pulling air through the commutator, so you should expect a brief lifetime when exposed to even non-metallic swarf.
This sounds like not a good choice for milling prototype PCBs — one of the product photos — which is my primary interest. Would you concur or do you think it would drag okay for that?
I would inevitably attach a vacuum to pull away the nasties.
I think it could be made to work for that, with some effort & attention to detail.
The extruded aluminum platform isn’t a plane surface, so you’ll need auto-zero probe/adjust to compensate. I’m using a spring-loaded diamond drag tool, where ±0.2 mm isn’t a dealbreaker, but an end mill wouldn’t be nearly so forgiving.
Put it in a box with a vac hose on the rear wall, rather than try to attach the nozzle to the table or (worse) the XZ carriage. Maybe a really skinny hose would work on XZ, at the cost of lower flow and worse vac motor cooling.
I’m getting all compulsive with the motor current waveforms; the 24 V supply may be too much voltage, rather than the MPCNC’s too little 12 V supply.
[…] « CNC 3018-Pro: Assembly Tweaks […]
[…] CNC 3018-Pro router arrived with GRBL 1.1f installed on the Camtool V3.3 board and ran well enough, although it accelerated […]