The small patch of chain mail early in the M2’s PETG conversion had links with four threads along each bar:

Dropping the bars to 3.3 threads wide produced a slightly smaller patch:

The bars on the platform are 1.6 mm = 4 threads wide, because I’ve forced the thread width to 0.40 for that layer:
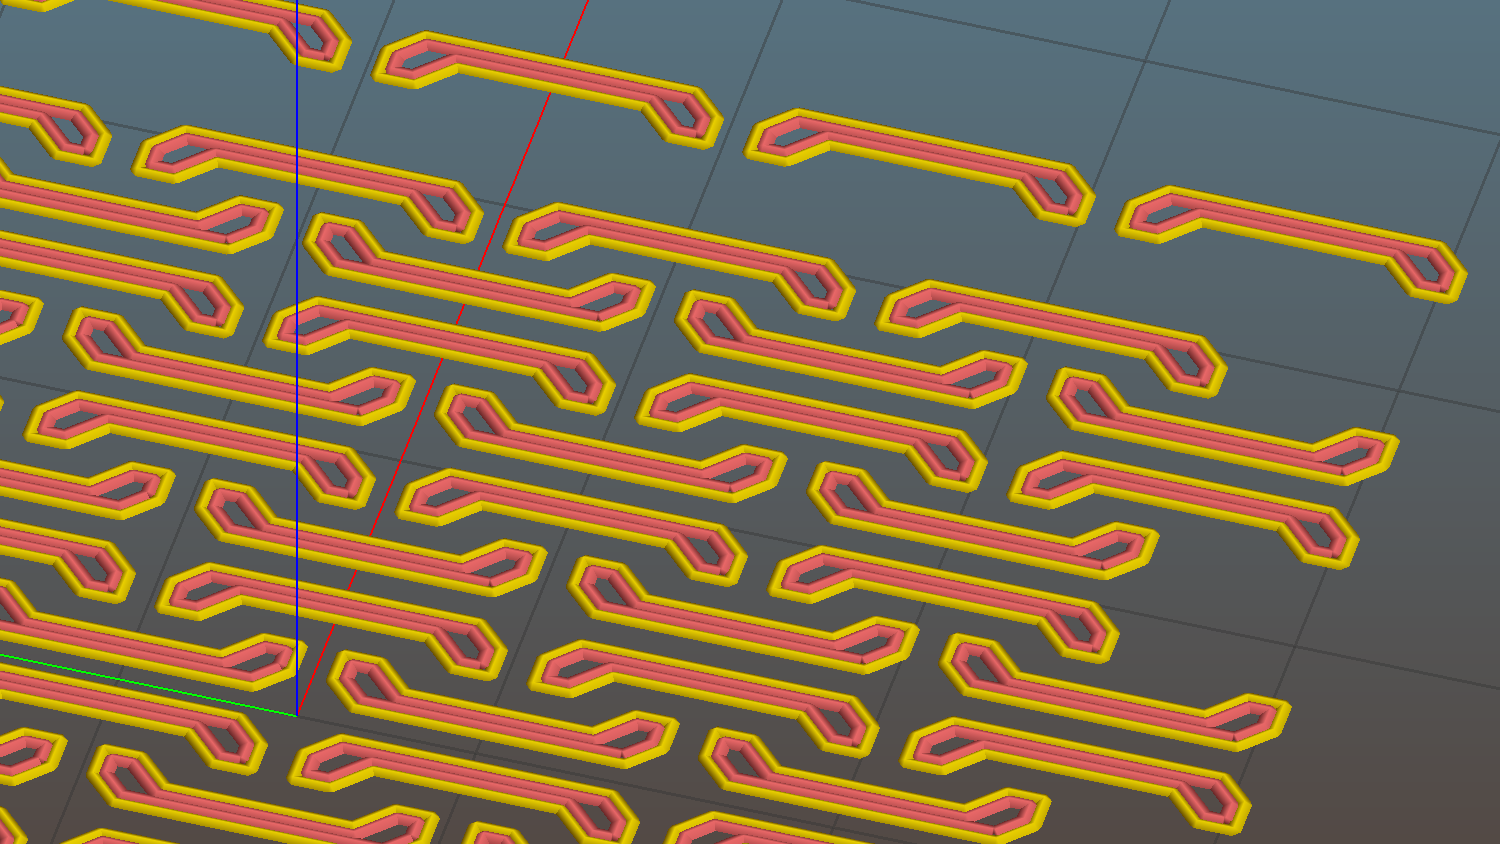
The remainder are closer to 1.4 mm = 3.3 threads, with the preview showing Slic3r allowed a narrow gap that doesn’t appear in real life:

What’s important about this is that the bridging worked perfectly: all the links emerged free of their neighbors and the patch flexed along both axes.

I tried this on one layer of Elmer’s White Glue, diluted 1:3 with water, and the links bonded firmly. I’d had some trouble with a few links popping off the usual hairspray after the first few layers, so I decided to try something different.
The fine hair strands have mostly Gone Away, perhaps due to using Concentric infill.
All in all, PETG looks pretty good, even if it’s just as hard to photograph as red PLA.
Update: You may prefer the source code as a GitHub gist.
The OpenSCAD source code:
// Chain Mail Armor Buttons
// Ed Nisley KE4ZNU - December 2014

Layout = "Build";			// Link Button LB Joiner Joiners Build PillarMod

//-------
//- Extrusion parameters must match reality!
//  Print with 1 shell and 2+2 solid layers

ThreadThick = 0.25;
ThreadWidth = 0.40;

HoleWindage = 0.2;

Protrusion = 0.1; 				// make holes end cleanly

function IntegerMultiple(Size,Unit) = Unit * ceil(Size / Unit);

//-------
// Dimensions

//- Set maximum sheet size

SheetSizeX = 55;	// 170 for full sheet on M2
SheetSizeY = 55;	// 230 ...

//- Diamond or rectangular sheet?

Diamond = false;					// true = rotate 45 degrees, false = 0 degrees for square

BendAround = "X";					// X or Y = maximum flexibility *around* designated axis

Cap = true;										// true = build bridge layers over links
CapThick = 4 * ThreadThick;						// flat cap on link: >= 3 layers for solid bridging

Armor = true && Cap;							// true = build armor button atop (required) cap
ArmorThick = IntegerMultiple(2.0,ThreadThick);	// height above cap surface

ArmorSides = 4;
ArmorAngle = true ? 180/ArmorSides : 0;			// true -> rotate half a side for best alignment

//- Link bar sizes

BarThick = 3 * ThreadThick;
BarWidth = 3.3 * ThreadWidth;

BarClearance = 4 * ThreadThick;		// vertical clearance above & below bars

VertexHack = 0;						// 0 = no, 1 = slightly reduce openings to avoid coincident vertices

//- Compute link sizes from those values

//- Absolute minimum base link: bar width + corner angle + build clearance around bars
//  rounded up to multiple of thread width to ensure clean filling
BaseSide = IntegerMultiple((4*BarWidth + 2*BarWidth/sqrt(2) + 3*(2*ThreadWidth)),ThreadWidth);

BaseHeight = 2*BarThick + BarClearance;           // both bars + clearance

echo(str("BaseSide: ",BaseSide," BaseHeight: ",BaseHeight));
//echo(str(" Base elements: ",4*BarWidth,", ",2*BarWidth/sqrt(2),", ",3*(2*ThreadWidth)));
//echo(str(" total: ",(4*BarWidth + 2*BarWidth/sqrt(2) + 3*(2*ThreadWidth))));

BaseOutDiagonal = BaseSide*sqrt(2) - BarWidth;
BaseInDiagonal = BaseSide*sqrt(2) - 2*(BarWidth/2 + BarWidth*sqrt(2));

echo(str("Outside diagonal: ",BaseOutDiagonal));

//- On-center distance measured along coordinate axis
//   the links are interlaced, so this is half of what you think it should be...

LinkOC = BaseSide/2 + ThreadWidth;

LinkSpacing = Diamond ? (sqrt(2)*LinkOC) : LinkOC;
echo(str("Base spacing: ",LinkSpacing));

//- Compute how many links fit in sheet

MinLinksX = ceil((SheetSizeX - (Diamond ? BaseOutDiagonal : BaseSide)) / LinkSpacing);
MinLinksY = ceil((SheetSizeY - (Diamond ? BaseOutDiagonal : BaseSide)) / LinkSpacing);
echo(str("MinLinks X: ",MinLinksX," Y: ",MinLinksY));

NumLinksX = ((0 == (MinLinksX % 2)) && !Diamond) ? MinLinksX + 1 : MinLinksX;
NumLinksY = ((0 == (MinLinksY % 2) && !Diamond)) ? MinLinksY + 1 : MinLinksY;
echo(str("Links X: ",NumLinksX," Y: ",NumLinksY));

//- Armor button base

ButtonHeight = BaseHeight + BarClearance + CapThick;
echo(str("ButtonHeight: ",ButtonHeight));

//- Armor ornament size & shape
//	 Fine-tune OD & ID to suit the number of sides...

TotalHeight = ButtonHeight + ArmorThick;
echo(str("Overall Armor Height: ",TotalHeight));

ArmorOD = 1.0 * BaseSide;						// tune for best base fit
ArmorID = 10 * ThreadWidth;						// make the tip blunt & strong

//-------

module ShowPegGrid(Space = 10.0,Size = 1.0) {

  RangeX = floor(95 / Space);
  RangeY = floor(125 / Space);

	for (x=[-RangeX:RangeX])
	  for (y=[-RangeY:RangeY])
		translate([x*Space,y*Space,Size/2])
		  %cube(Size,center=true);

}


//-------
// Create link with armor button as needed

module Link(Topping = false) {

LinkHeight = (Topping && Cap) ? ButtonHeight : BaseHeight;

render(convexity=3)
rotate((BendAround == "X") ? 90 : 0)
	rotate(Diamond ? 45 : 0)
		union() {
			difference() {
				translate([0,0,LinkHeight/2])									// outside shape
					intersection() {
						cube([BaseSide,BaseSide,LinkHeight],center=true);
						rotate(45)
							cube([BaseOutDiagonal,BaseOutDiagonal,(LinkHeight + 2*Protrusion)],center=true);
					}

				translate([0,0,(BaseHeight + BarClearance + 0*ThreadThick - Protrusion)/2])
					intersection() {											// inside shape
						cube([(BaseSide - 2*BarWidth),
								(BaseSide - 2*BarWidth),
								(BaseHeight + BarClearance + 0*ThreadThick + VertexHack*Protrusion/2)],
								center=true);
						rotate(45)
							cube([BaseInDiagonal,
									BaseInDiagonal,
									(BaseHeight + BarClearance + 0*ThreadThick + VertexHack*Protrusion/2)],
									center=true);
					}

				translate([0,0,((BarThick + 2*BarClearance)/2 + BarThick)])		// openings for bars
					cube([(BaseSide - 2*BarWidth - 2*BarWidth/sqrt(2) - VertexHack*Protrusion/2),
						(2*BaseSide),
						BarThick + 2*BarClearance - Protrusion],
						center=true);

				translate([0,0,(BaseHeight/2 - BarThick)])
					cube([(2*BaseSide),
						(BaseSide - 2*BarWidth - 2*BarWidth/sqrt(2) - VertexHack*Protrusion/2),
						BaseHeight],
						center=true);

			}

 			if (Topping && Armor)
				translate([0,0,(ButtonHeight - Protrusion)])		// sink slightly into the cap
					rotate(ArmorAngle)
					cylinder(d1=ArmorOD,d2=ArmorID,h=(ArmorThick + Protrusion), $fn=ArmorSides);
		}

}


//-------
// Create split buttons to join sheets

module Joiner() {

	translate([-LinkSpacing,0,0])
		difference() {
			Link(false);
			translate([0,0,BarThick + BarClearance + TotalHeight/2 - Protrusion])
				cube([2*LinkSpacing,2*LinkSpacing,TotalHeight],center=true);
		}

	translate([LinkSpacing,0,0])
		intersection() {
			translate([0,0,-(BarThick + BarClearance)])
				Link(true);
			translate([0,0,TotalHeight/2])
				cube([2*LinkSpacing,2*LinkSpacing,TotalHeight],center=true);
		}

}


//-------
// Build it!

//ShowPegGrid();

if (Layout == "Link") {
	Link(false);
}

if (Layout == "Button") {
	Link(true);
}

if (Layout == "LB") {
	color("Brown") Link(true);
	translate([LinkSpacing,LinkSpacing,0])
		color("Orange") Link(false);
}

if (Layout == "Build")
	for (ix = [0:(NumLinksX - 1)],
		 iy = [0:(NumLinksY - 1)]) {
			x = (ix - (NumLinksX - 1)/2)*LinkSpacing;
			y = (iy - (NumLinksY - 1)/2)*LinkSpacing;
			translate([x,y,0])
			color([(ix/(NumLinksX - 1)),(iy/(NumLinksY - 1)),1.0])
				if (Diamond)
					Link((ix + iy) % 2);					// armor at odd,odd & even,even points
				else
					if ((iy % 2) && (ix % 2))				// armor at odd,odd points
                        Link(true);
					else if (!(iy % 2) && !(ix % 2))		// connectors at even,even points
						Link(false);
	}

if (Layout == "Joiner")
	Joiner();

if (Layout == "Joiners") {
	NumJoiners = max(MinLinksX,MinLinksY)/2;
	for (iy = [0:(NumJoiners - 1)]) {
		y = (iy - (NumJoiners - 1)/2)*2*LinkSpacing + LinkSpacing/2;
		translate([0,y,0])
			color([0.5,(iy/(NumJoiners - 1)),1.0])
				Joiner();
	}
}

if (Layout == "PillarMod")					// Slic3r modification volume to eliminate pillar infill
	translate([0,0,(BaseHeight + BarClearance)/2])
		cube([1.5*SheetSizeX,1.5*SheetSizeY,BaseHeight + BarClearance],center=true);