The Smell of Molten Projects in the Morning

Ed Nisley's Blog: Shop notes, electronics, firmware, machinery, 3D printing, laser cuttery, and curiosities. Contents: 100% human thinking, 0% AI slop.

Tag: Repairs

If it used to work, it can work again

  • 60 kHz Preamp: Power LED Resistor Oops

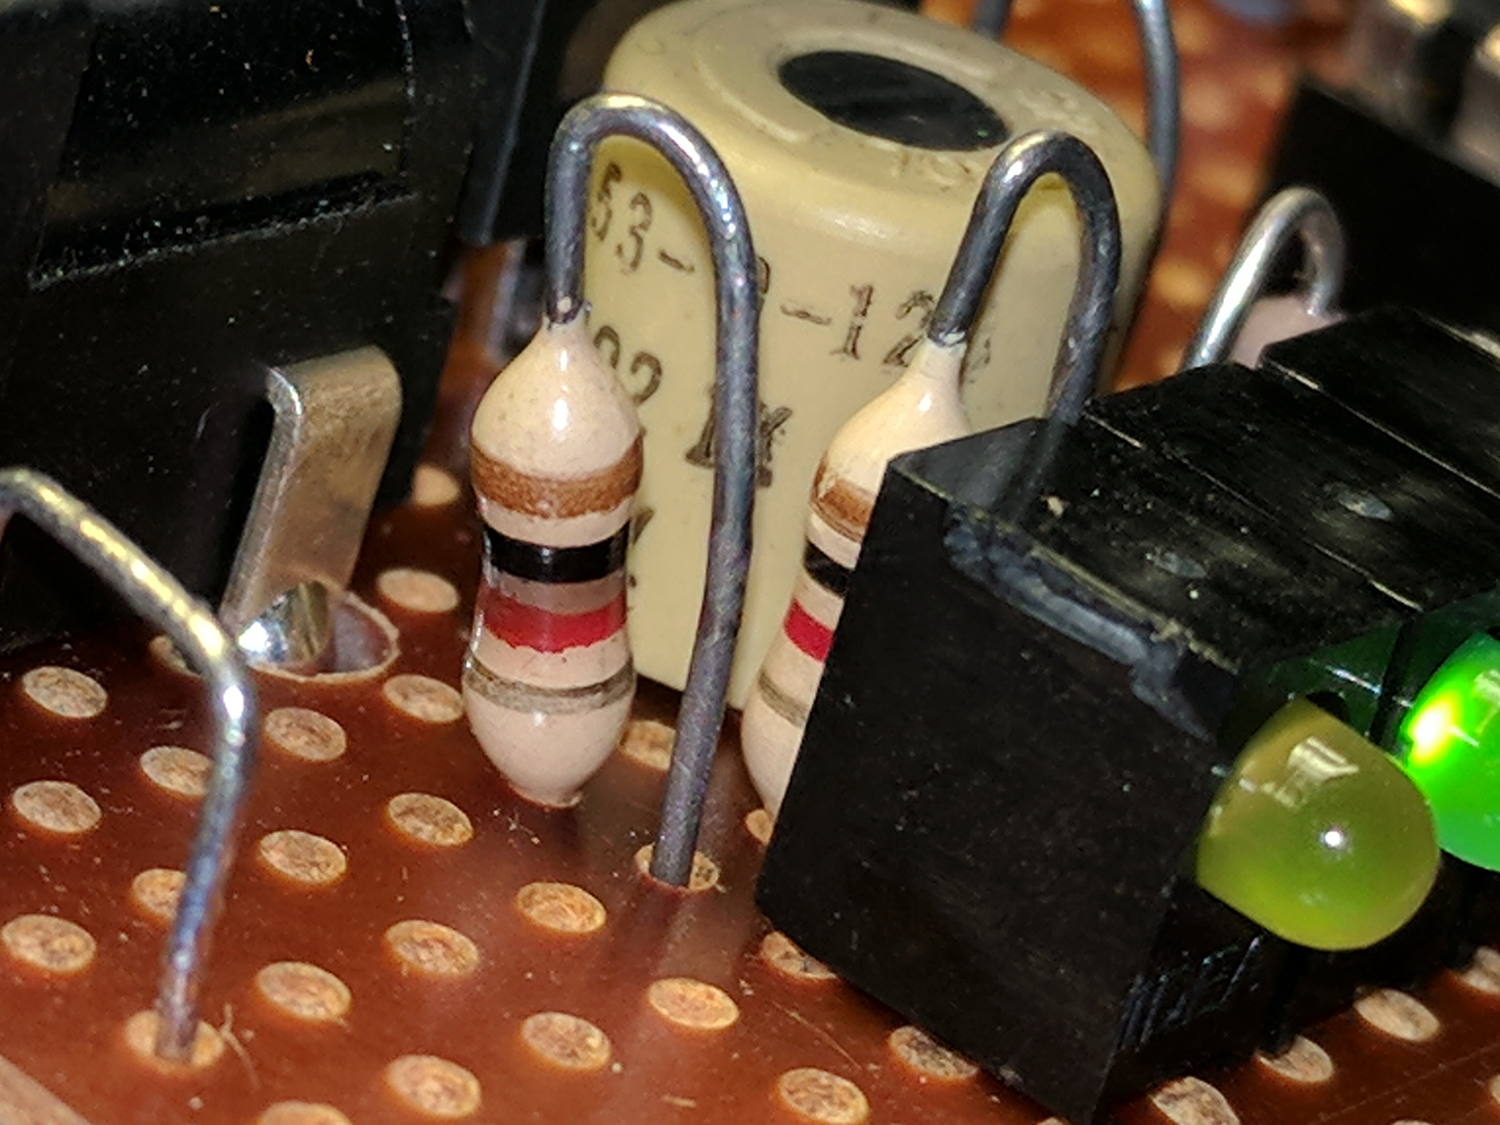
    I eventually noticed the yellow LED indicating +24 V input from the power supply (previously, a noisy wall wart) was dark. Poking around revealed I’d inadvertently installed a 1 kΩ ballast resistor:

    LF Preamp - burned power-on LED resistor
    LF Preamp – burned power-on LED resistor

    A 1/4 W resistor can’t dissipate half a watt for very long, as shown by the discolored circuit board around the leads and the faint smell of electrical death in the area.

    I swapped in a 3.3 kΩ resistor, the yellow LED lit up for a few seconds, then went dark again. This time, the LED was dead; apparently, it’d been overstressed for long enough to fail. I can’t be too annoyed.

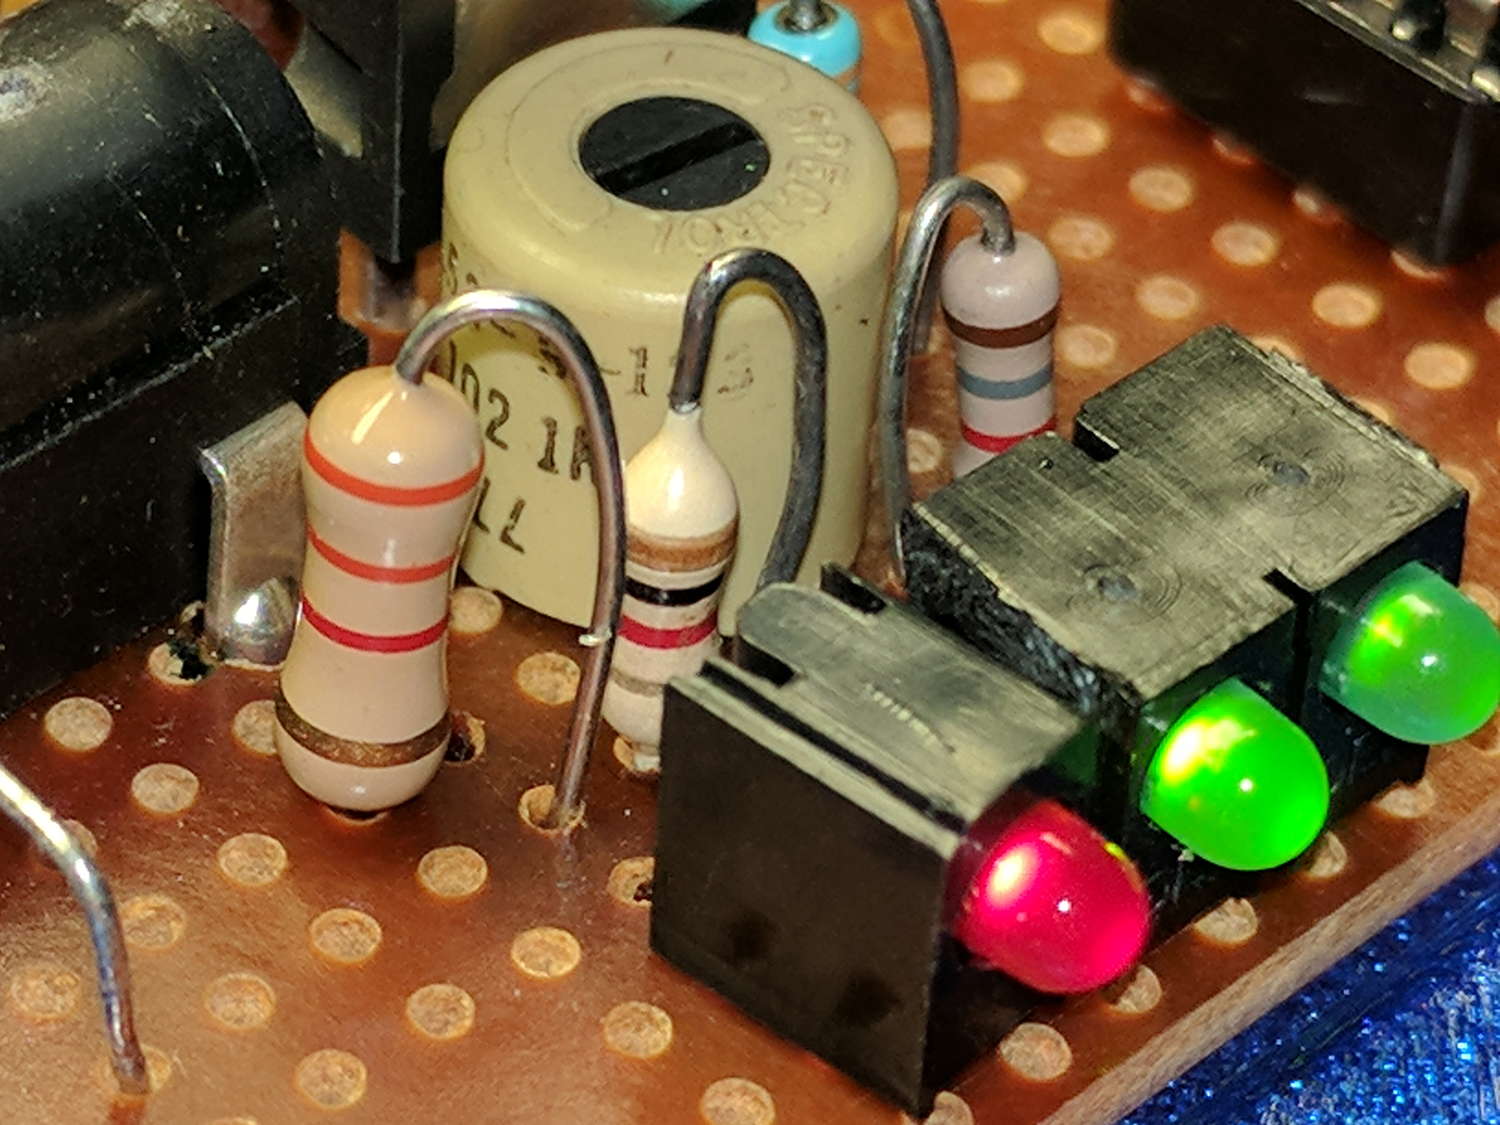
    Unfortunately, replacing the LED required removing the entire housing with all three LEDs, chopping off the defunct block, reinstalling the attenuated block with the two green LEDs, installing a similar red LED, and finally installing a nice 3.3 kΩ half-watt resistor:

    Power LED - Red with 0.5 W resistor
    Power LED – Red with 0.5 W resistor

    So it goes …

  • 60 kHz Preamp: Power Supply Noise

    This took entirely too long to figure out:

    Ground noise - 24 VDC wall wart - probe on gnd lug
    Ground noise – 24 VDC wall wart – probe on gnd lug

    That’s with the scope probe ground clip connected to the wall wart coax connector barrel and the scope probe tip on the ground clip. It’s not the noise on the 24 VDC supply, it’s the noise injected into the ground connection!

    Huh. Makes it tough to sort out low-level signals, it does indeed.

    Consider one of my bench power supplies at 24 V:

    Ground noise - bench supply 24 V - probe on gnd lug
    Ground noise – bench supply 24 V – probe on gnd lug

    Nice & quiet, the way power should be. One might quibble about the residual noise, but at least it’s not blasting out horrific bursts at 120 Hz.

    For completeness, the PCB inside the offending SMAKN 24 V wall wart:

    SMAKN 24 VDC wart - PCB
    SMAKN 24 VDC wart – PCB

    “High Quality Commercial Grade” my aching eyeballs.

    [Update: Edits based on eagle-eyed observations in the comments. ]

    Not as many missing components as I expected, though, if the truth be told. The missing transformer common-mode choke seems odd and, AFAICT, the resistor inductor angling out from the R1 callout doesn’t connect to anything, connects directly to the AC line because  C5 is missing and the pad joining them doesn’t go anywhere else it replaces the jumper (?) to the bottom-left pad and the missing parts. The red LED in the upper right isn’t visible through the black case, although it might serve as a voltage regulator.

    Over on the far right, beyond the transformer and between the two capacitor cans, is a component marked C9 with an oddly angled part. Seen from the other end, it’s a ferrite bead:

    SMAKN 24 VDC wart - output ferrite
    SMAKN 24 VDC wart – output ferrite

    I don’t know why that spot has an inductor symbol with a capacitor part callout.

    The other side of the PCB looks clean:

    SMAKN 24 VDC wart - PCB solder side
    SMAKN 24 VDC wart – PCB solder side

    It’ll probably serve well in a noise-tolerant application, maybe an LED power supply.

    As pointed out in the comments, there’s a UL mark:

    SMAKN 24 VDC wart - label
    SMAKN 24 VDC wart – label

    Not sure what I’ll replace it with, although a small 24 V power supply brick may suffice.

  • Google Pixel XL: Google Play Services Phone Number Update

    This notification appeared every day after I got my shiny-new / soon-to-be-obsolete Google Pixel XL:

    Screenshot_20170906-085931 - Update Your Phone Number - detail
    Screenshot_20170906-085931 – Update Your Phone Number – detail

    Fast-forward through nearly a month of doing the obvious things to no avail:

    • Tap the notification to update my phone number
    • Update my phone number from Firefox on the Pixel
    • Update my phone number from Firefox on my desktop
    • Ditto, from Chromium
    • Just dismiss the notification, repeatedly
    • Change my phone number in various Google places
    • Ditto, in various ways

    Searching on the obvious keywords provided very few hits and none with a resolution. I followed one suggestion to flush the Google Play and Google Play Services caches, to no visible effect.

    So I started a chat with Google Support by coredumping the entire list of Things Already Tried. After ten minutes of pleasantries, mostly spent idling while Holmes (great name for a tech support guy) read my coredump (and, most likely, timeshared a dozen other support chats), this transpired:

    11:36:01​ ​ Holmes:​ ​ I ​ ​ see​ ​ that​ ​ you’ve​ ​ tried​ ​ almost​ ​ all​ ​ the​ ​ things​ ​ to​ ​ get​ ​ rid​ ​ of​ ​ the​ ​ notification​ ​ for​ ​ Google​ ​ play services.
    11:36:05​ ​ Holmes:​ ​ Is​ ​ that​ ​ right?
    11:36:57​ ​ Ed​ ​ Nisley:​ ​ It’s​ ​ everything​ ​ I ​ ​ could​ ​ think​ ​ of,​ ​ plus​ ​ a ​ ​ bit​ ​ of​ ​ searching​ ​ the​ ​ usual​ ​ forums.​ ​ A ​ ​ few​ ​ other folks​ ​ have​ ​ the​ ​ same​ ​ problem,​ ​ but​ ​ none​ ​ have​ ​ a ​ ​ resolution.
    11:38:04​ ​ Holmes:​ ​ Sure,​ ​ I ​ ​ understand​ ​ that.​ ​ Please​ ​ don’t​ ​ worry​ ​ at​ ​ all,​ ​ we’ve​ ​ a ​ ​ dedicated​ ​ team​ ​ of​ ​ experts​ ​ for Play​ ​ related​ ​ concern.​ ​ I’m​ ​ from​ ​ hardware​ ​ nexus​ ​ Support​ ​ team.
    11:38:15​ ​ Holmes:​ ​ I’d​ ​ connect​ ​ you​ ​ directly​ ​ with​ ​ them.

    I’ve never gotten to Level 2 that fast in my entire life!

    Fifteen minutes later (again, mostly his reading & timesharing):

    11:54:37​ ​ Calvin​ ​ S:​ ​ The​ ​ issue​ ​ might​ ​ be​ ​ due​ ​ to​ ​ some​ ​ residual​ ​ files​ ​ that​ ​ might​ ​ hinder​ ​ the​ ​ download​ ​ process.
    Lets​ ​ try​ ​ to​ ​ clear​ ​ cache​ ​ of​ ​ Google​ ​ Play​ ​ Store,​ ​ to​ ​ see​ ​ if​ ​ the​ ​ issue​ ​ can​ ​ be​ ​ resolved.
    11:55:06​ ​ Calvin​ ​ S:​ ​ I ​ ​ can​ ​ help​ ​ you​ ​ with​ ​ the​ ​ steps,​ ​ if​ ​ you​ ​ want​ ​ to.
    11:55:10​ ​ Ed​ ​ Nisley:​ ​ As​ ​ I ​ ​ said​ ​ in​ ​ the​ ​ initial​ ​ description,​ ​ I’ve​ ​ already​ ​ done​ ​ that.
    11:55:39​ ​ Calvin​ ​ S:​ ​ I ​ ​ appreciate​ ​ your​ ​ efforts​ ​ to​ ​ fix​ ​ this​ ​ issue.
    11:56:08​ ​ Ed​ ​ Nisley:​ ​ Blew​ ​ away​ ​ all​ ​ the​ ​ caches​ ​ for​ ​ anything​ ​ to​ ​ do​ ​ with​ ​ Google​ ​ Play​ ​ anything!
    11:56:20​ ​ Calvin​ ​ S:​ ​ Could​ ​ you​ ​ please​ ​ let​ ​ me​ ​ know,​ ​ what​ ​ all​ ​ troubleshooting​ ​ steps​ ​ you​ ​ have​ ​ tried?
    11:57:05​ ​ Ed​ ​ Nisley:​ ​ Did​ ​ you​ ​ read​ ​ the​ ​ initial​ ​ description​ ​ I ​ ​ sent​ ​ to​ ​ start​ ​ this​ ​ chat?​ ​ Took​ ​ Holmes​ ​ five​ ​ minutes to​ ​ chew​ ​ through​ ​ it.
    11:58:11​ ​ Calvin​ ​ S:​ ​ I ​ ​ see​ ​ that​ ​ you​ ​ have​ ​ cleared​ ​ cache​ ​ of​ ​ Play​ ​ services.
    11:58:50​ ​ Calvin​ ​ S:​ ​ Let​ ​ us​ ​ uninstall​ ​ updates​ ​ for​ ​ the​ ​ Play​ ​ Store​ ​ app​ ​ Play​ ​ Store​ ​ and​ ​ Google​ ​ Play​ ​ Services.

    At which point it became obvious I was going to spend the rest of the day dinking around:

    12:00:58​ ​ Ed​ ​ Nisley:​ ​ Given​ ​ that​ ​ this​ ​ notification​ ​ appears​ ​ in​ ​ the​ ​ morning,​ ​ doing​ ​ this​ ​ step​ ​ by​ ​ step​ ​ will​ ​ take days.​ ​ Give​ ​ me​ ​ a ​ ​ list​ ​ of​ ​ everything​ ​ you​ ​ will​ ​ suggest​ ​ so​ ​ I ​ ​ can​ ​ do​ ​ it​ ​ without​ ​ wasting​ ​ hours​ ​ typing​ ​ at​ ​ you.
    12:02:22​ ​ Calvin​ ​ S:​ ​ Respecting​ ​ your​ ​ time,​ ​ I’ll​ ​ follow​ ​ up​ ​ with​ ​ you​ ​ over​ ​ an​ ​ email​ ​ with​ ​ all​ ​ the​ ​ possible troubleshooting​ ​ steps.

    The “troubleshooting steps” look like a generic list of progressively more desperate measures applicable to any mysterious Android problem:

    Clear app data for the Play Store

    Go to Settings > Apps.
    Tap Google Play Store > Storage > Clear data > Ok.
    At the top left, tap the Back arrow to go to the “App info” screen.
    At the top right, tap More (3 dots) > Uninstall updates > Ok > Ok to restore the app to its factory version.
    Note: The Play Store will update automatically within 48 hours. If “Uninstall updates” is dimmed, you can skip this step.
    Note: If you’ve changed the Google Play Store app settings (content filters, password protection, etc.), you’ll need to set them up again.

    Clear the app data of Google Play services

    Warning: Clearing the app data of Google Play services can reset settings, affect app performance, and cause unpredictable behavior across the device.

    Go to Settings > Apps or Application Manager.
    At the top right, tap More (3 dots) > Show system apps (on Android versions lower than 6.0, go to All instead).
    Tap Google Play services.
    Note: If you don’t see “Google Play services,” check Show all system apps and make sure that both Google Play Framework and Google Play Services are enabled. ​​If they aren’t enabled, download the Google Play Service from Play Store.
    Tap Storage > Clear cache.
    Then tap Manage Space > Clear All Data > Ok.

    After completing this step, you should check the settings on your apps to see if they’re still configured correctly.

    Remove and re-add your Google Account

    Note: This may reset settings and remove in-app content. However, your purchases and synced data (Gmail, Google contacts, etc.) are tied to your account and will be available after re-adding your account.

    Go to Settings > Accounts > Google.
    Tap the name of the account you wish to remove.
    Important: Make sure you remember your account password. You’ll need it to sign back in to your account.
    At the top right, tap More (3 dots) > Remove account > Remove account.
    At the top left, tap the Back arrow > Add account > Google.
    Sign in to your Google Account.

    Uninstall and reinstall Play Store updates

    Temporarily uninstalling updates to the Google Play Store app can help fix some issues.

    To revert the Play Store app to the previous version:

    Go to Settings.
    Tap Apps or Application manager (depending on the device).
    Tap Google Play Store (depending on the device, you may need to go to All).
    Tap on the menu button, and then Uninstall updates.
    If the Uninstall updates button isn’t available, skip the rest of this step and continue troubleshooting.
    When prompted to change the Play Store app back to the factory version, tap OK.
    Go back to the device’s home screen and relaunch the Play Store. Your Play Store app should update to the latest version within a few minutes.
    If the Play Store app doesn’t update, tap on the menu button from within the app and go to Settings. Scroll down until you see Play Store Version. Tap on that to check for an update. If none is available, continue to the next step.

    Uninstall updates for Google Play Services

    Go to Settings.
    Tap Apps or Application manager (depending on the device).
    Tap Google Play Services (depending on the device, you may need to go to All).
    Tap on the menu button, and then Uninstall updates.
    If the Uninstall updates button isn’t available, skip the rest of this step and continue troubleshooting.
    When prompted to change the Play Store app back to the factory version, tap OK.

    Reset your device to factory settings

    If you’d like help with resetting your device, contact us from another device and we’ll walk you through it.

    To reset your device:

    If you have an SD card, remove it to save the data on the card.
    Reset your Android device to factory settings.
    Sign in to your device with a Google Account that was signed in before the reset.
    If you removed an SD card, reinsert it.

    To reload your apps and data:

    Open the Play Store app.
    Tap the Menu (3 lines) > My apps & games > Library.
    Next to the apps that you’d like to install, tap Install or Enable.

    If the issue still persist after performing all the troubleshooting steps I request you to reply to this email with the screenshot.

    As it turned out, blowing away “the app data of the Google Play services” did the trick; the notification Went Away and hasn’t returned.

    I hope I never need that information again …

  • Tour Easy Headset Wrench

    The headset on my Tour Easy ‘bent worked its way loose, which led to a disturbing discovery: the headset wrench I made from a discarded flat wrench vanished with the shop tools donated to MakerSmiths.

    Fortunately, we live in the future:

    Tour Easy Headset Wrench - Slic3r preview
    Tour Easy Headset Wrench – Slic3r preview

    A thin plastic wrench is absolutely no good for torquing down the locknut, but that’s not what it’s for. Adjust the bearing race to the proper preload with this wrench, hold it in place, then torque the locknut with the BFW.

    The OpenSCAD source code as a GitHub Gist:

    // Tour Easy Headset Wrench
    // Ed Nisley KE4ZNU – September 2017
    /* [Extrusion] */
    ThreadThick = 0.25; // [0.20, 0.25]
    ThreadWidth = 0.40; // [0.40]
    function IntegerMultiple(Size,Unit) = Unit * ceil(Size / Unit);
    Protrusion = 0.01; // [0.01, 0.1]
    HoleWindage = 0.2;
    //- Sizes
    /* [Dimensions] */
    WrenchSize = 32.0; // headset race across-the-flats size
    NumFlats = 8;
    JawWidth = 10.0;
    JawOD = 2*JawWidth + WrenchSize;
    echo(str("Jaw OD: ",JawOD));
    StemOD = 23.0;
    WrenchThick = 5.0;
    HandleLength = 2*JawOD;
    HandleWidth = 25.0;
    //- Build things
    difference() {
    linear_extrude(height=WrenchThick,convexity=4) {
    hull() { // taper wrench body to handle
    circle(d=JawOD);
    translate([0.75*JawOD,0,0])
    circle(d=HandleWidth);
    }
    hull() { // handle
    translate([0.75*JawOD,0,0])
    circle(d=HandleWidth);
    translate([HandleLength,0,0])
    circle(d=HandleWidth);
    }
    }
    translate([0,0,-Protrusion])
    rotate(1*180/NumFlats) { // cosine converts across-flats to circle dia
    cylinder(d=WrenchSize/cos(180/NumFlats),h=(WrenchThick + 2*Protrusion),$fn=NumFlats);
    }
    translate([-StemOD,0,WrenchThick/2])
    cube([2*StemOD,StemOD,(WrenchThick + 2*Protrusion)],center=true);
    translate([WrenchSize,0,WrenchThick – 3*ThreadThick])
    linear_extrude(3*ThreadThick + Protrusion,convexity=10)
    text(text=str("TE Headset"),size=8,spacing=1.20,font="Arial",halign="left",valign="center");
    }

    Now, I’d like to say that was easy, but in actual point of fact …

    First, I forgot to divide by cos(180/6) to convert the across-the-flats size to the diameter of OpenSCAD’s circumscribed hexagon-as-circle, which made the wrench uselessly small:

    Tour Easy Headset Wrench - v1
    Tour Easy Headset Wrench – v1

    If you have a 28 mm nut with low torque requirements, though, I’ve got your back.

    While I had the hood up, I slenderized the handle into a much shapelier figure:

    Tour Easy Headset Wrench
    Tour Easy Headset Wrench

    Trotting off to the garage with a warm plastic wrench in hand, I discovered the blindingly obvious fact that the headset nuts have eight sides. On the upside, the number of sides became a parameter, so, should you happen to need a five-sided wrench (perhaps on Mars), you can have one.

    So, yeah, it’s rapid prototyping in full effect:

    Tour Easy Headset Wrench Iterations
    Tour Easy Headset Wrench Iterations

    Remember, kids, never design while distracted …

  • 60 kHz Tuning Fork Resonator: Maximum Overdrive

    Datasheets loosely associated with the tuning fork resonators in hand suggest 1 μW maximum drive power, which works out to maybe 100 mVrms = 150 mVpk at about 10 kΩ ESR. If you inadvertently apply 500 mVpk = 375 mVrms, the resulting 14 μW does this:

    Broken 60 kHz Tuning Fork Resonator - overview
    Broken 60 kHz Tuning Fork Resonator – overview

    I was applying a precisely tuned 60 kHz sine wave to the first pass at a crystal filter grafted onto the loop antenna preamp and wasn’t paying attention to the amplitude. For all I know, though, the poor thing died from a power-on transient. I’m pretty sure I didn’t break it during extraction, because it stopped being a resonator while in the circuit.

    The missing tine fell out of the can:

    Broken 60 kHz Tuning Fork Resonator - tine detail
    Broken 60 kHz Tuning Fork Resonator – tine detail

    Laser trim scars form a triangle near the tip, a T a bit further down, a slot just above the nicely etched gap.

    A closer look at the fractured base:

    Broken 60 kHz Tuning Fork Resonator - detail
    Broken 60 kHz Tuning Fork Resonator – detail

    The metalization appears black here and gold in person.

    So, yeah, one down and 49 to go …

  • Amazon Packaging: PAR30 LED Bulb

    The second incandescent bulb over the kitchen sink popped and a replacement LED bulb arrived with the by-now-familiar homeopathic Amazon padding:

    Amazon Packaging - Satco LED bulb
    Amazon Packaging – Satco LED bulb

    Turns out the new bulb is slightly brighter than the old one:

    Satco S9415 LED PAR30 bulbs
    Satco S9415 LED PAR30 bulbs

    Oh, and it’s three bucks cheaper, too.

    Eyeballometrically, 5% makes no difference whatsoever, even in a side-by-side comparison.

    Life is good.

  • Eyeglasses: New Nose Pads

    A stray nose pad appeared on the kitchen floor and, after some investigation, it corresponded with the stub in Mary’s oldest reading glasses. Some rummaging in the Bag o’ Eyeglass Stuff produced a similar pair of pads:

    Glasses - missing nose pad
    Glasses – missing nose pad

    Although the lenses have become somewhat scuffed over the years, masking the optics with Parafilm is always Good Practice:

    Glasses - new nose pads - masked
    Glasses – new nose pads – masked

    The split boxes clamped around the pad stems required a bit of delicate opening-up with a utility knife blade before the new ones pressed firmly into place.

    This was significantly easier than the Silhouette frame repair!