The Smell of Molten Projects in the Morning

Ed Nisley's Blog: Shop notes, electronics, firmware, machinery, 3D printing, laser cuttery, and curiosities. Contents: 100% human thinking, 0% AI slop.

Category: Recumbent Bicycling

Cruisin’ the streets

  • HT GPS + Audio: Battery Pack Contacts the CNC Way

    Flattening the screw head
    Flattening the screw head

    Faced with the daunting prospect of converting half a dozen 4-40 brass screws into battery contacts by hand filing, I did what I should have done in the first place: turn it into a CNC project.

    It’s quick-n-easy:

    • mill the head flat and 0.5 mm thick
    • shave off the sides

    I grabbed the screw in the Sherline vise, touched off XY on the head (close enough to being concentric for this purpose), and touched off Z on the nut supporting the screw. For the next few, I’ll eyeball the Z touchoff at the bottom of the head, rather than the nut, because the heads don’t quite sit flush on the nut.

    They dropped right into place, without any filing or fiddling! Well, the second one did. I had to tweak the dimensions slightly to make the answer come out right. But that’s one of the advantage of hammering out simple G-Code like this: change two lines and wham you’re done.

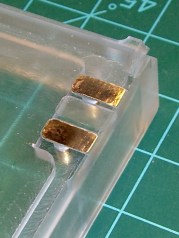
    Contacts in place
    Contacts in place

    The heads show some tool marks, but that’ll just make the silver solder stick better. Right?

    Herewith, the G-Code…

    (ICOM IC-Z1A battery pack shell)
    (Battery pack contacts)
    (Ed Nisley - KE4ZNU - June 2010)
    (Vise clamping on threads, XY orgin on central axis, Z=0 at *bottom* of screw head)
    (Tool table used just for Axis previews and to activate "manual" changer via M6)
    (Tool change @ G30 position above length probe)
    
    (-- Global dimensions & locations)
    
    #<_Traverse_Z> =        5.0
    #<_Cutting_Z> =            0.0
    
    (-- Get started ...)
    
    G40 G49 G54 G80 G90 G92.1 G94 G97 G98        (reset many things)
    
    M5
    (msg,Verify XY=0 on screw axis)
    M0
    
    (msg,Verify tool touched off at Z=0 on *bottom* of head)
    M0
    
    (debug,Verify vise clearance around head)
    M0
    
    #<Contact_Width> =        4.1            (X axis metallic contact - minus a smidge)
    #<Contact_Head_Dia> =    5.5            (recess for 4-40 head)
    #<Contact_Head_Radius> = [#<Contact_Head_Dia> / 2]
    
    #<Contact_Head_Depth> =    0.7            (recess depth - plus  smidge)
    
    #<Mill_Dia> =            1.98            (end mill diameter)
    #<Tool_Num> =            20
    #<Mill_Radius> =        [#<Mill_Dia> / 2]
    #<Mill_RPM> =            5000
    #<Mill_Feed> =             50
    
    (debug,Verify #<Mill_Dia> mm end mill)
    M0
    
    (debug,Set spindle to #<Mill_RPM>)
    M0
    
    F#<Mill_Feed>
    
    (--- Flatten the head)
    
    G0 Z#<_Traverse_Z>
    
    #<X_Step> = [0.5 * #<Mill_Dia>]
    #<X_Limit> = [3 * #<Mill_Radius>]
    #<Y_Limit> = [#<Contact_Head_Radius> + #<Mill_Radius>]
    
    #<X_Coord> = [0 - #<X_Limit>]
    
    G0 X#<X_Coord> Y[0 - #<Y_Limit>]
    G0 Z#<Contact_Head_Depth>
    
    O<Head_Trim> DO
    
    G1 Y#<Y_Limit>
    #<X_Coord> = [#<X_Coord> + #<X_Step>]
    G1 X#<X_Coord>
    G1 Y[0 - #<Y_Limit>]
    #<X_Coord> = [#<X_Coord> + #<X_Step>]
    G1 X#<X_Coord>
    
    O<Head_Trim> WHILE [#<X_Coord> LT [3 * #<Mill_Radius>]]
    
    G0 Z#<_Traverse_Z>
    
    (--- Trim the sides)
    
    #<Arc_Radius> = [#<Contact_Head_Radius>]
    #<Half_Width> = [#<Contact_Width> / 2]
    #<Angle> = ACOS [#<Half_Width> / #<Arc_Radius>]
    #<Half_Height> = [#<Arc_Radius> * SIN [#<Angle>]]
    
    G0 Z#<_Traverse_Z>
    
    G0 X[0 - #<Half_Width>] Y[0 - #<Contact_Head_Radius> - 3 * #<Mill_Dia>]
    G0 Z#<_Cutting_Z>
    
    G41.1 D#<Mill_Dia>
    G1 X[0 - #<Half_Width>] Y[0 - #<Half_Height>]
    
    G1 Y#<Half_Height>
    G2 X#<Half_Width> I[#<Half_Width>] J[-#<Half_Height>]
    G1 Y[0 - #<Half_Height>]
    G2 X[0 - #<Half_Width>] I[-#<Half_Width>] J[#<Half_Height>]
    G1 Y#<Half_Height>
    
    G0 Z#<_Traverse_Z>
    
    G40
    
    G30                    (back to tool change position)
    
    (msg,Done!)
    M2
    
  • HT GPS + Audio: Case Dimensions

    Having obtained eyeballometric measurements from the case, the next step was to doodle some shapes on graph paper and pencil in the dimensions. My motivation for not using CAD is simple: it’s easier (for me, at least) to doodle using a pencil.

    The outside of the case had pretty much the same features.

    Pack Layout - External
    Pack Layout – External

    The inside, of course, bore no resemblance to the battery pack; the shoulder and whatnot will support the circuit board.

    Pack Layout - Internal
    Pack Layout – Internal

    The original battle plan was to build the case in at least two layers, simply because it had to be so deep the Sherline couldn’t reach to the bottom with any rational end mill. It would probably make more sense to glue up four sides on a machined bottom, but that requires actual skill.

    This became the Front layer, with Front and Rear faces. The Rear layer attaches to the back of this one. In this picture, the Front layer is on the bottom, taped to the radio.

    ICOM IC-Z1A with GPS+Audio Interface
    ICOM IC-Z1A with GPS+Audio Interface

    The two layers peeled apart, with the Front layer to the right. You can barely see the internal shoulder and external tabs.

    Interface - top and bottom surfaces
    Interface – top and bottom surfaces
  • ICOM IC-Z1A and W-32A: BP-171 Battery Pack Dimensions

    Early on, I decided that the whole APRS + voice interface for our bikes had to fit on the back of the radio, which meant it had to look a lot like a BP-171 battery pack. The first step was to get all the relevant dimensions from an existing pack.

    I laid a (rebuilt) pack on the scanner and took its picture. There’s a lip on the bottom (top in the image), so I held it level with the end of the calipers you can see near the bottom. That puts it slightly above the scanner’s focal plane, but it’s close enough.

    Then I scanned some graph paper (remember that?) with 10 lines per inch, overlaid that on the pack image, rotated to line it up with the pack, scaled the grid so that the major lines were 1 cm apart on the pack in both directions, and that gave me a nice 1 mm grid to eyeball the measurements.

    Printed the image out at about twice real size and there you have it:

    Battery Pack Dimensions
    Battery Pack Dimensions

    The doodles around the bottom give the Z-axis dimensions for tabs & contact slots & suchlike.

    The notes near the top were a first pass at how to mill the thing; two years later, the actual G-Code bears little resemblance to that.

    I put the origin at the lower-left corner of the part that fits into the radio body, 2.4 mm inside the left edge that mates with the outside of the body. That was probably a mistake, as it meant I had to touch off the final part at X=-2.4 rather than just 0.0.

    We live & learn.

  • HT GPS + Audio: Battery Case Contacts

    The case for this gadget slides into the back of the ICOM IC-Z1A HT and powers the radio through its usual battery contacts. I reshaped 5/16″ 4-40 brass machine screws into flat-top studs, then soldered 8-mil tin strips to their tops.

    Grab a screw in a pin vise, brace it on the bench vise, and file off everything that doesn’t fit:

    Reshaped 4-40 screws
    Reshaped 4-40 screws

    The result should fit neatly into the flatted recess, with the top flush in the rectangular slot:

    Studs in their recesses
    Studs in their recesses

    Cut an oversized strip of 8-mil tin and solder it to the stud. I tinned both pieces to get nice solder coverage, although the notion of tinning a piece of pure tin with silver-tin solder did give me pause. It’s all in the flux, I suppose.

    Anyhow, put the two tinned sides together and hit the combo with a half-second pulse at 100% duty cycle from my resistance soldering gadget. Perfect:

    Tin strip soldered in place
    Tin strip soldered in place

    Then snip off whatever doesn’t fit into the slot with an ordinary (albeit shop-only) scissors, making it just slightly shorter than the slot so the end doesn’t snag on anything. File the sides and corners so they’re easy on the fingers, flatten the strip so it fits neatly into the slot, buff it up a bit, and it’s all good.

    Contacts in place
    Contacts in place

    Takes longer to describe than to do it, at least the second time you do it…

  • Bike Mirror Ball Clamp Doodles

    The plastic-ball-in-plastic-socket joint found in bicycle mirrors seems to fail after a year or two of constant use. These are some doodles & thoughts about building a small, robust, adjustable joint.

    A bike mirror needs two ball joints:

    • at the helmet mount to put the mirror in the proper spot
    • at the mirror to align the image

    A flexy boom can replace the helmet joint, although rotation around X (pitch) is still handy.

    A flexy mirror mount can replace the mirror joint, but it must also be compact.

    Without heroic measures, the range of travel for a ball joint isn’t all that much.

    How to make a ball? Anneal & drill a standard ball bearing for a wire shaft? Solder onto chrome steel? CNC mill the end of a bar in a rotary table?

    How to make a socket? Some of that low-temperature themoplastic might be useful. Mold it around the ball, slit radially, and squash it in a circ clamp?

    How to adjust? Circumferential clamp around the socket or pull the whole socket into a wedge? Radial cuts through the socket to allow compression or depend on plastic/elastic deformation?

    How much friction? You want it stiff enough to hold position in a strong wind and easy enough to reposition. You definitely don’t want grub screws or fiddly knobs!

    The doodles are all far too complex, some are absurd, one can’t be built (at least by me), and I’ll probably end up using some bendy wire anyway.

    Something of this may be useful in another project … and now I can throw out that scrap of paper.

    Mirror clamp doodles
    Mirror clamp doodles
  • HT GPS + Audio: Modified Plug Alignment Plates

    As described there, I made a fixture and a small plate to hold 2.5 mm and 3.5 mm plugs in the proper alignment for the mic & speaker jacks on our ICOM IC-Z1A HTs. Knowing I was going to rebuild the interface boxes, I made several spare plates and tucked them into a small bag against future need.

    Jack Plates - Oblique
    Jack Plates – Oblique

    Time passes.

    Come to find out that the new gratuitously gold-plated 2.5 mm plugs in my stash have a slightly thicker front plate that doesn’t quite fit into the recess I milled in the plates for the old nickel-plated plugs. So I set up a little nest in on the Sherline’s table, snuggled each plate into the corner, and poked a 9/32-inch end mill 1 mm down into the plate. The net change was a 0.5 mm deeper recess. Sheesh.

    Milling the plug plate recess
    Milling the plug plate recess

    I’d originally create the recess with helical milling, but I recently uncovered a stash of shiny-new end mills in a box: 9/32 is 7.31 mm, just about exactly what you want for a 7-mm dia plug front plate surrounded by a blob of fast-curing epoxy.

    Plugs epoxied into plate
    Plugs epoxied into plate

    This epoxy just holds the plugs in the right position for wiring and initial testing. After the cable checks out, I’ll smoosh a blob of epoxy putty around the whole thing as before.

  • HT GPS + Audio: PCB Layout

    The circuit board is 30-mil, double-sided, half-ounce (I think) copper on glass-fiber stock, direct-etched by rubbing ferric chloride solution onto it with a sponge.

    Used the CNC Sherline to drill the holes; the G-Code is now tailored for my Sherline mill and tool-length probe station.

    The copper layers as a 600 dpi PNG file:

    Top and Bottom Copper
    Top and Bottom Copper

    The top copper image (on the left) is reversed so it comes out correctly when you’re doing toner-transfer etching.

    I didn’t bother with a silkscreen, because I don’t have a soldermask and there’s no room for text around the parts anyway.

    The four vias at the corners mark the edge of the board. Trim it with tinsnips (or a shear if you have one), then introduce it to Mr Belt Sander until the edges pass directly through the middle of those via holes. Round the corners a bit so they fit into the case recess atop the mounting shoulder.

    Put Z-wires in the small round vias (the ones that don’t have any other traces) to connect the top and bottom ground planes.

    Put Z-wires in the other round vias to connect a top-side signal to the corresponding bottom-side trace.

    There are three jumper wires across the bottom; with only two layers I don’t get all bothered about embedding the last few. Those vias are square.

    I don’t have any way to do plated-through holes, so solder the wires to both sides of any vias with traces on both planes. I admit I missed two of them on the TT3 ribbon cable.

    The big empty space around the positive power terminal prevents the ring-lug connector from shorting to the ground plane. Now that I think of it, there’s no need for an empty space on the bottom copper, but it doesn’t do any harm.