The Butterfly Bush is attracting all manner of insects, including these bumblebees. It looks like one is gathering propolis, as the stuff on her back leg looks sticky rather than grainy.
I’d never noticed their three ocelli before!


The Smell of Molten Projects in the Morning
Ed Nisley's Blog: Shop notes, electronics, firmware, machinery, 3D printing, laser cuttery, and curiosities. Contents: 100% human thinking, 0% AI slop.
Taking & making images.
The Butterfly Bush is attracting all manner of insects, including these bumblebees. It looks like one is gathering propolis, as the stuff on her back leg looks sticky rather than grainy.
I’d never noticed their three ocelli before!
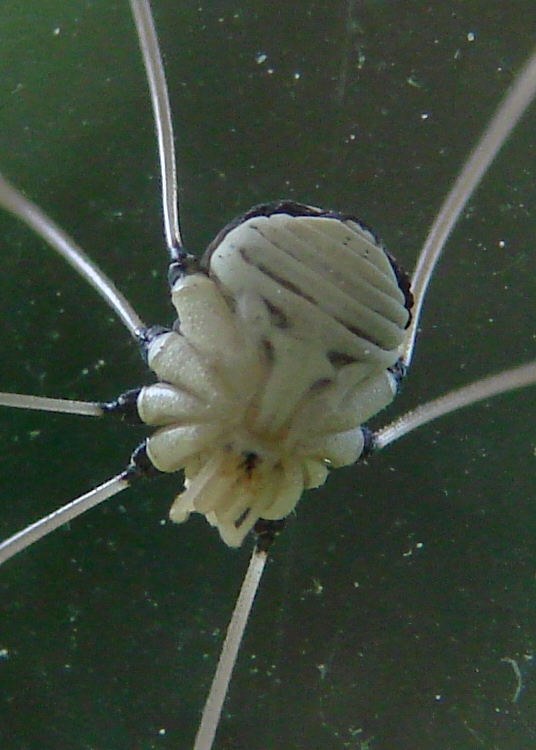
Saw several of these critters on our tent while we were packing up in the morning; I’m in favor of anything that eats small insects, so Harvestmen get a pass. I don’t know if those frogs eat ’em, but that’s something they can work out without my attention.
Then I found another Harvestman on a window when we got home. Not having seen the underside of one in quite a while, I was struck by the “alien face” pattern. I suppose the reddish dot under the alien’s nose is the Harvestman’s mouth, just like it looks.
Eeeek!
They’re actually pleasant to have around and tickle mightily when they crawl up your arm. We gently deport them from the house and generally manage to deposit them undamaged on a plant, where we presume they’ll be much happier.

Mary planted some Butterfly Bushes in front of the living room window and shazam we have butterflies. Highly recommended!
This unusual butterfly came by yesterday. The invaluable Butterflies Through Binoculars identifies it as a Giant Swallowtail Butterfly and says:
So either this chap’s range is expanding northward or that colony never quite died out.


So we did the HersheyPark thing on the way back from our bicycling vacation and our young lady rode seven of their eleven roller coasters. Not being all that strong of stomach, I wimped out after two and contented myself with taking pictures.
I had decided to not lug a Big Camera and the tele-adapter along, seeing as how we’d be camping for four nights. That turned out to be a wise decision: it rained every night and everything we carried was damp. So I took pix with my Casio Z-850 pocket camera, which had been sealed in a ziplock bag most of the time, and that had to be good enough.
The Fahrenheit coaster is, they tell me, 121 feet tall and I was standing outside the fence about 100 feet from the base of the drop; the slant range was maybe 150 feet. I had plenty of time to set up and practice the shot, as the line was half an hour long. I filled the equivalent of two rolls of film with pix of people I don’t know while exploring a nine-dimensional parameter space & scrutinizing the results; pixels are cheap.
Most digital cameras, this one included, have a long delay between pushing the button and getting results. However, it has several “continuous shutter” modes and I picked the “high-speed” version that records three images in quick succession. There’s no indication of how much time passes between exposures, which probably depends more on the SD Card’s speed than anything else. The timestamp resolution is 1 second, which isn’t much help.
Anyhow, poking the shutter button when the train came over the top consistently produced one good picture as it descended.

I fought all the other automation to a standstill:
The camera picked ISO 200, probably as a result of the “high speed” continuous shutter setting, and warned me that it wasn’t happy about doing that. This being a bright, sunlit day, the nominal exposure for that ISO speed would be 1/200 @ f/16. Two stops faster shutter and three stops bigger aperture should work out OK, as the subjects were on the down-sun side of the coaster. The camera has just two apertures (big and little) that, of course, vary with the zoom setting, so I didn’t have much leeway. I figured I could fix any minor exposure issues in the cough darkroom.
The tele end of the zoom range is equivalent to a 114 mm lens with 35 mm film, which is better than the beer-can-sized zoom on the SLR I used to lug around back in the day.
In round numbers:
Cropping the interesting part from the frame, goosing the gamma a smidge, and applying a touch of Unsharp Mask says that’s about right: you can see the expressions on their grainy little faces. National Geographic quality, it ain’t, but it’s OK for a pocket camera and pix of relatives.
Memo to Self: Would forcing the ISO down to 100 reduce the graininess a bit?

It’s that time of the year again: a pair of hens and about a dozen chicks have been cruising through the yard. The chicks vary from softball- to football-sized, so we think the hens are tending a creche.
The chicks are, of course, insufferably cute…
We haven’t seen a hen with chicks roosting in the trees this year, but that just means they’re using trees near the creek rather than ones we can see from the house.

That cute thing the chicks have going for them tapers off pretty quickly as they grow up.
Wow, are those big toms ugly!
But it works well enough for turkeys, so who are we to complain?

Watching the tree frogs crawl up the tent from inside let us see how they move: hand-over-hand up the fabric. A dozen of them crawling along was spooky…
I took a movie with my pocket camera that turned into an 8 MB AVI, which I can’t upload here. Most of it isn’t all that interesting, anyway, an observation which hasn’t stopped YouTube dead in its tracks yet, but we can do better than that.
A pair of Free Software programs extracts the interesting part and produces a (somewhat) smaller animated GIF that works with WordPress.
First, shatter the AVI into separate JPG images:
mkdir frames
ffmpeg -i cimg3781.avi -sameq frames/frame-%03d.jpg
A bit of browsing showed that I wanted frames 227 through 265 and that the frog was pretty much in the upper-middle of the image. So, crop a 320×240 image around the frog from those 640×480 frames:
cd frames
mkdir stills
for f in `seq 227 265` ; do convert frame-$f.jpg -crop 320x240+160+60 stills/still-$f.jpg ; done
Then convert them into an animated GIF with a 500-ms frame rate (the -delay ticker is 10 ms):
cd stills
convert -delay 50 still-2* frogwalk.gif
It’s a 1.6 MB wad, but gets the message across: frogs keep three paws stuck to the floor.
Remember, that little guy is moving at glacial speed in the GIF: those 40 frames of video last just over a second in real time.
Memo to self: MPEG-1 and MPEG-2 only support video-style frame rates around 30 fps.
Update: Regular reader Przemek Klosowski showed me how to generate those numeric sequences on the fly, without using a for loop:
There's this neat Bash construct {1..10} that you can use directly after ffmpeg:
convert -delay 50 still-{227..430}* result.gif

You can even skip every nth frame:
convert -delay 50 still-{227..430..5}* result.gif
Thanks!

We bicycled along the Pine Creek Gorge rail-trail in north-central Pennsylvania on a Rails-to-Trails Conservancy group ride, camping at schools and campgrounds along the trail. Quick summary: for four days we rode in the sun and slept in the rain.

As we set up camp at Pettecote Junction, the wet ground was hopping with tiny tree frogs. It was impossible to avoid stepping on the critters. When we got the tent set up, they swarmed up the sides between the tent and the rain fly; perhaps they had an imperative to get above the flood?
The lines in the tent fabric are about 3.7 mm apart, so the frogs are perhaps 10 mm from snout to butt. That size rules out everything in our RTP Eastern Reptiles & Amphibians book except the Little Grass Frog, which used to live only south of Virginia. The spot pattern doesn’t match, either, although they’re said to be highly variable. Who knows what’s going on in these degenerate days?

They didn’t like the mesh vent screens, favored the rougher tent fabric over the smoother seam binding, and didn’t seem to mind falling off the tent.
Things are different when you’re small.
Tomorrow: the video…
