The Smell of Molten Projects in the Morning

Ed Nisley's Blog: Shop notes, electronics, firmware, machinery, 3D printing, laser cuttery, and curiosities. Contents: 100% human thinking, 0% AI slop.

Category: PC Tweakage

Remembering which tweaks worked

  • Ubuntu 9.10 HAL FDI: Input Device Configuration – Kensington Expert Mouse FAIL

    The recent Ubuntu 9.10 release uses HAL & UDEV to permit hotplugging USB mice / trackballs / tablets without killing the X server. This is a vast improvement over the Bad Old Days, with two minor issues:

    1. You must now write an FDI file to configure your widget
    2. There is absolutely no documentation on how to do that

    Basically, you’re left to find a blog post somewhere that describes an fdi file for something similar to your widget, then puzzle out how to get from there to what you have. If you’re reading this (and you’re not one of the few dozen folks who read my posts for their pure amusement value), then you’ve probably stalled on Step 2 and arrived here via search engine.

    So, here’s how the rest of the story goes down. I assume you’ve read all the various posts scattered here & there and have a vague notion of what goes into an fdi file and why it’s needed. I am not an expert on this stuff, but I did manage to get a few things working with an afternoon of concerted heads-down effort.

    Start with the widget plugged in. Type:

    lshal | less
    

    Then rummage through that steaming pile until you find the stanzas that (seem to) have something to do with the widget. One stanza should mention a driver that sounds familiar: evdev, wacom, whatever you formerly found in /etc/X11/xorg.conf.

    For example, I want to flip the buttons on my Kensington Expert Mouse (it’s really a trackball) to make it left-handed. The userland GUI mouse configuration isn’t relevant, because I also have a tablet and another trackball that must remain right-handed.

    Here’s the appropriate stanza for the trackball, with the key lines highlighted:

    udi = '/org/freedesktop/Hal/devices/usb_device_47d_1020_noserial_if0_logicaldev_input'
     info.capabilities = {'input', 'input.mouse'} (string list)
     info.category = 'input'  (string)
     info.parent = '/org/freedesktop/Hal/devices/usb_device_47d_1020_noserial_if0'  (string)
     info.product = 'Kensington      Kensington Expert Mouse'  (string)
     info.subsystem = 'input'  (string)
     info.udi = '/org/freedesktop/Hal/devices/usb_device_47d_1020_noserial_if0_logicaldev_input'  (string)
     input.device = '/dev/input/event7'  (string)
     input.originating_device = '/org/freedesktop/Hal/devices/usb_device_47d_1020_noserial_if0'  (string)
     input.product = 'Kensington      Kensington Expert Mouse'  (string)
     input.x11_driver = 'evdev'  (string)
     linux.device_file = '/dev/input/event7'  (string)
     linux.hotplug_type = 2  (0x2)  (int)
     linux.subsystem = 'input'  (string)
     linux.sysfs_path = '/sys/devices/pci0000:00/0000:00:1d.3/usb5/5-1/5-1:1.0/input/input20/event7'  (string)
    

    I don’t know what the difference between info.product and input.product might be, but it looks like the same string for both.

    Most of the fdi files I’ve seen try to match the largest possible number of different devices. I take the other tack: I only have one of the things and if I get something similar, it’ll likely be configured entirely differently. So, my fdi files assume one widget of that type, match its name directly without thinking, and are pared to the bare minimum.

    I called the file 10-expertmouse.fdi and plunked it in /usr/share/hal/fdi/policy/20thirdparty. The proper directory seems to move around, the files get renamed, and so forth and so on. This was the correct file in the correct spot for the current Ubuntu 9.10 configuration…

    <?xml version="1.0" encoding="ISO-8859-1"?>
    <deviceinfo version="0.2">
     <device>
     <match key="input.product" string="Kensington      Kensington Expert Mouse">
     <merge key="input.x11_options.ButtonMapping" type="string">3 8 1 4 5 6 7 2</merge>
     </match>
     </device>
    </deviceinfo>
    

    You get the X button numbers using xev; write them on the trackball for future reference.

    The default Expert Mouse trackball buttons are:

    • upper-left = 2 — middle mouse button
    • upper-right = 8 — page back in browsers, mostly
    • lower-left = 1 — left mouse button
    • lower-right = 3 — right mouse button

    So the ButtonMapping line swaps (2 & 8) and (1 & 3). If you prefer not interchanging the 2 and 8 buttons, so as to keep the “page back” button on the upper-left corner, then 3 2 1 will suffice.

    The scroll ring emits buttons 4 and 5 as usual. If you don’t like the rotation-to-up/down mapping you can (presumably) swap those using ZAxisMapping as you did before.

    The syntax for, say, button mapping is whatever the driver expects and if you can find that doc, great. I used whatever I used in xorg.conf and that seems to work; it matches what the current evdev doc suggests. Leaving out all the config other than the button mapping line seems to work, but I’m sure that’s not a general rule. Maybe it only works with devices that are already automagically recognized as some sort of mouse or tablet.

    With that fdi file in place, you just unplug and replug the trackball: no need to reboot or restart X or whatever you’re thinking.

    Here’s the new stanza…

    udi = '/org/freedesktop/Hal/devices/usb_device_47d_1020_noserial_if0_logicaldev_input'
     info.capabilities = {'input', 'input.mouse'} (string list)
     info.category = 'input'  (string)
     info.parent = '/org/freedesktop/Hal/devices/usb_device_47d_1020_noserial_if0'  (string)
     info.product = 'Kensington      Kensington Expert Mouse'  (string)
     info.subsystem = 'input'  (string)
     info.udi = '/org/freedesktop/Hal/devices/usb_device_47d_1020_noserial_if0_logicaldev_input'  (string)
     input.device = '/dev/input/event7'  (string)
     input.originating_device = '/org/freedesktop/Hal/devices/usb_device_47d_1020_noserial_if0'  (string)
     input.product = 'Kensington      Kensington Expert Mouse'  (string)
     input.x11_driver = 'evdev'  (string)
     input.x11_options.ButtonMapping = '3 8 1 4 5 6 7 2'  (string)
     linux.device_file = '/dev/input/event7'  (string)
     linux.hotplug_type = 2  (0x2)  (int)
     linux.subsystem = 'input'  (string)
     linux.sysfs_path = '/sys/devices/pci0000:00/0000:00:1d.3/usb5/5-1/5-1:1.0/input/input21/event7'  (string)
    

    Shazam! Suddenly, the trackball is completely left-handed and that configuration survives hotplugging and all that happens without killing X.

    Well, at least that’s what you’d expect, based on all the doc you can find on the Web.

    As it turns out, something in the Ubuntu 9.10 udev mouse event hal X input button stack absolutely prohibits swapping buttons 1 and 3. You can verify this by looking at what the X button IDs are, using xinput:

    xinput list --short
    "Virtual core pointer"    id=0    [XPointer]
    "Virtual core keyboard"    id=1    [XKeyboard]
    "Logitech Logitech USB Headset"    id=2    [XExtensionKeyboard]
    "Microsoft Comfort Curve Keyboard 2000"    id=3    [XExtensionKeyboard]
    "stylus"    id=4    [XExtensionKeyboard]
    "stylus cursor"    id=5    [XExtensionKeyboard]
    "eraser"    id=6    [XExtensionKeyboard]
    "Microsoft Comfort Curve Keyboard 2000"    id=7    [XExtensionKeyboard]
    "Power Button"    id=8    [XExtensionKeyboard]
    "Power Button"    id=9    [XExtensionKeyboard]
    "Macintosh mouse button emulation"    id=10    [XExtensionPointer]
    "Logitech USB Receiver"    id=12    [XExtensionPointer]
    "Kensington      Kensington Expert Mouse"    id=11    [XExtensionPointer]
    
    xinput get-button-map "Kensington      Kensington Expert Mouse"
    1 8 3 4 5 6 7 2 9 10 11 12
    

    Notice that buttons 2 and 8 are swapped, so you know the fdi file is in full effect.

    You can force the button mapping using xinput like this (leaving 2 and 8 unswapped, for effect):

    xinput set-button-map "Kensington      Kensington Expert Mouse"  3 2 1 4 5 6 7 8
    xinput get-button-map "Kensington      Kensington Expert Mouse"
    3 2 1 4 5 6 7 8 9 10 11 12
    

    As you might expect by now, whenever the trackball disconnects itself, the xinput mapping Goes Away and the button handedness changes. That completely defeats the entire purpose of the whole obscene-gerund HAL fdi concept.

    You might then think you could whip up a nice udev rule that would fire off xinput when the trackball reappears, but udev scripts execute outside the entire user-terminal-X paradigm: xinput complains that it can’t talk to the X server. Of course, you can’t hear it scream, because it’s not connected to a terminal…

    Game over. Thanks for playing.

    Equally of course, there’s no documentation for the Officially Approved way to configure these devices, if, indeed, there is a way.

    Oh, and the real punch line? HAL is (about to be?) Officially Deprecated, so all this information is (or should be, shortly, we’re told) completely obsolete.

    I would love to be proved wrong. Let me know…

    Surprisingly, Xubuntu 9.10 not only enumerates all the mouse-like objects, but also allows you to set their handedness. That part works fine, but occasionally the Kensington trackball’s scroll ring stops working for a while: xev reports no “button” events happening. Then, unpredictably, it starts up again and works fine. I’d love to believe it’s a hardware problem, but I have two of the things and it happens with both of ’em.

    Tomorrow: fun with a Wacom tablet.

  • Kubuntu 9.10 Karmic: Static IP FAIL

    Once again, it seems to be impossible to set a static IP address in the Latest & Greatest version of Kubuntu… with KDE 4.whatever, the triumph of glitz over usability.

    This seems peculiar, as Unix-oid operating systems have networking built into their DNA since the beginning and every single Unix-oid system has a network connection of some sort. Evidently, all Ubuntu systems for the last couple of years have had only wireless NICs and nobody in their whole obscene-gerund testing universe has ever tried to set a static IP address.

    Maybe I’m exaggerating, but it does look that way.

    The fix is the same as in 8.10… as described there.

    This time, use KPackageKit (aka, the KDE package manager) to remove network-manager & plasma-widget-network-manager. Evidently, the Gnome version is pooched, too.

    Sheesh…

  • Thinkpad 560Z Configuration

    Turns out the ancient $20 Thinkpad 560Z I’d been using to capture WWVB receiver data didn’t have the IBM configuration utility on it, which made it tough to tweak the LCD timeout. The key parameter for this laptop is that it runs at about 8 W with the LCD turned off, which is just what you want for long-term data collection.

    The thing runs from a 2 GB CompactFlash card stuck in a CF-to-IDE adapter, so it has a (rather slow) solid-state hard drive. The nice part is being able to just jam the CF into the card reader on my desktop box, make appropriate changes, and pop it back in the 560Z.

    Xubuntu automagically mounts all the partitions, so that part is easy. It has a FreeDOS partition that runs the DOS-only config program, a swap partition (not heavily used), and an Ubuntu 8.04 command-line-only installation.

    The IBM config stuff is in a directory on a hard-drive image (saved from the picture frame project), so mount that and copy it over:

    sudo mount -o loop,uid=ed,ro,offset=$((63*512)) develop.hd /mnt/loop
    cp -a /mnt/loop/ThinkPad/ /media/FreeDOS/
    

    While figuring out what to change, it occurred to me that I should just make a batch file with all the proper settings. Here’s a cheat sheet for the available settings:

    Refer to ps2.msg for raw help file
     some commands/options do not apply to 560Z
    
    1. Power Management
    DEFAULT     suspend time, screen off, HD off, standby time, proc speed
    DISK        power-down timeout
    SAfe        safe suspend
    S2H         suspend to hibernate time
    PMode       power mode
    ON          auto-on date/time from suspend
    RI          resume on Ring Detect from serial port
    HSWITCH     hibernate on power off
    SErial      serial port enable
    HFile       create hibernation file
    HTimer      time to hibernate
    CPUPower    stop clock when idle
    POwer       time to suspend
    Cover       suspend with closed cover
    TImer       Power command = suspend or hibernate
    PCIBUSPower PCI power saving
    LCd         time to display power off
    DOCK        suspend when docked
    LBattery    suspend / hibernate with low battery
    SPeed       CPU speed selection
    
    2. Display Device
    SCreen      select LCD / CRT
    HVEXPansion expand 640x480 to 800x600
    F8          F8 selects LCD expansion
    
    3. Alarm Related
    BEEP        beep settings
    
    4. Thinkpad Setup
    IRQ         interrupt assignments
    JStick      joystick config
    PCIIRQ      PCI IRQ assignment
    DMA         DMA channel assignment
    PARallel    parallel port config
    IR          IR port config
    KRate       keyboard repeat rate
    SERA        serial port config
    AUdio       sound system config
    FNSticky    sticky Fn key
    STARTup     display startup screen
    MIDIport    MIDI config
    TPOint      Trackpoint enable / disable
    PRESENtation  disable screen, standby, suspend
    AUDIOCTRL   audio control port config
    
    5. Others
    SUSpend     suspend NOW
    FDD         diskette drive int / ext
    OFF         turn off NOW
    HIBernation hibernate NOW
    TURN        turn off NOW
    BRightness  LCD brightness on battery
    

    And then the batch file:

    ps2 default
    ps2 disk 0 ac
    ps2 pmode custom ac
    ps2 serial off
    ps2 hfile c
    ps2 htimer 0 ac
    ps2 power 0 ac
    ps2 cover disable
    ps2 lcd 5 ac
    ps2 speed auto medium ac
    ps2 hvexpansion off
    ps2 jstick disable
    ps2 parallel disable
    ps2 ir disable
    ps2 krate fast
    ps2 sera disable
    ps2 audio disable
    ps2 midi disable
    ps2 audioctrl disable
    

    The time-of-day clock drifts with breathtaking speed, which may have something to do with the CPUPower option that shuts the processor clock off when there’s nothing useful going on.

  • VGA-grade Video Cable Connector

    VGA-class Video Cable Connector
    VGA-class Video Cable Connector

    Setting up a new (well, new to me, it’s that old GX270) PC gave me reason to rummage in the Video Cable box and come up with this VGA-class cable. Half the connector shell had worked its way off, giving a nice view of the handiwork. Easily snapped back on with no permanent damage.

    The cable works OK at 1280×1024, although the image seems a bit soft, and higher screen resolutions are out of its reach. There are no obvious signal reflections visible on the screen, so the impedance bumps are not as bad as you might think.

    The VGA connector includes common returns for the Red, Green, and Blue signals, and the two wires for each color should be twisted together. That obviously hasn’t happened here, but crosstalk doesn’t seem to be much of a problem.

    To their credit, they did solder the cable shield to the connector shell, which is a really nice touch. Alas, the impedance of a one-inch pigtail pretty much chokes off the high-frequency stuff you really want to drain to the shell.

    Memo to Self: One of these days, run a bandwidth check with the spectrum analyzer. Use 6-dB pads to get nice 75-Ω terminations.

  • More Firefox Update Restart Foolishness

    Guess what? Update Firefox to 3.0.15 in Xubuntu and we’re back to the continuous restart reminder situation I mentioned there.

    Same fix applies this time, too.

  • HP8591E Spectrum Analyzer: Capturing Screen Images Therefrom

    While I’m thinking about instrument screen shots, this is the script for my Hewlett-Packard 8591E Spectrum Analyzer.

    You’ll need C-Kermit, ImageMagick, and hp2xx for this one, too.

    The cable must cross-connect RTS/CTS for hardware flow control.

    Set the spectrum analyzer to

    • print-to-plotter
    • 19200 b/s (limited by USB-to-RS-232 converter)
    • One plot per page

    Turning menus off doesn’t seem to have any effect on screen captures from the serial port, so the script crops off that part of the image.

    Copy-n-paste the following text into a file (gethp8591), make it executable (chmod u+x gethp8591), and run it with a file name (./gethp8591 test).

    Unlike the (well, my) 54602 ‘scope, the 8591 responds to serial commands just like the Fine Manual says. So before you run this script, make sure the screen shows what you want.

    #!/usr/bin/kermit +
    # Fetches screen shot from HP8591E spectrum analyzer
    # Presumes it's set up for plotter output...
    # Converts HPGL to PNG image
    
    set modem none
    set line /dev/ttyUSB0
    set speed 19200
    set flow rts/cts
    set carrier-watch off
    
    # Make sure we have a param
    if not defined \%1 ask \%1 {File name? }
    
    set input echo off
    set input buffer-length 200000
    
    # Tell it what size to plot
    echo Triggering plot output...
    output plot 0,0,60000,40000;
    
    log session "\%1.hgl"
    
    # Wait for end of data stream
    input 400 SP;
    
    echo ... HPGL data captured
    
    close session
    close
    
    echo Converting HPGL in
    echo --\%1.hgl
    echo to PNG in
    echo --\%1.png
    
    run hp2xx -m png -c 143 "\%1.hgl"
    
    echo Cropping and resizing
    run mogrify -crop "515x395+0+0!" "\%1.png"
    run mogrify -density 300 -resize 200% "\%1.png"
    
    echo Finished!
    
    exit 0
    

    Here’s a picture of the FM broadcast band, as seen from the Basement Laboratory. The marker looks a bit off from 104.7 MHz, but that’s a combination of broad span and skinny peaks.

    Spectrum Analyzer Screen Capture
    Spectrum Analyzer Screen Capture
  • HP 54602B Oscilloscope: Capturing Screen Images Therefrom

    Back in the early 90s I bought a Hewlett Packard 54602B digital oscilloscope: 150 MHz bandwidth, 4 channels. By and large, a fine piece of gear that’s been worth every penny.

    Over the objections of the HP sales force, I got the HP 54651A RS-232 interface rather than the HP 54650A HPIB (aka GPIB, aka IEEE-488) interface. Reasoning: I’d need a matching interface on the PC side and PC architecture is anything but stable. Turns out that was a good decision, as you’ll realize if you count up the number of different buses since those days and factor in the cost of an IEEE-488 interface for each iteration. RS-232 is slow and not well-suited for complex arrays of test gear, but mostly I needed the scope for screen shots to go with my Circuit Cellar columns.

    Here’s how that works…

    Configure the scope by poking the RS-232 softkey in Print/Utility:

    • Connect to: HP Plot
    • Factors: On (this is absolutely vital)
    • Resolution: High
    • Baud Rate: 19200 (yes, “baud rate” is an oxymoron)
    • Handshake: DTR

    Now the scope will dump HPGL to what it thinks is a plotter, so the trick is to make the PC look like a plotter. Turns out that’s not particularly difficult.

    Despite the name, DTR handshaking does not use the scope’s DTR pin. The relevant manual section looks like this (click the thumbnail for full-size image):

    HP54602B Oscilloscope Serial Port Pin Functions
    HP54602B Oscilloscope Serial Port Pin Functions

    So DTR remains high and the flow-control signaling actually uses the RTS/CTS pins. The cable I’ve been is basically a null modem connection with the appropriate gender on each end:

    PC RS-232 HP 54602B Oscilloscope
    9-pin F Signal 25-pin M Signal
    1 DCD 20 DTR
    2 RxD 2 TxD
    3 TxD 3 RxD
    4 DTR 6 DSR
    also-> 8 DCD
    5 Gnd 7 GND
    6 DSR 20 DTR
    7 RTS 5 CTS
    8 CTS 4 RTS
    9 RI n/c

    Note:

    • PC 1 and 6 <- scope 20
    • PC 4 -> scope 6 and 8

    I wired the cable like that mostly because I have a lifetime supply of nice 9-conductor shielded cable lying around. You could connect the scope’s DTR to its own DSR and DCD pins, apply similar trickery on the PC end, and everybody would be perfectly happy with 5-conductor cable, maybe even 4-conductor if you ran the ground through the shield.

    Using XON/XOFF flow control seems to not work well, although I admit to not trying too hard to figure it out.

    These days, I use a USB-to-RS-232 converter with the now-standard 9-pin connector. The port identifier may be nearly anything after udev/hotplug has its way with the hardware, but it usually works out to /dev/ttyUSB0.

    The script requires C-Kermit (likely the ckermit package), ImageMagick, sed, and hp2xx (yes, spelled exactly like that), all of which should be packages in your favorite Linux distro. Haven’t a clue how this might work with Windows.

    With all that in hand, copy-n-paste the following text into a file (I used gethp54602, for lack of anything more original), make it executable (chmod u+x gethp54602) and run it with a file name (./gethp54602 test). Poke the Print Screen softkey on the scope and settle back for a bit. The scope can’t keep up a steady flow of data at 19200 b/s, so the whole affair takes a minute or three for the 50-ish kB of text in a dual-trace image.

    You’ll end up with three files:

    • test.hgl — raw HPGL text from the ‘scope
    • test.eps — raster conversion from HPGL
    • test.png — bitmapped screen-capture image

    The magic script…

    #!/usr/bin/kermit +
    # Fetches screen shot from HP54602B oscilloscope
    # Presumes it's set up for plotter output...
    # Converts HPGL to PNG image
    
    set modem none
    set line /dev/ttyUSB0
    set speed 19200
    set flow rts/cts
    set carrier-watch off
    
    # Make sure we have a param
    if not defined \%1 ask \%1 {File name? }
    
    set input echo off
    set input buffer-length 200000
    
    # Wait for PRINT button to send the plot
    echo Set HP54602B for HP Plotter, FACTORS OFF, 19200, DTR
    echo Press PRINT SCREEN button on HP54602B...
    
    log session "\%1.hgl"
    
    # Wait for final character
    input 480 \x03
    
    close session
    close
    
    echo Converting HPGL in
    echo --\%1.hgl
    echo to PNG in
    echo --\%1.png
    
    # Without factors
    #run hp2xx -m png -a 1.762 -h 91 -c 14 "\%1.hgl"
    #run mogrify -density 300 -resize 200% "\%1.png"
    
    # With factors
    run sed '/lb/!d' "\%1.hgl" > "\%1-1.hgl"
    run hp2xx -q -m eps -r 270 -a 0.447 -d 300 -w 130 -c 14 -p 34 -f "\%1.eps" "\%1-1.hgl"
    run rm "\%1-1.hgl"
    run convert -density 300 -resize 675x452+2+2 "\%1.eps" "\%1.png"
    
    echo Finished!
    exit 0
    

    [Update: WordPress unpredictably and ruthlessly mangles source code by incorrectly escaping some symbols. The line with sed should have a greater-than symbol to pipe the result into the .hgl file. A more recent version (albeit using my SENA PS410 serial server) hosted as a GitHub gist may help.]

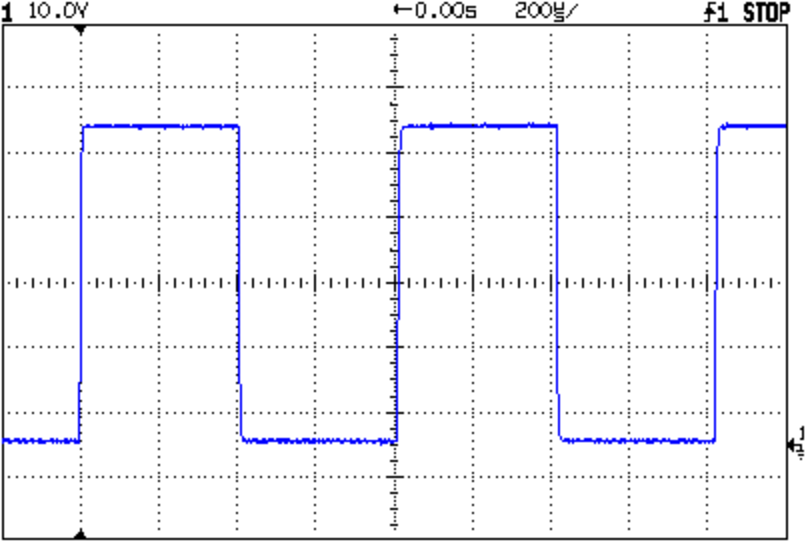
    Here’s a sample of what pops out; it’s the scope’s own calibrator waveform, nothing exciting, but you get the general idea.

    Screen Capture of Calibrator Signal
    Screen Capture of Calibrator Signal

    The commented-out section labeled “Without Factors” converts the format you get with Factors Off. Turns out that there’s no unique ending string without factors, which puts a real crimp in getting the data. The advantage is that the HPGL converts directly to PNG and looks good. The only way I’ve found to capture the scope data is to just time out after a while.

    With Factors On, however, the image data has a unique ending character (ASCII ETX, 0x03) after the label text, but the layout is rotated to plot in landscape mode. A direct conversion to PNG looks awful, perhaps because hp2xx must do software character generation, and I eventually figured out that making a bank shot off EPS vector format produced much better results.

    However, hp2xx dutifully renders the text into the EPS image, but it doesn’t inject a carriage return after each linefeed: the text dribbles off to the far right of the actual screen image. To fix that, the sed editor hacks off the label text following the lb command. Mercifully, hp2xx doesn’t choke on the incomplete command.

    And then convert does its usual magic. The image size is just right to drop into my Circuit Cellar columns; you may want something different for your purposes.

    [Update: The PNG has an alpha channel that selects only the traces, so the background color depends on where you put it. A small tweak is there.]

    For reasons that I absolutely do not understand, I cannot control the oscilloscope through the serial interface. The scope sends data to the PC just fine and I can get the scope to complain about the character format if I send truly bogus junk (like, mismatching the baud settings), but it simply will not respond to commands. Maybe the interface is broken or, more likely, I’m screwing something up. Hasn’t been a problem, though, for my simple needs.

    Memo to Self: One of these days, eBay will have a 54652B serial/parallel interface that might work better.