The Smell of Molten Projects in the Morning

Ed Nisley's Blog: Shop notes, electronics, firmware, machinery, 3D printing, laser cuttery, and curiosities. Contents: 100% human thinking, 0% AI slop.

Category: PC Tweakage

Remembering which tweaks worked

  • Arduino Mega: Showstopper!

    I planned to use an Arduino Mega for an upcoming Circuit Cellar project, but … it doesn’t work. Well, it works, but under very limited circumstances.

    The problem manifests itself as a complete crash / lockup under very straightforward conditions: attempting to use the serial output will suffice. This unmodified example sketch fails: AnalogInOutSerial.

    After considerable Googling, there’s the showstopper: the gcc-avr compiler fails to save-and-restore a register that gets clobbered by the object constructors. Simple code doesn’t instantiate any objects, so it works fine. The serial failure is just a symptom, which means the various workarounds suggested in the forums don’t fix the general case.

    The patch offered for gcc-avr is basically four lines (a pair of save / restores on R20), but requires recompiling what seems to be the entire AVR toolchain from source. That, alas, lies far beyond my capabilities… I could probably figure out enough to recompile it, but I’m very uncertain I could accomplish that without screwing up the main gcc compiler or the setup thereof.

    It is not clear to me that the many claims of “it works on this version” are correct. From the nature of the problem, the failures depend critically on addresses occupied, final layout of the program / data in Flash, and (most likely) the execution path. The “working” configurations / systems may simply not fail using the sample programs.

    This is on Arch Linux, for what it’s worth, with gcc-avr 4.5.1.

    If anybody can walk me through the process of rebuilding whatever must be rebuilt, preferably in a safe place, perhaps I can manually stuff the new file(s) into the proper spots(s) to replace the incorrect ones…

  • Continuous Ink Reservoirs: Elevation Thereof

    Do Not Raise External Ink Reservoir
    Do Not Raise External Ink Reservoir

    The continuous ink system I have on the Epson R380 occasionally stops the yellow ink flow. I think it’s related to back pressure: the lines drain down quickly after the printer stops and the yellow line is on top.

    The label on the front of the continuous ink supply reservoir minces no words:

    Do not raise the external ink reservoir higher because of curiosity or insufficient ink-supply …

    Well, maybe a little bit won’t hurt?

    As it turns out, the original ink tanks inside the printer are pretty high up, with the bottom of the print heads maybe 60 mm off the table. That chunk of foam packing material is 40 mm tall: the bottom of the ink supply remains well below the heads.

    The ink supply tubes drain back a few cm when the printer has been idle, which means the elevated reservoir isn’t applying positive pressure to the heads. And, after a few weeks of this treatment, the yellow ink flow hasn’t stopped!

    I’ll call it a win.

    Here’s the overall view, with a few ink splotches visible from previous blunders. If the table wasn’t a raw slab of half-inch plywood bolted to a surplus printer (?) stand in the basement, I’d care a lot more…

    Elevated continuous ink reservoir
    Elevated continuous ink reservoir

    The amount of ink in the waste ink tank beside the printer is breathtaking: about 50% more than noted there.

  • Useful Minicom Defaults

    I usually figure this stuff out for each minicom setup; now I can just refer here and get it right the first time.

    Run minicom -s the first time to set the internal configs:

    • Port typically /dev/ttyUSB0 for USB-serial adapter
    • 19200 8N1 for lack of anything smarter
    • No hardware flow control
    • Software flow control
    • Clear modem Init and Reset strings to blank
    • No DCD line
    • Set colors as below

    Your favorite colors will differ; these are Old-Skool:

    • Menu: white on blue
    • Status: black on cyan
    • Terminal: green on black

    Save that as the overall system default.

    Set command-line defaults in ~/.bashrc:

    • -m to use Alt+key rather than Ctrl-A and then the key
    • -c on to see those pretty colors

    Which will look like

    MINICOM='-m -c on'
    export MINICOM
    

    And then it Just Works…

  • CPU Heatsink Fuzz

    My PC makes a seasonal migration: to the basement during the summer, to the living room in the winter. Those moves provide an opportunity to vacuum the fuzz out of the fan grilles and heatsinks.

    You’d think that, given the trouble caused by blocked air inlets, manufacturers would make it easy to get access to the grilles and trivially easy to remove the fuzz. Not so, alas.

    This time, I decided to see what the intake side of the main heatsink looked like. Two screws secure the shell to the circuit board and provide clamping pressure on the CPU heat spreader. The heatsink is a massive affair with liquid-filled heat pipes; I’ve never taken it out before because removing the screws exposes the CPU heat spreader, where you do not want to get fuzz.

    Heatsink fuzz
    Heatsink fuzz

    Oops!

    A bit of work with the vacuum and a brush greatly improved the situation. I think I kept the fuzz out of the heatsink-to-CPU joint, but there’s really no way to know because, as nearly as I can tell, Dell didn’t include any of the CPU temperature readouts on this system board.

    Memo to Self: Gotta do that more often …

  • IRQ Troubles on Razor

    The Dell Dimension 4560, a.k.a. razor, that controls my Sherline CNC mill woke up without network support. That’s a showstopper, because all the G-Code files live on the server across the basement.

    All my boxes have a network function dipstick test: the desktop background is an image on that same file server. When the NFS share wakes up dead, then the screen shows the default Ubuntu background: brown = down! (At least in Ubuntu 8.04 LTS, which is what EMC2 is built on right now.)

    Checklist…

    • NFS share isn’t mounted
    • … and can’t be mounted
    • ifconfig shows eth0 up & active
    • can’t ping the server
    • can’t ping razor from the server
    • Link lights on network switch nailed to floor joist overhead are green
    • Link light on NIC on back panel
    • Activity lights on switch & NIC blink occasionally (??)
    • Swapping ports on the switch = no change
    • Laptop works fine plugged into switch = switch OK

    So whatever is busted, is busted in the 4560. Drat!

    (Should have checked cable between switch and NIC. Sometimes you get a data failure without affecting the link & activity lights. Weird, but stuff happens.)

    Looking in dmesg shows that a bogus IRQ 11 occurred during startup:

    [   44.439932] irq 11: nobody cared (try booting with the  irqpoll" option)
    ... time passes ...
    ... bad IRQ log dump gibberish ...
    [   44.440440] Disabling IRQ #11
    

    Fairly obviously, after that point nothing about the NIC or anything else on IRQ 11 will work: the hardware setup may be OK, you can write to it and read from it, but no actual data gets through.

    A reboot didn’t cure the problem. Reboots in Linux rarely solve a problem; you’ve got to actually find the root cause and fix it, rather than shake the dice to see if a better combination comes up.

    Anyhow.

    Restarted to get into Dell’s attenuated BIOS configuration routine, changed the NIC to IRQ 3 (just because it was first on the list), saved, restarted, and everything works. The bogus interrupt is gone, the NIC is running, NFS shares are OK.

    It absolutely beats me. But at least this is written down so the next time it happens, I’ll remember what I did.

    Oh, yeah. The Sherline CNC mill uses stepping motors and uses cutters, so it’s a Steppin’ Razor, of course, and is therefore named razor. I suppose I could have called it molly, but that’d be a stretch.

  • Desktop Background From the Deep

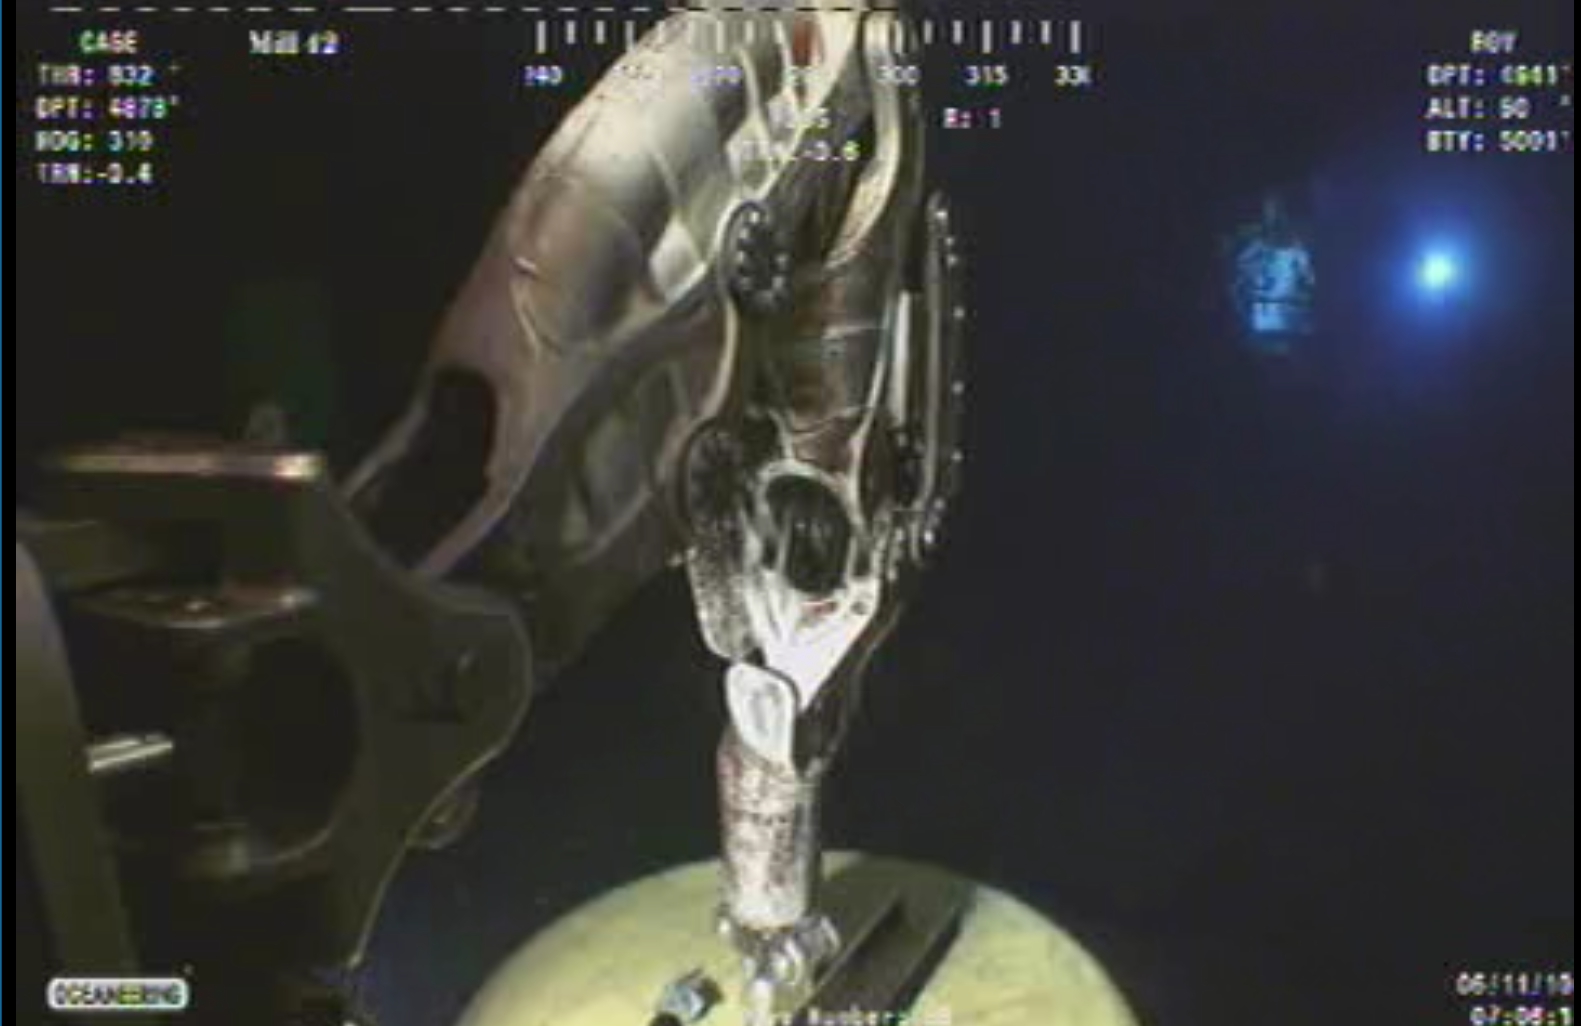
    I snagged this gem from the Deep Horizons spillcam site a while back; it’s a screen grab at 1600×1200 with all the extraneous junk cropped off. Scaling it back to fit a 4:3 screen doesn’t do it a bit of damage: it looks just as weird.

    Something from Alien, perhaps?

    Deepwater Horizon capping - manipulator arm
    Deepwater Horizon capping – manipulator arm

    I’m pretty sure that’s Sweet Babby Jeebus™ floating over there in the background…

    [Update: Some “best of” the ROV video feeds, speeded up by a factor of 7, are there.]

  • New 1.5 TB USB Backup Drive

    Just got a new 1.5 TB USB drive (Western Digital Elements; every manufacturer has produced horror stores) for $85 delivered; I do not understand the economics of that business in the least. Anyway, this will become the external drive onto which the rsnapshot routine dumps the daily changes from the file server; the old 500 GB drive was 99% full, so it’s time to tuck that one in the fireproof safe.

    The NTFS partition had some weird-ass peculiarities that choked cfdisk, so I used parted to blow away the NTFS type=7 partition and create a new Linux type-83 partition. Strangely, the drive came with no shovelware, for which I’m grateful.

    sudo fdisk /dev/sde
    Command (m for help): d
    Selected partition 1
    Command (m for help): n
    Command action
       e   extended
       p   primary partition (1-4)
    p
    Partition number (1-4): 1
    First cylinder (1-182401, default 1):
    Using default value 1
    Last cylinder, +cylinders or +size{K,M,G} (1-182401, default 182401):
    Using default value 182401
    Command (m for help): w
    The partition table has been altered!
    

    Then build an ext3 filesystem:

    sudo mke2fs -j -m 0 -L 'Backup-1.5TB' -O sparse_super /dev/sde1
    

    The sparse_super option seems to make sense; if the drive fails to the point where you must go rummaging for more than one spare superblock, you’re probably not going to find any of them.

    Turns out you really should unplug / replug a USB drive after walloping its partition table. Took me a while to figure that out. Again. You’d think I’d remember.

    Then you find the partitions’s new UUID using any of:

    ll /dev/disk/by-uuid/
    vol_id /dev/sde1
    

    Then plug the UUID into fstab so the rsnapshot routine can mount the drive regardless of which device it wakes up as on any given day:

    UUID=77c75554-26a0-4bbc-a452-201c2150bf1a  /mnt/backup ext2 defaults,noatime,noauto,nodev,noexec,nosuid 0 0
    

    More on that from the last go-round there.

    The first backup took about six hours to copy 430-some-odd GB of data from the internal SATA drive. Call it almost exactly 20 MB/s; such a nice round number surely means a drive-limited data rate.

    Incidentally, if you need a shiny new UUID for some reason, uuidgen is your friend.

    Memo to Self: Just unplug the [mumble] drive.