This carton went through the date coder with its lid open:

They made a fine breakfast …
The Smell of Molten Projects in the Morning
Ed Nisley's Blog: Shop notes, electronics, firmware, machinery, 3D printing, laser cuttery, and curiosities. Contents: 100% human thinking, 0% AI slop.
Who’d’a thunk it?

This carton went through the date coder with its lid open:
They made a fine breakfast …

Mary found the wrench I made five years ago in the bottom of her tool bucket:

Having moved away from the garden with all the valves that wrench turned, it can now go into the 3D Printed Sample Box for use in the unlikely event I ever give another talk on the subject.
I’d design it differently these days, what with BOSL2 in my sails, but it got the job done.
Some things last long enough!

Thanks to Google Translate:

It’s not clear why a Sergeant in the US Army would translate her request for help into Simplified Chinese so I can better understand it, but that’s the world we live in.
This deposit would move my Quality-of-Life needle, but certainly not in a good direction:

Today I Learned: there are humanitarian doctors connected with the Red Army in Morocco.
The cost of sending this junk must be low enough to fuel the spam machine from a minuscule response rate.
A pox on their collective backside!

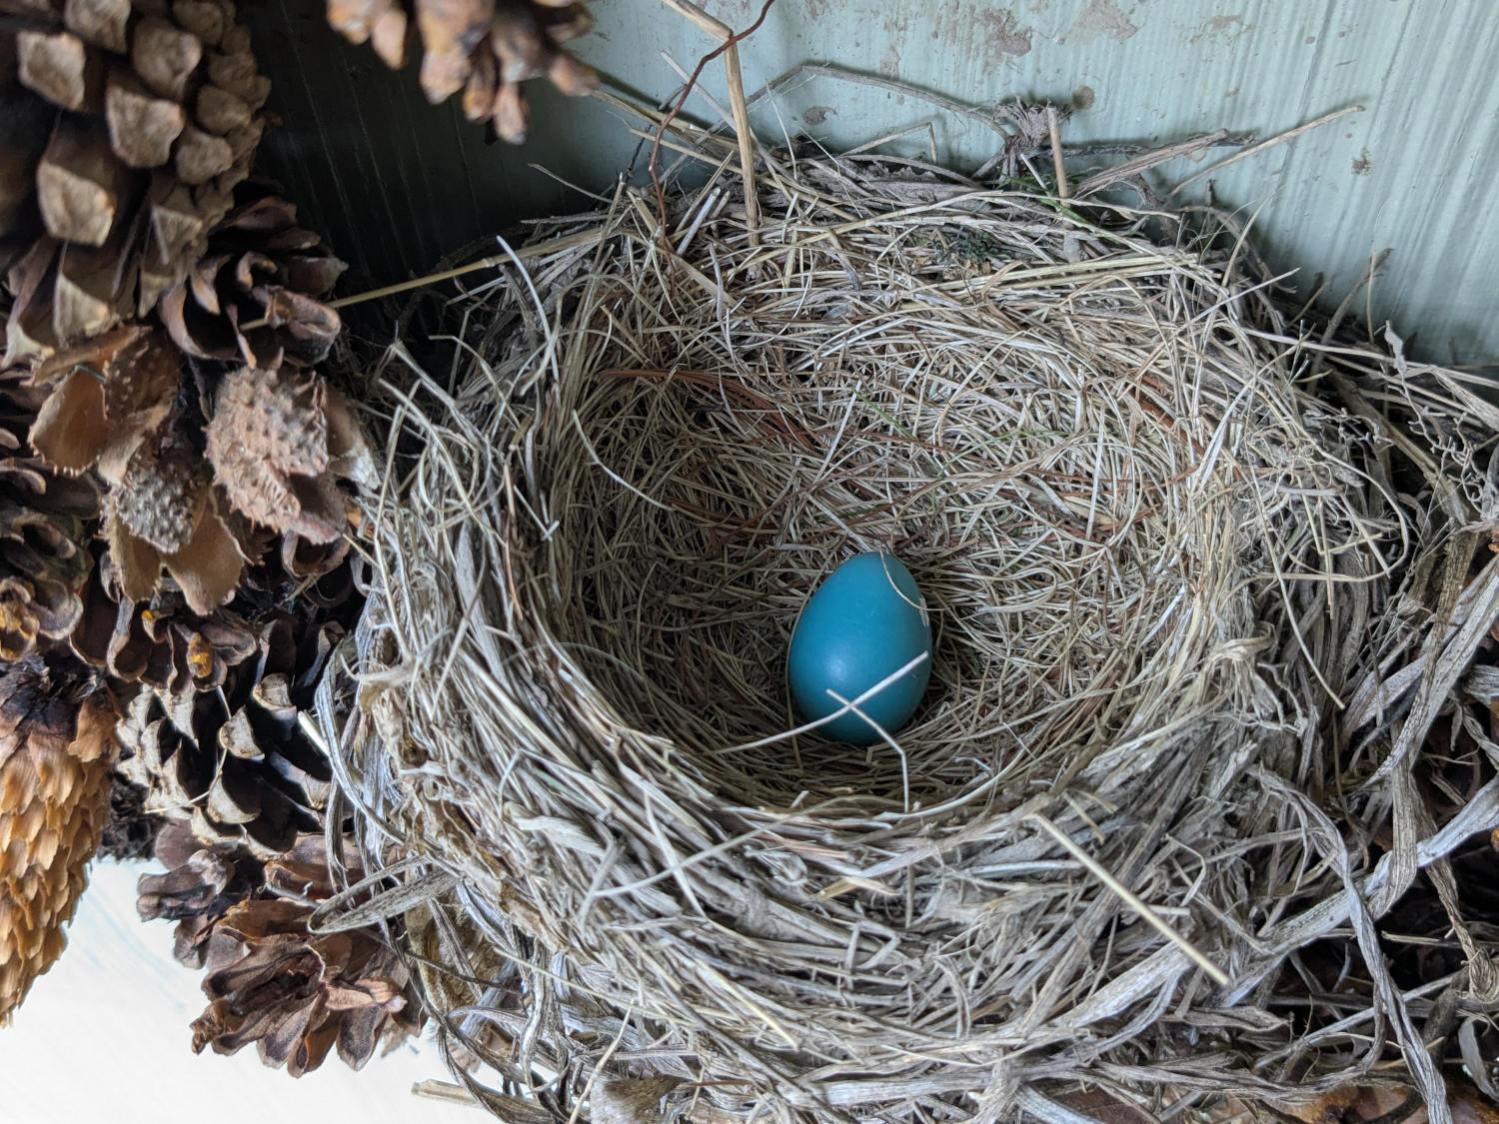
Last year, a pair of finches made several nesting attempts in the wreath at our front door, only the first of which succeeded.
This year, a pair of robins took over:

They’re considerably larger and we hoped would be more able to repel attackers. They also seemed to get off to a late start, as we saw young robins hopping around the yard with other adults while these birds were building their nest, so this may have been their second nest of the season.
The first egg appeared on 5 May:
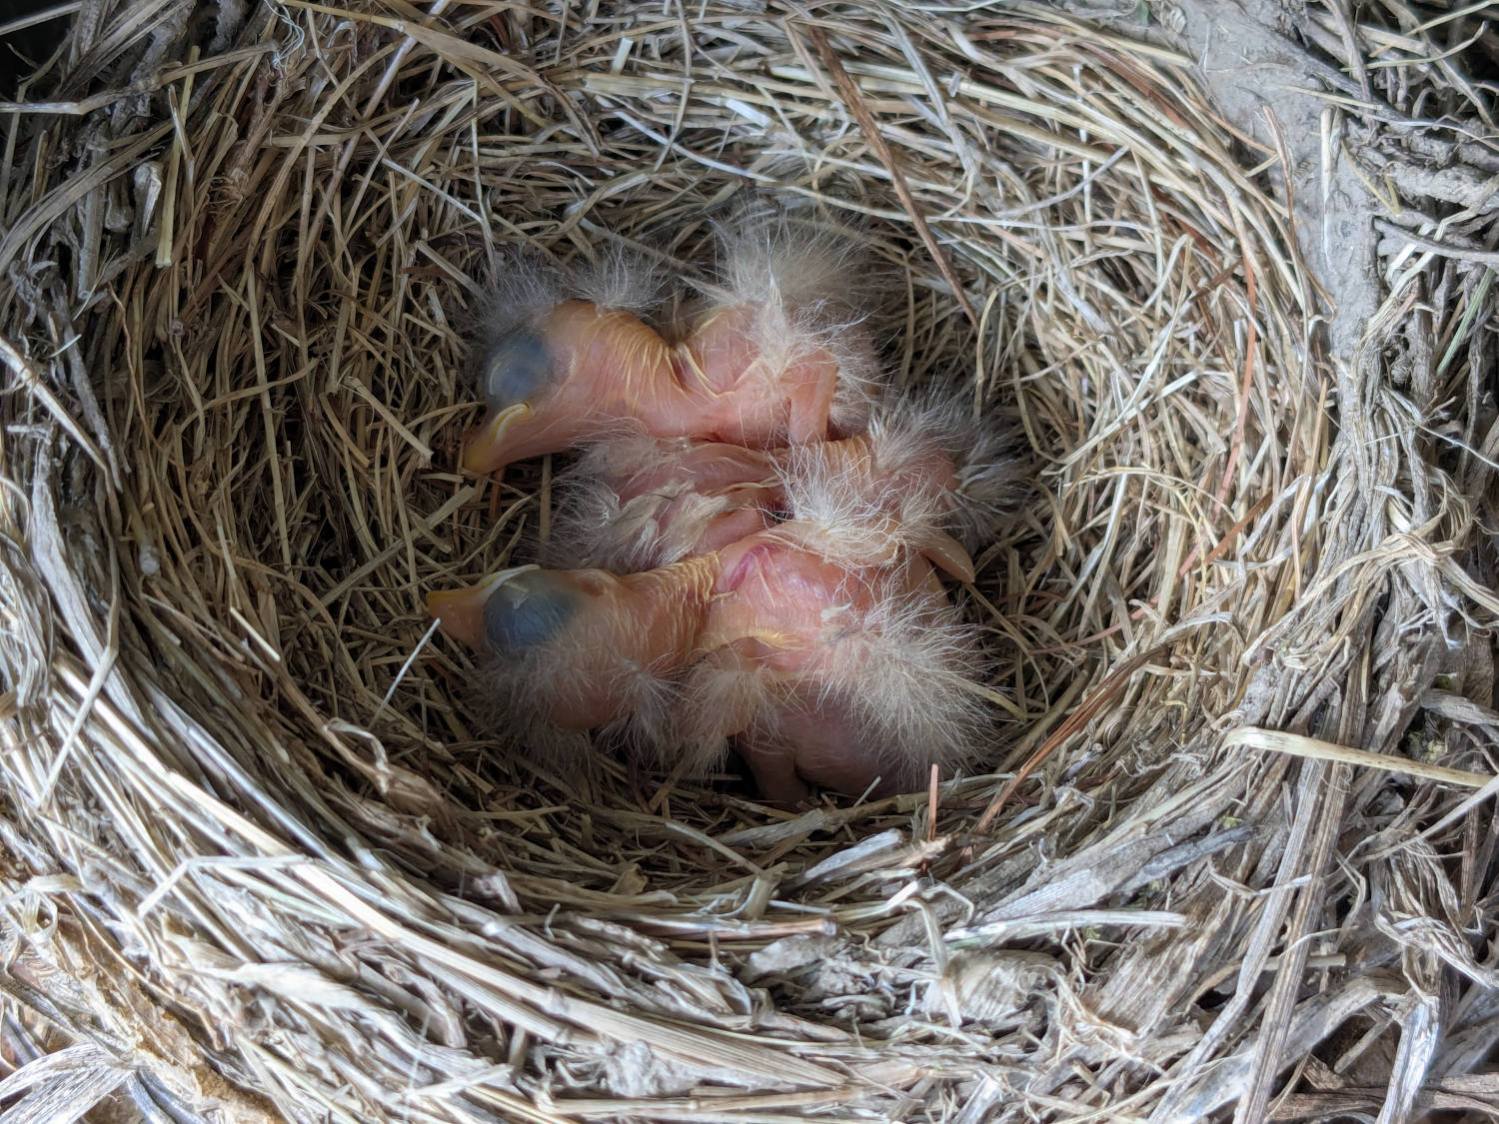
Two weeks later, the first chick pipped:

Only a mother could love something like that, but they almost always do:
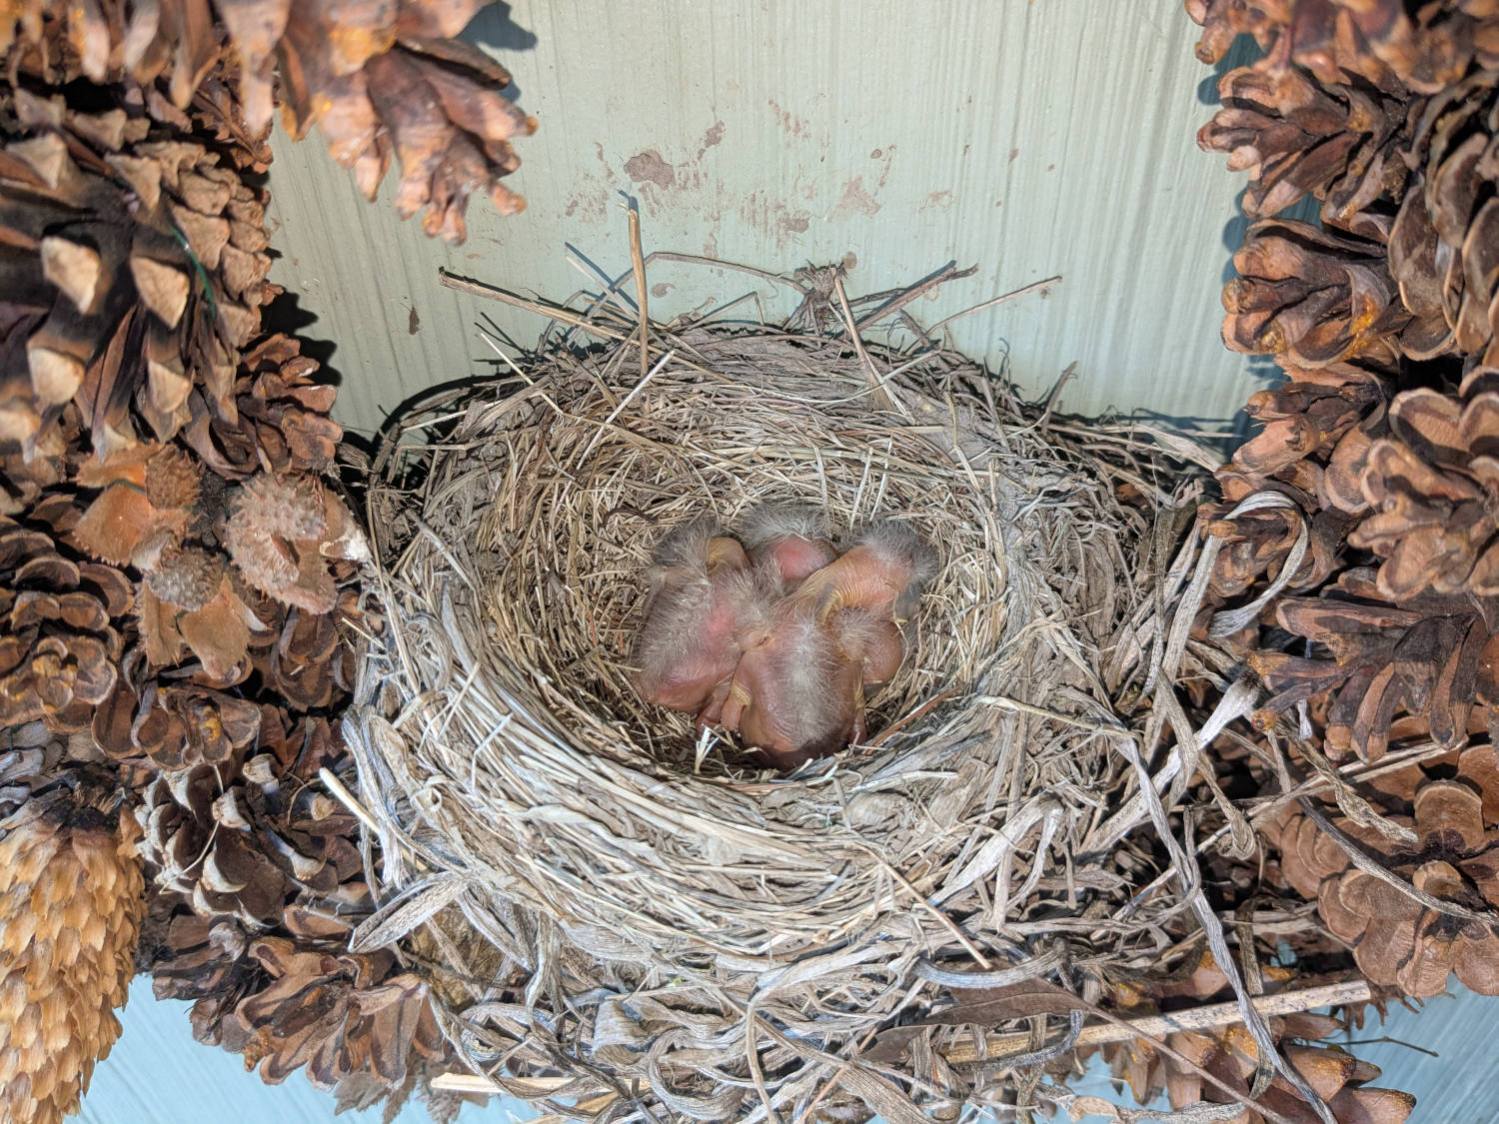
Floppy chicks are (still) floppy one day later:
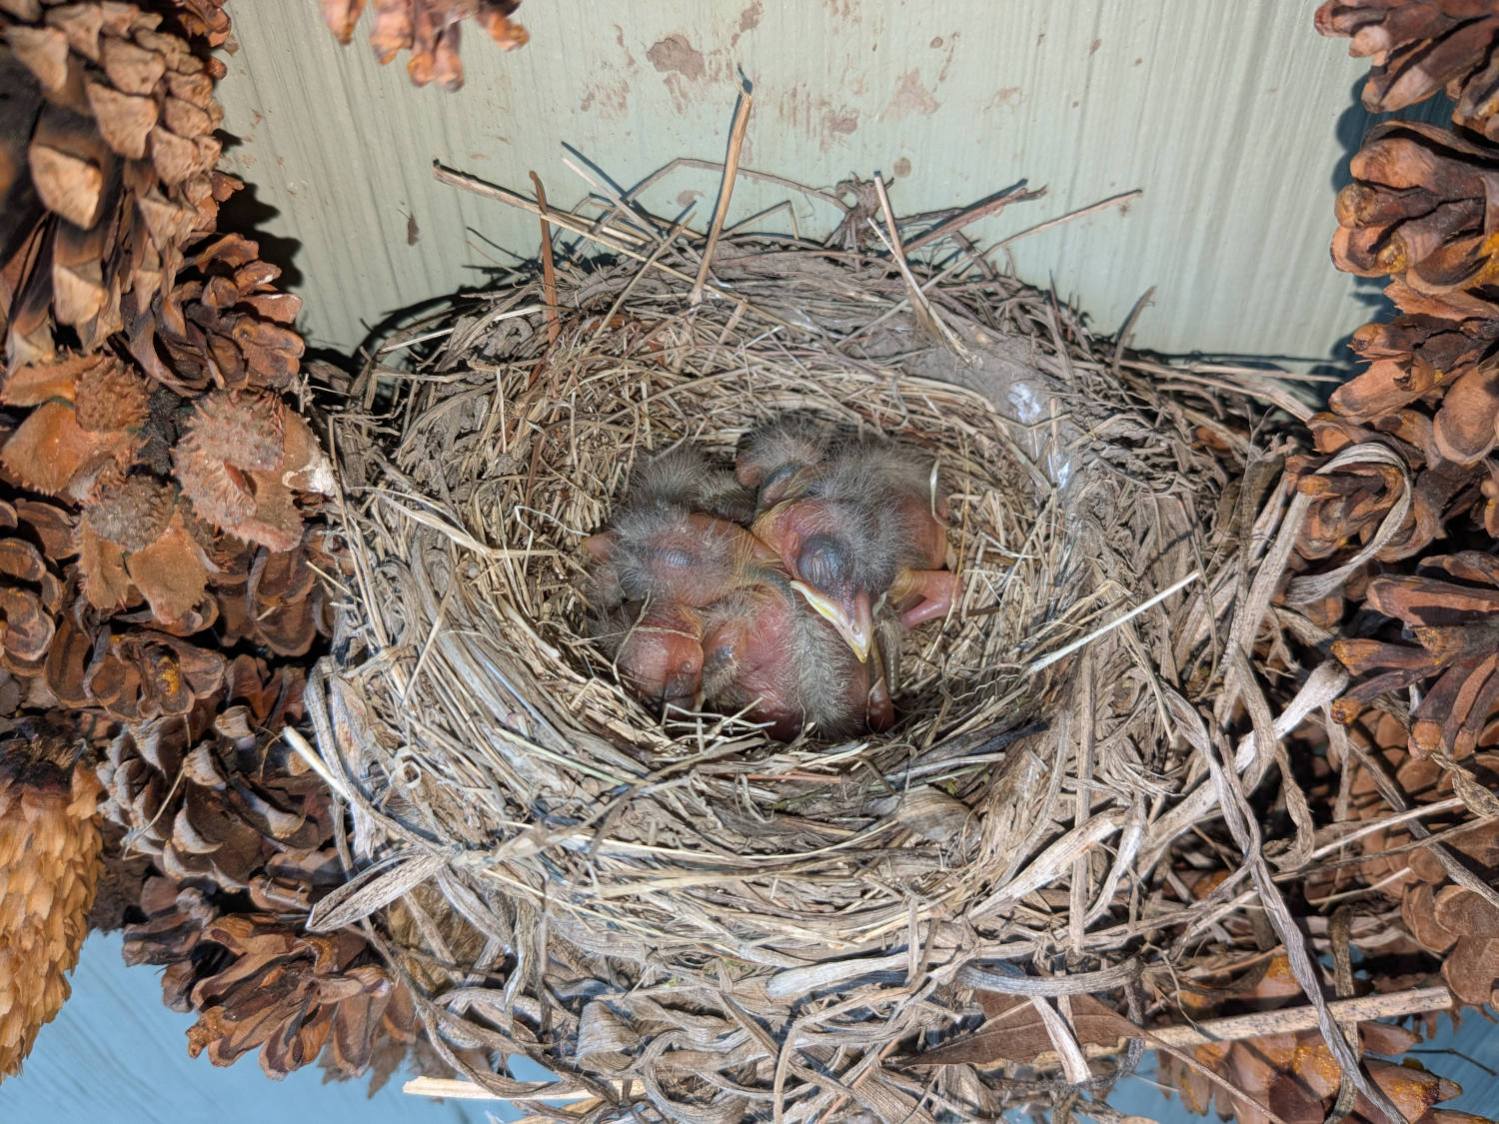
Rapid growth is Job One:
Taking shape:

And then there were none:
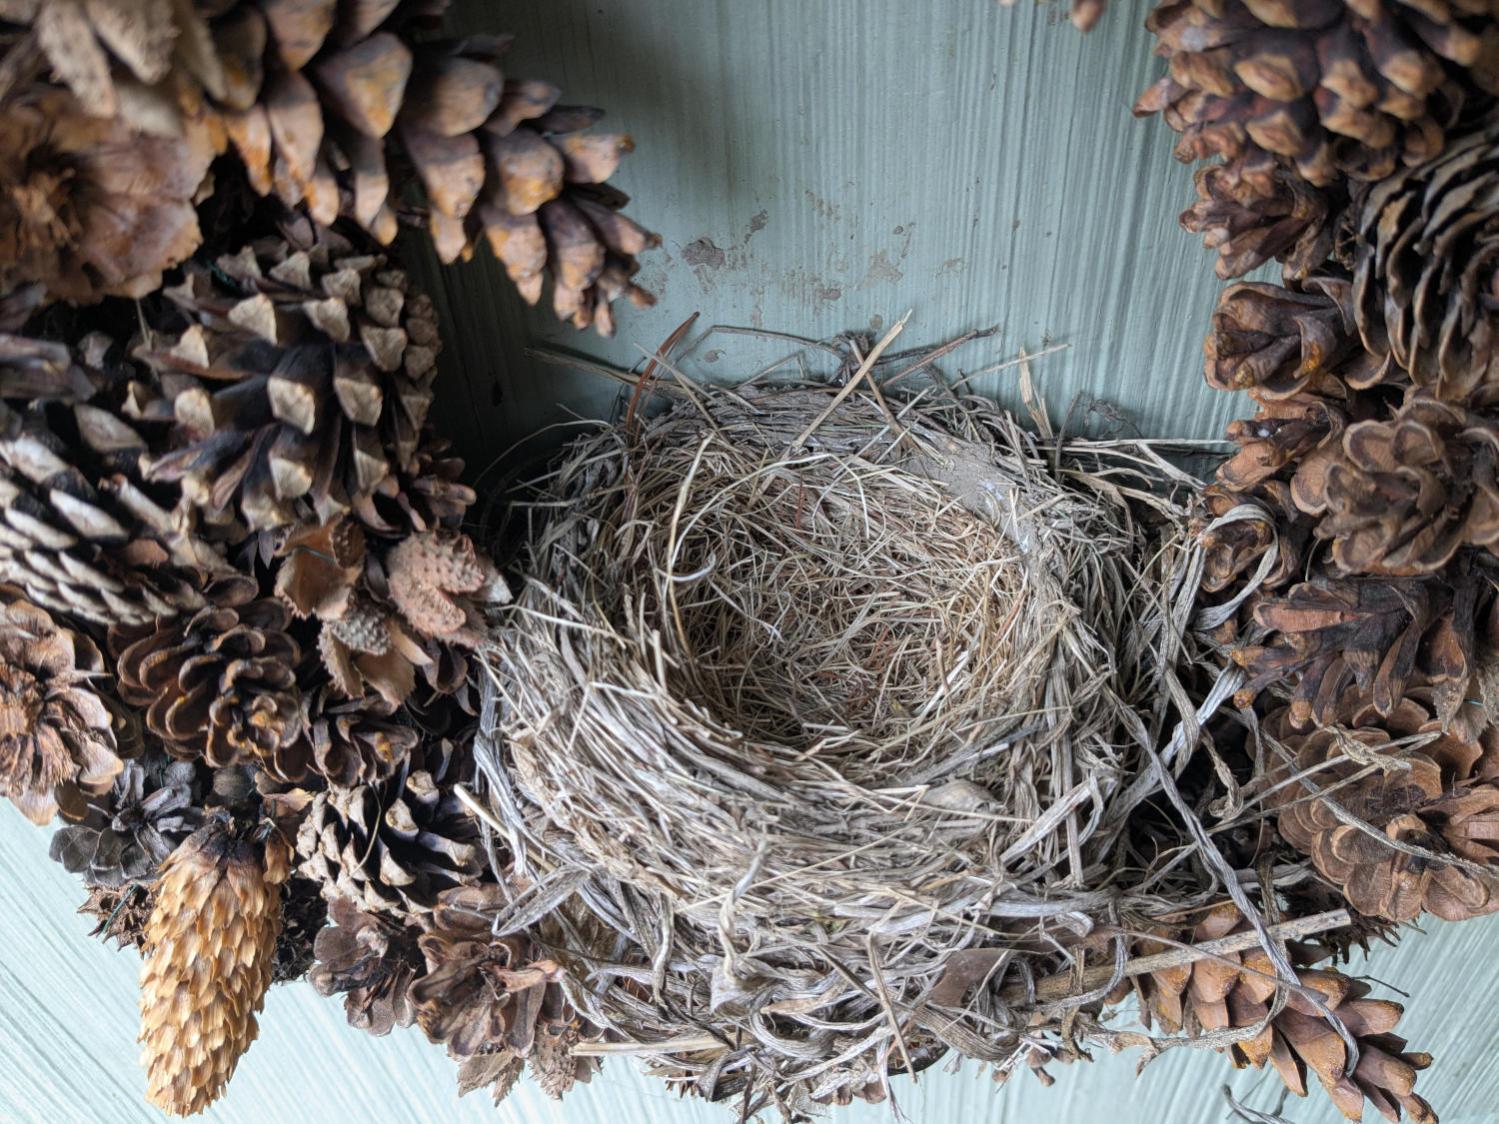
The M50 trail camera was defunct, so we don’t know what happened to them. Mary didn’t hear a fuss through the adjacent bedroom window, which suggests something grabbed them while Ms Robin was off getting breakfast.
We took the wreath down and replaced it with a slate plaque, because we’d rather not know …

So I finally took our pepper mill apart to see why it was having trouble grinding peppercorns:

It was a wedding present and, nigh onto half a century later, it’s all worn out.
Its replacement surely won’t survive so long, even with ceramic innards, but I may not notice.

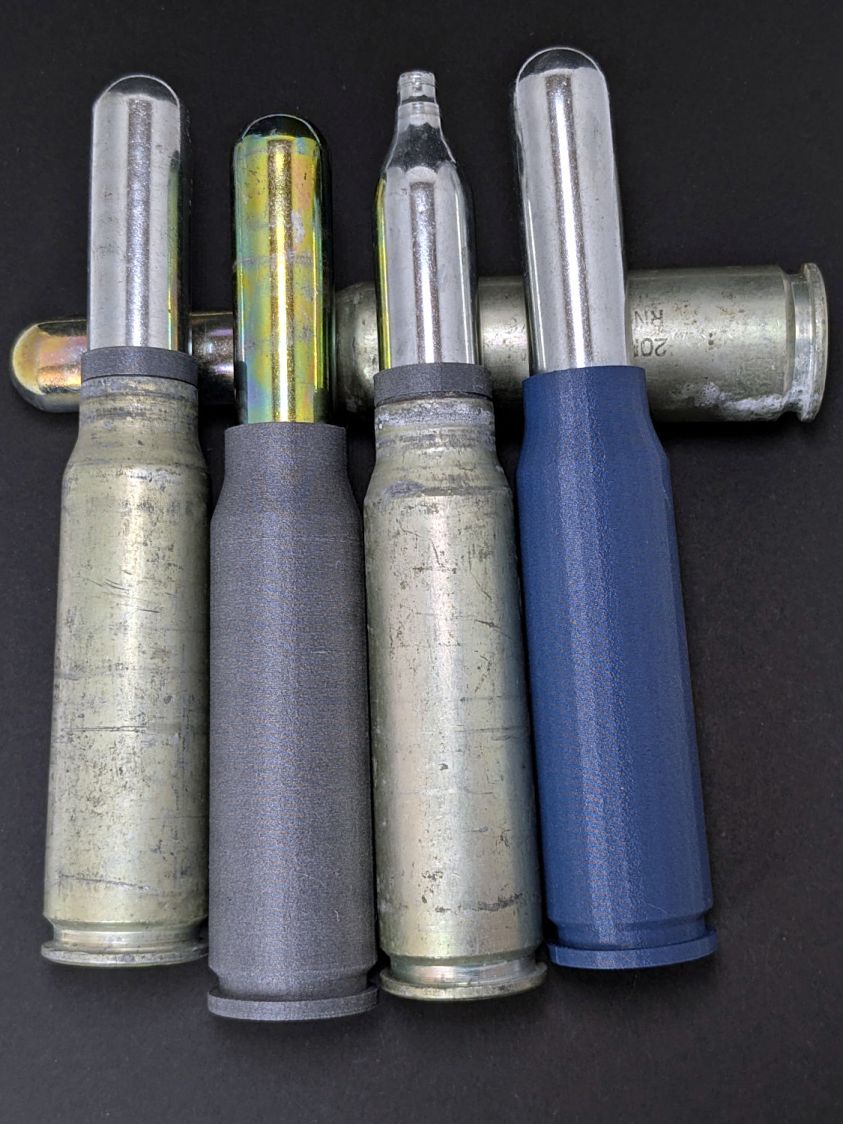
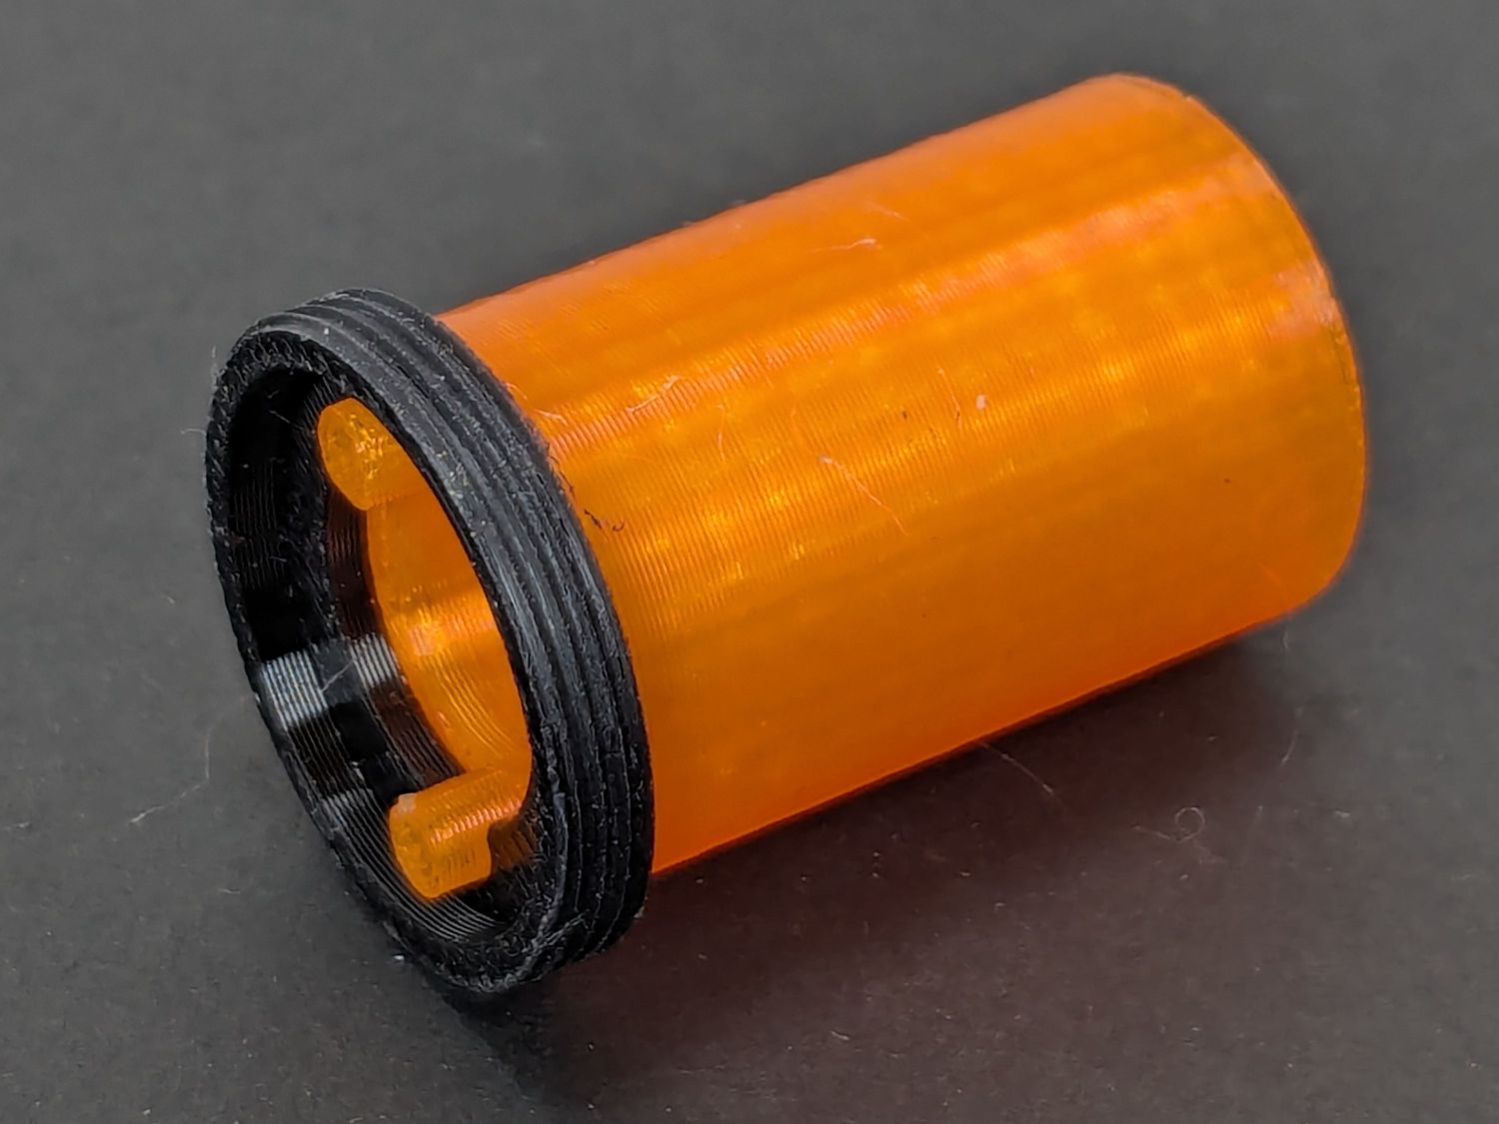
Having accumulated a box of empty 12 gram CO₂ capsules and having already done Too Many bomb fins:
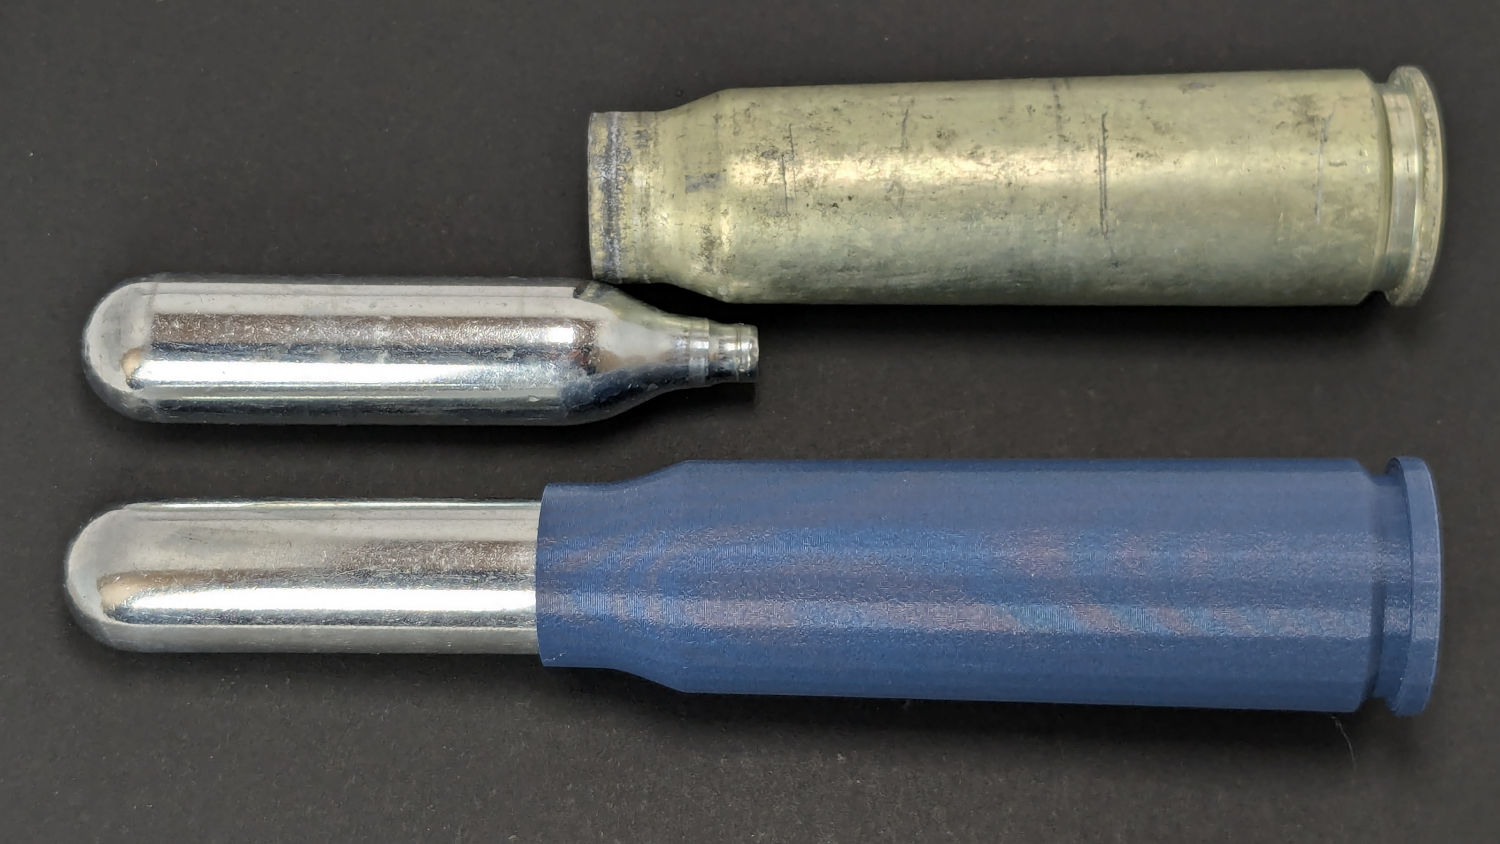
The capsule is obviously the wrong shape, too short, and only 19 mm diameter, but it’s the thought that counts.
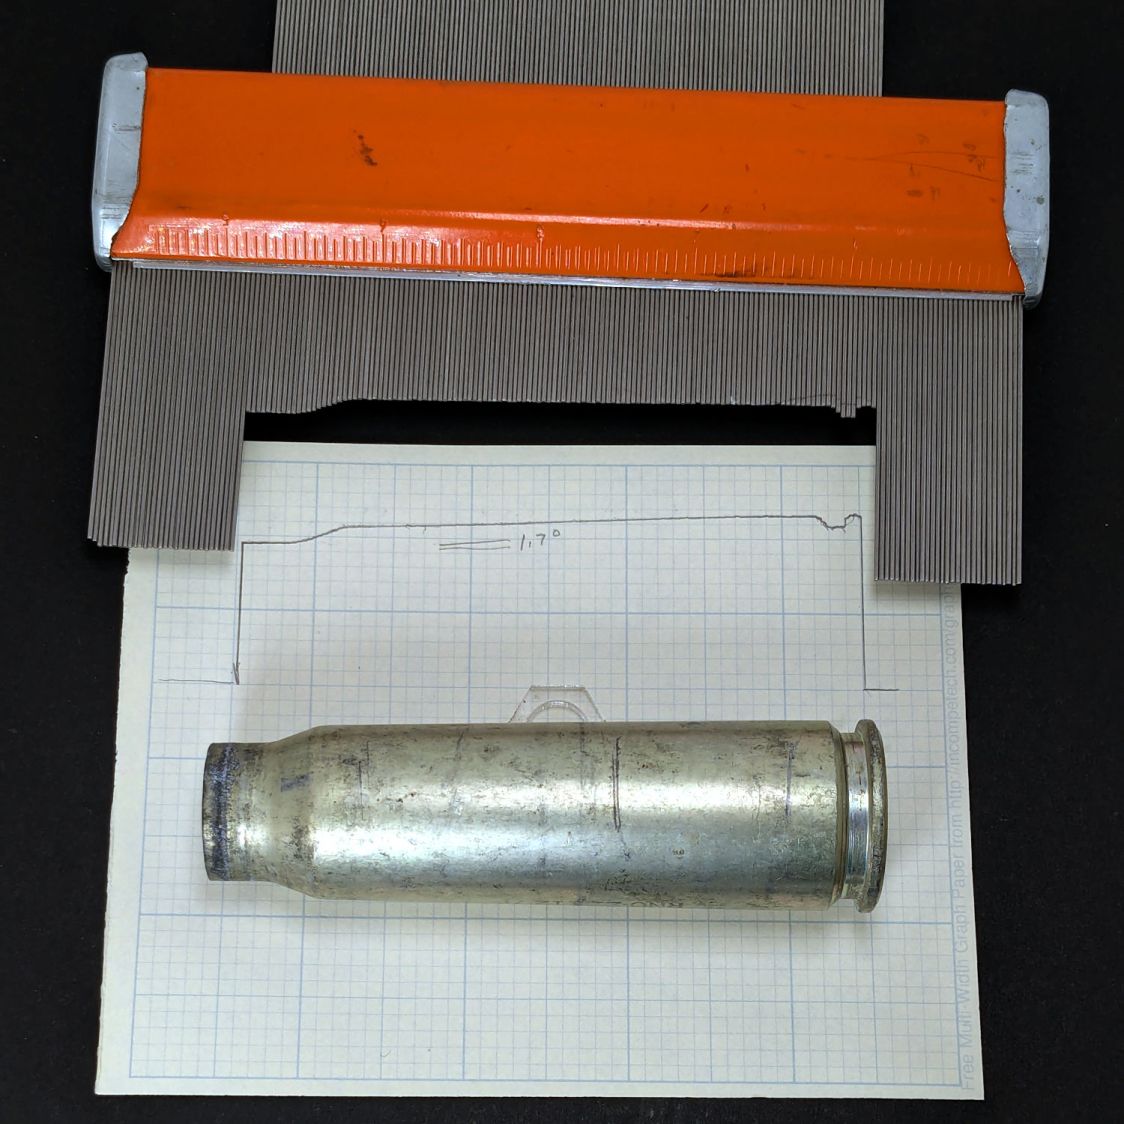
Apply the contour gauge to a genuine slightly battered 20×102mm cartridge:
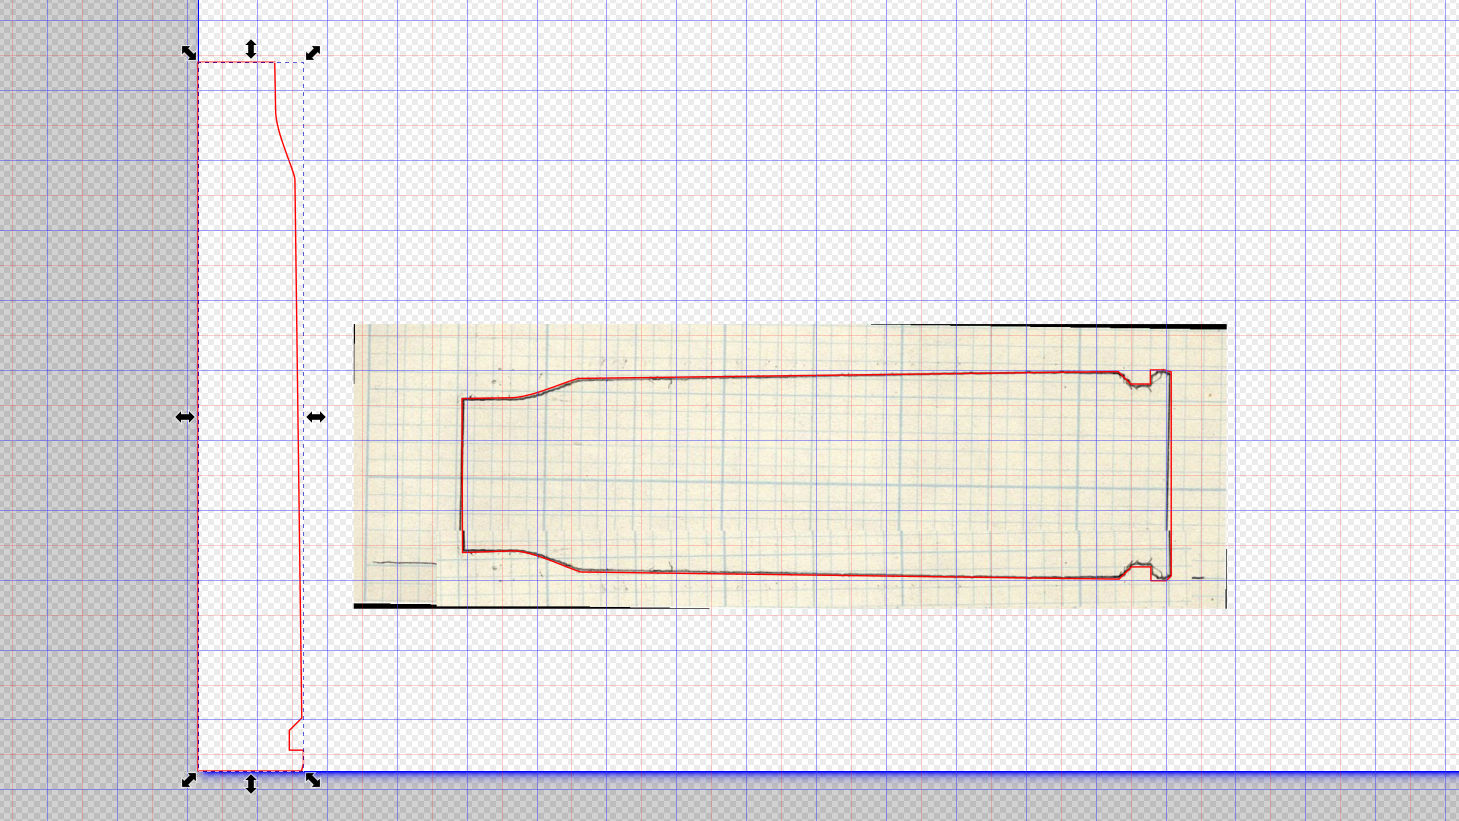
Scan the sketch, import into Inkscape, rotate the image to correct the case taper angle vs. the page, lay lines & curves around the perimeter, align half of it at the page origin to work with OpenSCAD, export as SVG:
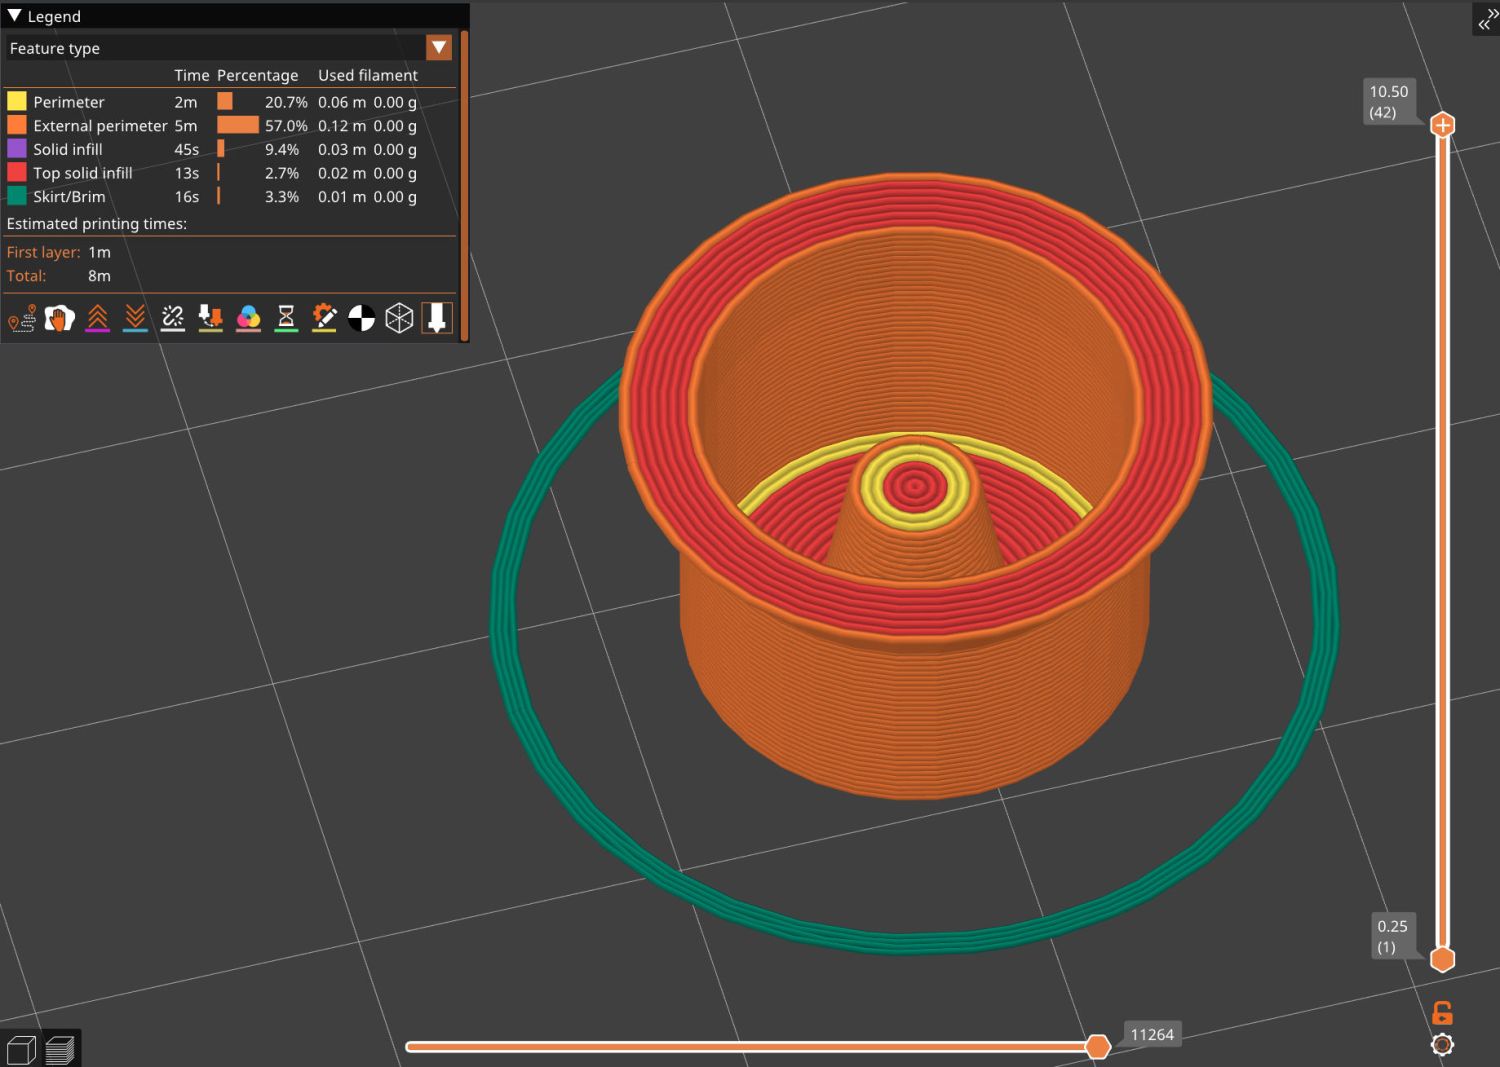
Import into OpenSCAD, let rotate_extrude do the heavy lifting, and remove some pieces:
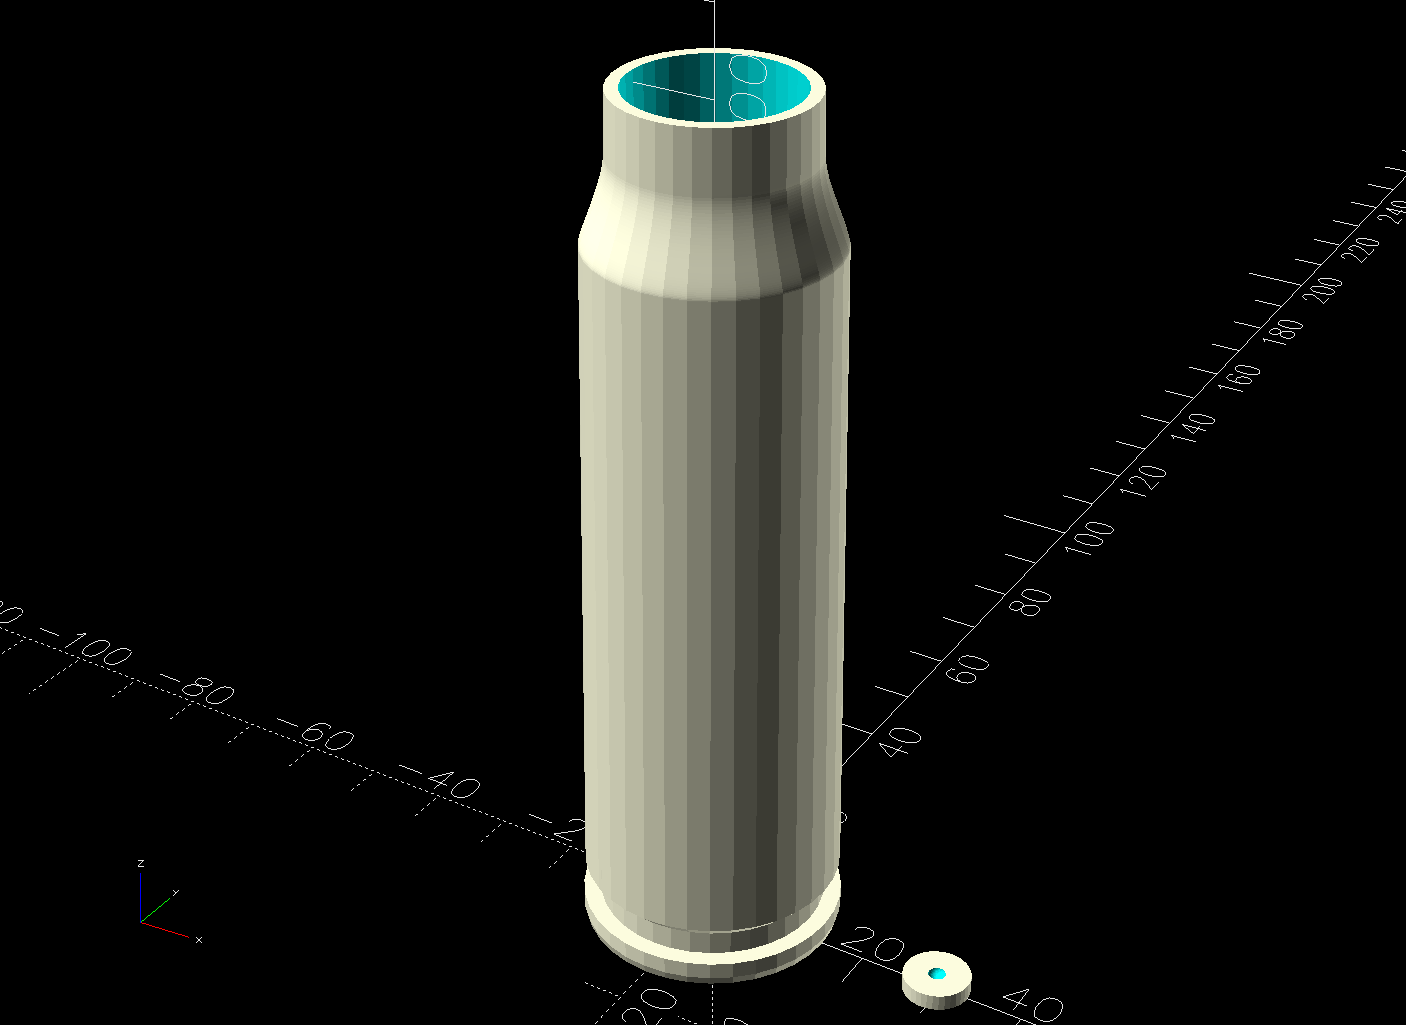
The little disk represents a fired primer you’d print separately in a different color and glue into the pocket shown in this cutaway view:
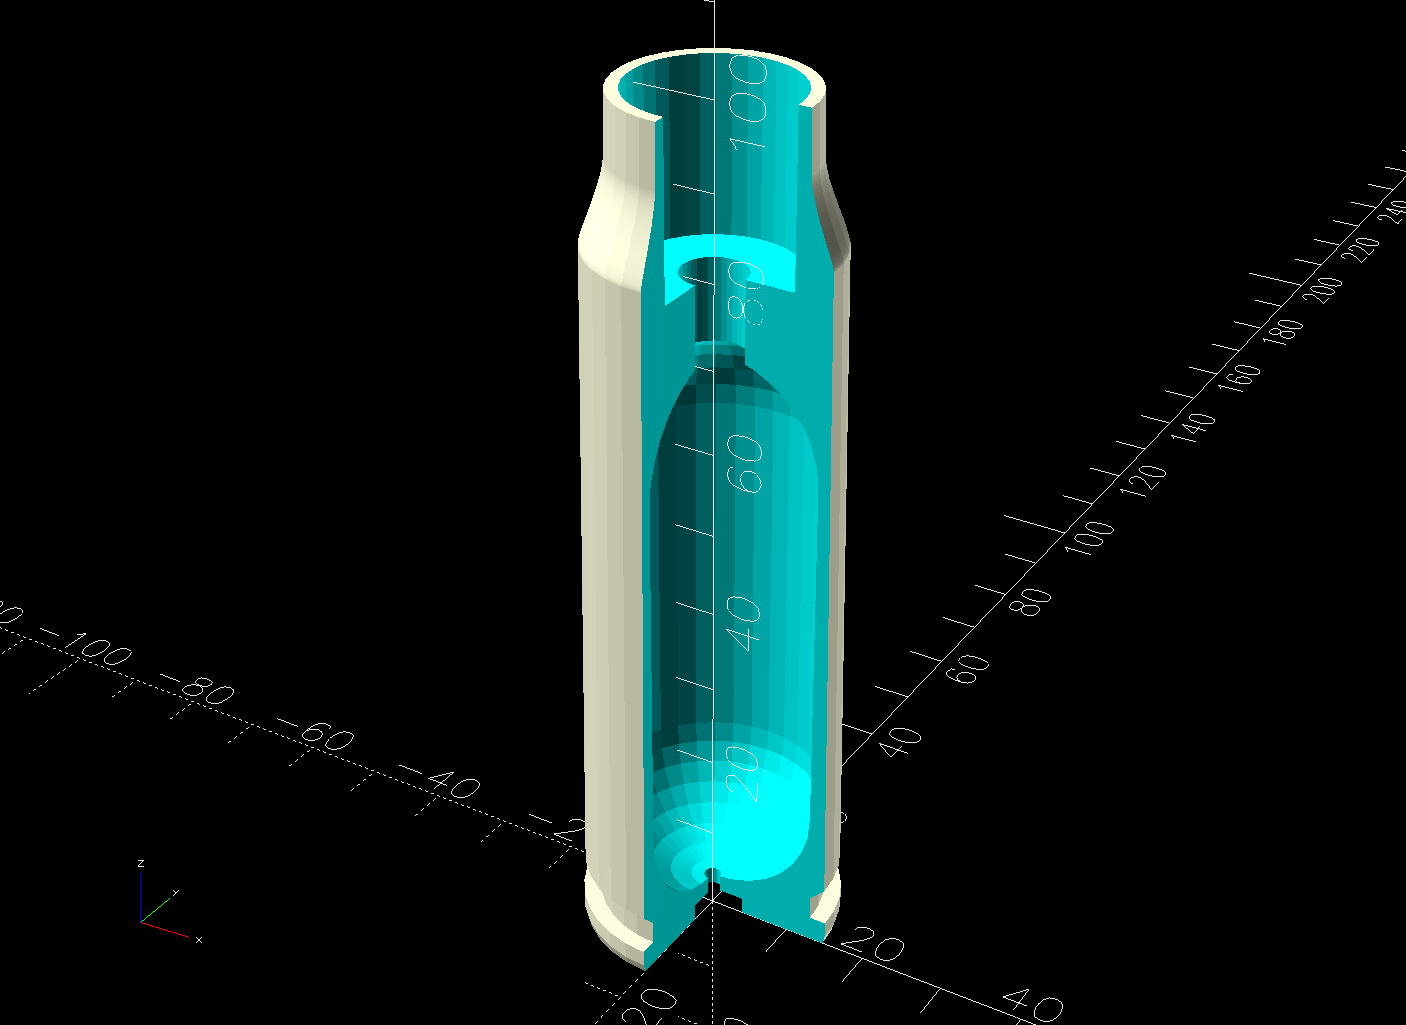
The interior void could hold sand for additional heft, as the whole thing is obviously nose-heavy; that’s certainly in the nature of fine tuning. Obviously, we are not dealing with anything that could go bang.
It builds just like you’d expect:

Dab some adhesive on the capsule tip, ditto for the primer, stick them in place, and it’s all good.
I like the gray PETG-CF version:
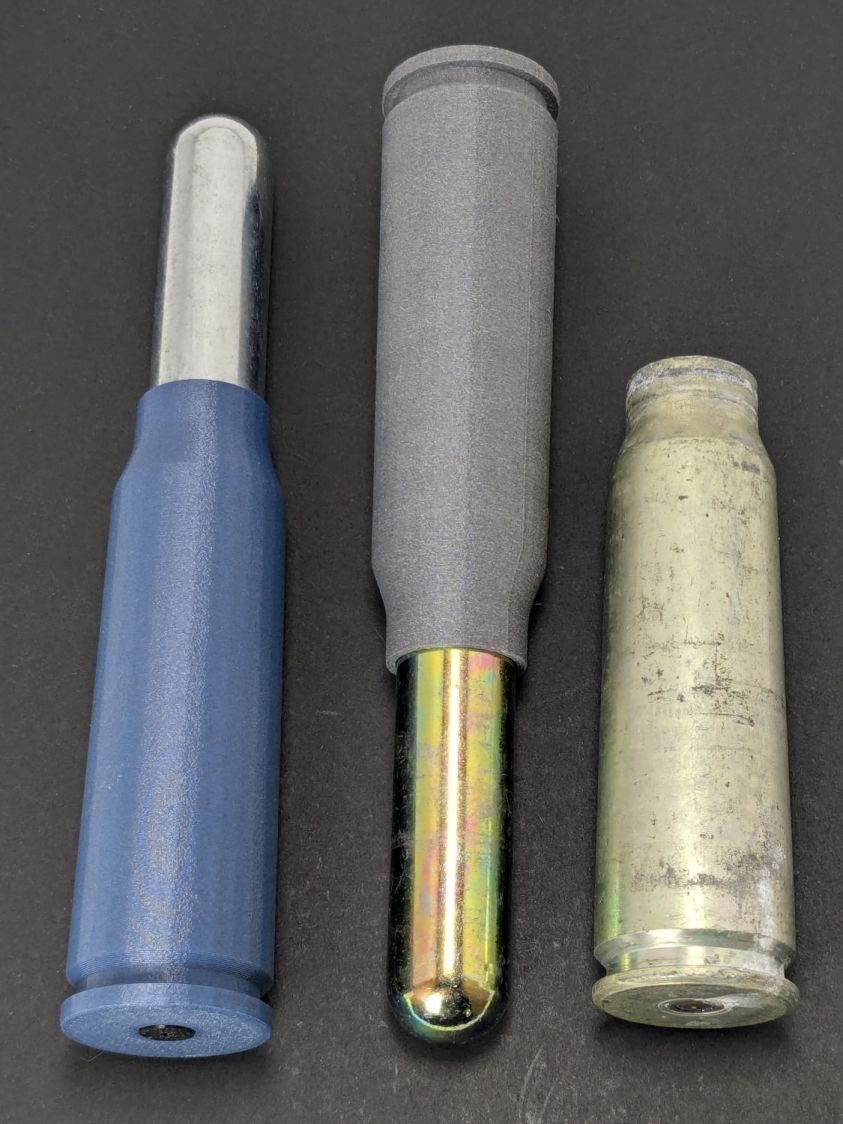
Maybe not such a good idea in this day & age. Print responsibly, as they say.
Update
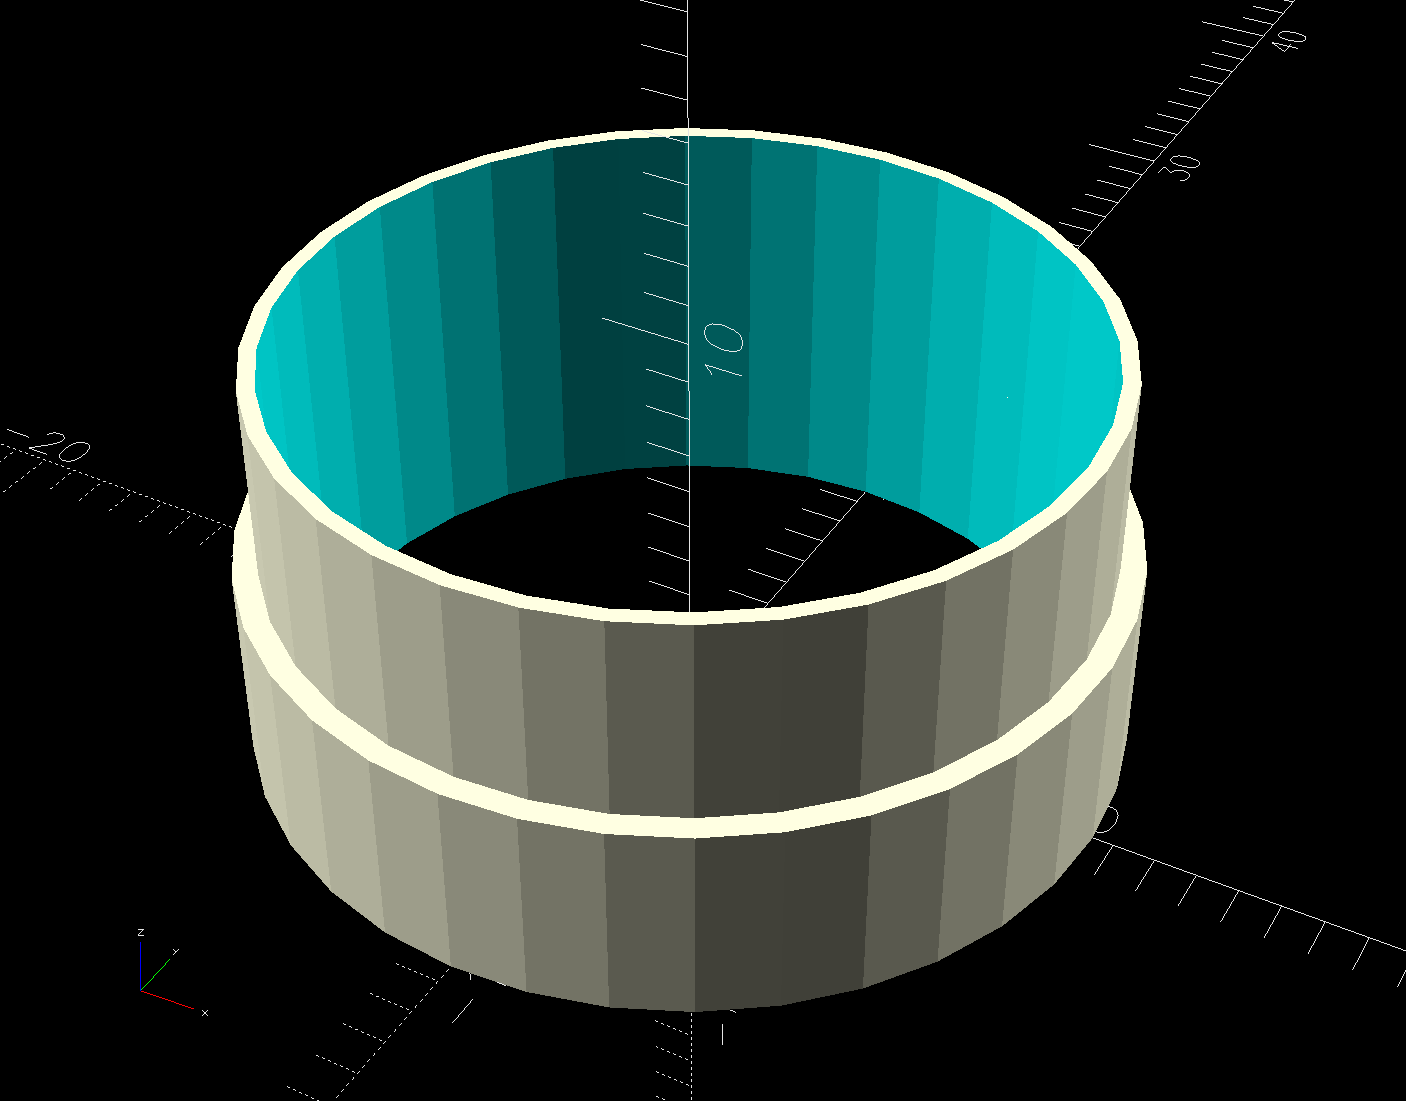
Print a sabot to fit a CO₂ capsule into a genuine steel cartridge.
The solid model:
The OpenSCAD making it happen:
module Sabot() {
tube(SabotOA[LENGTH],id=SabotOA[ID],od=SabotOA[OD],anchor=BOTTOM)
    position(BOTTOM)
      tube(SabotOA[LENGTH]/2,id=SabotOA[ID],od=CartridgeOA[ID],anchor=BOTTOM);
}
The result:
The OpenSCAD source code (minus the sabot) and outline as a GitHub Gist:
| // 20x102mm cartridge | |
| // Ed Nisley – KE4ZNU | |
| // 2025-05-18 | |
| include <BOSL2/std.scad> | |
| Layout = "Show"; // [Show,Build] | |
| Powder = true; // build internal void | |
| /* [Hidden] */ | |
| ID = 0; | |
| OD = 1; | |
| LENGTH = 2; | |
| HoleWindage = 0.2; | |
| Protrusion = 0.1; | |
| NumSides = 3*3*4; | |
| $fn = NumSides; | |
| CartridgeOA = [21.0,29.5,101.4]; // must match SVG pretty closely | |
| PrimerOA = [2.0,8.0,2.0]; | |
| CapsuleTip = [7.5,7.5,5.0]; | |
| Capsule = [7.5,18.8 + HoleWindage,83]; | |
| SeatingDepth = 25.0; | |
| Void = [CartridgeOA[ID]- 4.0,CartridgeOA[OD]- 4.0,CartridgeOA[LENGTH] – SeatingDepth – 4*PrimerOA[LENGTH]]; | |
| //———- | |
| // Define shapes | |
| module Cartridge() { | |
| difference() { | |
| rotate_extrude() | |
| import("Cartridge – 20x102mm outline.svg",layer="Cartridge Aligned Half"); | |
| up(PrimerOA[LENGTH]) | |
| cyl(PrimerOA[LENGTH] + Protrusion,d=PrimerOA[OD],anchor=TOP); | |
| up(CartridgeOA[LENGTH] + CapsuleTip[LENGTH]) | |
| cyl(SeatingDepth,d=Capsule[OD],anchor=TOP); | |
| up(CartridgeOA[LENGTH] – SeatingDepth) | |
| cyl(Void[LENGTH],d=CapsuleTip[OD],anchor=BOTTOM); | |
| if (Powder) { | |
| up(Void[LENGTH]/2) | |
| cyl(Void[LENGTH],d=CapsuleTip[OD],anchor=BOTTOM); | |
| up(2*PrimerOA[LENGTH]) | |
| cyl(Void[LENGTH],d=Void[OD],rounding=Void[OD]/2,anchor=BOTTOM); | |
| down(Protrusion) | |
| cyl(Void[LENGTH],d=PrimerOA[ID],anchor=BOTTOM); | |
| } | |
| } | |
| } | |
| module Primer() { | |
| difference() { | |
| cyl(PrimerOA[LENGTH] – Protrusion,d=PrimerOA[OD] – HoleWindage,anchor=BOTTOM); | |
| up(PrimerOA[LENGTH]) | |
| spheroid(d=PrimerOA[ID]); | |
| } | |
| } | |
| //———- | |
| // Build things | |
| if (Layout == "Show") | |
| //render() | |
| difference() { | |
| Cartridge(); | |
| cuboid(3*CartridgeOA[LENGTH],anchor=LEFT+BACK); | |
| } | |
| if (Layout == "Build") { | |
| Cartridge(); | |
| right(CartridgeOA[OD]) | |
| Primer(); | |
| } |

The switch on the Anker LC-40 flashlight serving as a running light on my Tour Easy became slightly intermittent before I replaced it with a 1 W amber LED, but it was still good enough to become the troubleshooting flashlight in the tray next to the Prusa Mk 4 printer. Eventually, of course, it failed completely and Something Had To Be Done.
Although I knew an exact replacement switch had to be available from the usual sources, I could not come up with a set of keywords capable of pulling them out of the chaff.
That was not a problem, because the assortment of SMD switches I used to replace the handlebar control caps on Mary’s Handi-Quilter HQ Sixteen contained push-on / push-off switches that were almost the right size:

Having recently convinced the MakerGear M2 3D printer to use TPU filament, all I had to do was produce a suitable cap to fit over the new switch in the flashlight’s tail:
Which turned into a multi-dimensional search over cap geometry, TPU extrusion speeds & feeds, and various impossible-to-directly-measure sizes:
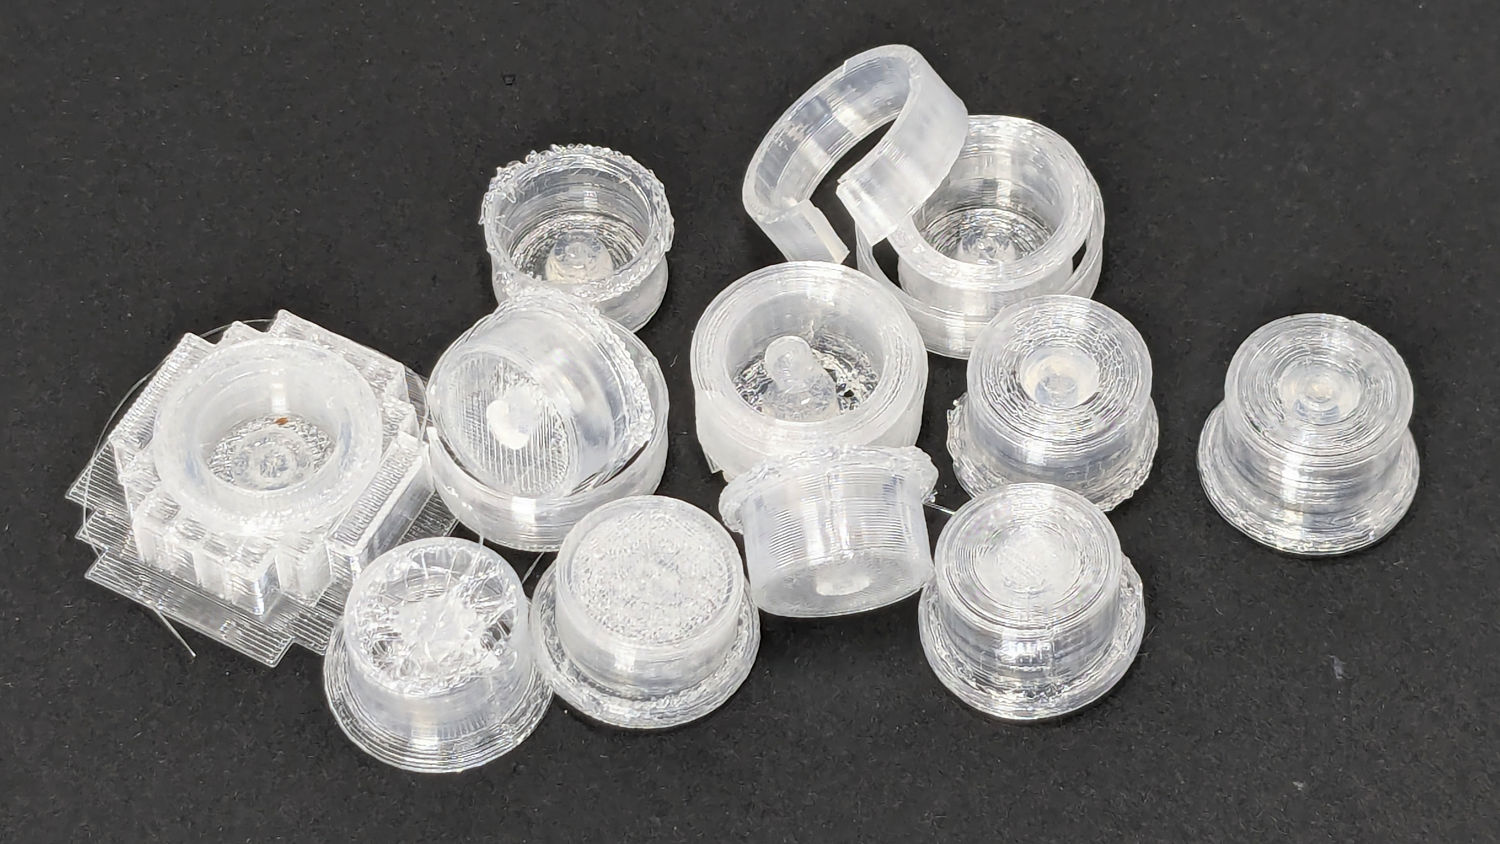
The squarish block over on the left is PrusaSlicer’s version of a support structure wrapped around the first cap version; if human lives depended on it, I could surely extract the cap, but it would take a while.
The remaining debris samples occured while discovering:
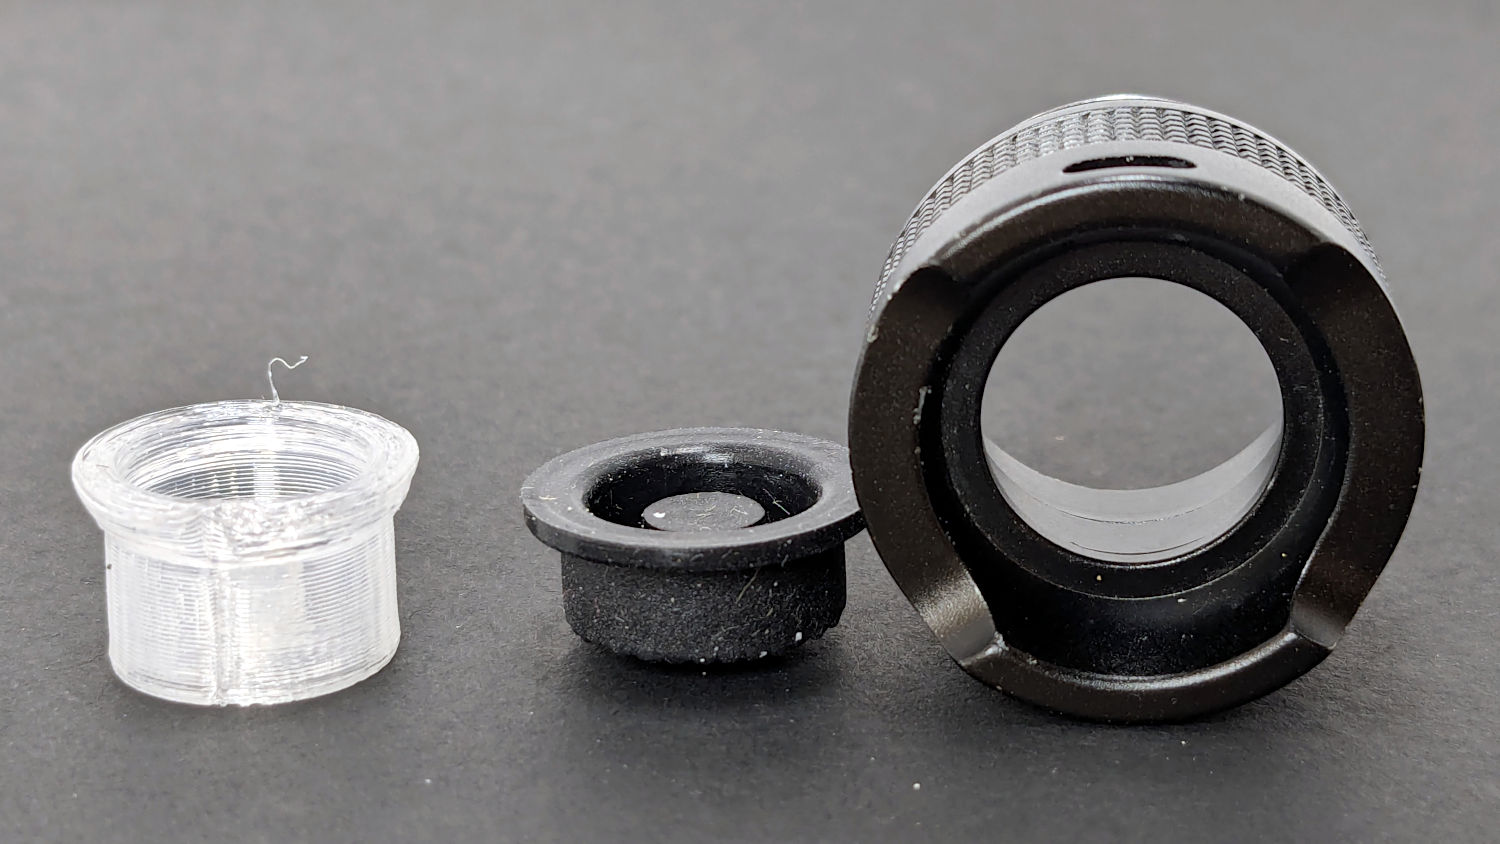
Eventually I came up with a suitable combination:
Because I expected this would be an easy job, I used snap ring pliers to unscrew and rescrew the threaded retaining ring holding the switch PCB in place. Because the pliers didn’t have a stable grip on the ring, the threads eventually became just a bit goobered.
This was not a problem, because I have a(nother) 3D printer:
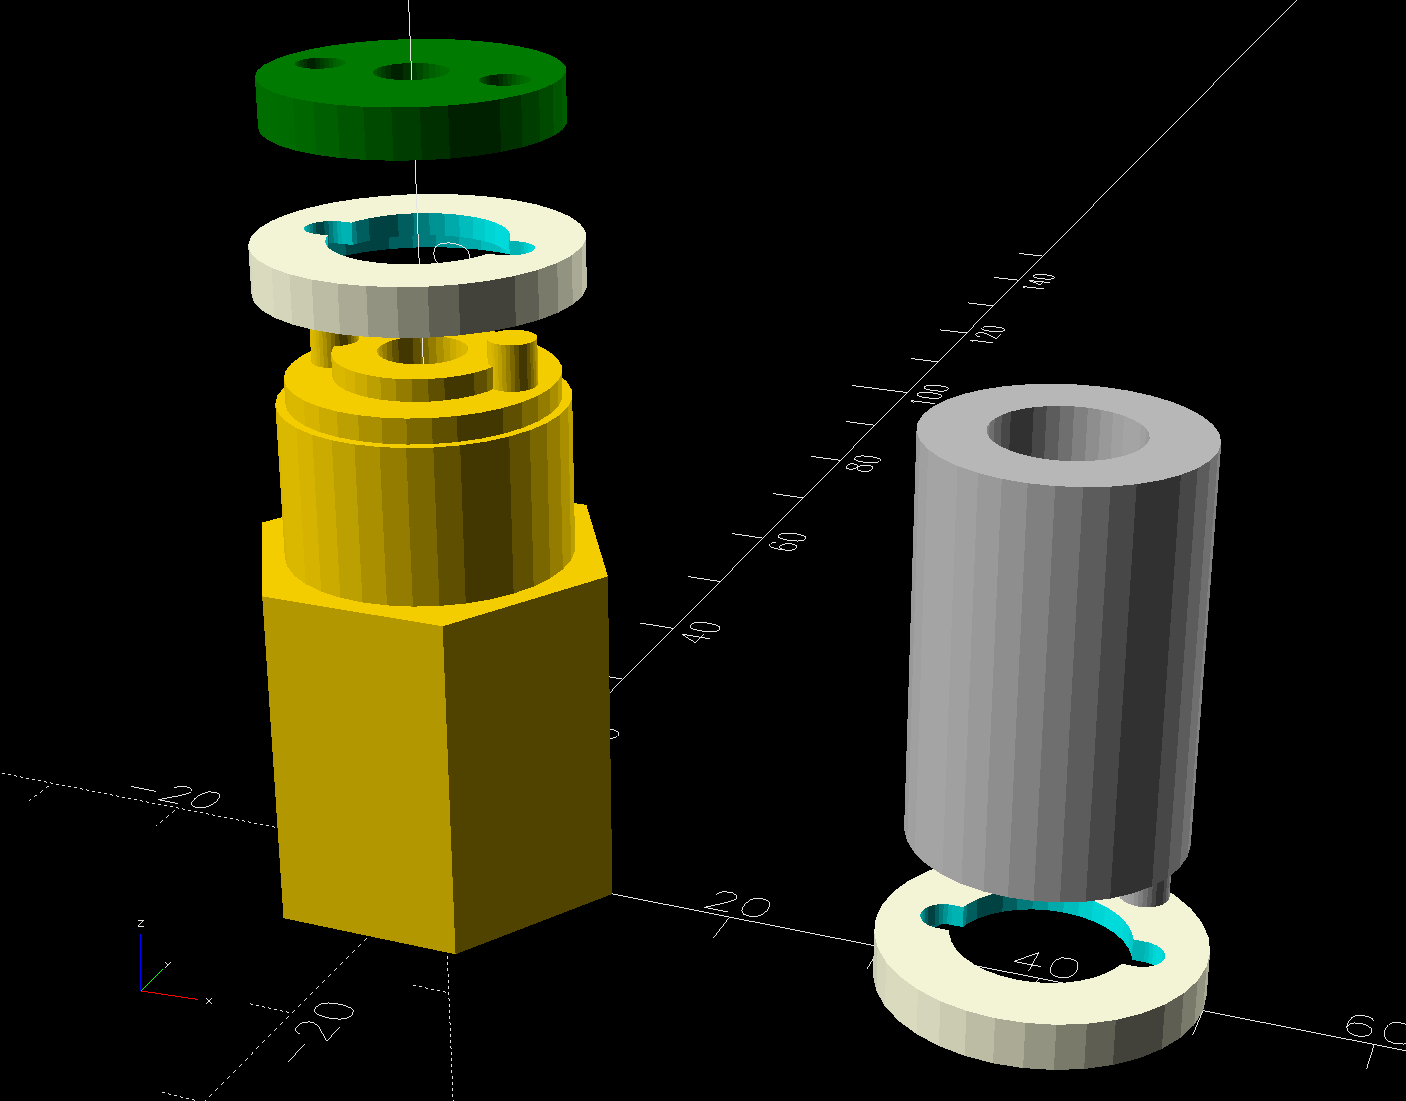
The gray thing on the right is a simple pin wrench fitting both the original and the replacement retaining rings, so I can orient the rings properly while unscrewing & rescrewing:
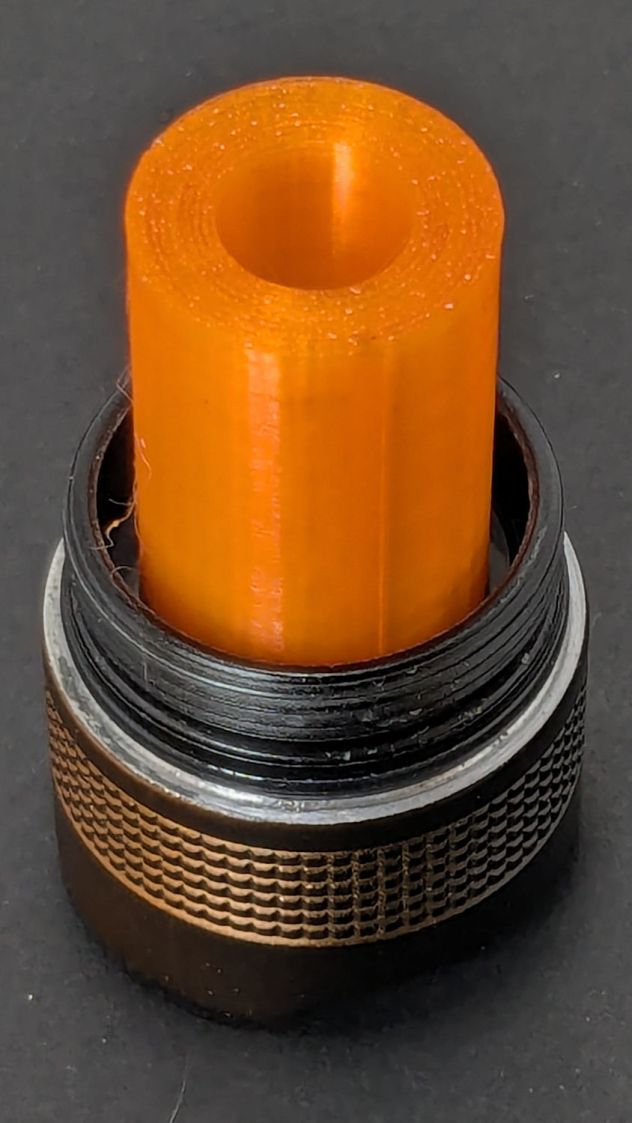
The threads have a 0.75 mm pitch and, while it’s possible to print screw threads, even a tedious 0.1 mm layer height would define each turn of the thread with only 7-½ layers.
This was not a problem, because I have a mini-lathe:

The yellow & green things on the left of those solid models are the fixture holding a retaining ring for threading and the washer applying pressure to keep the ring in place:
The alert reader will note that washer lacks holes for the alignment pins I added after seeing the washer sit not quite concentric on the fixture. I could call it continuous product improvement, although I doubt I’ll print another one.
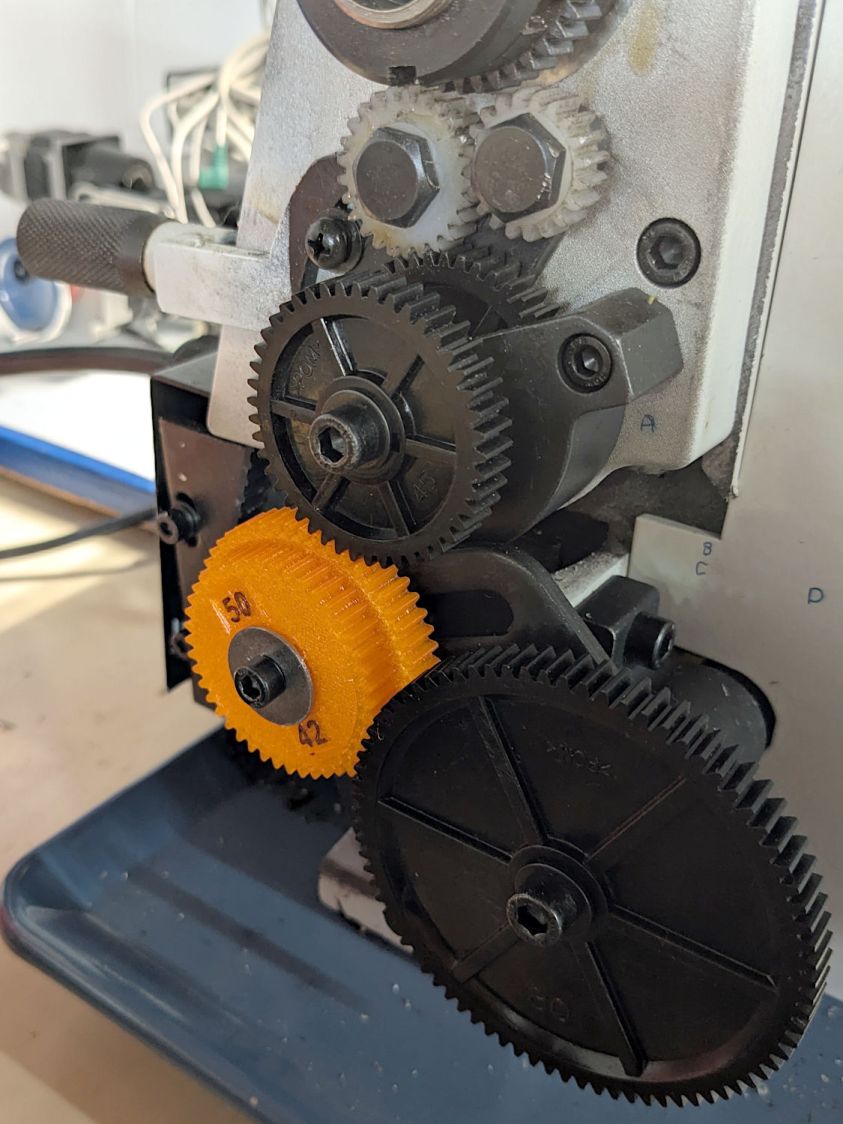
Setting up the lathe involved finding the proper set of change gears, including the vital 42-50 stacked gear I made a while ago to print metric threads on a hard-inch lathe:
Although you’re supposed to measure the thread spacing on a skim pass, I find it’s easier to just measure the carriage movement for one spindle rotation:
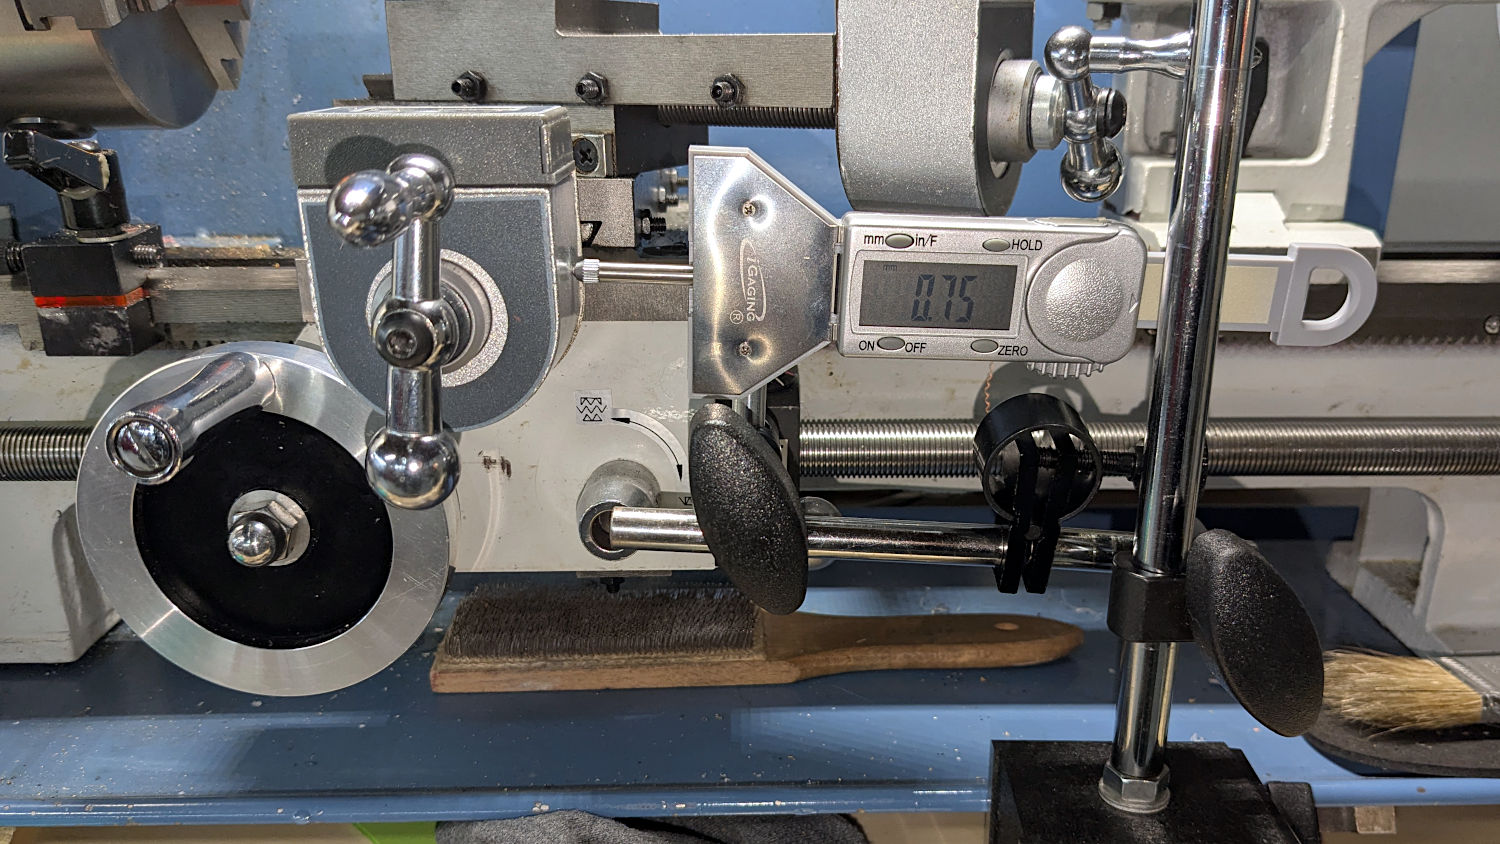
A few passes produced a fine retaining ring:
Sporting much nicer looking threads than the goobered original:
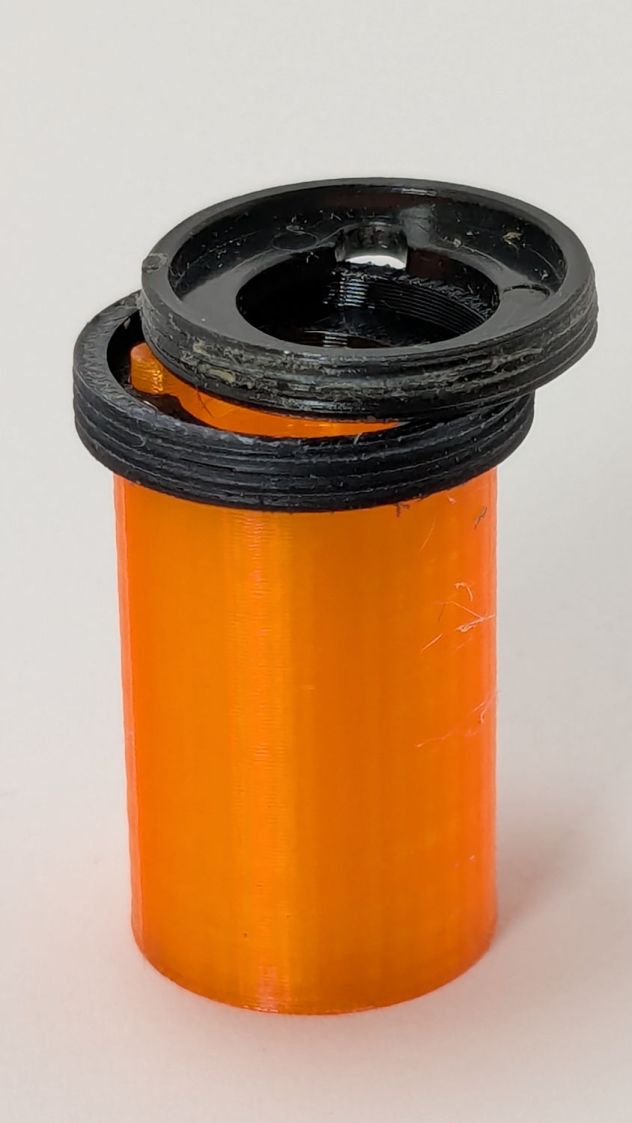
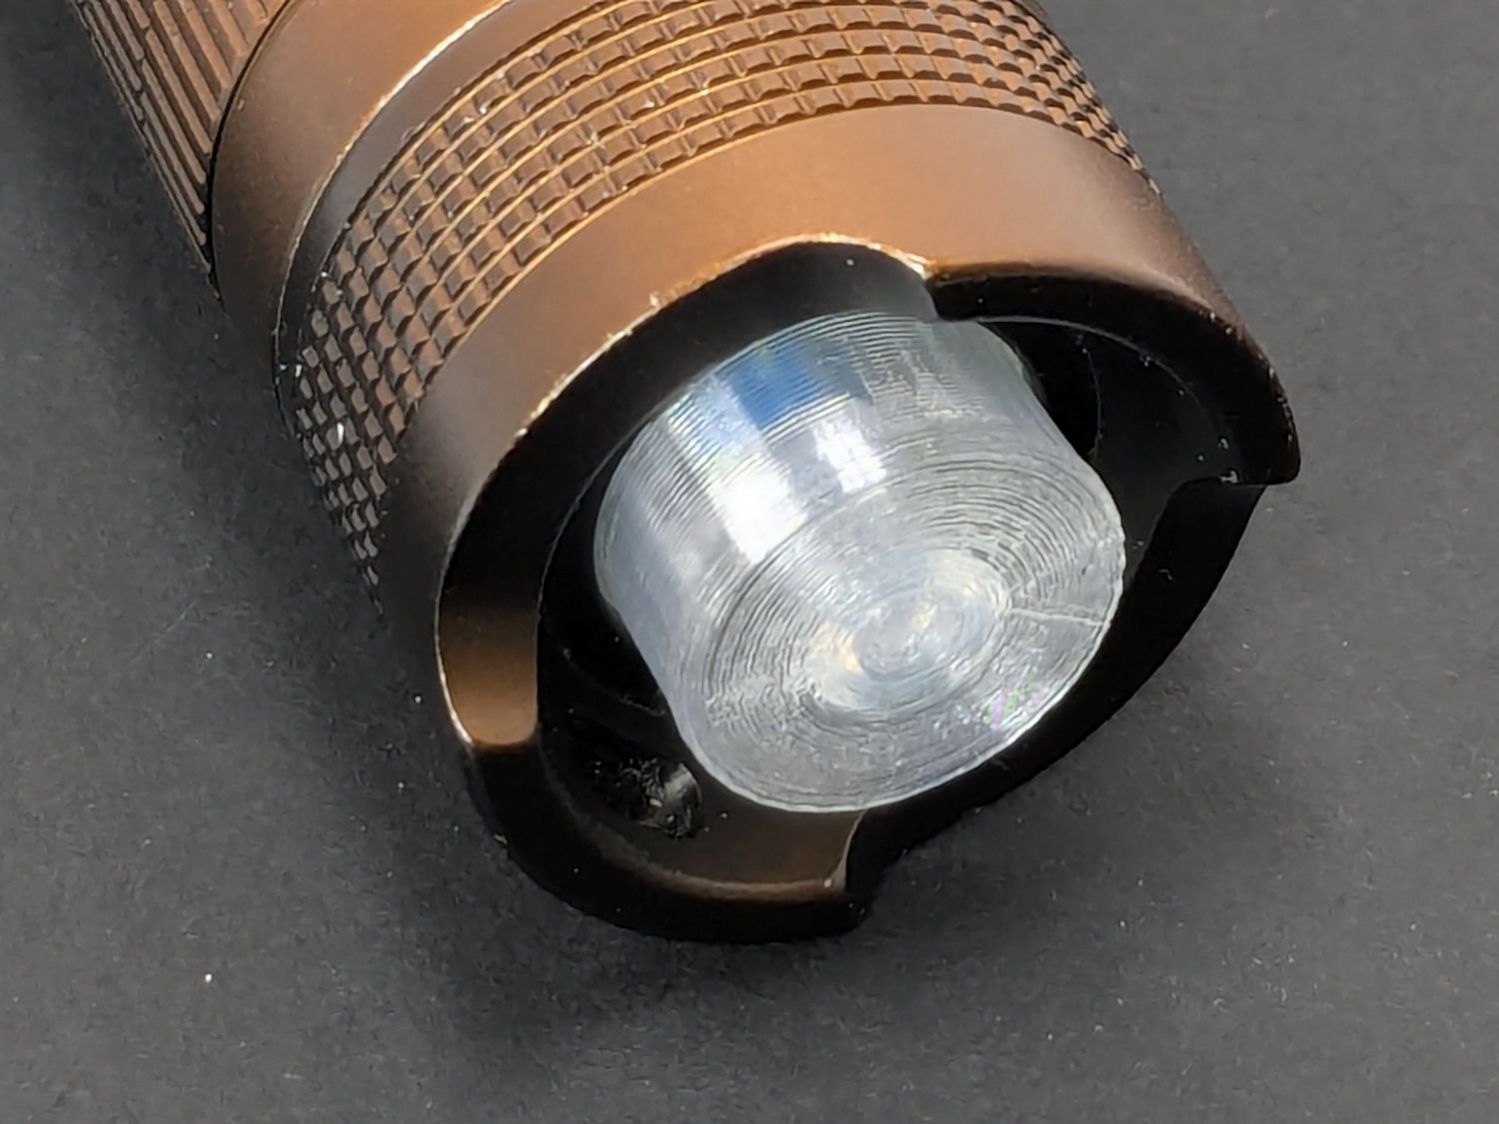
The original switch had a stabilizing ring around the body to prevent it from wobbling under the original rubber cap.
This was not a problem, because I have a laser cutter:
Those came from a scrap of fluorescent acrylic.
The wave washer behind the acrylic stabilizer improves the contact between the PCB trace around the rim and the flashlight tailcap, with the current passing through the body to the “light engine” up front. The retaining ring provides enough pressure to compress the wave washer, which is why it’s so easily goobered without a close-fitting pin wrench.
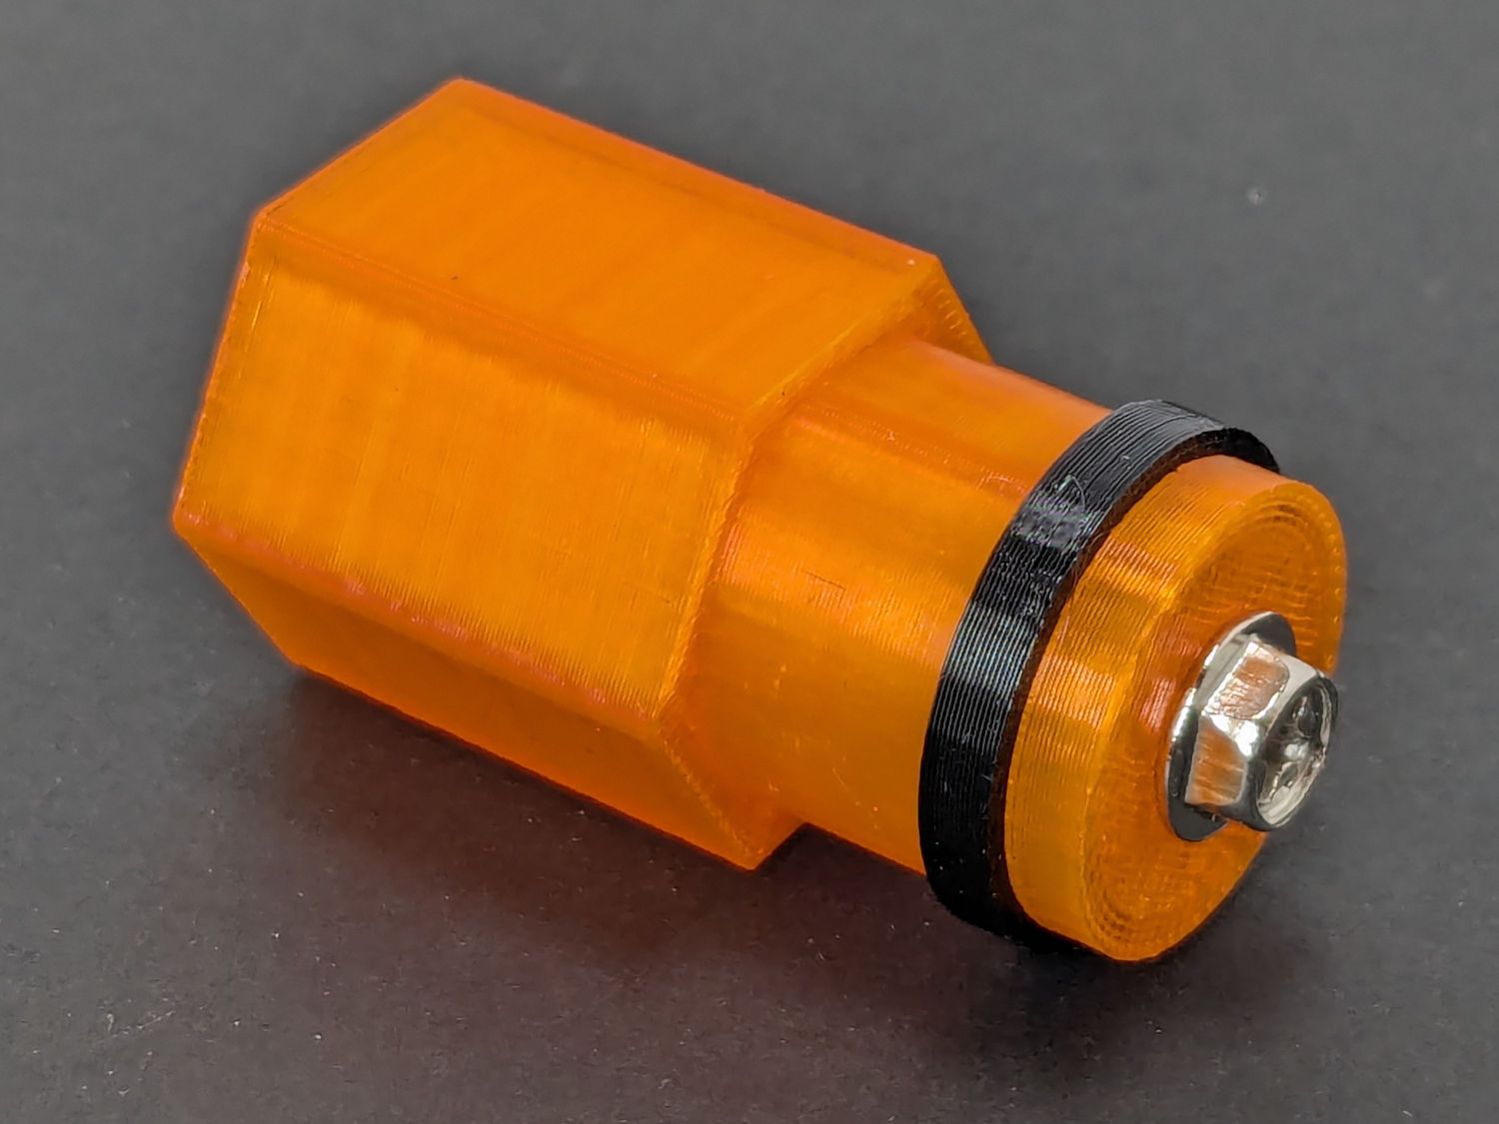
With everything assembled in reverse order, the flashlight worked pretty much as it did back when it was new:
However, after describing this during a recent SquidWrench meeting, I discovered that adding “latching” to my keywords surfaced a bodacious assortment of flashlight switches, so (a few days later) I removed the not-quite-right switch and replaced it with an identical twin of the OEM switch requiring just a little lead forming to fit the PCB.
Even better, using the 3D printed pin wrench to screw the original retaining ring into the flashlight’s aluminum threads a few times re-formed (unrelated to recent electrolytic capacitor reforming) its goobered threads well enough to fit and work perfectly again.
So I have:
And I loves me a happy ending or two!
The OpenSCAD source code as a GitHub Gist:
| // Anker LC-40 flashlight switch retainer | |
| // Ed Nisley – KE4ZNU | |
| // 2025-05-05 | |
| include <BOSL2/std.scad> | |
| Layout = "Show"; // [Show,Build,Retainer,Fixture,Washer,Wrench] | |
| Gap = 5; // [0:10] | |
| /* [Hidden] */ | |
| HoleWindage = 0.2; | |
| Protrusion = 0.1; | |
| NumSides = 3*3*4; | |
| ID = 0; | |
| OD = 1; | |
| LENGTH = 2; | |
| $fn=3*3*4; | |
| Plate = [16.8,20.0,3.0]; // retainer plate, OD allows for lathe threading | |
| PlateRecessDepth = 1.6; | |
| PlateInnerThick = Plate[LENGTH] – PlateRecessDepth; | |
| ClearID = 11.0; | |
| PinOD = 3.0; | |
| PinOC = 12.0; | |
| WrenchLength = 25.0; // handle on wrench | |
| JawLength = 22.0; // lathe jaw | |
| ThreaderOverrun = 10.0; // stick-out for threading tool clearance | |
| ThreadAllowance = 2*1.0; // clearance for thread depth | |
| //———- | |
| // Define Shapes | |
| module Retainer() { | |
| difference() { | |
| tube(Plate[LENGTH],od=Plate[OD],id=ClearID,anchor=BOTTOM); | |
| up(Plate[LENGTH] + Protrusion) | |
| cyl(PlateRecessDepth + Protrusion,d=Plate[ID],anchor=TOP); | |
| down(Protrusion) | |
| hull() | |
| for (i = [-1,1]) | |
| right(i*PinOC/2) down(Protrusion) | |
| cyl(Plate[LENGTH] + Protrusion,d=PinOD,anchor=BOTTOM); | |
| } | |
| } | |
| module Fixture() { | |
| difference() { | |
| regular_prism(6,h=JawLength,d=1.2*Plate[OD],anchor=BOTTOM) position(TOP) { | |
| cyl(PlateRecessDepth + ThreaderOverrun,d=Plate[ID],anchor=BOTTOM); | |
| cyl(Plate[LENGTH] + ThreaderOverrun,d=ClearID,anchor=BOTTOM); | |
| // hull() | |
| for (i = [-1,1]) | |
| right(i*PinOC/2) | |
| cyl(Plate[LENGTH] + ThreaderOverrun + Plate[LENGTH]/2,d=PinOD,anchor=BOTTOM); | |
| cyl(ThreaderOverrun,d=Plate[OD] – ThreadAllowance,anchor=BOTTOM); | |
| } | |
| up(JawLength + ThreaderOverrun + Plate[LENGTH] + Protrusion) // M4 burly insert | |
| cyl(10.0 + 5,d=5.5,anchor=TOP); | |
| } | |
| } | |
| module Washer() { | |
| difference() { | |
| tube(Plate[LENGTH],od=Plate[OD] – ThreadAllowance,id=4.5,anchor=BOTTOM); | |
| down(Protrusion) | |
| for (i = [-1,1]) | |
| right(i*PinOC/2) | |
| cyl(2*Plate[LENGTH],d=PinOD,anchor=BOTTOM); | |
| } | |
| } | |
| module Wrench() { | |
| difference() { | |
| union() { | |
| cyl(WrenchLength,d=Plate[ID],anchor=BOTTOM); | |
| for (i = [-1,1]) | |
| right(i*PinOC/2) | |
| cyl(WrenchLength + Plate[LENGTH],d=PinOD,anchor=BOTTOM); | |
| } | |
| down(Protrusion) | |
| cyl(2*WrenchLength,d=ClearID – 2.0,anchor=BOTTOM); | |
| } | |
| } | |
| //———- | |
| // Build things | |
| if (Layout == "Retainer") | |
| Retainer(); | |
| if (Layout == "Fixture") | |
| Fixture(); | |
| if (Layout == "Washer") | |
| Washer(); | |
| if (Layout == "Wrench") | |
| Wrench(); | |
| if (Layout == "Show") { | |
| color("Gold") | |
| Fixture(); | |
| up(JawLength + ThreaderOverrun + Gap) | |
| zflip(z=Plate[LENGTH]/2) | |
| Retainer(); | |
| color("Green") | |
| up(JawLength + ThreaderOverrun + Plate[LENGTH] + 2*Gap) | |
| Washer(); | |
| right(40) { | |
| zflip(z=Plate[LENGTH]/2) | |
| Retainer(); | |
| color("Silver") | |
| up(Plate[LENGTH] + Gap) | |
| zflip(z=WrenchLength/2) | |
| Wrench(); | |
| } | |
| } | |
| if (Layout == "Build") { | |
| Fixture(); | |
| right(1.5*Plate[OD]) { | |
| Retainer(); | |
| fwd(1.5*Plate[OD]) | |
| Retainer(); | |
| } | |
| left(1.5*Plate[OD]) | |
| Washer(); | |
| fwd(1.5*Plate[OD]) | |
| Wrench(); | |
| } | |
