Ed Nisley's Blog: Shop notes, electronics, firmware, machinery, 3D printing, laser cuttery, and curiosities. Contents: 100% human thinking, 0% AI slop.
Just before midnight, the garage door opened, but, being early-to-bed folks, it wasn’t either of us. I pulled my fingernails out of the ceiling, padded out to the garage, verified there was nobody (not even a critter more substantial than a spider) inside, closed the door with the hardwired control button on the wall, and went back to bed. An hour later, the door opened again, then tried to take a bite out of me when I walked under it.
I pulled the opener’s plug, yanked its emergency release latch, lowered the door, and returned to bed; it was not a restful night.
The key to the diagnosis came from the little yellow LED on the back of the opener, just above the purple LEARN button:
Craftsman Garage Opener – indicator LED
In addition to indicating various programming states, it also lights when the opener’s radio receives a transmission from one of the remote controls. The LED was flickering continuously, showing that something was hosing the receiver with RF.
We have three remotes: one in the car, one on my bike, and one in the back room overlooking the garage. None of them worked reliably, suggesting the RF interference was clobbering their transmissions.
Disabling the remotes by removing their batteries (which were all good) also stopped the interference. Reinstalling the batteries one-by-one identified the rogue opener:
Craftsman Garage Opener – remote innards
The slip of paper let me isolate the battery terminal and stick a milliammeter in the circuit, which showed the remote was drawing about 1.5 mA continuously. I thought one of the pushbutton switches had gone flaky, but swapping an unused one for the main door switch had no effect.
I lost track of which remote it was, but it lived in the car or the back room for all its life, so it hasn’t suffered extreme environmental stress. I have no idea why it would fail late one night, although I admit to not monitoring the LED on a regular basis. For whatever it’s worth, in the weeks leading up to the failure, activating the opener sometimes required two pokes at the remote, but nothing bad enough to prompt any further investigation.
A new cheap knockoff remote arrived in few days and it’s all good.
Protip: different openers, even from the same company, use different RF frequencies. For Craftsman openers, the color of the LEARN button is the key to the frequency; purple = 139.53753 MHz.
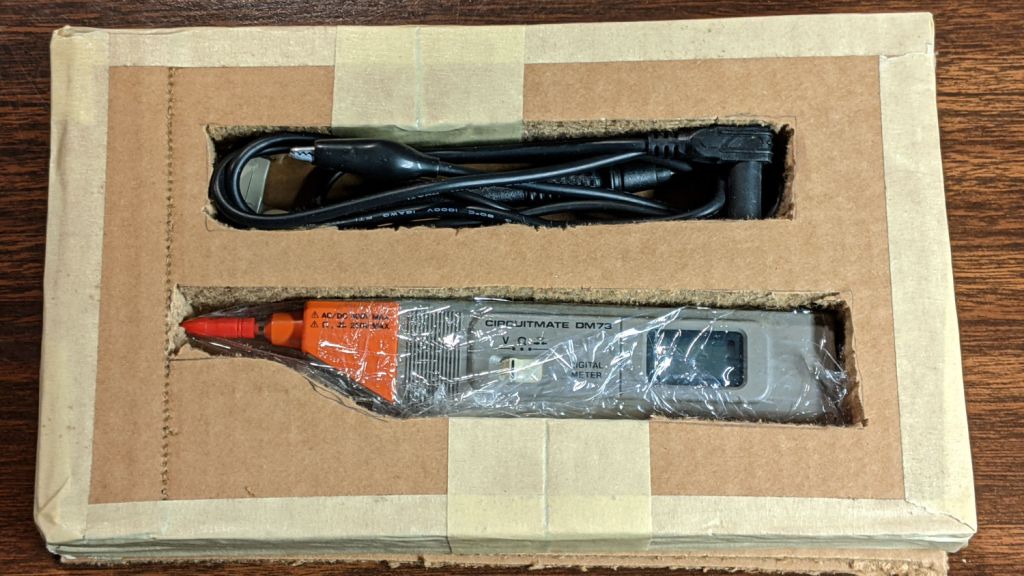
For reasons not relevant here, I sent the Beckman DM73 to a good home in Europe. Having some experience with the brutality applied to innocent packages by various package-delivery organizations, I filled a Priority Mail Flat Rate Small Box with a solid block of corrugated cardboard:
DM73 – cardboard armor
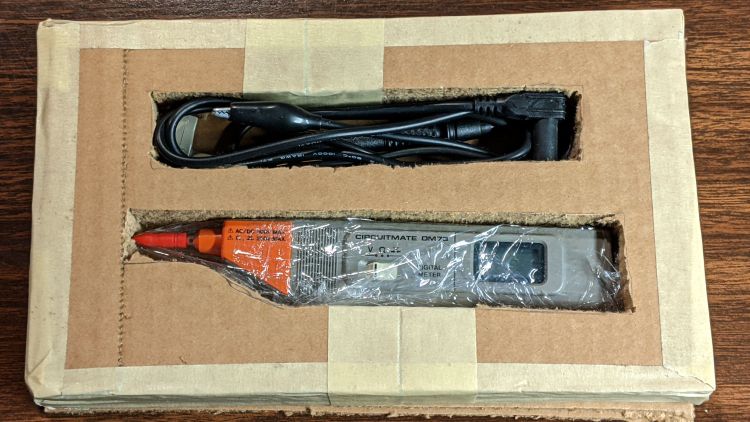
One inner layer has a cutout for the manual:
DM73 – Operator Manual package
The meter and its leads tuck into form-fitting cutouts:
Beckman DM73 – cardboard packing
I bandsawed the cutouts from a block with enough layers for some space on the top and bottom:
DM73 – bandsawing cardboard package
After mulling that layout overnight, I made a similar block with the saw cuts on diagonally opposite corners, so pressure on the center of the edges won’t collapse the unsupported sides. A slightly larger meter cutout allowed a wrap of closed-cell foam sheet that likely doesn’t make any difference at all.
With everything in place, the box had just enough space for a pair of plastic sheets to better distribute any top & bottom impacts.
I won’t know how the armor performed for a few weeks, but it’s definitely the best packaging idea I’ve had so far.
Update: After nearly two weeks, the package arrived undamaged and the meter was in fine shape. Whew!
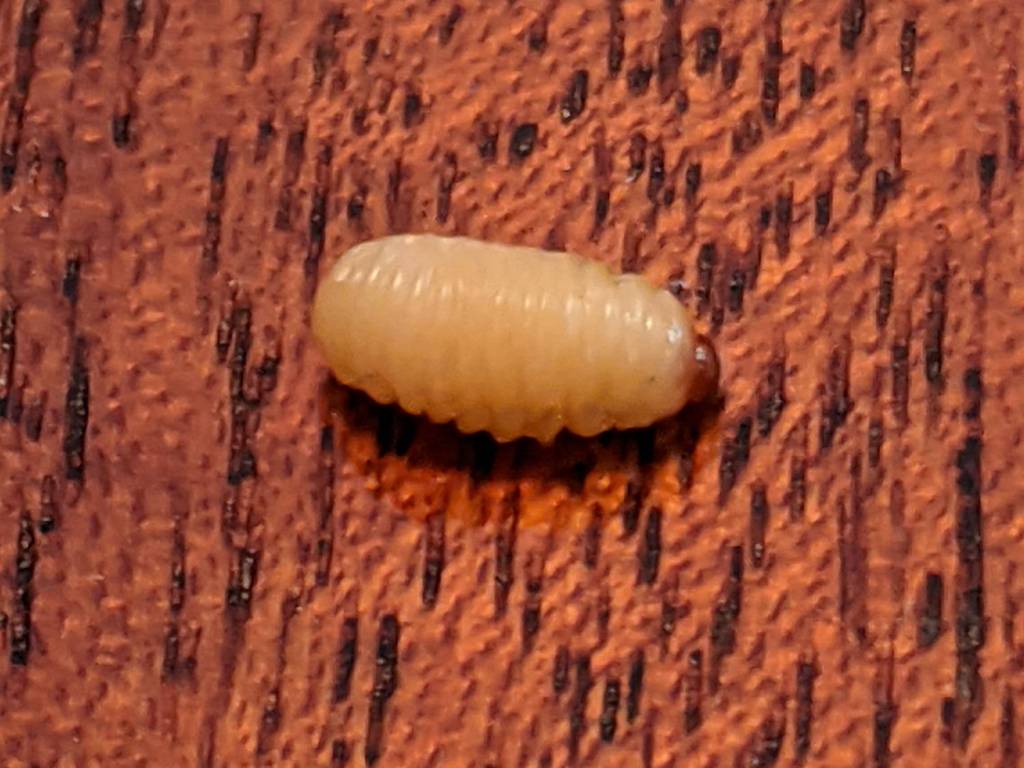
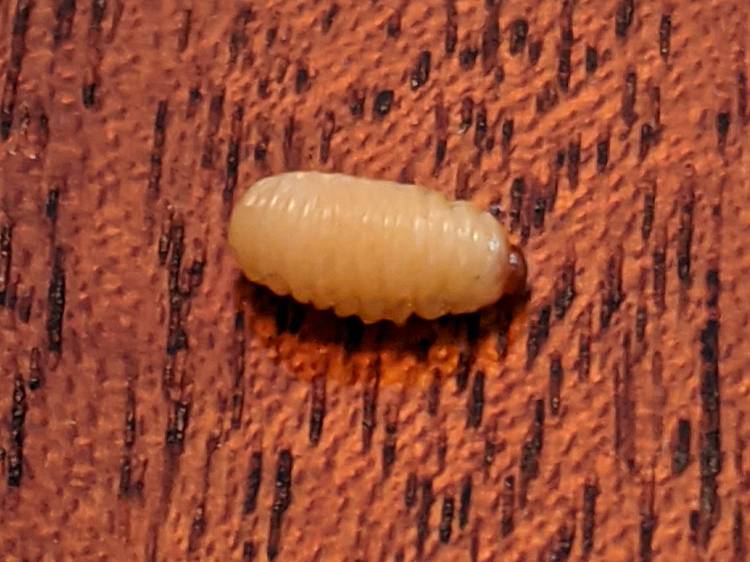
I spotted this little gadget chugging steadily across a table in the living room:
Chestnut parasite larva – detail
Nearby, two of its friends / siblings / clones remained near their landing craft:
Chestnut parasite larvae – overview
They’re about 5 mm long and, although there are no larva-size holes visible in the chestnuts tucked inside the burr, that’s definitely where they started their journey.
A few hours later, the rest of the crew bailed out:
Chestnut parasite larvae – irruption
The exit hole must be on a nut under the curve of the husk, but they’re sufficiently squishy to wriggle their way out. The little brown dot over on the left belongs to the top larva of a pair queued in the exit corridor:
Chestnut parasite larvae – exiting husk
I lost count at 18. There’s surely more where they came from, so I replaced the plate with a bowl to reduce the quantum tunneling probability.
In an ideal world, they’d grow up to be chestnut weevils, but I put them out near the suet feeder and, a few hours later, my offering was accepted.
Much to our utter astonishment, this appeared on the driveway:
Chestnut burr
We’ve since found half a dozen chestnut burrs in the yard, which means at least two trees (it takes two to cross-fertilize) are growing in the immediate area.
We originally thought they were American Chestnuts, but Mary (being a Master Gardener) found enough references including comparative burr pictures to convince us they’re Chinese Chestnuts.
We’ve seen squirrels carrying the burrs in their mouths from the trees to wherever they bury their food supply, as shown by this gnawed spot on the other side of the burr:
Chestnut burr – gnawed section
I regard this as conclusive proof that squirrels either have no sense of pain or no lips, because I can’t imagine carrying that thing in my hand, let alone gnawing through it to extract the nuts inside.
Each burr contains three nuts, although this empty husk shows some nuts can fail to fill out:
Chestnut burr – interior with failed nut
We don’t know where the trees are, but the squirrels seem to carry the burrs across our yard from north to south, so they can’t be too far from us or each other.
Despite our conclusion, it’s faintly possible they’re American Chestnuts, in which case they’re definitely survivors!
There’s not much to it, because the RPi can enable pullup resistors on its digital inputs, whereupon the encoder switches its code bits to common. The third oscilloscope probe to the rear syncs on a trigger output from my knob driver.
I started with the Encoder library from PyPi, but the setup code doesn’t enable the pullup resistors and the interrupt (well, it’s a callback) handler discards the previous encoder state before using it, so the thing can’t work. I kept the overall structure, gutted the code, and rebuilt it around a state table. The code appears at the bottom, but you won’t need it.
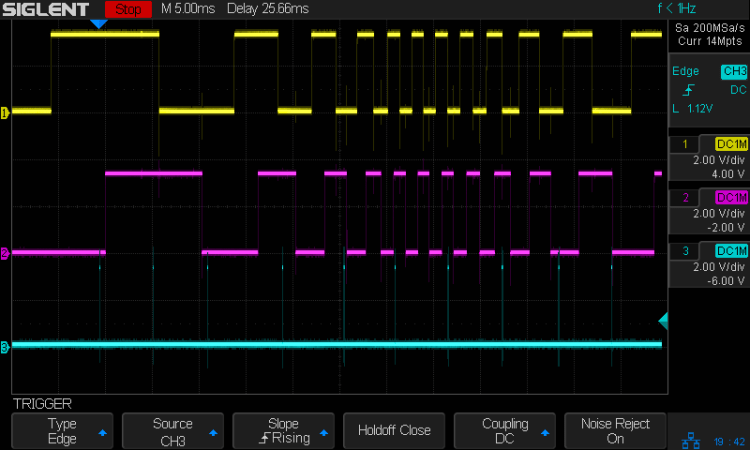
Here’s the problem, all in one image:
Knob Encoder – ABT – fast – overview
The top two traces are the A and B encoder bits. The bottom trace is the trigger output from the interrupt handler, which goes high at the start of the handler and low at the end, with a negative blip in the middle when it detects a “no motion” situation: the encoder output hasn’t changed from the last time it was invoked.
Over on the left, where the knob is turning relatively slowly, the first two edges have an interrupt apiece. A detailed view shows them in action (the bottom half enlarge the non-shaded part of the top half):
Knob Encoder – ABT – fast – first IRQs
Notice that each interrupt occurs about 5 ms after the edge causing it!
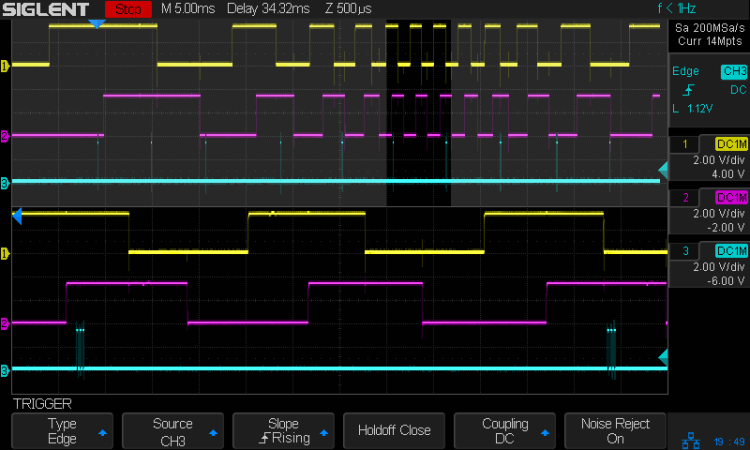
When the edges occur less than 5 ms apart, the driver can’t keep up. The next four edges produce only three interrupts:
Knob Encoder – ABT – fast – 4 edges 3 IRQ
A closer look at the three interrupts shows all of them produced the “no motion” pulse, because they all sampled the same (incorrect) input bits:
In fact, no matter how many edges occur, you only get three interrupts:
Knob Encoder – ABT – fast – 9 edges 3 IRQ
The groups of interrupts never occur less than 5 ms apart, no matter how many edges they’ve missed. Casual searching suggests the Linux Completely Fair Scheduler has a minimum timeslice / thread runtime around 5 ms, so the encoder may be running at the fastest possible response for a non-real-time Raspberry Pi kernel, at least with a Python handler.
If. I. Turn. The. Knob. Slowly. Then. It. Works. Fine. But. That. Is. Not. Practical. For. My. Purposes.
Nor anybody else’s purposes, really, which leads me to think very few people have ever tried lashing a rotary encoder to a Raspberry Pi.
So, OK, I’ll go with Nearer and Farther focusing buttons.
The same casual searching suggested tweaking the Python thread’s priority / niceness could lock it to a different CPU core and, obviously, writing the knob handler in C / C++ / any other language would improve the situation, but IMO the result doesn’t justify the effort.
My attempt at a Python encoder driver + simple test program as a GitHub Gist:
This file contains hidden or bidirectional Unicode text that may be interpreted or compiled differently than what appears below. To review, open the file in an editor that reveals hidden Unicode characters.
Learn more about bidirectional Unicode characters