Ed Nisley's Blog: Shop notes, electronics, firmware, machinery, 3D printing, laser cuttery, and curiosities. Contents: 100% human thinking, 0% AI slop.
As a temporary expedient while awaiting more outlets in the basement, I screwed several hundred watts of LED strip lighting to the floor joists so I could see where I was going:
First pass at basement lighting
The switch seemed to run warm, which I attributed to being snuggled up against one of the LED strips, eventually became intermittent, and finally failed with the lights out.
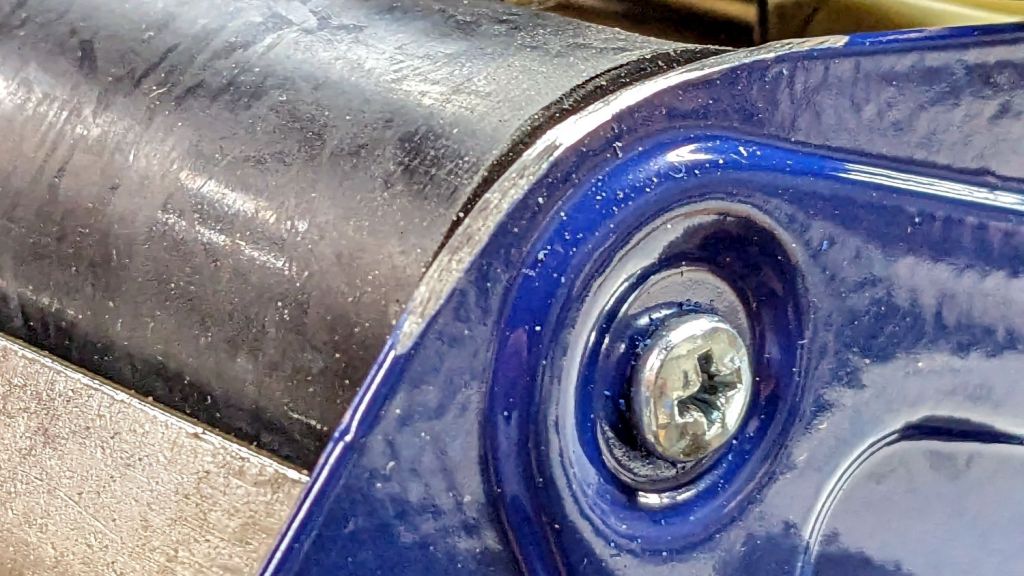
Prying apart the snapped-together case destroyed it, but that didn’t really matter when I saw the innards:
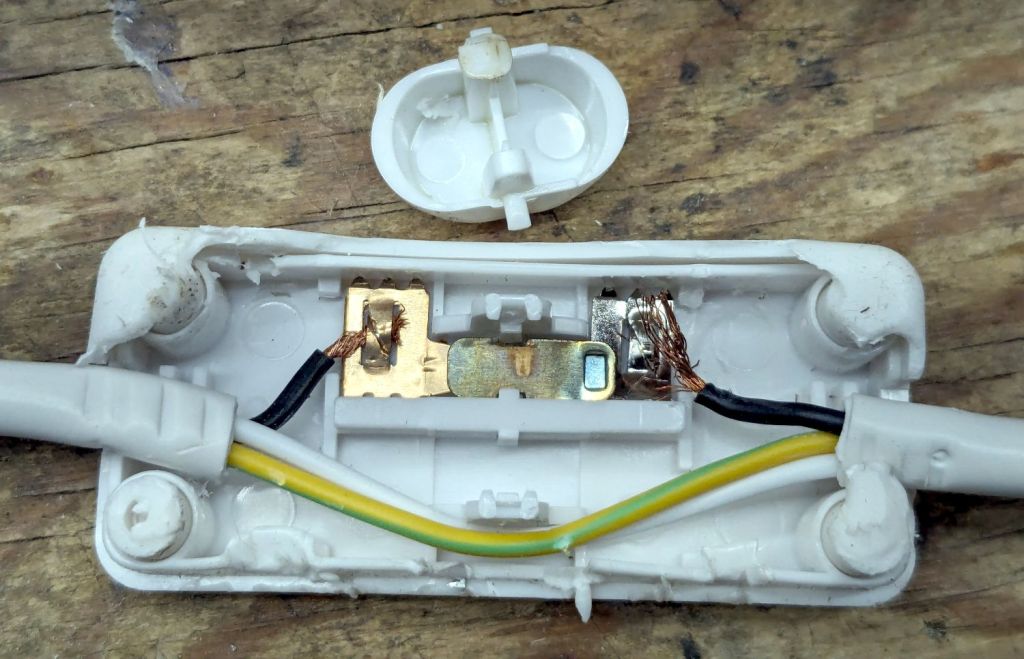
T8 LED power switch
The “intermittent” action came from the melted post on the switch actuator at the top of the photo. The “warm” came from the barely crimped black wire on the right side of the switch, which *might* have had half a dozen strands caught in the flattened crimp triangles.
I replaced it with an identical switch from the assortment that came with the lamps. That one seems to run cooler, although I doubt the crimps are really up to any reasonable quality standards.
In addition to adding basement outlets & lighting circuits, the rest of the house has some electrical wiring peculiarities; the kitchen microwave really shouldn’t share a circuit with the dining room lights.
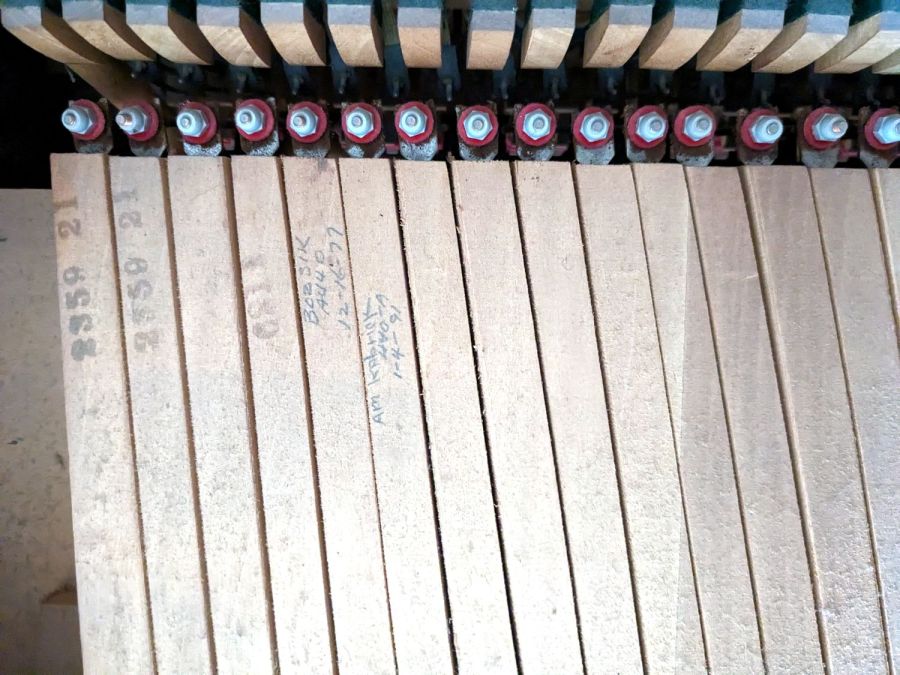
It’s apparently customary for piano tuners to annotate their work on the keys, starting after the serial numbers on the bass notes at the left end:
Piano tuner notes
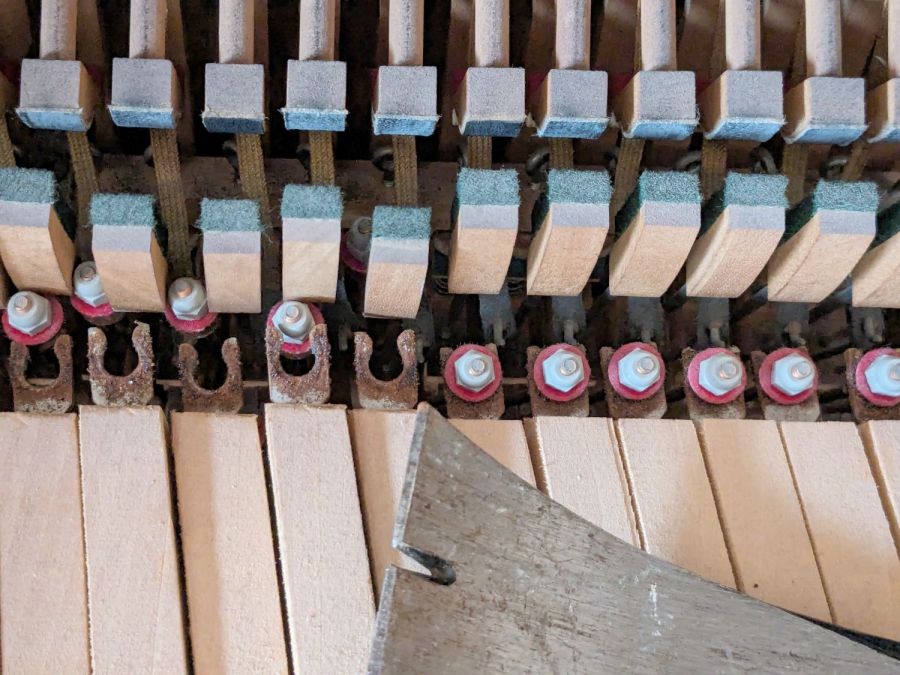
After admiring that, you can pop the hammer links off with a prybar:
Detaching piano keys
All 88 keys stack neatly into a Home Depot Extra Small moving box, filling it about 2/3 full, starting with the bass keys on the bottom:
Boxed piano keys
I harvested the lovely wood panels, then the scrapper hauled the carcass to the transfer station. Perhaps it raised the secret chord when it hit the bottom …
Lest you wonder why we didn’t try to contact X, who would surely be interested in a free piano: we did. Believe me, we tried, for many values of X, only to find nobody wants a piano in this day and age.
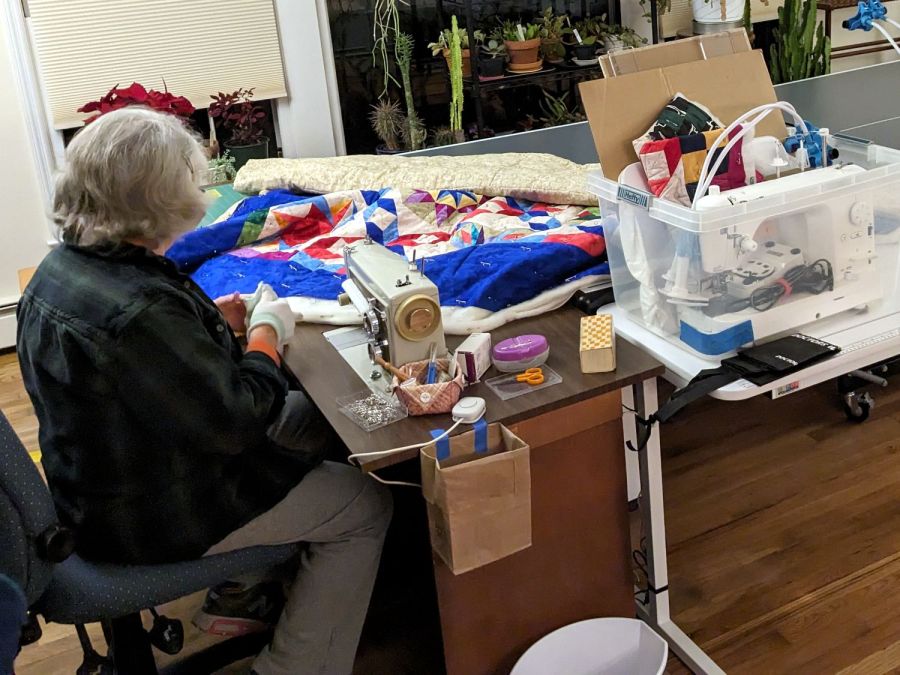
Mary’s new Sewing Room (f.k.a. The Living Room) has a set of cellular blinds over the windows:
Sewing Room – Cellular shades
They have internal springs instead of pull cords: you just grab the tabs on the lower bar to raise / lower the shade. This worked with one hand for the narrower shades on the sides, but the center shade seemed unusually difficult to move, even with one person on each end.
Then, one morning, the center shade jammed in place about halfway up and resisted all persuasion to move in either direction. So I evacuated all the plants, dismounted the shade, laid it out on the quilting table, and found a sticker showing they were manufactured in 2018:
Cellular shade – data plate
They were surely installed shortly thereafter, so they’re the better part of six years old. Although parts are available for some shades, casual searching suggested replacing all three blinds (because color matching) would require more attention than I wanted to apply in the midst of our ongoing real estate transactions.
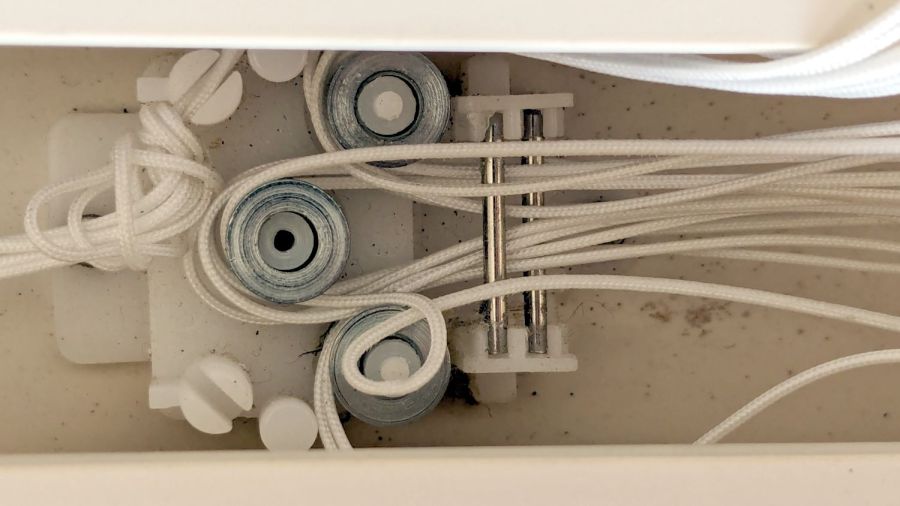
Gingerly removing the spring released the tension on the mechanism and a vast array of cords, so I could lay things out and see how the shade was supposed to work:
Cellular shade – cord layout
Four cords support the lower bar, pass through the entire height of the shade, and emerge through plastic guides into the upper bar:
Cellular shade – grommet
All four cords pass around pulleys in the fixed block on the left, to more pulleys in the movable block on the right, then back to the fixed block where they are tied off:
Cellular shade – cord snag
The possibility of successfully re-stringing those cords from a cold start is exactly zero, so I knew I must not fumble anything.
The hook on the right side of the movable block connects to the spring counterbalancing the weight of the shade:
Cellular shade – block missing cord
After considerable pondering, I noticed the upper pulley has four cords on its outer side and the lower pulley has only three. Reasoning by symmetry, I concluded that can’t possibly be right.
Gentle poking at the fixed block showed where the missing cord went:
Cellular shade – errant cord
Apparently the loop slipped off the lower pulley in the movable block, distributed several feet of loose cord somewhere inside the shade, and eventually bound tight around the lower pulley in the fixed block.
Removing the cover from the fixed block confirmed the diagnosis:
Cellular shade – fixed block disassembly
Removing the cover from the movable block shows the cord layout, with the lower pulley still missing one loop:
Cellular shade – block cord layout
Gingerly pulling the loose cord from deep inside the shade, I managed to extend the errant loop back around the pulley in the movable block, then, following the “First, do no harm” part of the Hippocratic Oath, I immobilized all the cords in their current positions relative to all the pulleys / pins / blocks:
Cellular shade – block cords sorted
Which revealed how the cord got loose in the first place:
Cellular shade – block side view
Apparently half a dozen years is enough to warp a thin plastic plate. Who would have expected that?
With the cords sorted out, I eased them off the pulleys, freed the block, and discovered the situation was worse than I thought:
Cellular shade – block warp
Now that I knew what to look for, it was obvious the tiny pin molded into the boss supporting the lower pulley had broken, allowing the cord to slide between the pulley and the top plate. You can see the dark hole vacated by the pin in the first picture of the upper block.
Knowing what I had to do next, I snipped the pin off the other boss with flush-cutting pliers.
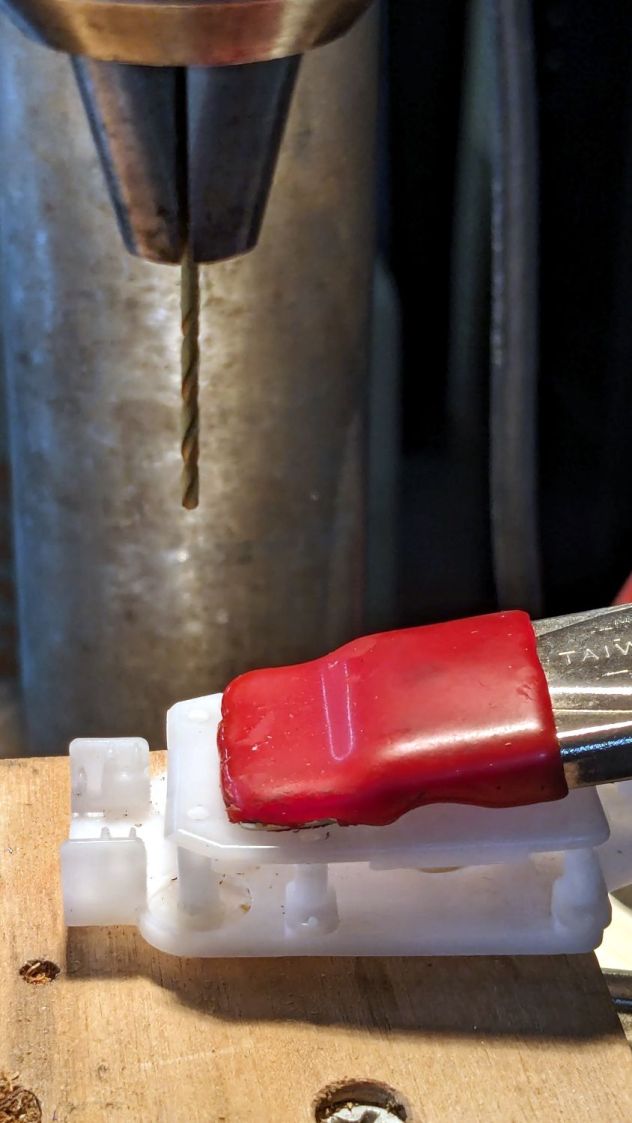
Line up the drill press using the top plate to center the drill in the boss, drill a hole suitable for a small screw, and repeat for the other pulley:
Cellular shade – block drilling
At that point, the New Basement Shop™ consisted of empty shelves and full moving boxes, but the drill press and tool chests were accessible. The basement has four outlets, one in each far-distant corner, but I have extension cords and know how to use them; I intend to spray-paint the walls with outlets in the near future.
With the holes drilled, I restored the pulleys / pins / cords to their proper locations:
Cellular shade – cord sorting
Almost proper, as it turned out I put the errant loop on backwards, so I had to go through one completely assembly / test / disassembly cycle.
The two new screws in the pulleys, in addition to the two old screws along the midline, hold the top plate flat against the bottom plate, with the remaining pins seated securely in their holes.
Reassemble in reverse order, tension the spring, snap it on the movable block, and reinstall in the window. I don’t have any pix of the completed assembly, but the shade now works as it should: we can raise and lower it from either end with just a bit of effort.
While arranging the venerable Sears Sewing Table in its new abode, we found the casters underneath didn’t roll nearly as well as they should, which turned out to be due to an accumulation of damage:
Sears sewing table – torn MDF
As far as I can tell, all four casters have been displaced upward, probably because they have no support directly above their stems and any force applied to the wheel has plenty of lever arm against those screws.
The MDF panels on the outside of the table have pictures of wood laminated to their surface, but lack enough structural integrity to keep the screws in place. The plywood, however, survived largely unscathed, although the screws were pulling out.
I poked as much wood glue into the gaps as possible, then applied as many clamps as possible, with wood strips on both sides of the bulge squashing the MDF into a flat sheet. Over the course of two gluing sessions (I need more clamps!) spanning three days, while Mary really wanted to start sewing, the glue cured. I had plenty of time to unbend the brackets and put a more-or-less right angle between their two screw plates.
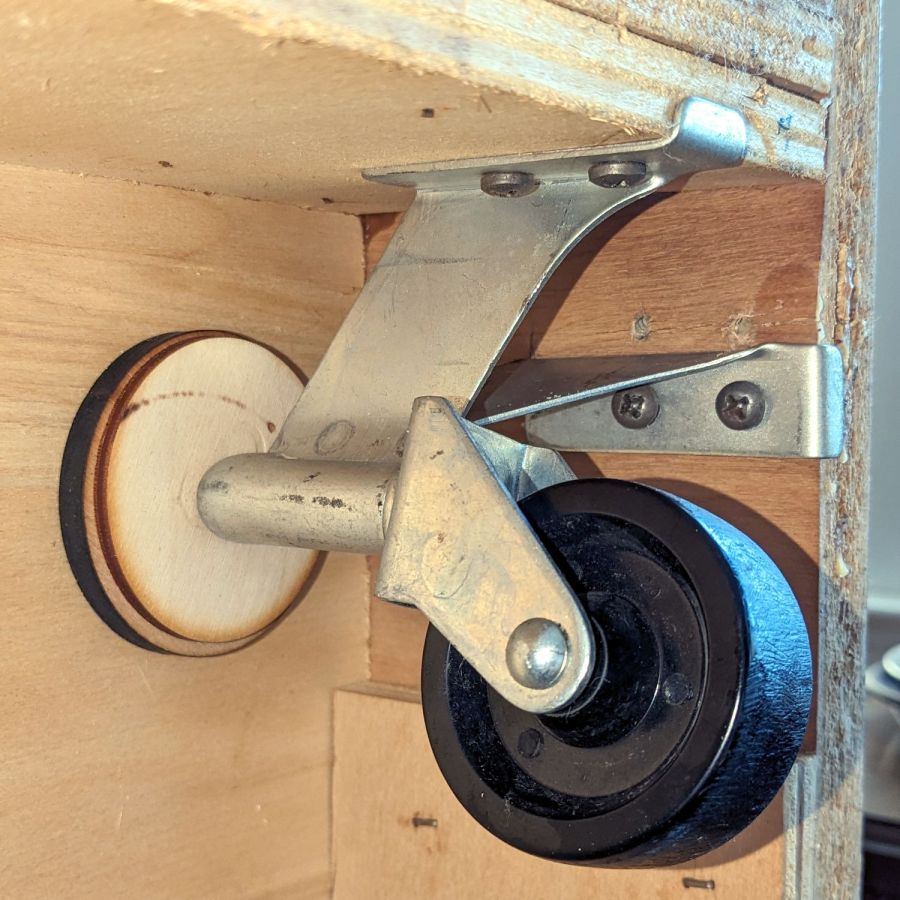
Rummaging in the box of laser scraps (after finding said box) produced disks cut from various projects that fit between the plywood bottom of the cabinet and the stems:
Sears sewing table – repaired foot – side
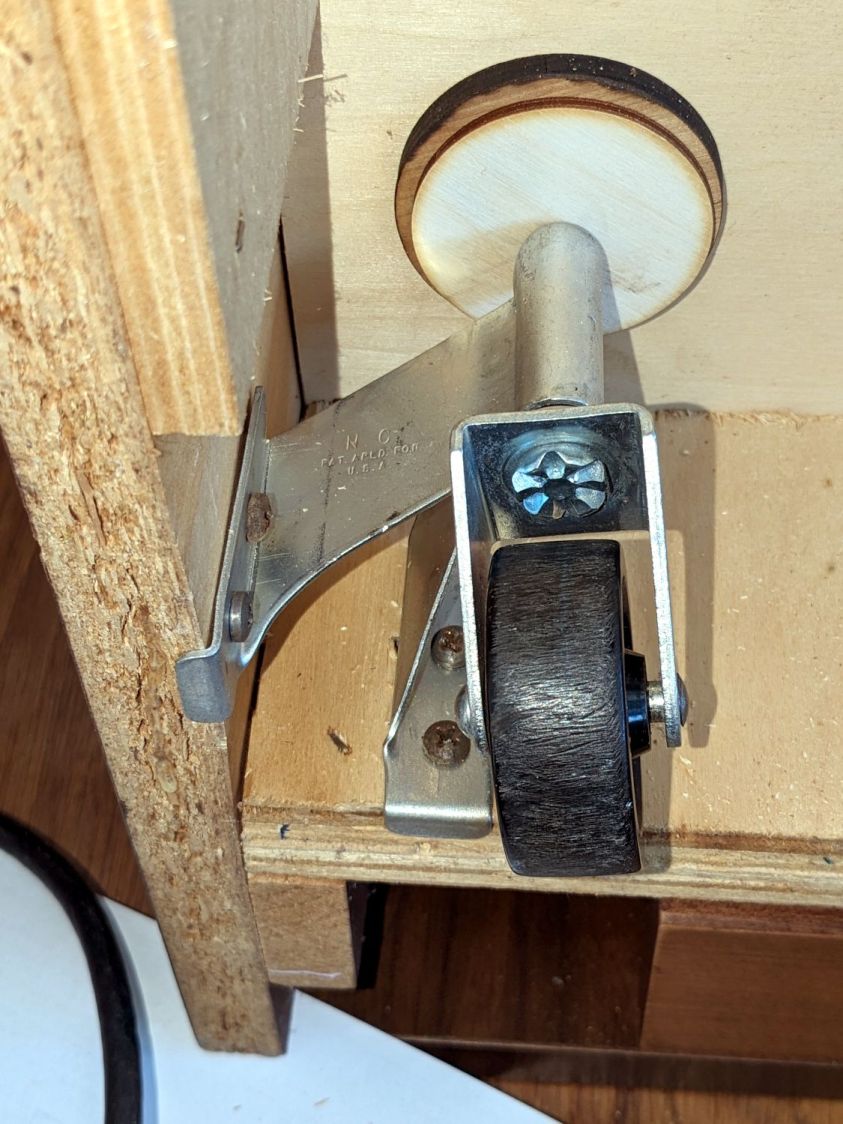
The brackets deliberately don’t match their original shape, because their new squareness put the screws into undamaged spots in the MDF and plywood:
Sears sewing table – repaired foot – bottom
The MDF will never be quite the same, but it’s flat on the visible side and the glue (seems to have) consolidated the fragments well enough.
Although those wheels look terrible, the bracket now holds the stem vertically and all four of them roll easily and pivot smoothly.
The laser-cut disks are held in place by pure faith and the overwhelming weight of all the MDF in the table, so they’re not going anywhere. Because the table’s weight now rests on the caster stems, as distributed across the plywood cabinet bottom through the disks, the brackets shouldn’t be subject to excessive upward force.
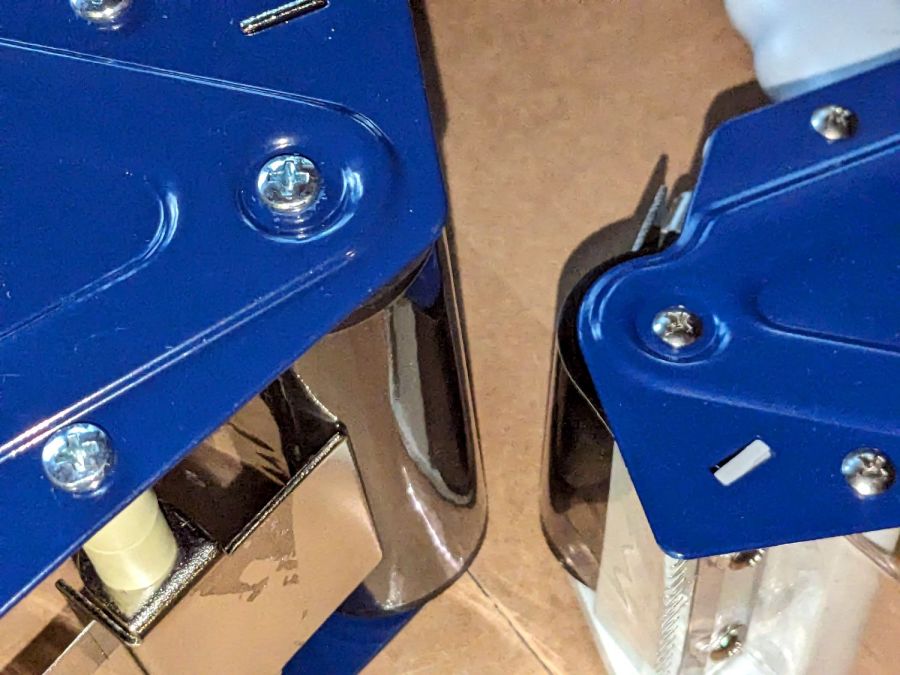
So I bought a packing tape dispenser (“gun”) for the 4 inch wide clear tape over the box labels, only to find the frame projected beyond the rubber roller on one side:
Packing tape dispenser – projecting edge
That steel flange prevented the roller from making firm contact with the box and pressing the tape into place. I’d never seen such a thing on any of the other tape guns I’d used, including a similar one (for 2 inch tape) on loan from the good folks at archive.org:
Packing tape dispensers
Well, even with the shop in disarray, I can fix that:
Packing tape dispenser – filed edge
Filing that bump down definitely improved my disposition over the next few hundred boxes …
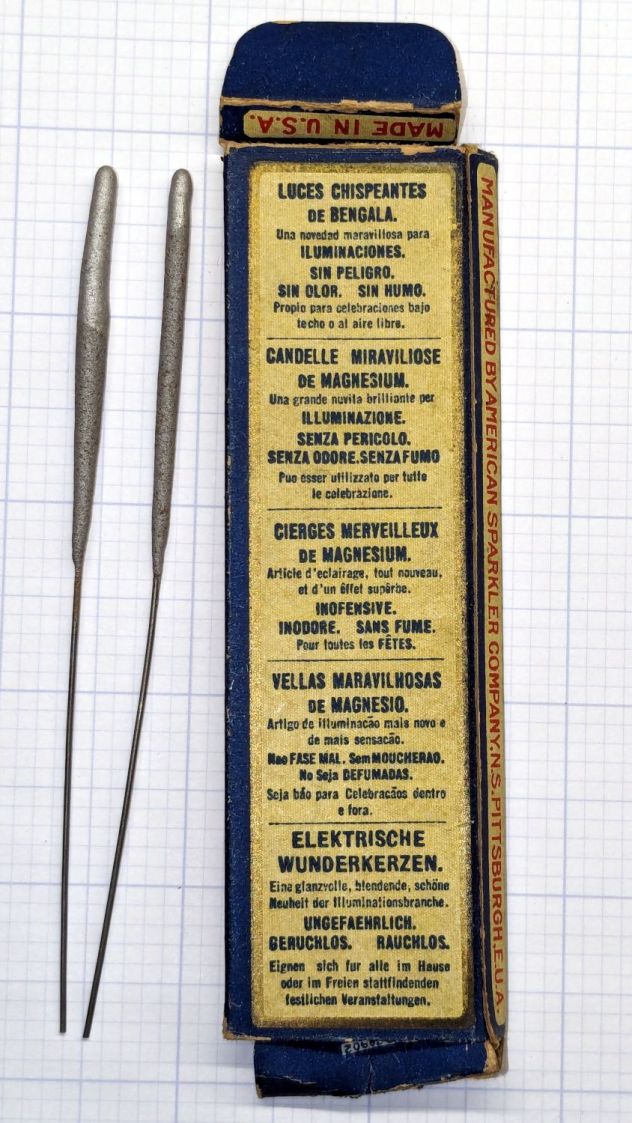
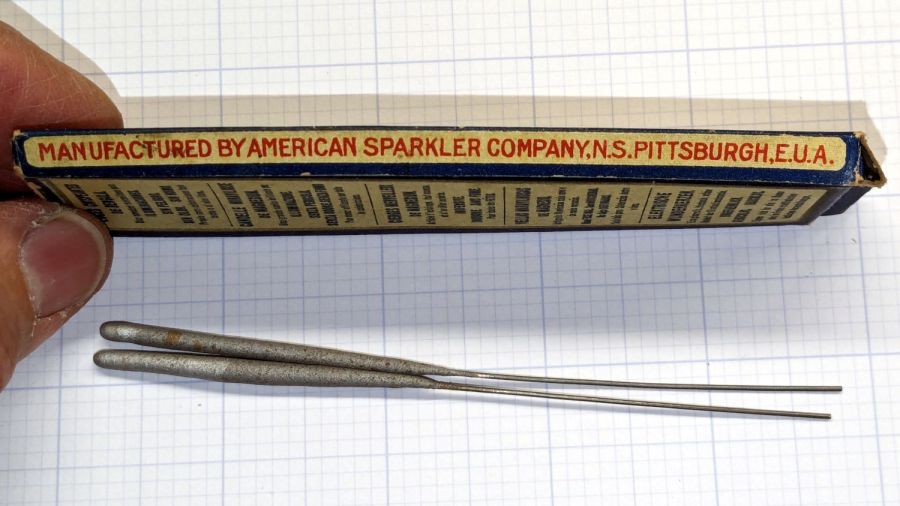
The back of the box gets downright multilingual, although there’s no English-language mention of “magnesium” anywhere on the box:
Little Fairy Electric Sparklers – box backLittle Fairy Electric Sparklers – box rightLittle Fairy Electric Sparklers – box left
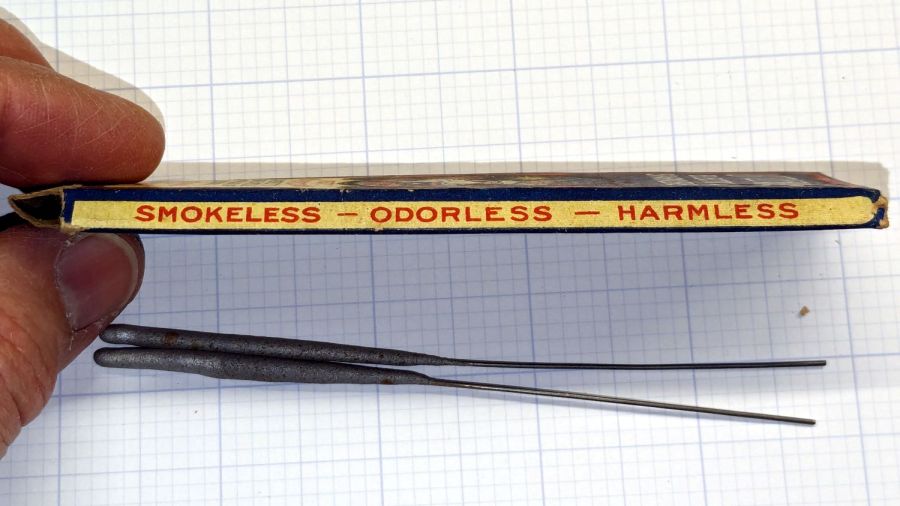
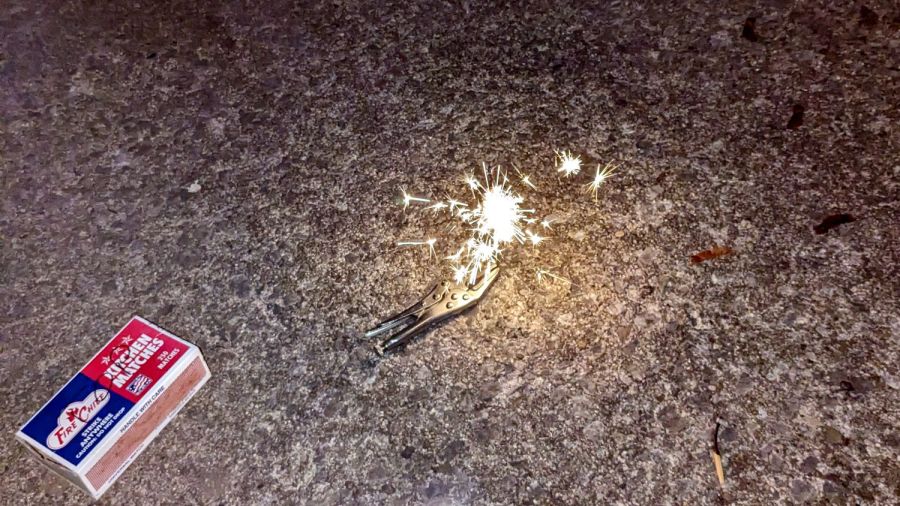
They are most assuredly not electric, which means they have no batteries to corrode and they still work fine:
Little Fairy Electric Sparklers – test firing
They emerged from a box of my father’s memorabilia, most likely packed away by his parents, so they date back to the early part of the previous century. The American Sparkler Company is long defunct, but the Internet never forgets.
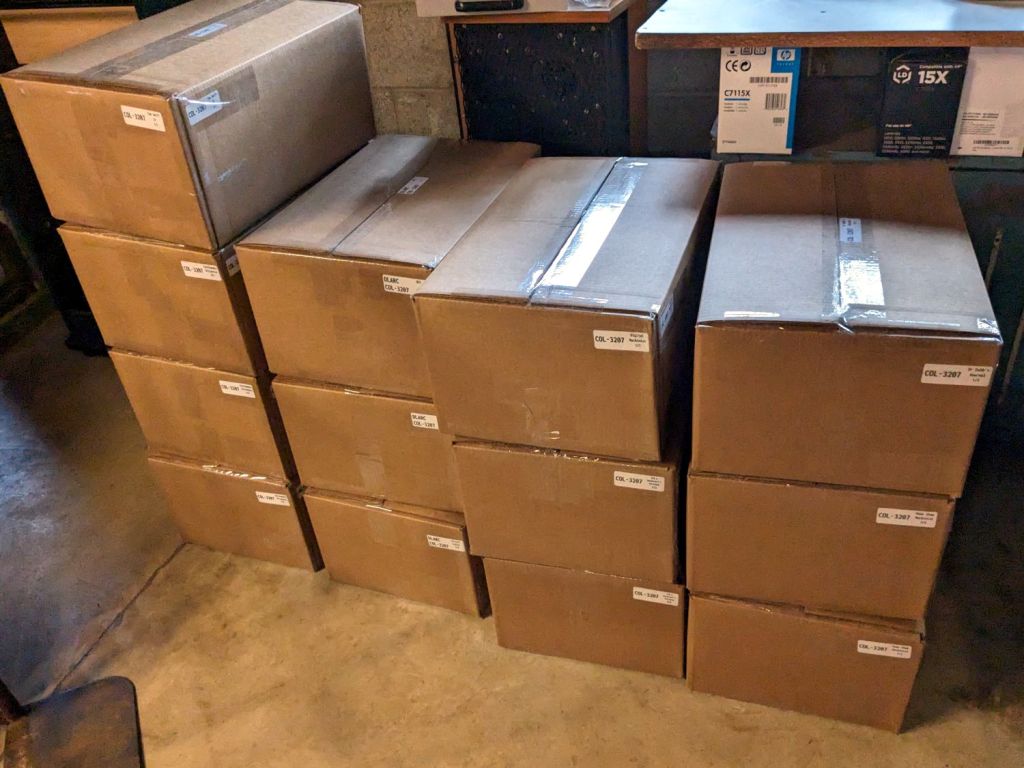
They’re also accepting our 14th Edition of the Encylopædia Britannica (back when folks realized global war was a thing, but before knowing the recently concluded horror was the first), two dozen Tom Swift Jr books (largely responsible for much of the rest of my life), three years of LIFE magazines from the mid-1940s needing no further description, and a few other goodies:
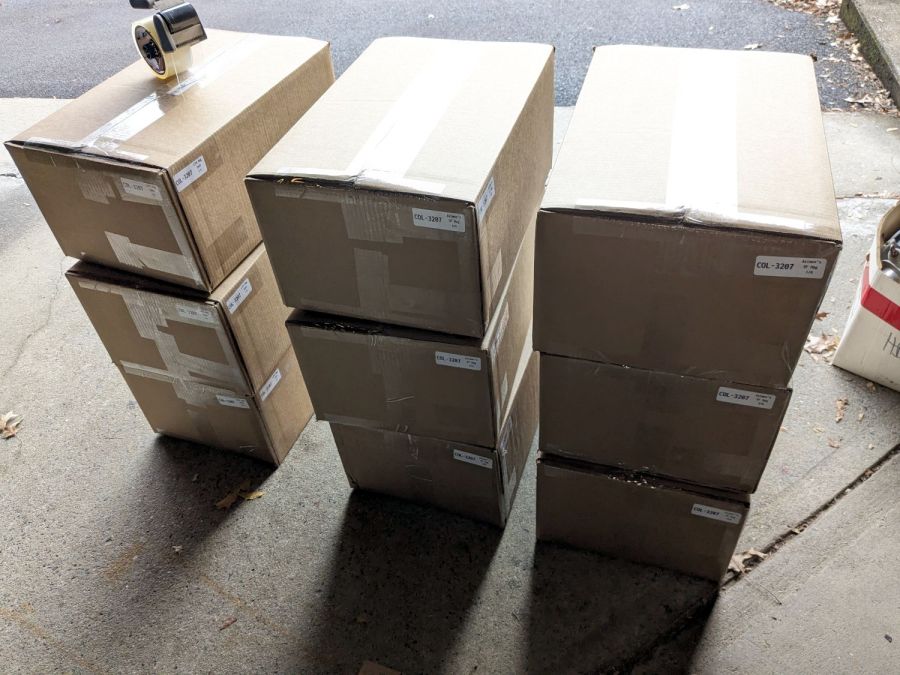
Archive boxes – B
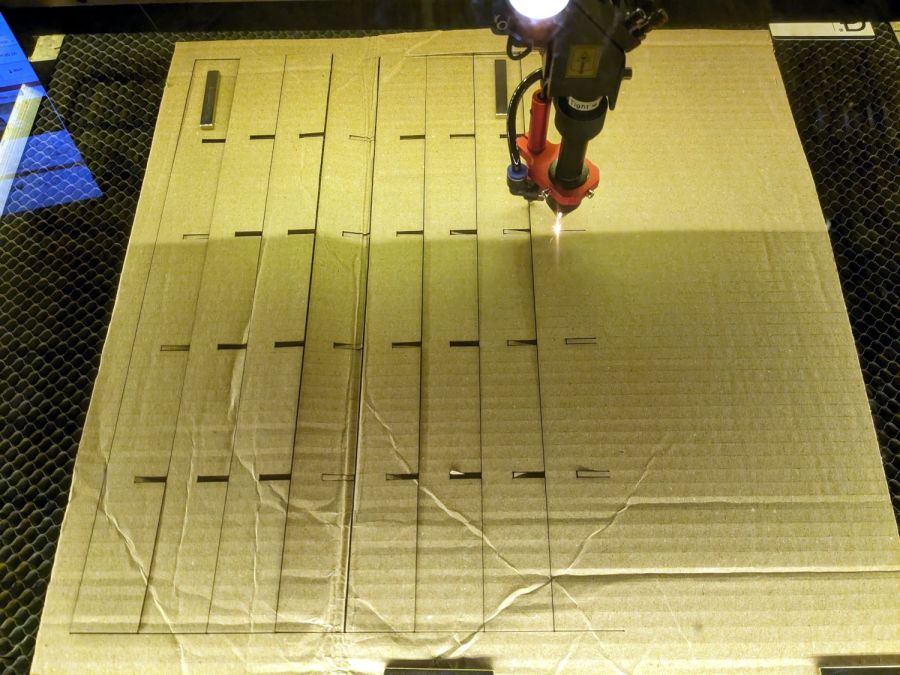
They want boxes packed as solidly as possible to withstand shipping & warehousing, so I converted nearly all of my scrap cardboard into bracing and padding:
Archive boxes – cutting gridwork
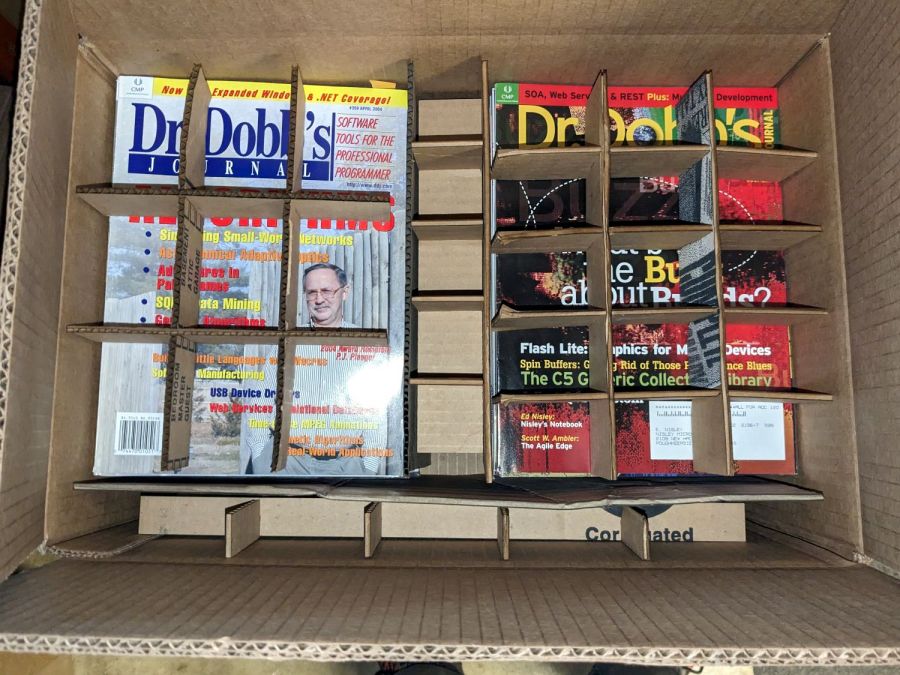
The grids are Tray Inserts generated at festi.info:
Archive boxes – internal bracing
Here, try one yourself:
TrayInsert – sample QR code
That will set up a grid filling the gap between two stacks of magazines in the Archive’s standard 12×18×8 inch box. You’ll also want simple rectangles for the sides & tops, but those are easy.
They preferred the laser cutter’s inevitable campfire smell to smashed boxes full of crumpled magazines. AFAICT, you might be able to crush the box, but if you did the magazines wouldn’t have survived anyway.