The Smell of Molten Projects in the Morning

Ed Nisley's Blog: Shop notes, electronics, firmware, machinery, 3D printing, laser cuttery, and curiosities. Contents: 100% human thinking, 0% AI slop.

Category: Machine Shop

Mechanical widgetry

  • Sherline CNC Mill: Digital Knurling!

    Depth = 0.50 Knurl Detail
    Depth = 0.50 Knurl Detail

    My buddy Eks once observed that knurling is something you want to do on somebody else’s lathe, because it puts so much stress on the bearings. As it happens, both Home Shop Machinist and Machinist’s Workshop have run several articles / series on improved knurling, ranging from better clamp knurling tools to a wonderful widget that turns your lathe into something like a shaper with a rotary axis.

    I wondered if a touch of G-Code could do the same thing on my Sherline CNC milling machine, using an ordinary end mill…

    Pretty much, yes, it can.

    The knurled diamonds aren’t raised above the surface, as they are in classical crush-rolled knurling, but my fingers can’t really tell the difference. That’s a chunk of 1-inch PVC pipe, turned smooth in the lathe and knurled with a 2-mm end mill; the fluff is left over from wiping off the swarf with a rag.

    The setup mounts the workpiece in the rotary table on the right with the tailstock on the right end. In this case, a little boring (on the lathe) produced a slip fit on the tailstock ram, but you probably should have a plug that supports the tubing with a center-drilled hole for the tailstock’s dead center.

    CNC Knurling Setup
    CNC Knurling Setup
    Geometry Sketch
    Geometry Sketch

    The general idea is to do the cutting at a 45-degree angle in front of the workpiece, where the end mill will carve a neat 90-degree recess almost like a real 90-degree conical engraving point. This sketch shows the layout, albeit for a very large cutter and a very small workpiece. The YZ origin is at the center of the workpiece, with the X origin at the left edge of the knurled region.

    The Z axis remains constant at the level where the bottom of the cutter intersects the 45-degree angle at the proper depth-of-cut. Then you drive Y into the workpiece and drag the end mill along  X while twirling A to make a single cut. Move Y out to clear, return X to the start, index A by the angle between the knurls, repeat.

    This isn’t perfect, because the bottom of the cutter isn’t parallel to the cut between the knurl diamonds. The leading edge cuts too high / low and the trailing edge cuts too low / high (depending on which way you’re moving X and twirling A), but for small cutters and large workpieces the approximation is probably Close Enough.

    Machined Knurl Measurements
    Machined Knurl Measurements

    The key number is the diametral pitch DP: the number of knurl diamonds around the workpiece divided by the workpiece OD in inches. Machinery’s Handbook suggests that a DP of 48 is coarse and 96 is fine. Measuring some knurled tools lying around the shop shows those values aren’t hard numbers, but they’re a start.

    Given an initial DP and the workpiece diameter, figure an actual DP that will produce an integral number of knurl diamonds around the circumference (call it NA):

    NA = round (DP * OD) to the nearest integer

    Actual DP = NA / OD

    Knowing the number of diamonds NA, figure the width of a diamond in degrees (call it the Width-in-Angle):

    WA = 360/NA

    and also as a fraction of the circumference in inches:

    W = π * diameter / NA

    Typical knurl diamonds seem to be about twice as long their width, so the nominal aspect ratio is 2. Given the desired length-of-the-knurled-region, figure an actual aspect that will produce an integral number of diamonds along the length (call it NX):

    NX = round (length-of-knurl / nominal-aspect) to the nearest integer

    Knowing NX, figure the angle to turn (call it TA) while making the cut along X:

    TA = WA * NX

    Depth of Cut Sketch
    Depth of Cut Sketch

    This sketch shows the depth-of-cut geometry, with the cutter producing skeletal points where the cut just touches the next knurl over. With a 45 degree angle between the diagonal, all the trig boils down to factors of √2.

    The perimeter of an NA-sided polygon inscribed in a circle of radius R (which is just the OD/2 is:

    Perimeter = 2 NA R sin (180 / NA)

    which simplifies to

    Perimeter = NA OD sin (180 / NA)

    The length of the chord L from tip to tip for such a polygon:

    L = Perimeter / NA

    The side of the triangle from the corner of the cut perpendicular to the chord is half the chord length, because it’s an isosceles triangle with angles of 45 and 90 degrees.

    The height of the segment above the chord:

    (L / 4) tan (WA / 4)

    The total depth-of-cut along the diagonal is the sum of those two numbers. Given that, figure the coordinates (Y is negative because it’s out in front):

    Z = (radius – depth) / √2

    Y = -Z

    Now, because the end mill has a nontrivial length along the X axis, it’s doing too much cutting. Reductio ad absurdum, imagine putting a 1-inch knurl along a pencil using a 6-inch end mill: the thing would cut a horizontal swath the entire length of the knurled region, leaving no material behind.

    So it makes sense to heave in a Fudge Factor limiting the actual depth-of-cut to some percentage of that value. The knurl above was with that factor set to 0.50, but (as with rolled knurls) be sure to test in an inconspicuous spot before actual use. Subtract the shrunken depth-of-cut from the radius as above to get the YZ coordinates.

    Notice the difference between the ends of the cut in that first picture: you can clearly see the shape of the end mill’s cylindrical cut.  I ran the cutter at 2500 rpm to avoid overheating the PVC, so you can see the cuts on the top edges of the diamonds: the trailing edge makes neat little swipes. In actual practice, you’d run it much faster to get a smooth cut.

    Then it’s just a matter of writing some G-Code…

    Knurled Pencil
    Knurled Pencil

    Herewith, the G-Code that did the pencil, with depth-of-cut set to 0.30. It cuts to the right and cuts to the left, then indexes to the next cut by unwinding the A axis. The nominal DP = 48 makes for a coarse, yet oddly attractive, knurl. The variable names don’t track what you see above, but should be pretty obvious. Also see the notes on optimizations down near the bottom.

    (Engraved knurling)
    (Ed Nisley - KE4ZNU - May 2010)
    (G55 Coordinate Origin: 	X to left of checkering)
    (							YZ on centerline of workpiece)
    (							A = 0 wherever you like)
    (Touch off tool center at Y = workpiece radius)
    (				   tip at Z = workpiece radius)
    
    (-- Input dimensions)
    
    #<_Outer_Dia>			= 0.324					(outside dia of workpiece - INCHES)
    
    #<_Knurl_Start_X>		= 0.0					(X offset to start of kurling)
    #<_Knurl_Length>		= 1.0					(length of knurled section)
    
    #<_Diamet_Pitch>		= 48					(96 = fine 48 = coarse)
    #<_Depth_Fraction>		= 0.3					(fraction of max cut depth)
    #<_Aspect_Nominal>		= 2.0					(desired knurl diamond length-to-width ratio)
    
    #<_Tool_Dia>			= 0.078					(end mill diameter)
    #<_Feed>				= 20					(cutting speed, inch/min)
    
    #<_Traverse_Clear>		= 0.050					(clearance for traverse moves)
    
    (-- Calculated dimensions)
    
    #<_PI>					= 3.14159265358979323
    
    #<_Outer_Radius>		= [#<_Outer_Dia> / 2]
    #<_Tool_Radius>			= [#<_Tool_Dia> / 2]
    
    #<_Num_Points_A>		= ROUND [#<_Diamet_Pitch> * #<_Outer_Dia>]	(points around circumference)
    #<_Point_Width_Deg>		= [360 / #<_Num_Points_A>]					(degrees per point)
    #<_Point_Width>			= [#<_PI> * #<_Outer_Dia> / #<_Num_Points_A>]
    
    #<_Num_Points_X>		= ROUND [#<_Knurl_Length> / [#<_Aspect_Nominal> * #<_Point_Width>]]
    #<_Rotation_Per_Cut>	= [#<_Point_Width_Deg> * #<_Num_Points_X>]
    #<_Point_Length>		= [#<_Knurl_Length> / #<_Num_Points_X>]		(actual point length)
    #<_Aspect>				= [#<_Point_Length> / #<_Point_Width>]		(actual aspect ratio)
    
    #<_Perimeter>			= [2 * #<_Num_Points_A> * #<_Outer_Radius> * SIN [180 / #<_Num_Points_A>]]
    #<_Chord>				= [#<_Perimeter> / #<_Num_Points_A>]		(across one point)
    #<_Segment_Height>		= [[#<_Chord> / 2] * TAN [#<_Point_Width_Deg> / 4]]
    
    #<_Cut_Depth_Max>		= [#<_Segment_Height> + #<_Chord> / 2]
    #<_Cut_Depth>			= [#<_Depth_Fraction> * #<_Cut_Depth_Max>]
    
    #<_Cut_Z>				= [[#<_Outer_Radius> - #<_Cut_Depth>] / SQRT [2]]	(corner of cut)
    #<_Cut_Y>				= [0 - #<_Cut_Z>]
    
    #<_Tool_Z>				= #<_Cut_Z>									(tool bottom)
    #<_Tool_Y>				= [#<_Cut_Y> - #<_Tool_Radius>]				(tool centerline)
    
    #<_Safe_Z>				= [#<_Outer_Radius> + #<_Traverse_Clear>]	(clear workpiece top)
    #<_Safe_Y>				= [0 - #<_Safe_Z> - #<_Tool_Radius>]		(clear workpiece side)
    
    #<_Retract_Y>			= [0 - [#<_Safe_Z> / SQRT [2]] - #<_Tool_Radius>]	(clear cut)
    
    (-- Start cutting!)
    
    G40 G49 G80 G90 G94 G97 G98		(reset many things)
    
    G55					(working coord system)
    G20					(inch!)
    
    F#<_Feed>			(set cutting speed)
    
    (debug,Num points AX: #<_Num_Points_A> #<_Num_Points_X>)
    (debug,Pt Width Deg Len: #<_Point_Width> #<_Point_Width_Deg> #<_Point_Length>)
    (debug,Aspect: #<_Aspect>)
    (debug,Cut Depth: #<_Cut_Depth>)
    (debug,Cut YZ: #<_Cut_Y> #<_Cut_Z>)
    (debug,Tool YZ Retract: #<_Tool_Y> #<_Tool_Y> #<_Retract_Y>)
    
    (msg,Press [Resume])
    M0
    
    G0 Z#<_Safe_Z>					(get air)
    G0 Y#<_Safe_Y>					(move to cutting side)
    
    G0 X#<_Knurl_Start_X> A0		(get to knurl XA start)
    
    G0 Y#<_Retract_Y> Z#<_Tool_Z>	(get to clearance point)
    
    #<This_Point> = 0				(loop setup)
    #<This_Angle> = 0
    
    O1000 DO
    
    ;(debug,Angle: #<This_Angle>)
    
    #<Far_A> = [#<This_Angle> + #<_Rotation_Per_Cut>]
    #<Near_A> = [#<This_Angle> + 2 * #<_Rotation_Per_Cut>]
    
    G1 Y#<_Tool_Y>					(cut into workpiece)
    G1 X[#<_Knurl_Start_X> + #<_Knurl_Length>] A#<Far_A>	(cut right)
    
    G1 X[#<_Knurl_Start_X>] A#<Near_A>						(cut left)
    
    G0 Y#<_Retract_Y>				(get air)
    
    #<This_Point> = [#<This_Point> + 1]
    #<This_Angle> = [#<This_Point> * #<_Point_Width_Deg>]
    
    G0 A#<This_Angle>				(index to next cut)
    
    O1000 WHILE [#<This_Point> LT #<_Num_Points_A>]
    
    G0 Y#<_Safe_Y> Z#<_Safe_Z> A0	(get big air)
    
    M2
    

    Some obvious improvements:

    • Use G92.whatever to whack A appropriately or
    • Fiddle the angle variable to track the actual A windup and
    • Figure the shortest direction to unwind A & tweak the variable
    • Cut in only one direction to reduce backlash or
    • Make all the cuts with common endpoints in one pass
    • Knurl along a known taper by interpolating Y & Z along X
    • Offset the workpiece axis to match the knurl angle (ugh!)

    Although I find it hard to believe I’m the first person to figure this out, a search on CNC knurling using an end mill doesn’t provide any meaningful hits. If you get rich using this idea, send me a generous donation…

  • Another Rebuilt Gas Cap Splash Shield

    Gas Cap Parts
    Gas Cap Parts

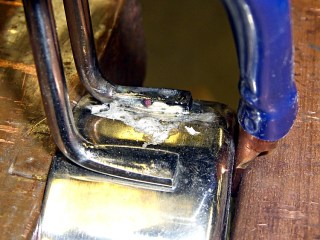
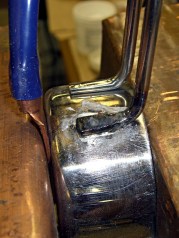
    I finally rebuilt the snowblower gas cap, this time before the splash cone worried its way through the plastic stem and dumped all the parts into the tank.

    The black rubbery domed thing conceals a chunk of open-cell foam that evidently separates the gasoline from the vent channels under the rim. The plastic stem was quite eroded, but probably had another season or two left in it; now I need not worry about it.

    Unlike with the shredder cap, this time I put the screw head on the outside and the jam nuts on the inside; there’s also a jam nut under the cap to keep the screw from walking outward. Just in case, I wrecked the threads to keep the nuts from walking off the end, too; you can see the gouge just above the nut.

  • Monthly Aphorism: On Supplies

    • Never put a part back in the supply cabinet

    The Great Green, another excellent manager from my IBM days, mandated that very simple stockroom rule.

    He knew, even if we didn’t, that the next engineer would spend two days figuring out that the part you returned was defective, costing far more in the long run than just tossing the part.

    Of course, we never tossed the parts…

  • McCulloch Chainsaw Handle Repair

    Shaped bolt head
    Shaped bolt head

    We acquired a McCulloch chainsaw from a friend in “Used to worked fine” condition. I hate small internal combustion engines, two-strokers in particular, but sometimes ya can’t look a gift horse in the orifice.

    Anyhow, the only real repair needed was a new bolt for the anti-kickback clutch handle. For unknown reasons, McCulloch uses a non-standard head that, fortunately, can be carved out of a stock bolt.

    Reshaped bolt in place
    Reshaped bolt in place

    I got the two parallel sides a bit closer together than was required; if I were to do it again I would squish some modeling clay into the recess, make some measurements, and get it right the first time. I’m certain the original was much fancier, but this will suffice.

    Nylock nut on trimmed bolt
    Nylock nut on trimmed bolt

    Trim the bolt to fit and a nylock nut on the outside should hold it in place forever more.

    The repair was prompted by a late winter storm that dropped a huge branch from our neighbor’s tree next to the house. We’d splurged on underground utilities when we upgraded the service entry to 200 A and this is exactly why…

    [Update: A great and completely off-topic discussion about schematic & PCB programs showed up in the comments. I’ve extracted those into a separate post so folks can actually find the discussion with a sane set of search keywords…]

  • Abusing a Leather Punch for Manhattan-Style Circuit Construction

    I’m building a crystal parameter measurement fixture and decided to use Manhattan wiring, rather than an etched circuit board, because I think this will be a rarely used gadget… and it’s RF, so air-wiring is a Good Thing.

    The key to Manhattan construction is having a pile of little circuit-board pads that you glue to a ground plane, then solder component leads to the pads. A bit of rummaging turned up an old leather punch / snap crimping tool that’s probably older than I am. After punching a few pads, though, I realized that the die hole had a constant diameter: no relief behind the cutting edge.

    Aligning to the die
    Aligning to the die

    That meant the circuit board pads jammed tight in the hole. Extracting them required a pin punch and far more hammering than seemed reasonable, not to mention far more force to operate the punch than I was willing to apply.

    So I found the largest transfer punch that would fit in the die hole, chucked it in the drill press, and aligned the table so the vise grabbed the tool directly in line with the spindle.

    The tool is soft steel, intended for leather, so I could get away with the next step: chuck up a drill a few mils larger than the die hole and drill it out to within about 1/8 inch of the cutting edge.

    Worked like a champ: the pads no longer jammed in the hole and the tool operated with much less force.

    Nevertheless, I shrank some glue-lined heat stink shrink tubing around the handles to cushion the sharp inner edges. The handles are just folded steel, as nobody expected the retraction stroke to require much effort at all.

    Padded handles
    Padded handles

    That helped a lot, as did a few drops of oil in the obvious spots.

    The end result was a pile of punchies poked from a chunk of 32-mil double-sided circuit board.

    Punch with circuit-board punchies
    Punch with circuit-board punchies

    Now, to start soldering…

  • Ugliest Tool Length Probe Switch: Repeatability

    Probe Repeatability Setup
    Probe Repeatability Setup

    Given the overall slovenliness of the recently kludged tool length probe switch on my Sherline CNC mill, you have to have to ask yourself… does that thing actually work?

    This boils down to a simple test: repeatedly poke the switch and record the Z-axis trip point. If it’s the same every time, then the switch is repeatable and life is good. If not, then the switch is moving: not good.

    One good measurement being worth a thousand expert opinions, I devoted some Quality Shop Time to measuring the switch. The picture shows the simpleminded setup.

    There’s a broken carbide cutter (I have a disturbing number of these) held in a collet, with its blunt end downward. The spindle isn’t turning, for obvious reasons.

    The probe switch is as far in the -X direction as I can conveniently put it, screwed down to one of the T-nuts holding the tooling plate in place. The G30.1 tool change position is a few inches directly above the switch position.

    The dial test indicator grabbed in the vise has 0.5 mil graduations, so it’s eyeballable to more-or-less 0.1 mil, although I have my doubts about the mechanical repeatability in that range. The arm is horizontal, with the XYZ origin set to the top of the ball.

    The G-Code (shown below) probes the switch to establish & display the tool’s reference length. Actually, what we’re displaying is the Z-axis coordinate where the switch trips, then computing the new tool length from those values.

    Then it does these steps 10 times:

    1. Go XY=0.0 Z=5, just above the indicator ball
    2. Go to Z=0.0. The indicator should read 0.0, too.
    3. Prompt me to write down the indicator reading
    4. G30 to the tool change location
    5. Probe the (unchanged) tool & display the new Z-axis value

    So I did that and here’s the result. The second column is the indicator reading in mils, with negative numbers being further down toward the tooling plate. The third column is the Z-axis coordinate of the probe switch trip in mm.

    Iteration Z @ Origin (mils) Tool Z @ Probe (mm)
    0 0.0 -50.008042
    1 0.0 -50.008873
    2 0.0 -50.010536
    3 0.0 -50.012032
    4 -0.1 -50.013526
    5 0.0 -50.014193
    6 -0.2 -50.014857
    7 -0.1 -50.016686
    8 -0.1 -50.016852
    9 -0.1 -50.017185
    10 -0.1 -50.018514
    Probe drift -0.010472

    Now, that just cries out for a graph, doesn’t it?

    Probe Switch Repeatability
    Probe Switch Repeatability

    The slope of the regression line says the switch is tripping about one wavelength of infrared light (1 micron) further down at each probe. Well, now, that’s not too bad, is it?

    After ten probes, it’s descended about 10 microns, call it 0.3 mils, which is somewhat more than what the dial test indicator reports: 0.1 mil or just slightly more than the width of the indicator’s needle away from the 0.0 line.

    It turns out that the switch doesn’t have any mechanical overtravel whatsoever, so when the switch contacts close, the button is already pretty much bottomed out.

    Switch Released
    Switch Released
    Switch Over-pushed
    Switch Over-pushed

    The left picture shows the tool a few millimeters over the switch. Notice that the top of the black plastic switch body is snug against the metal frame. Although you can’t see it here, there’s nothing but air below the body; the brown hot-melt glue secures the sides and submerges the terminals & wiring.

    The right pictures shows the situation after probing the switch at 300 mm/min. The switch body is pushed slightly downward from the metal shell, showing that the Z axis drive didn’t screech to an instant halt after the switch tripped.

    My back of the envelope said it’d stop in about 7 mils from 12 in/min (call it 0.2 mm from 300 mm/min, which is what I actually used here). Turns out it’s more like 15 mils, about 0.4 mm. So much for the back of the envelope…

    On the other hand, what’s a binary order of magnitude among friends?

    The routines below do an initial probe at 300 mm/min, back off about 1 mm, then probe again at 10 mm/min. The theory was that the switch overtravel would soak up the initial probe and the second, more gentle, probe would always trip at the same Z-axis level.

    Another good theory all shot to hell…

    I should do the initial probe at, say, 100 mm/min and (to speed things up) put the tool change location as close to the switch as the longest tool will allow. That should cut the overtravel down to 5 mils, which ought not be a real problem.

    However, I think the switch is usable as-is. It’s certainly more accurate than my manual tool height adjustment and I really don’t do many jobs that require more than a few tool changes, separated by long periods of chewing away at the part.

    I suspect the switch gradually oozes back to its original position after being rudely poked, but I ought to check that, too.

    The G-Code to make the tests happen:

    (Tool length probing test)
    
    (--------------------)
    ( Initialize first tool length at probe switch)
    ( assumes metric units!)
    
    O<Probe_Init> SUB
    
    G49					( clear tool length compensation)
    G30					( to probe switch)
    G91					( relative mode for probing)
    
    G38.2 Z-90 F300		( trip switch on the way down)
    
    G0 Z1				( back off the switch)
    G38.2 Z-10 F10		( trip switch slowly)
    
    #<_ToolRefZ> = #5063	( save trip point)
    
    G90					( absolute mode)
    G30					( return to safe level)
    
    O<Probe_Init> ENDSUB
    
    (--------------------)
    ( Initialize new tool length at probe switch)
    ( assumes metric units!)
    
    O<Probe_Tool> SUB
    
    G49					( clear tool length compensation)
    G30					( to probe switch)
    G91					( relative mode for probing)
    
    G38.2 Z-90 F300		( trip switch on the way down)
    
    G0 Z1				( back off the switch)
    G38.2 Z-10 F10		( trip switch slowly)
    
    #<_ToolZ> = #5063				( save new tool length)
    
    G43.1 K[#<_ToolZ> - #<_ToolRefZ>]	( set new length)
    
    G90					( absolute mode)
    G30					( return to safe level)
    
    O<Probe_Tool> ENDSUB
    
    (--------------------)
    ( Set up first tool)
    
    G21					( metric units)
    
    (msg,Verify origin at indicator ball, hit Resume)
    M0
    (msg,Verify G30.1 above tool change switch, hit Resume)
    M0
    (msg,Verify blunt tool installed, hit Resume)
    M0
    
    O<Probe_Init> CALL
    
    (debug,Initial tool length = #<_ToolRefZ>)
    
    O100 REPEAT [10]
    
    G0 X0 Y0
    G0 Z0
    (msg,Record indicator Z-axis reading, hit Resume)
    M0
    
    G0 Z5				(get air)
    G30					(to tool change position)
    
    O<Probe_Tool> CALL
    (debug,Tool length offset = #<_ToolZ>)
    
    O100 ENDREPEAT
    
    M2
    

    And here you thought that switch was a total piece of crap, didn’t you?

  • EMC2: Ugliest Tool Length Probe Station… Ever

    Tool length probe switch
    Tool length probe switch

    Having hacked a jack in the Sherline motor driver box, this is what goes on the other end of the cable: the simplest possible tool length switch.

    I’ve seen all manner of exceedingly fancy and painstakingly constructed tool length switch stations, but it seems ordinary snap-action / tactile-feedback switches are repeatable enough for most purposes. I selected a switch from my stash with these qualifications:

    • physically small — fits on Sherline table
    • plastic button — avoid nicking the cutters
    • many more in the stash — not a special-order item
    • cheap – ’nuff said

    A few snippets of heat stink shrink tubing later…

    Switch detail
    Switch detail

    After puzzling over the mounting, I snagged a chunk of aluminum U-channel from the heap, poked a 10-32 clearance hole in one end, and held the switch in place while slobbering brown hot-melt glue over it. The glue is rigid when cool, so the switch isn’t going anywhere, but it’s mounted with some air space below to allow crushing when the probe routine screws up.

    The button stands slightly proud of the U-channel, so even wide tools have side clearance. If the tool doesn’t stop when the switch trips (it could happen!), the entire switch will bend downward until the Z-axis drive stalls as the tool crushes the rubble or snags on the side of the U-channel.

    At which point I just cut the cable, hammer the hot-melt glue and switch rubble out of the U-channel, solder up another switch, blob it in place, and continue the mission… from scratch, though, because the stored tool height reference value will be kaput.

    The U-channel can be screwed down to a T-nut, clamped directly to the table, or affixed wherever it’s needed. If the Sherline had home switches, it’d be better to mount the probe switch in a fixed location somewhere, then use a fixture offset for the part, but I’m not there yet.

    The switch doesn’t have much overtravel: when the contacts activate with a tactile click, the button is pretty much bottomed out. However, unless you’re driving the tool into the switch at a dead run, it ought to stop moving fairly quickly.

    Back of the envelope: I have the Z axis acceleration set to (a sluggish) 3.0 in/s/s. Approaching the switch at 12 in/min = 0.2 in/s , it’ll screech to a halt in 67 ms = (0.2 in/s)/(3.0 in/s/s). Assuming the average velocity while stopping is 0.1 in/s, the distance works out to 7 mils, which shouldn’t pose a problem.

    Then drive up off the switch enough to clear the backlash and drive down at nose-pickin’ speed, so the axis stops pretty much instantly when the switch clicks.

    Some not-very-exhaustive testing suggests the repeatability for a single tool is well within 0.03 mm, about 0.001 inch, which is entirely satisfactory for my purposes.

    [Update: It’s pretty good, all things considered. A simple experiment is there.]

    The overall procedure:

    • Laser align XY to the part origin, home X&Y axes
    • Execute G49 to clear any existing tool length compensation
    • Insert first tool, align to Z=0 on part, home Z axis
    • Eyeball align XY to the switch with the tool just above
    • Jog Z comfortably high, execute G30.1 to set tool change location
    • Fire up your program!

    The program probes the first tool length and saves that as the reference length. Each subsequent tool change gets probed and the tool offset becomes the difference between the new length and the reference length.

    The initial probing routine:

    O<Probe_Init> SUB
    
    G49					( clear tool length compensation)
    G30					( to probe switch)
    G91					( relative mode for probing)
    
    G38.2 Z-90 F300		( trip switch on the way down)
    G0 Z1				( back off the switch)
    G38.2 Z-10 F10		( trip switch slowly)
    
    #<_ToolRefZ> = #5063	( save trip point)
    
    G90					( absolute mode)
    G30					( return to safe level)
    
    O<Probe_Init> ENDSUB
    

    Note that the G30 coordinates are stored in native units, which are inches for my Sherline mill. To get to that Z height (for safety, before moving) while using metric units:

    G0 Z[#5183 * 25.4]

    The G38.2 coordinates are stored in whatever units the G20/G21 mode calls for, so they can be applied directly to tool length compensation. That seems odd, as EMC assumes the tool table uses native units.

    There does not seem to be any way to determine which unit mode is active, although the probe speed depends on that setting. although I suppose I could set a global variable to the desired probe speed and leave it up to the G-Code program(mer) to get it right. Yeah, like that’ll work…

    Anyhow, each subsequent tool gets probed thusly:

    O<Probe_Tool> SUB
    
    G49					( clear tool length compensation)
    G30					( to probe switch)
    G91					( relative mode for probing)
    
    G38.2 Z-90 F300		( trip switch on the way down)
    G0 Z1				( back off the switch)
    G38.2 Z-10 F10		( trip switch slowly)
    
    #<_ToolZ> = #5063				( save new tool length)
    
    G43.1 K[#<_ToolZ> - #<_ToolRefZ>]	( set new length)
    
    G90					( absolute mode)
    G30					( return to safe level)
    
    O<Probe_Tool> ENDSUB
    

    With those two routines in hand, this demo code shows how it’s done…

    G21					( metric units)
    
    (msg,Verify origin at proper location, hit Resume)
    M0
    (msg,Verify G30.1 at tool change switch, hit Resume)
    M0
    (msg,Verify first tool installed, hit Resume)
    M0
    
    O<Probe_Init> CALL
    
    G0 X0 Y0 Z0
    (msg,Verify return to origin, hit Resume)
    M0
    
    M6 T2
    O<Probe_Tool> CALL
    
    G0 X0 Y0 Z0
    (msg,Verify return to origin, hit Resume)
    M0
    
    M6 T3
    O<Probe_Tool> CALL
    
    G0 X0 Y0 Z0
    (msg,Verify return to origin, hit Resume)
    M0
    
    M6 T4
    O<Probe_Tool> CALL
    
    G0 X0 Y0 Z0
    (msg,Verify return to origin...)
    M2
    

    The M6 Tx commands make use of a

    TOOL_CHANGE_AT_G30 = 1

    line in Sherline.ini, which tells the Axis automagic manual tool changer routine to traverse to the G30 position and pop up a prompt to (manually) change the tool. When you click OK, the subsequent CALL command invokes the tool length probe routine and away it goes.

    This whole lashup doesn’t have a lot of power-on hours, but I really like how it works!

    A tip o’ the cycling helmet to the folks behind EMC2…