Ed Nisley's Blog: Shop notes, electronics, firmware, machinery, 3D printing, laser cuttery, and curiosities. Contents: 100% human thinking, 0% AI slop.
Although the oven igniter I just installed worked, its 3.0 A current fell below the gas valve’s minimum 3.3 A, which, based on past experience, suggested it would fail in short order. Just to see what happened, I sent a note to the seller, who offered a warranty swap and, after a bit of fiddling, the replacement arrived:
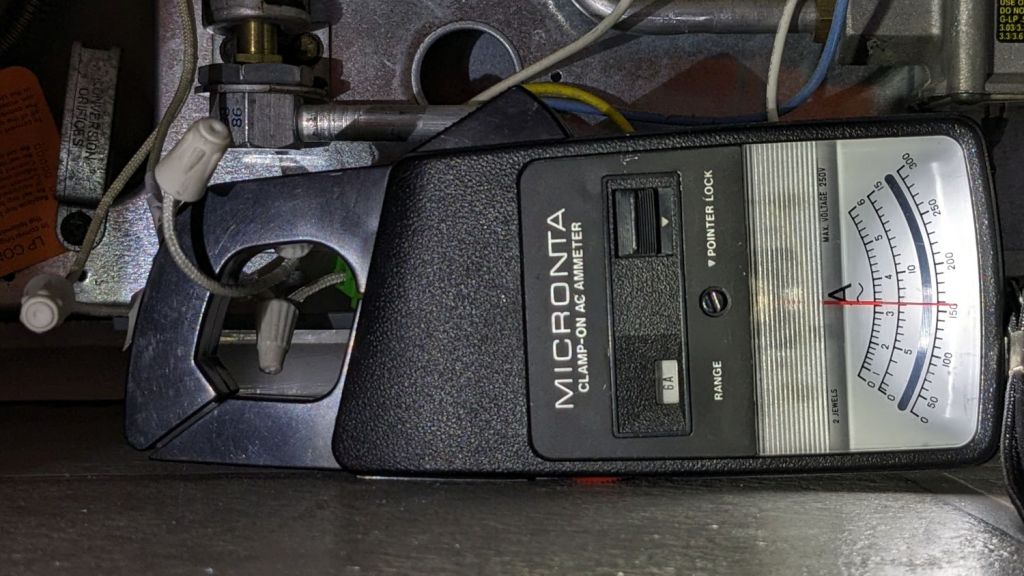
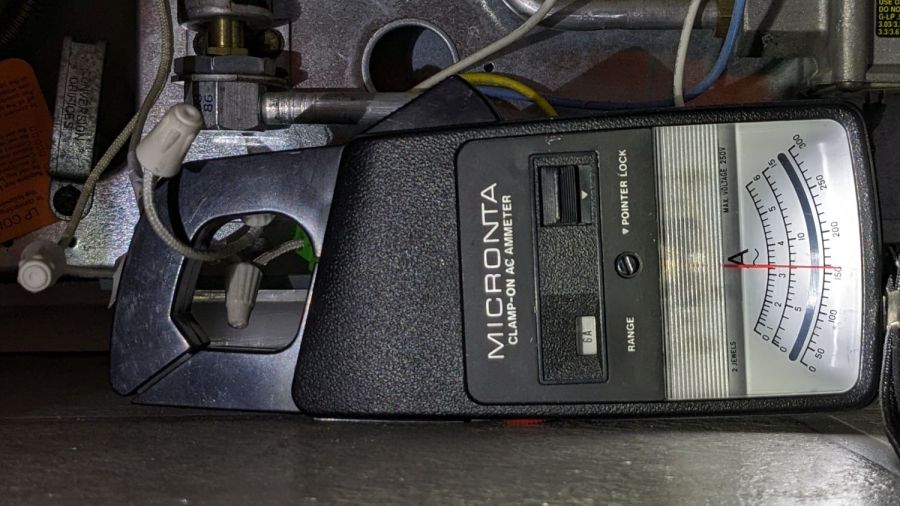
Oven Igniter B – 3.3 A initial current
This one draws exactly 3.3 A, so it just barely meets both its product description and the gas valve’s minimum current.
Daubing urethane adhesive into each pocket, sliding a tiny magnet atop the goo, and flipping them over onto a sheet of plastic atop the surface plate to let them cure went about the way you’d expect. Given the state of my fingertips, however, I was not about to fiddle with the phone / camera / anything, but it really did happen.
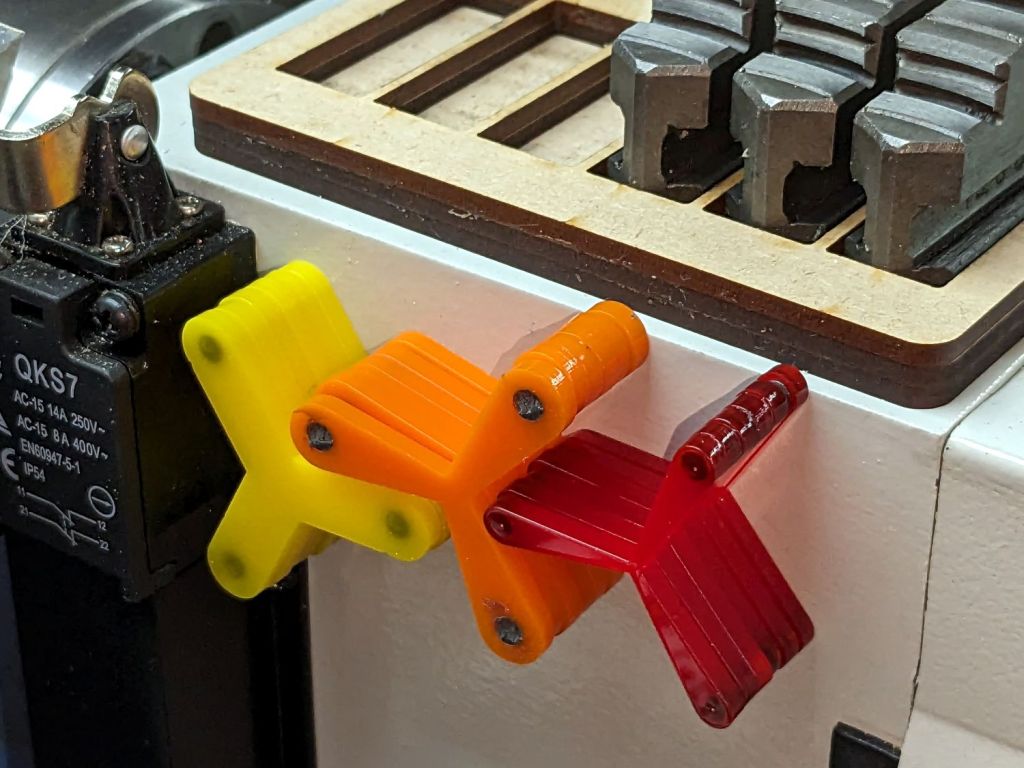
The final result:
Lathe Chuck Stops – on-lathe storage
The alert reader will notice the slight gap under the left leg of the first orange stop, which provides a good introduction for a few things that should happen differently the next time I do something like this.
To my credit, I got all but one of the 54=3×6×3 magnets into their pockets in the same orientation. That’s gotta count for something and, hey, that orange stop sticks to the chuck just fine.
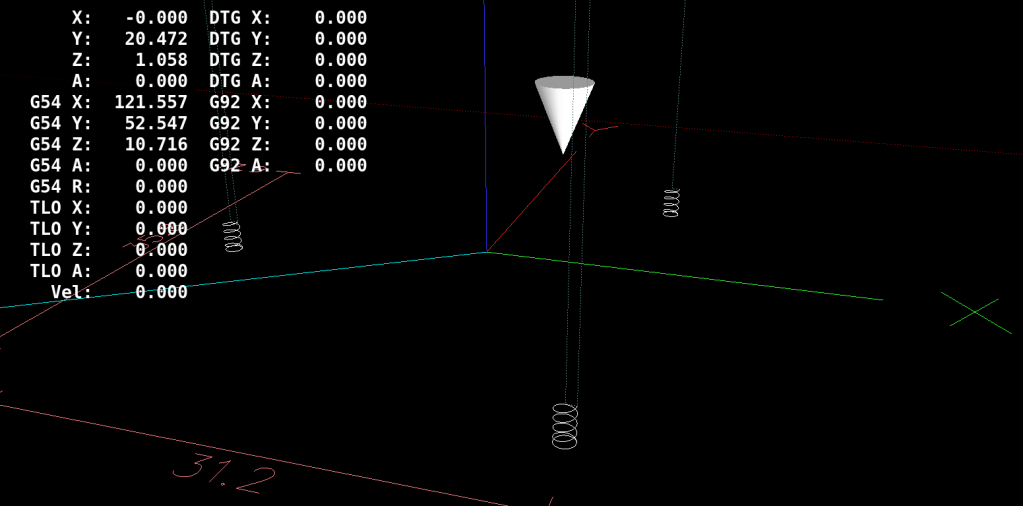
That one also suffered from my failure to switch the Axis UI to metric units before touching off the Z axis at 0.1 mm, thereby putting the Z=0.0 level 2.53 mm below the surface. Fortunately, the 3 mm MDF baseplate prevented that error from creating three pockets in the tooling plate, although it did produce holes instead of pockets in the stop.
I dropped the magnets into the thru-cut stop on the surface plate and dabbed some adhesive atop the magnets to bond them into their holes. This worked fine and led me to suspect the easiest way to make these stops would be to just laser-cut the holes and skip the whole CNC thing.
The disadvantage of cutting the holes through is that adhesive will inevitably ooze out around the magnet and mess up the bottom surface of the stop. Sticking both the stop and the magnets onto kapton tape seems like it should seal well, but liquid always finds a way.
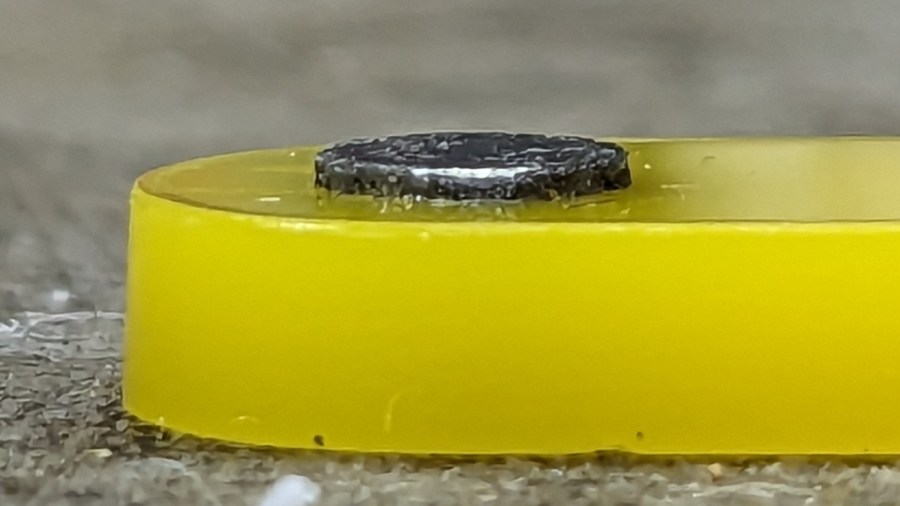
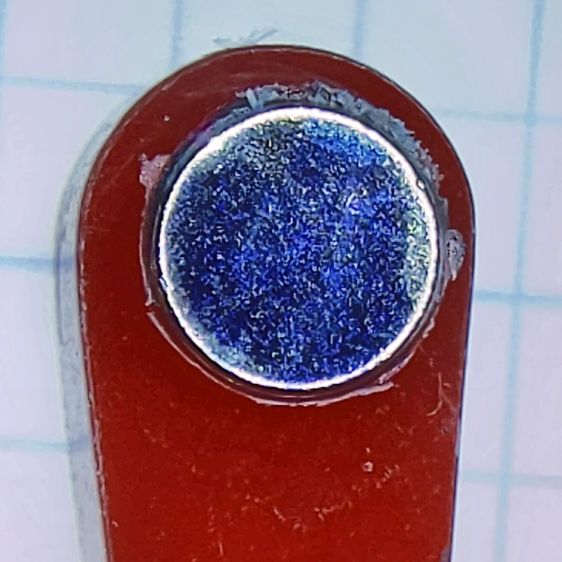
In any event, the two-part urethane adhesive (JB Plastic Bonder) expands slightly as it cures, which is great for gap filling and not so good for precision bonding. With the pockets in the other 17 stops arranged open-side down, the magnets held themselves firmly to the plastic sheet atop the surface plate and the expanding urethane pushed the acrylic stop upward, leaving the magnets standing slightly proud of the stop’s surface:
Lathe Chuck Stops – protruding magnet
Not by much, mind you, but not what I wanted, having painstakingly cut the pockets 2.2 mm deep for a 2.0 mm magnet.
Next time, dot some slow-cure clear pouring epoxy in each pocket, put the stop on the surface plate with the pocket facing up, then drop the magnet in place. The magnet pulls itself into the pocket, the epoxy doesn’t expand, any overflow will fill in over the magnet, and anything sticking out can be sanded off.
The fixtures worked well and aligned perfectly on the Sherline’s tooling plate. The 0.1 mm outset around the stops in the chipboard probably wasn’t needed, although the total repeatability seemed to be around 0.2 mm and pocket position errors are visible only on the smallest (red) stops:
Lathe Chuck Stops – misaligned pocket
All in all, this turned out pretty well. Next time will be even better!
#<chuckrad>=20.000                  (radius to center of magnet)
#<chuckjaws>=3                      (number of jaws)
#<chuckang>=[360.0/#<chuckjaws>]    (angle between jaws)

#<bitrad>=[2.900/2]                 (cutter radius)

#<pocketrad>=[4.100/2]              (magnet pocket radius)
#<pocketdeep>=2.200                 ( … depth)
#<xoffs>=[#<pocketrad>-#<bitrad>]   (pocket center to cutter center)

#<safez>=20.0                   (above all the clamps & gadgets)

G21 G54 G80 G90 G94             (metric!)

F600                            (full speed for the Sherline)

G0 Z#<safez>
Obviously, those magic numbers must match the laser-cut blanks, the magnets, the cutting bit in the spindle, the clamps on the table, the speed of the machine, and everything else you overlooked.
So. Much. Pain.
Knowing the angle to the current pocket, polar coordinate notation gets to the center point, with a jaunt in relative motion to the starting point for the helix into the pocket:
That dance produced rounder pockets with cleaner bottoms than just a single helix down and a straight pull upward.
Then set up for the next hole and clean up after the last one:
G0 @#<chuckrad> ^#<ang>         (back to center)
G0 Z#<safez>

#<ang>=[#<ang>+#<chuckang>]     (set up next hole)
O100 ENDREPEAT

G0 Z[2*#<safez>]
G0 X0 Y0

M2
I ran the Sherline XY axes at their 600 mm/min top speed, the spindle at 10 kRPM with a shiny new 3 mm (nominal!) cutter, ramped into the helix at ≅10° (on a 1 mm circle!), and it sliced the acrylic into nice chips without getting all melty.
Unlike with Javascript, when you get something wrong in G-Code, you can hear the crash.
The LinuxCNC pocketing code as a GitHub Gist:
This file contains hidden or bidirectional Unicode text that may be interpreted or compiled differently than what appears below. To review, open the file in an editor that reveals hidden Unicode characters.
Learn more about bidirectional Unicode characters
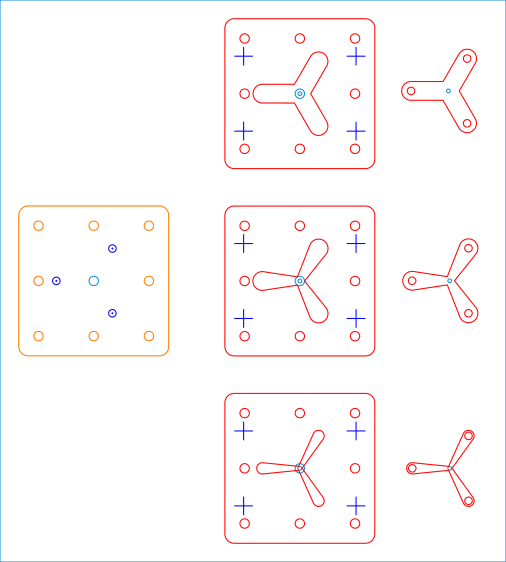
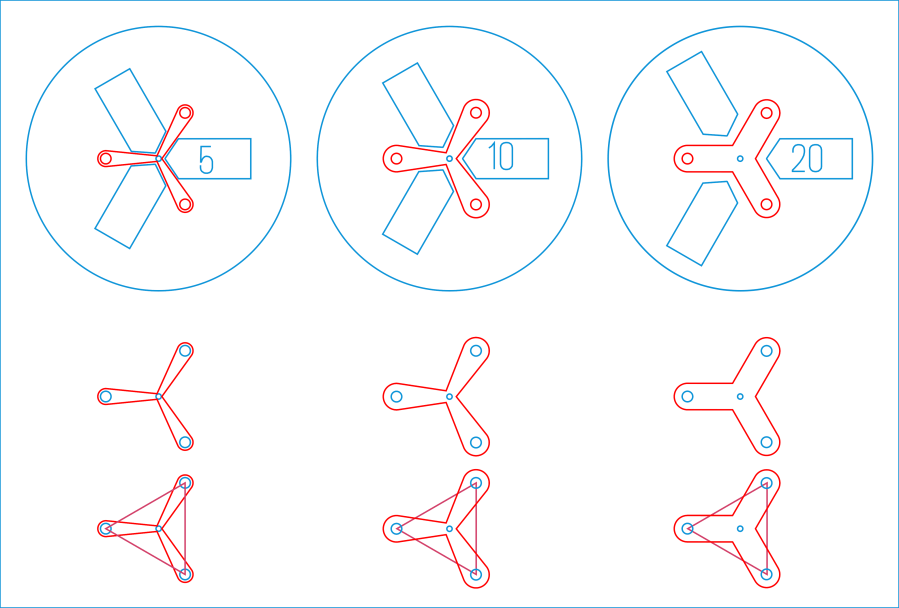
Because it need not withstand much lateral force and will get used only a dozen-ish times, the base is MDF and the stop alignment happens in three matching chipboard layers:
Lathe Chuck Stops – Pocketing Fixture – LB layout
The three stops (over on the right) are copy-pasta from the originals. A 0.1 mm outset in the chipboard (center) lets the acrylic shapes drop into the chipboard sheets with Good Enough™ alignment accuracy. The MDF layer (left) provides some overshoot comfort below the chipboard.
The chipboard layers each have four alignment targets at (±30,±20):
Lathe Chuck Stops – pocketing fixture touchoff
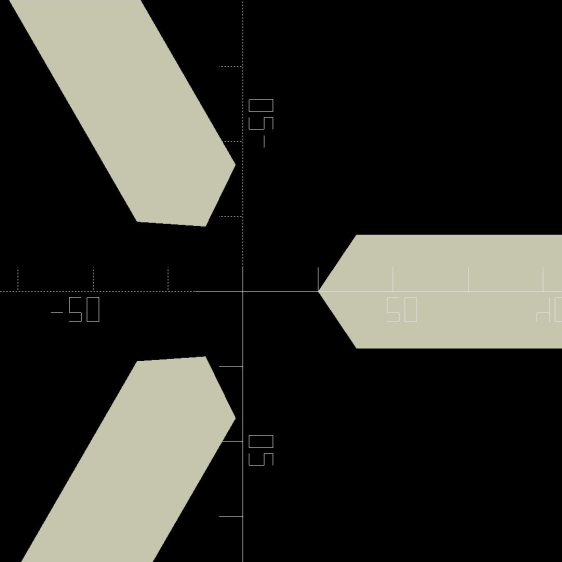
Touch off the lower-left target at (-30,-20) and G0 X30 Y30 should drop the laser dot in the middle of the upper-right target. With the (0,0) origin at the geometric center of the stop, LinuxCNC’s polar notation picks out the three pockets:
G0 @20 ^-60
G0 @20 ^180
G0 @20 ^60
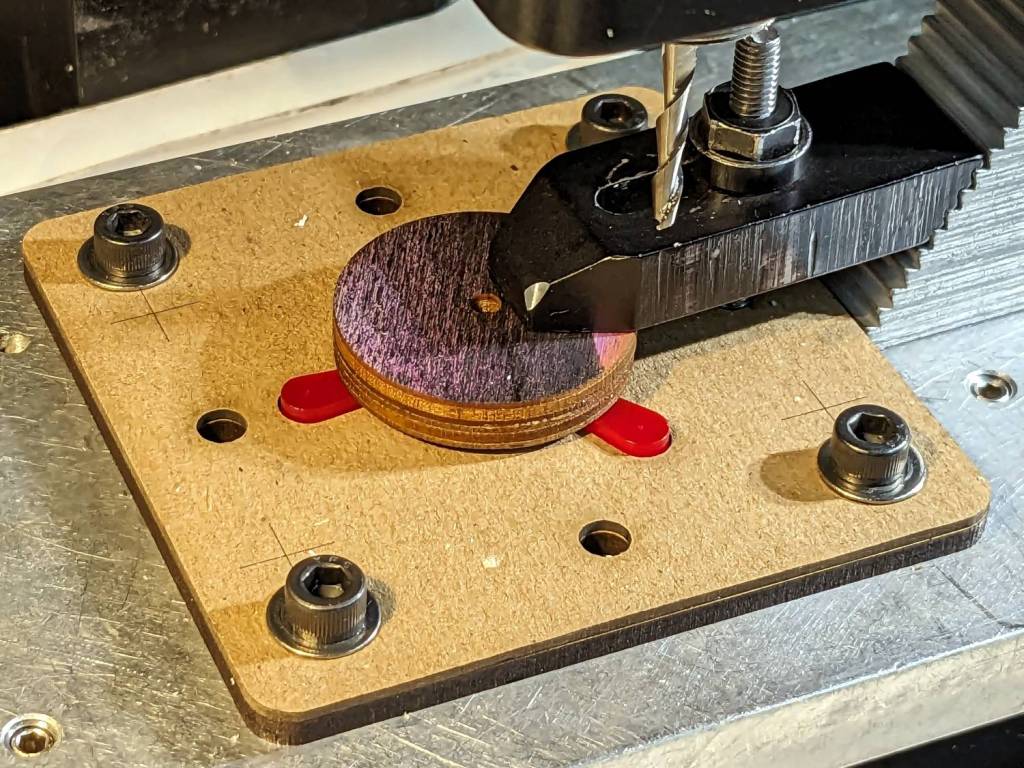
The plywood disk under the Sherline’s clamp has a glued ring to put the clamping force out near the ends of the legs. I started with just the aluminum clamp, but the legs needed a bit more stability; a laser cutter makes impromptu widgets like that trivially easy.
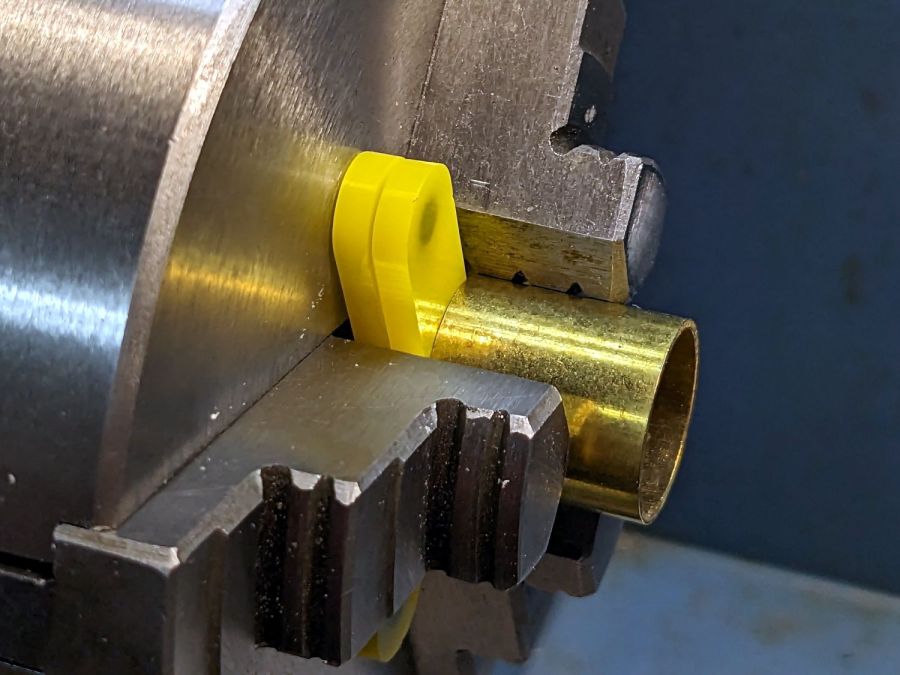
Having occasionally been in need of a lathe chuck stop, I finally cleared that project off the heap:
Lathe Chuck Stops – demo setup
These are definitely not up to commercial standards, but also don’t cost fifty bucks each. A trio of 4×2 mm neodymium disk magnets stick the stop to the chuck (and to each other) with enough force to hold it there, but not enough to make removing it a hassle.
Trace the right-side jaw, clean it up, put the tip a known distance from the origin, make a circular array, and draw a comfort circle the size of the chuck OD.
The stop geometry comes from a hull wrapped around a circle a few millimeters larger than the 4 mm magnet (out 20 mm from the center) and a circle at the center sized so the hull clears the jaws:
Lathe Chuck Stops – LB layout
Then a small circle at the center allows me to drop the stop atop a known coordinate and rotate it around the circle, because the XY coordinate center is not at the geometric center.
I cut out a few chipboard samples to verify the sizes, a few more from scrap acrylic to set up the pocketing operation, then half a dozen of each in cheerful kindergarten colors:
Lathe Chuck Stops – on-lathe storage
The 5 mm stop is obviously too fragile for commercial success, but I figured it’ll survive long enough around here. Worst case, I can make another handful as needed.
Although I have laser-engraved pockets in plywood, a few experiments in acrylic confirmed the surface finish is terrible and the depth control is iffy, at best. Given that I need a 2.2 mm deep pocket in 3 mm acrylic, a CNC mill seems the right way to poke the pockets:
The trash truck drives up to the dumpster, stops with its front tires barely on the concrete pad, extracts the dumpster contents, and backs away over the same two tire tracks. The crushed asphalt tracks extend halfway to the perimeter road circling around on the far right, where another crushed area shows the truck’s route into the parking lot.
Google Streetview’s history suggests the parking lot was sealed and striped five years ago. The motel predates the earliest pictures from 2007, although the tree sizes suggest the place was maybe five years old by then, so we’re looking at two decades of regular use.
As far as I can tell, dribbling hot tar along asphalt cracks does absolutely nothing except give the appearance of someone caring.


