Ed Nisley's Blog: Shop notes, electronics, firmware, machinery, 3D printing, laser cuttery, and curiosities. Contents: 100% human thinking, 0% AI slop.
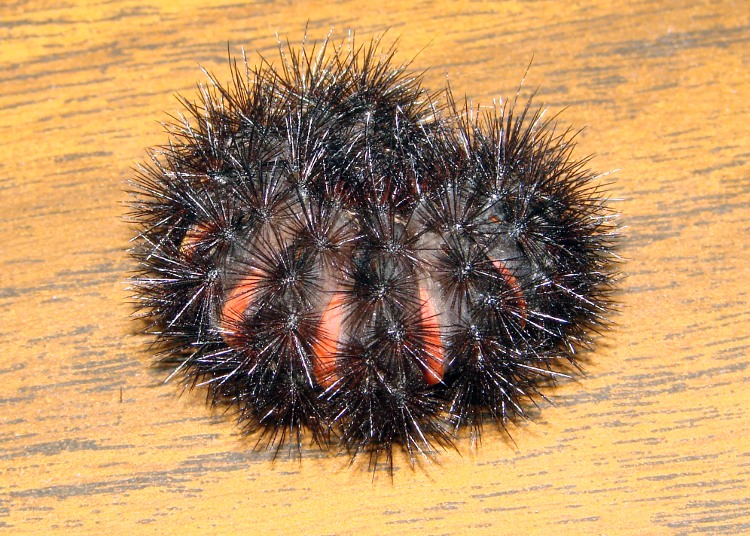
This gizmo appeared in one of Mary’s garden containers and, as is their custom, curled up tight and stayed that way when she picked it up.
Wooly Bears generally have a central brown band, but all-black isn’t unusual. I hadn’t known about the orange bands across the back between the body segments.
Those spiny hairs are so stiff and it weighs so little that it skitters around on the desk at the slightest touch, all without moving a muscle…
Find out more about Wooly Bears there or by searching on the obvious keywords.
We put it back in the garden where it can turn into a moth and produce more Wooly Bears to delight children of all ages.
Wooly Bear caterpillar – bottom view
Wooly Bear caterpillar – top view
Photography note: exposing a dead-black spiny thing against a woodgrain desktop is basically impossible. The desktop is grossly overexposed so the Wooly Bear details come out more-or-less visible. Ugly, but you get the idea.
The charger pedestal includes an LED to light up the dosimeter’s graticule. I seated a 10 mm white LED into a polycarbonate ring that also serves as the base for the stiff spring that presses the contact assembly against the dosimeter’s internal spring.
I made the base while I was doing the lathe work for the contact assembly, then grabbed it in the Sherline mill’s 3-jaw chuck to drill the 4-40 holes with a touch of manual CNC.
As before, I manually tapped the holes, but it’s a lot easier with each hole at the right location and pointed in the right direction!
Step bit making an annular ring
I described the step-drilling that produced the correct hole and shoulder sizes there. That won’t work every time, but in this situation it was just about perfect.
The LED power wires pass through the central hole in the ring. I used a blob of hot-melt glue to hold the LED in place; epoxy would be more in keeping with the nuclear weapons theme, but HMG is just fine with me.
There’s another hole just to one side of the LED, more or less centered between the mounting screws, that passes the wire from the dosimeter charging contact out of the pedestal. This wire starts at the center of the top, passes inside the spring, and must not be pinched along the way.
LED in base with spring positioning ring
I added an aluminum cylinder as a positive stop to prevent the dosimeter contact assembly from getting pushed too far into the pedestal. The length matches up with the anti-rotation slot in the EMT: the screw doesn’t quite hit the top or the bottom of the slot.
A wrap of green electrical tape around the outside made the cylinder a slip fit inside the EMT shell. It shouldn’t move at all.
The cylinder also holds the spring in place so it can’t rub against the charging wire, but I’m pretty sure that isn’t necessary.
The spring comes from my parts heap. It must provide a bit under 8 pounds of force to activate the dosimeter charging spring with about 3 mm of travel. I picked the length of the EMT shell to preload the spring to make the answer come out right, which also affects the length of the aluminum cylinder.
The spring OD must fit into the EMT and the ID must clear the 10 mm LED and charging wire in the base. Your mileage will most certainly vary.
Charging pedestal components
Assembly is straightforward, but goes much more easily with three hands.
Screw the panel mount bolt into place
Attach the charging wire to the central contact & remove the anti-rotation screw
Slide the central contact in place, reinstall the screw through the slot
Slide the spring & aluminum cylinder in place, wire in the middle
Pass the wire through the LED base ring
Press the base assembly into position and hold while installing the screws
Finished charging pedestal
The charger I built turns the LED and charger power on with a push-to-activate digital encoder knob, so there’s no need for the 1 lb spring & switch found in the V-750 charger.
To read the dosimeter, just hold it loosely atop the pedestal, push the twiddle knob down, and the LED comes on.
To zero the dosimeter, press it firmly and twiddle the knob for zero!
I’ll describe the charger circuity at some point; it’s detailed in my Circuit Cellar column in the August 2009 issue.
This is a chunk of EMT (Electrical Metallic Tubing) with 4-40 clearance holes that attach it to the panel mounting bolt, hold the base disk in place, and keep the central contact assembly from rotating. The overall view gives you a good idea what’s involved.
The nominal EMT size is 3/4″, which (of course) means the ID is about 0.8″ and the OD is a bit over 0.9″. There’s a weld seam running the length of the tube that I cleaned up on the lathe, so the actual ID is slightly enlarged. While it’s in the lathe, face off both ends to whatever length suits the spring you’ll eventually use.
There’s nothing tricky about this, other than getting the three holes on each end lined up properly with their mating parts. Once again, manual CNC comes in handy: grab it in the 3-jaw on the rotary table, use G81 to drill the hole and G0 A120 and G0 A240 to index the locations. Make sure you retract the drill bit far enough to clear the chuck jaws!
The two sets of holes need not be perfectly aligned with each other.
Milling rotation stop slot in shell
The photo shows that I milled the rotation stop slot after drilling the holes. It’d be easier to do that without removing the cylinder from the chuck, but this was one of those incremental designs where I was checking the fit as I built it.
The slot should be long enough to allow the contact assembly to slide almost completely into the pedestal. That prevents you from crunching the dosimeter’s innards when you’re pressing it down on the spring.
The clearance from tool holder to chuck isn’t all that large; you might want to put the slot at the far end of the cylinder… but then I’d have to conjure up a pipe center for the Sherline tailstock and figure out how to mount it high enough to match the rotary table’s axis.
The original V-750 pedestal is a threaded bushing around the cylinder that contacts the dosimeter. Hard to make from scratch, but it’s basically a bolt with hole in the middle. I can do that…
A foray into the parts heap produced a copper bolt threaded 1/2″-20 and a matching steel nut. I bandsawed the nut in half, doing a surprisingly good job of cutting it parallel to the surfaces, and filed off the obvious blems. The thin washer fit a 7/16″ bolt until I filed the hole out; the OD is a bit undersized for a 1/2″ head and looks much better in this application.
I grabbed the bolt threads in the lathe and turned down the head for a slip fit in the EMT. Turns out the head wasn’t exactly concentric with the threads, but now the rounded-off hexagon tips are. Drill out the middle for a slip fit around the 11/32″ brass tubing, break the edges, and it’s all good.
Drilling EMT mounting holes in bolt head
The bolt threads need to be barely long enough to go through the aluminum box I’ll eventually mount this thing in and pass through the nut, so I sawed the bolt off to 3/8″, more or less, and cleaned up the end in the lathe.
I thought about soldering the bolt to the EMT shell, but, fortunately, came to my senses before doing any damage. Instead, I drilled & tapped three 4-40 holes in the head that will match with similar clearance holes in the EMT. This is the sort of thing that works really well with “manual” CNC: get the first side lined up, then just type G0 A120 and you’re at the next face. A manual G83 peck drill cycle pokes the hole exactly where it’s needed.
Manual tapping, a bit more edge breaking, some cleanup, and the thing looks pretty good.
Pedestal mount – oblique viewPedestal mount – top view
The cylindrical center of the pedestal must conduct light into the dosimeter, conduct a positive charge into the contact pin, and push that pin hard enough to make contact inside the dosimeter.
The general notion is to turn an acrylic rod to a slip fit inside an 11/32″ telescoping brass tube, glue a wider acrylic disk to the bottom to take up the spring pressure, and run a 4-40 machine screw right down the axis to carry the current. There’s also a screw in the side to prevent the shaft from rotating.
Although the bulk of screw and solderless lug looks like it should block much of the central shaft’s view of the LED in the base, enough light gets around to illuminate the dosimeter’s scale. The acrylic doesn’t need an optically perfect finish, either, as diffuse light works fine.
Turning contact base ringTurning central contact post
I used a hole saw to extract a disk from a piece of acrylic that used to contain one of those crappy desk clocks they give out as awards when money’s too tight to mention. The diameter should be a bit larger than the EMT’s ID so you can turn it to a slip fit.
Chuck the disk up reasonably square and drill out the center to a bit over 11/32″, so the tubing will bear against the rod rather than the base.
The acrylic rod has two slip fits: into the brass tubing and into the disk. Neither will be particularly fussy, so don’t lose much sleep over perfection here. Apply some good solvent adhesive to the rod’s large end and slide it into the disk. Pause for a day while it cures: it’s a big joint.
After it’s cured, chuck up the rod and turn the disk so it’s nice & square & neatly finished.
You’ll need two more disks: one for the pedestal base and another to act as a collet. I made them from 3/8″ polycarbonate sheet, of which I have what may turn out to be a lifetime supply. The base disk will be another slip fit in the EMT, the collet must match the actual OD you just turned on the contact disk. Saw a slot in the collet disk to convert it into a (crude) collet.
Drilling 4-40 clearance hole
The original V-750 pedestal has a nice stamped rod running the length of the central post, but I figured a long 4-40 screw would work as well. However, there’s no reason to thread the entire length of the post, so drill out a 4-40 clearance hole from the disk to within about 1 cm of the other end. This is where the collet disk comes in handy; you can see the saw slit at the bottom, between two jaws.
Take the rod out out and thread the end.
Drilling rotation stop hole
The last step is drilling & tapping a 4-40 hole in the side for the rotation stop screw. This will fit into a corresponding slot in the EMT shell to prevent you from twisting the contact wire off.
Put everything together, with a dab of cyanoacrylate adhesive to keep the brass tubing in place, and you’re done with this part.
Although my V-750 dosimeter charger cleaned up reasonably well, I wanted to see if I could build a high-voltage supply from more-or-less contemporary parts to charge the dosimeters. The circuit is easy enough, but the charging pedestal that connects to the dosimeter turned into an interesting shop project.
V-742 dosimeter charging contact
Pencil-style electrometer radiation dosimeters, like the V-742 shown here, have a charging contact pin embedded in a transparent plastic (?) end cap recessed in the bottom. Inside the dosimeter a mighty spring (or, perhaps, the plastic cap itself) holds the pin outward so that it does not make electrical contact with the gold-coated quartz fiber in normal use.
This baffled me at first, because I did not understand why the charge didn’t just leak off the fiber through the charging pin. In order to dump charge onto the fiber, you must first press the pin inward by about 1 mm against the internal spring: no pressure, no contact, no charge.
Duh…
The dosimeter’s innards must be kept scrupulously clean and full of dry air. After you pull the pin out to admire it, the dosimeter won’t hold a charge ever again. I yanked the pin out of a dosimeter that simply didn’t work and, after a bit of fiddling, the dosimeter can now be set to zero, but the charge leaks off in a matter of hours rather than days.
Charging contact pedestal
The V-750 charging pedestal has an outer sleeve (the negative contact) and a central pin (the positive contact) that fit neatly into the end of the dosimeter. The pin stands about 2 mm proud of the plastic insulator that pipes light into the dosimeter to illuminate the scale. The sleeve, insulator, and pin move as a single unit: the dosimeter presses them down into the V-750 against two stacked springs.
A 1-lb spring holds the insulator in place by pressing the whole cylinder outward against its shoulder. The charger turns on when the dosimeter reaches that spring’s limit of travel at about 1 mm, but it’s not firm enough to press the dosimeter pin into contact with the quartz fiber. That’s the position you use to read the dosimeter: the light is on, but the fiber won’t move yet.
In order to charge the fiber, the dosimeter must move down an additional 3 mm against an 8-lb leaf spring until it seats against the pedestal’s threaded shell. Holding the dosimeter steady against that pressure while twiddling the voltage knob to adjust the dosimeter fiber to the zero point of the scale is more challenging than you might expect: grab it in your fist and hold on tight. It’s a good idea to wear glasses, as the dosimeter optics provides maybe 5 mm worth of eye relief: you can easily poke yourself in the eye with the fool thing if your grip loosens.
So, basically, a new charging pedestal must include a shell that meets the dosimeter’s body and a central shaft consisting of a sliding outer sleeve, a transparent insulator, and a central pin. The shaft must be pushed against the dosimeter by a really stiff spring to close the charging contact.
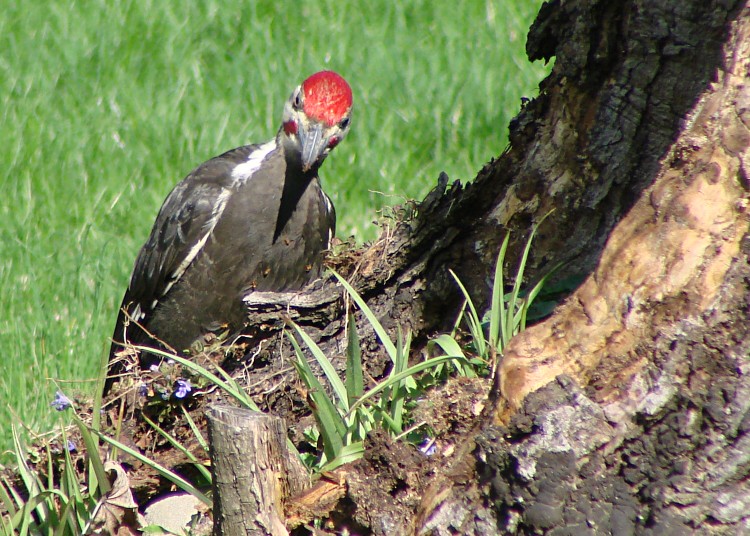
This fellow has been helping to remove the stump in the front yard for a quite a while; today he let me peek around the edge of the door and take a few pictures…
He’s about crow-sized with a much snappier paint job.
Scary-sharp beak!
Pileated woodpecker – head-on
Pileated woodpecker
Pileated woodpecker – left side
Taken with a Sony DSC-H5 with their VCL-HGD1758 1.7x teleconverter lens at about 50 feet, then ruthlessly cropped. Not as good as an SLR with a real telephoto lens, but good enough for my simple needs. The teleconverter with a macro lens on the back provides some standoff distance for photos of tabletop widgetry.