Ed Nisley's Blog: Shop notes, electronics, firmware, machinery, 3D printing, laser cuttery, and curiosities. Contents: 100% human thinking, 0% AI slop.
I’ve bought plenty of batteries from batteries.com over the years, but the alkaline AA cells I picked up last year have been a real disappointment: some had very short service lives. It took quite a while to figure this out, as I mentioned there, and when I finally got around to checking the rest of the package, most of them were dead… in Spring 2009 with a 12-2012 date code.
One characteristic of the weak / dead cells is that the negative terminal is swollen, even on the deaders direct from the package. This picture shows four cells removed from service: the front two are used with some remaining charge, the rear two are dead.
When I checked the package, most of the dead-on-delivery cells had swollen bottoms, so I suspect they had a manufacturing problem with at least one batch of cells.
A query to batteries.com asking about this got no reply. Perhaps they were busy dealing with the aftermath of their security breach?
A 48-pack of alkaline cells from the late Circuit City, bought about the same time, seems just fine.
Many interesting projects require more digital output bits than the Arduino hardware can support. You then use 74HC595 serial-in/parallel-out chips and that tutorial pretty well explains how it works. The shiftOut() library function squirts a byte out through an arbitrary pin, leading with either the high or low bit.
Software SPI: Clock and Data
Just drop one byte into shiftOut() for each ‘595 lined up on your board. Remember to latch the bits (LOW-to-HIGH on RCK @ pin 12 of the ‘595) and enable the output drivers (LOW on -G @ pin 13, similarly) when you’re done sending everything. You can have separate latches-and-enables for each ‘595 if that suits your needs, although then you once again run out of Arduino bits pretty quickly. It’s entirely possible to devote a ‘595 to latches-and-enables for the rest of the chain, but that gets weird in short order.
The scope shot shows that shiftOut() ticks along at 15 µs per bit (clock in the upper trace, data in the lower trace). For back-of-the-envelope purposes, call it 8 kB/s, which is probably less than you expected. If you have a string of 5 external bytes, as I did on a recent project, that’s only 1600 updates / second. It was part of a memory board reader & EPROM programmer: reading an 8 kB ROM chip requires two shift-register runs (one to set the address & data, one to read in the chip output), so the overall rate was on the order of 10 seconds per pass and much worse for programming. You can optimize the number of bits by not shifting out all the bytes, but that’s the general idea.
Because ‘595 chips are output-only, in order to get 8 bits of data into the Arduino board, add a 74HC166 parallel-in/serial-out chip to the string. Alas, shiftOut() doesn’t know about input bits, so you’re on your own.
Hardware SPI: Clock and Data
If you’re going to have to write some code to get input bits anyway, you may as well use the ATmega168 (and its ilk) hardware SPI as it was intended to be used: for high-speed synchronous serial I/O. This scope shot shows the SPI clock (in the top trace again) ticking along at 1 µs per bit, which is 1/16 the Diecimila’s oscillator frequency. You can pick any power of two between 1/2 and 1/128; I used 1/16 because it’s fast enough to make the rest of the software the limiting factor, while slow enough to not require much attention to layout & so forth.
Start by Reading The Fine Manual section about the ATmega168’s SPI hardware, starting at page 162.
The pin definitions, being lashed to internal hardware, are not optional. Note that SCK is also the standard Arduino LED, which won’t be a problem unless you need a tremendous amount of drive for a zillion ‘595s. I stuck an additional LED on Arduino digital pin 2.
#define PIN_HEARTBEAT     2             // added LED
#define PIN_SCK          13             // SPI clock (also Arduino LED!)
#define PIN_MISO         12             // SPI data input
#define PIN_MOSI         11             // SPI data output
Initial hardware setup goes in the usual setup() function:
pinMode(PIN_SCK,OUTPUT);       // set up for "manual" SPI directions
digitalWrite(PIN_SCK,LOW);
pinMode(PIN_MOSI,OUTPUT);
digitalWrite(PIN_MOSI,LOW);

pinMode(PIN_MISO,INPUT);       // configure inputs
digitalWrite(PIN_MISO,HIGH);

SPCR = B01110001;              // Auto SPI: no int, enable, LSB first, master, + edge, leading, f/16
SPSR = B00000000;              // not double data rate
Basically, the “manual” setup allows you to wiggle the bits by hand with the hardware SPI control disabled.
Arduino Hardware SPI Schematic
Here’s a chunk of the schematic so you can see how the bits rattle around. You’ll surely want to click it to get the details…
I put the data in a structure that matches the shift register layout, with the first byte (Controls) connected to the ATmega’s MOSI pin and the last byte (DataIn) connected to MISO. The SCK pin drives all of the serial clock pins on the ‘595 and ‘166 chips in parallel. Your structure will certainly be different; this was intended to suck data from a Tek 492 Spectrum Analyzer memory board.
typedef struct {      // external hardware shift register layout
 byte Controls;       // assorted control bits
 word Address;        // address value
 byte DataOut;        // output to external devices
 byte DataIn;         // input from external devices
} SHIFTREG;

SHIFTREG Outbound;    // bits to be shifted out
SHIFTREG Inbound;     // bits as shifted back in
The functions that make it happen are straightforward:
void TogglePin(char bitpin) {
 digitalWrite(bitpin,!digitalRead(bitpin));
}
void PulsePin(char bitpin) {
 TogglePin(bitpin);
 TogglePin(bitpin);
}

void EnableSPI(void) {
 SPCR |= 1 << SPE;
}

void DisableSPI(void) {
 SPCR &= ~(1 << SPE);
}

void WaitSPIF(void) {
 while (! (SPSR & (1 << SPIF))) {
//        TogglePin(PIN_HEARTBEAT);       // use these for debugging!
//        TogglePin(PIN_HEARTBEAT);
 continue;
 }
}

byte SendRecSPI(byte Dbyte) {             // send one byte, get another in exchange
 SPDR = Dbyte;
 WaitSPIF();
 return SPDR;                             // SPIF will be cleared
}

void CaptureDataIn(void) {                // does not run the shift register!
 digitalWrite(PIN_ENABLE_SHIFT_DI,LOW);   // allow DI bit capture
 PulsePin(PIN_SCK);                       // latch parallel DI inputs
 digitalWrite(PIN_ENABLE_SHIFT_DI,HIGH);  // allow DI bit shifting
}

void RunShiftRegister(void) {
 EnableSPI();                             // turn on the SPI hardware

 Inbound.DataIn  = SendRecSPI(Outbound.DataIn);
 Inbound.DataOut = SendRecSPI(Outbound.DataOut);

 Inbound.Address  =         SendRecSPI(lowByte(Outbound.Address));
 Inbound.Address |= ((word) SendRecSPI(highByte(Outbound.Address))) << 8;

 Inbound.Controls = SendRecSPI(Outbound.Controls);

 PulsePin(PIN_LATCH_DO);                   // make new shift reg contents visible
 PulsePin(PIN_LATCH_ADDRESS);
 PulsePin(PIN_LATCH_CONTROLS);

 DisableSPI();                             // return to manual control
}
Actually using the thing is also straightforward. Basically, you put the data-to-be-sent in the Outbound variables and call RunShiftRegister(), which drops output bytes into SPDR and yanks incoming bytes out, then stuffing them in the Inbound variables. I have separate latch controls for the Controls, Address, and Data chips, although I don’t use them separately here.
You must wiggle the parallel latch enable line on the 74HC166 chip before shifting to capture the data, as shown in CaptureDataIn(). That chip also requires a separate pulse on its serial clock line to latch the data, which you do manually with the hardware SPI disabled. If you’re paying attention, you’ll wonder if that clock pulse also screws up the data in the rest of the chips: yes, it does. If this is a problem, you must add some external clock-gating circuitry, disable the ‘595s, or pick a different input shift register chip; it wasn’t a problem for what I was doing.
Here’s a function that reads data from a RAM chip on the Tek memory board, so it must write the address and read the RAM chip’s output. The PIN_DISABLE_DO bit controls the output buffers on the ‘595 that drives the RAM’s data pins; they must be disabled to read data back from the RAM. Don’t worry about the other undefined bits & suchlike; just assume everything does what the comments would have you believe.
byte ReadRAM(word Address) {
 digitalWrite(PIN_DISABLE_DO,HIGH);            // turn off data latch output
 digitalWrite(PIN_BUS_READ,HIGH);              // allow RAM read access

 Outbound.Controls |=  CB_BUS_CLKPH2_MASK;     // set up RAM -CS gate
 Outbound.Address = Address;
 Outbound.DataOut = 0x55;                      // should not be visible
 RunShiftRegister();

 digitalWrite(PIN_BUS_N_SYSRAM,LOW);           // activate RAM -CS
 CaptureDataIn();                              // latch RAM data
 digitalWrite(PIN_BUS_N_SYSRAM,HIGH);          //  ... and turn -CS off

 Outbound.Controls &= ~CB_BUS_CLKPH2_MASK;     // disable -CS gate
 RunShiftRegister();                           // tell the board and get data

 return Inbound.DataIn;
}
Hardware SPI – Detail of clock and data timing
Here’s a detailed shot of the outbound bit timing. Notice that the upward clock transitions shift bits into the ‘595 and ‘166 chips, while the SPI output data changes on the downward transitions. You can tweak that to match your hardware if you’re using different shift register chips, by messing with the SPCR settings.
Bottom line: using the ATmega168 hardware SPI provided a factor-of-15 speedup and serial digital input, too.
Usually I replace the blade on my ancient (cast iron!) 14-inch Delta band saw when I can no longer force it through the thing-to-be-cut, which means every few years, tops, unless I procrastinate. Having just stripped the teeth off a foot of blade, it was time for a replacement long before one was due…
The first step is whacking off 93″ of blade from the 100-foot coil I bought ever so many years ago, using a cold chisel on the vise’s anvil surface. If you’re fussy, wrap a piece of duct tape around the ends-to-be so they don’t fly away after the cut. Otherwise, just enjoy the twang and risk some ritual scarification.
Scarfing the blade ends
Clamp the blade to the top of the vise with a half-twist so opposite sides face up, then scarf both ends about halfway through, so the finished joint will be more-or-less the same thickness as the rest of the blade. Chuck up a grinding wheel / cylinder in your Dremel-tool-like gadget, go slow so as to not overheat the joint, and shower your workbench with steel dust.
To emphasize: note that the teeth face this way on one end and that way on the other! You might want to butt the ends together, but I’m not sure I could get the taper thin enough in the middle that way. You want to cut about halfway through the width of the teeth, too, because they must overlap in the finished joint.
Preparing solder foil
I use a homebrew resistance soldering gadget, but a honkin’ big soldering gun might work. In any event, solder foil works better than solder wire, so I put a snippet of Brownell’s Hi-Force 44 4% silver solder (far more expensive now than when I bought that 1-lb spool long ago) in a stainless-steel sleeve and massage it with a hammer. Crude, but effective: the point is to keep the solder clean, which doesn’t happen when you just whack it on the anvil.
Aligning and clamping blade ends
However you do the joint, you must align the blade ends so they’re collinear: you do not want a kink in the middle of the blade. This setup reflects my soldering gear: a graphite slab clamped to a brass plate caught in the vise, an aluminum channel for alignment, and a pair of battery clamps to hold the blade in place. I apply paste flux to both sides of the joint and poke the solder foil into the flux, too. If you squint, you can see the trimmed-to-fit solder foil lying atop the scarfed edge.
Resistance soldering
Slide the right side over the left, make sure the teeth on both ends overlay each other, clamp in place, check the alignment, and apply heat. This is a slightly staged shot showing the carbon gouging rod in position well after the joint has solidified. The key advantage of resistance soldering is having a footswitch so you can hold everything in position while the joint cools.
Thinning the joint
Clamp the finished blade to the vise and thin both sides to the width of the rest of the blade. If you’ve done a better job of scarfing than I usually do, this is just a matter of tapering the edge a bit. The pic shows the first surface I thinned, so there’s some flux hanging in the teeth. That’ll vanish as you cut if you don’t clear it off while thinning.
Finished joint – victim's view
The end result should look like this, as seen from the victim’s position in the bandsaw: no lumps, no bumps, nothing sticking out on either side.
The whole process takes about half an hour, what with clearing space on the workbench, setting up the soldering gear, deploying the Dremel tool, and cleaning up a bit afterward. That would be crazy in a production environment, which is why they have blade welders bolted to the side of the bandsaws, but it’s OK for something I do every few years.
I formerly used a propane torch and a fixture to align the pieces, but the resistance soldering unit eliminates the flame and delivers a much better result because it compresses the joint while the solder cools.
Side views, just for completeness…
Finished joint – left sideFinished joint – right side
The gear cover is an elaborate ten-pound iron casting, emblazoned with brass tags, and held in place by three 1/4-20 machine screws. The back gear covers, visible in the upper-left corner, are the same sort of wonderfully complex iron casting.
Make magazine, issue 17, has a snippet about an old sorghum press with instructions cast right into the machine, so you could literally RTFM: Read The Ferrous Metal. As it turns out, this 1928 South Bend lathe has instructions stamped into machined metal areas atop the change gear train: OIL.
Here’s a closeup…
Read The Ferrous Metal
Think about it: an iron casting, with machined-flat surfaces, stamped with instructions. How many man-hours did it take to get from raw material to finished product?
After un-jamming the 3-jaw chuck, I decided it was long past time to remove the accumulated slop in the lathe spindle. Modern lathes have a thrust bearing, usually with tapered needles or some such fancy arrangement. This lathe was shipped in 1928, has hulking brass bearings, and a nut to remove the slop.
If you’re following along in your copy of How to Run a Lathe, it’s Part Number 25 in the elevation view of the lathe, at least in my 1966 “Revised Edition 66”. Various copies are available here & there, but link rot seems to be a common failing.
The gear on the end of the spindle has 30 teeth and the nut thread is 20 TPI. After all these years, turning the nut 3 teeth takes the spindle from “free spinning” to “jammed tight”. The nut had accumulated about four teeth worth of end play before the “free-spinning” stage.
Call it 0.010 inches of play. Enough that I should have adjusted it out long ago, but not a big deal when there’s a tailstock pushing the work against the headstock bearing.
I don’t do any lengthy machining operations that would tend to heat the bearings and reduce the end play. If you do, that’s certainly something to consider.
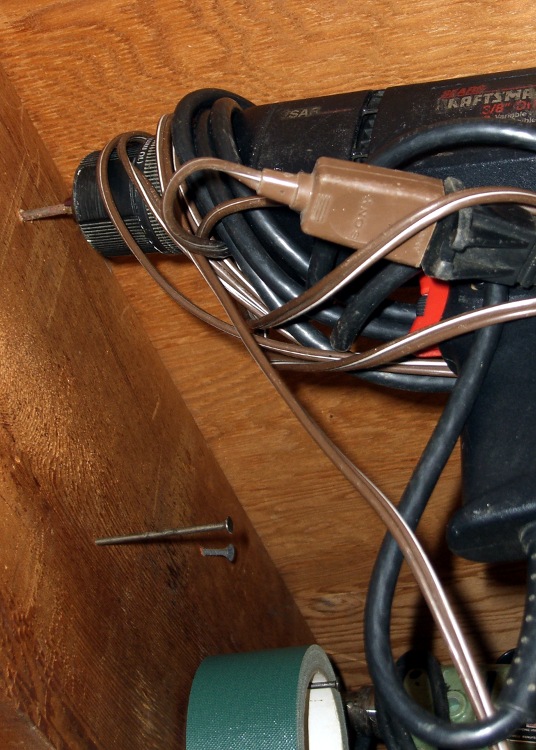
When you hang an electric hand drill on a nail pounded into a floor joist, you want the chuck jaws to just clear the nail. Too large and the drill tends to fall off. Too small and it won’t go.
I took way too long to figure this out, but…
Adjust the chuck properly just once, then run a fat marker around the jaws.
It’s trivially easy to get it right forever after: spin the chuck adjustment until the marks line up with the chuck nose and hang the drill up.
Some years ago, a friend convinced me I needed an Inova X1 LED flashlight. He was right; I’ve carried one in my belt pack ever since and, in fact, added a couple of X5s to the household armory.
Perforce, this is an old X1 with a coated glass lens to make the best of the LED. Newer X1s don’t have (or, likely) need the lens, as LED technology has made great strides in the last few years.
I couldn’t bear the thought of that lens rattling around in my belt pack, chewed upon by the assortment of other crap in there. So I made a lens protector: a length of heatshrink tubing with a polypropylene window. You might want to do the same for your flashlight to keep from grinding up the optical surfaces on its shiny end.
This tubing has an internal thermoplastic glue, but ordinary tubing would likely work as well. Position the tubing over the end of the flashlight with a few millimeters sticking out. Cut a circle from the clamshell case around some piece of consumer electronics, drop it on top of the lens, and shrink the tubing around the flashlight: watch it wrap right over the end and hold the circle in place. A dot or three of urethane glue may help for glue-less tubing.
It’s transparent enough for most purposes, but when you really need more light or a tighter beam, pull it off. That’s aided by dabbing a trace of oil on the X1, which you can get directly from the (outside) of your nose. Yeah, gross, but it’s a renewable natural resource…