Ed Nisley's Blog: Shop notes, electronics, firmware, machinery, 3D printing, laser cuttery, and curiosities. Contents: 100% human thinking, 0% AI slop.
We stayed at the Syracuse Sheraton while chaperoning a Marching Band trip, which led to meals in the Regents Ballroom, a large space (potentially) divided in three parts by the usual folding partitions. The wall in each section had a bank of RJ-11 and -45 jacks…
Hotel Ballroom Phone and Data Jacks
Obviously, back in the day, a single room with 25 Phone jacks and one (red) Data jack made perfect sense. Or maybe the ballroom has 75 phones lines and three Data connections? Hard to say.
Judging from the overall crud accumulation, the jacks aren’t getting much use. I wonder if it was originally set up so they could run a boiler-room operation out of the hotel ballroom?
Several decades ago I got my esteemed wife a ten-pound Hershey bar for Christmas. She said that was a thoughtful gift, exactly what she wanted, and if I ever did that again, she would kill me.
Turns out that I’d gotten such a bar myself, many many years ago…
These days, of course, the biggest Hershey’s Chocolate bar you can get is a measly five pounds.
I’m sure they have more different versions of these things than anyone can count, but when I unscrewed the kitchen sink aerator, this is what I found inside.
The yellow plastic filter actually has two parts, held together by a minuscule clickstop on the central post. You can pry the whole thing off the main body with your thumbnail or, as in the photo, just pop the top screen off.
Rinse the grit off the screen, snap it back together, screw everything back onto the spout. Done!
It’s amazing how much grit accumulates downstream of the whole-house water filter. On the other paw, having just replaced the water heater, I’m not that amazed.
Once again, the faucet O-ring seals are leaking. This happens about every two years, perhaps due to mineral buildup in the spout body despite the water softener. Fortunately, it’s a dribble rather than a spurt, so it’s not an emergency.
This is a Home Depot (or was it Lowe’s?) faucet, but they do not stock repair parts. Go to FaucetDirect.com, order these parts:
060366-0070A SPOUT SEAL KIT (on the main column)
060343-0070A SPACER WITH O-RINGS (below the valve cartridge)
030126-0070A BUTTON AND SCREW KIT (if you booger the button)
Popping off the button
Of course, order two or three of each, because FD has punitive shipping rates. Ten bucks for a few envelopes of O-rings? Sheesh… but the last time I tried to get ’em locally, they were No Stock. If I’ve got to wait around, I’ll have ’em delivered to my door.
[Update: that comment suggests you can now get ’em from Amazon.com]
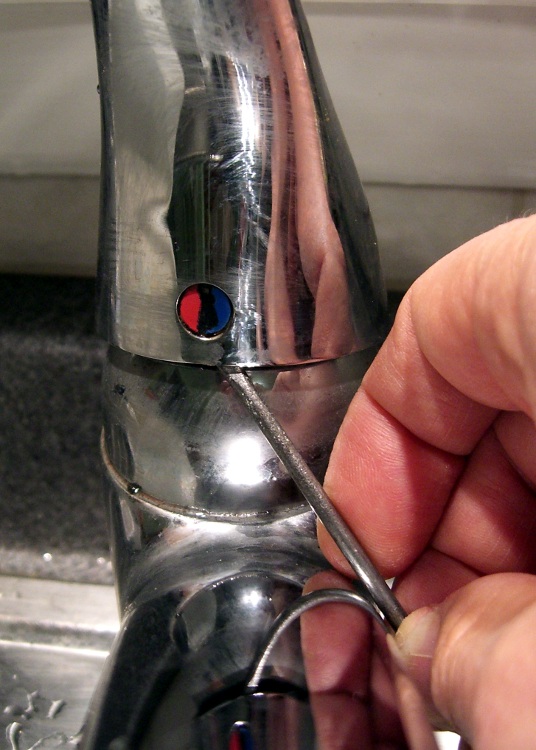
The first puzzle is how to get the faucet apart. After making a mess of it the first time, it turns out you poke a small flat screwdriver inside the handle and pop the red-blue button out. It’s held on by two small tabs, one on each side, and if you can just push one then it’ll ease right out. It is not a screw head, despite the recessed slot down the middle.
Poke a 3/32″ hex key in the hole, back out the setscrew a few more turns than you think it takes, pull the handle off.
The plastic cap retainer has two arms holding the escutcheon ring in place. Push inward, remove the escutcheon. The retainer is probably hopelessly jammed into the top of the faucet spout, so if it doesn’t come out, that’s OK.
Loosen the three screws holding down the valve cartridge, pull it straight up and out. You did turn the water off first, right? Remove the plastic spacer plate and three O-rings below it if you can; the plate may not fit through the retainer.
Faucet column
Now, get comfortable on the sink. Pull-and-twist the spout straight up with far more force than you think necessary. It will suddenly fly off and bloosh the water that’s been standing in the faucet column all over the place.
You’re left with a rather grody column and the two offending O-rings. Note the orientation of the silver flange ring at the bottom and the lower white plastic bearing ring. There may be three O-rings stuck to the top surface; they belong inside the spacer plate.
Remove all that hardware and scrub the grodosity off the column.
Hint: if you’re weak of stomach, never look inside your drinking water fixtures, because you’ll never drink tap water again.
I generally soak the spout in vinegar for a bit, scrub it out with a toothbrush, ease the remaining deposits off with a small screwdriver, then scrub the whole thing down with a ScotchBrite pad.
I apply a very very very thin layer of silicone lubricant to the bearing surfaces inside the column, which makes the next step possible.
Put the flange ring, the new O-rings, and plastic bearing rings in place, then slide the spout assembly straight down over the column until it bottoms out with a thump.
Install the new spacer plate & its O-rings, then reassemble all the other doodads in reverse order, turn on the water, and you’re done.
Then forget all the crud you saw in there that you couldn’t clean out.
Surprisingly, the flashlight holding these cells wasn’t damaged.
Judging from the position of the switch, my mother tried to turn the thing on, it didn’t light up, and she just dumped it back in the drawer. Time passed, corrosion never sleeps, and the weak link (fortunately, between the two cells) let the alkaline nastiness out.
Just refilled the continuous-flow ink tanks on my Epson R380 for the first time this year.
In milliliters:
Yellow 35
Light Magenta 40
Magenta 40
Light Cyan 40
Cyan 40
Black 50
Done in that order, the whole process requires only three syringe cleanings.
I haven’t checked lately, but the last time I worked it out, printer ink cost $1.80/ml. Let’s call it $2 nowadays, which means I just squirted nigh onto 500 bucks worth of ink into those tanks.
Much of that seems to go into head cleaning, as I don’t print that many photo-quality images on it. Nevertheless, they don’t charge you any less for ink that winds up in the diaper inside the printer.
I don’t keep track of the ink going into the refillable tanks on my Canon S630, but it’s the same order of magnitude. I have four trios of color tanks and six black tanks for that printer and refill them all when the last set runs low. I’ve been doing that for years with no printhead issues.
Sooo, for not spending a kilobuck a year on ink cartridges, I’m willing to spend 100 bucks for bulk ink, undergo some hassle, and endure the occasional oddly colored thumb…