Ed Nisley's Blog: Shop notes, electronics, firmware, machinery, 3D printing, laser cuttery, and curiosities. Contents: 100% human thinking, 0% AI slop.
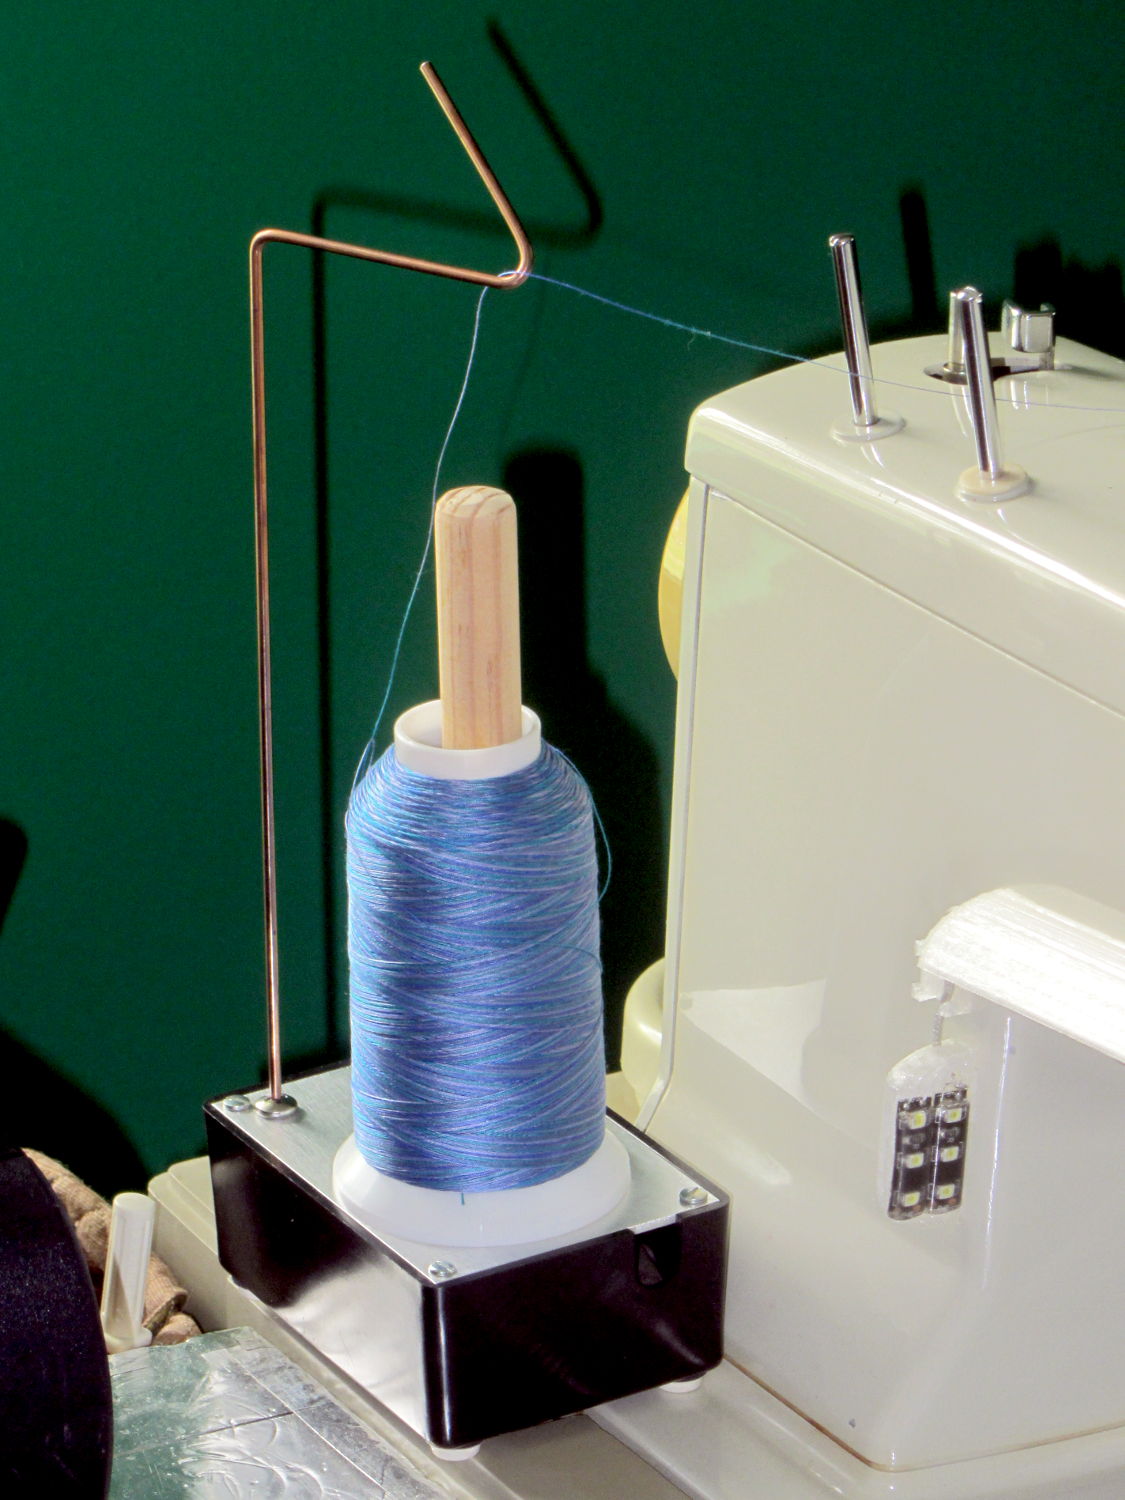
Large quilting projects require lots of thread, beyond the capacity of the previous spool adapter, so we came up with a different solution:
Large spool holder
These are cheap & readily available from the usual sources, but recent reviews indicate that the “metal” base has become plastic and the build quality isn’t anything to rejoice over. My feeling is that if it’s going to become a shop project anyway, I should just conjure something suitable from the heap.
The base is a random plastic project box that came with a flimsy sheet-steel top, which I replaced with a rectangle of 0.1 inch = 2.5 mm aluminum plate for more heft. The box is filled with 1.5 pounds of wheel weights, so it’s not going anywhere on its own. The silicone rubber feet probably don’t add much to the project, but why not use ’em?
The feed hook started life as copper-flashed welding filler rod, smooth to the thread and pleasant to the eye, sitting in a hole drilled into a stainless steel 10-32 screw. It’s long enough to feed the thread just above the Kenmore’s top surface. A hook works better than an eyelet: just pass the thread over the hook and you’re done.
The central shaft is a wood dowel, shaped & sanded on the (metal) lathe, held in place by another 10-32 screw. Inside the spool sits a length of “3/4 inch” CPVC pipe (ID = 0.7 inch, OD = 0.875 inch, gotta love those plumbing measurements) that’s a sloppy fit in the just-over 1 inch spool ID.
The smaller spools fit directly on the dowel, perhaps atop the CPVC sleeve.
This seems to work OK, but I’m going to trim the dowel down to just over the length of the spool, so the thread will feed without touching the wood. I thought stacking the smaller spools atop the CPVC sleeve made sense, but that turned out to not be the case.
Took about an hour to conjure with found materials and without a hint of 3D printing…
In this day and age, a pen plotter isn’t going to be doing anything useful, because we have better ways to draw schematics and make presentation graphics, but it can produce Algorithmic Art:
HP 7475A – Chiplotle Supershape plotting
Well, granted, that’s a rather small value of Art, but it does show that the plotter can draw 10 k points using serial port hardware handshaking.
That’s one of an infinite variety of Supershapes produced by the Chiplotle geometry.shapes.supershape() function:
from chiplotle import *
import math
plt=instantiate_plotters()[0]
plt.set_origin_center()
plt.write(hpgl.VS(5))
ss=geometry.shapes.supershape(3900,3900,5.3,0.4,1,1,point_count=10*1000,travel=10*2*math.pi)
plt.select_pen(1)
plt.write(ss)
plt.select_pen(0)
The plotter uses absolute plotter units that range from (0,0) to (10365,7962). Telling the plotter to put its origin in the middle of the page makes perfect sense, because that automagically centers the figure.
Dialing the speed back to 5 cm/s works much better with the Sakura pens than the default 38.1 cm/s = 15.0 inch/s; hand-drawing pens just don’t have the flow rate for prolonged vigorous scribbling. HP was obviously on the edge of converting to metric engineering units in the early 1980s, with the HP 7475A designed before the transition and shipped afterward.
The supershape parameters:
3900,3900 sets the maximum coordinate value along each axis. The plot may or may not exceed that value, depending on how weird the supershape turns out, but it’s generally pretty close
5.3,0.4,1,1 correspond to coefficients m, n1, n2, n3
By default, a=1 and b=1, but you can change those as you like
point_count=10*1000 sets how many total points appear in the plot
travel=10*2*math.pi sets the number of complete cycles, in units of 2π
The function spits out a list of Cartesian XY coordinates, not the polar rΦ coordinates you might expect.
Slightly non-integer values, particularly for m, produce more interesting patterns. Other than that, there’s just no telling.
Use io.view(ss) to get an idea of what you got, it’s much faster than plotting!
Chiplotle Supershape preview
You may find the online superformula explorers better suited to rapid prototyping, though. There’s a list at the bottom of the Wikipedia article, although some links seem defunct.
Notice that the end of the plot doesn’t quite reach the beginning over on the far right, which is a consequence of how Python produces sequences. Adding one more point does the trick:
It turns out my fancy Dell U2711 landscape monitor doesn’t work well with Displayport video. I normally leave it in power-save mode, with the power LED slowly fading orange, but about once a week it won’t start up when I turn on the PC. It seems the only solution is a hard power cycle, so I plugged it into a remotely switched outlet to eliminate having to pull its plug.
Now that I know what to watch for, it’s easy to work around: if the power LED doesn’t turn blue when the PC power goes on, immediately turn off the PC power and power-cycle the U2711. If I let the PC continue in Xubuntu, the U2713 portrait monitor becomes the primary display and X helpfully rearranges the video configuration around the disabled U2711 until I manually un-wedge things. If I shut down the PC while it’s still displaying the BIOS intro screen, then click-click the remote power switch, the U2711 will be good for another week or so.
Every month or so, the U2711 won’t light up after going into power-save mode, even though the PC is still running just fine. I set Lightlocker (which replaces the classic screensaver on Xubuntu) to blank the screen after 10 minutes and turn off the display power after 11 minutes. When the U2711 doesn’t light up, some delicate xrandr surgery through the U2713 will bring the U2711 back to life.
The starting situation looks like this:
xrandr
Screen 0: minimum 8 x 8, current 1440 x 2560, maximum 16384 x 16384
DP-0 disconnected primary (normal left inverted right x axis y axis)
DP-1 disconnected (normal left inverted right x axis y axis)
DP-2 connected (normal left inverted right x axis y axis)
   2560x1440      60.0 +
   1920x1200      59.9
   1920x1080      60.0     59.9     50.0     24.0     60.1     60.0     50.0
   1680x1050      60.0
   1600x1200      60.0
   1280x1024      75.0     60.0
   1280x800       59.8
   1280x720       60.0     59.9     50.0
   1152x864       75.0
   1024x768       75.0     60.0
   800x600        75.0     60.3
   720x576        50.0     50.1
   720x480        59.9     60.1
   640x480        75.0     59.9     59.9
DP-3 connected 1440x2560+0+0 left (normal left inverted right x axis y axis) 597mm x 336mm
   2560x1440      60.0*+
   1920x1200      59.9
   1920x1080      60.0     59.9     50.0     24.0     60.1     60.0     50.0
   1680x1050      60.0
   1600x1200      60.0
   1280x1024      75.0     60.0
   1280x800       59.8
   1280x720       60.0     59.9     50.0
   1152x864       75.0
   1024x768       75.0     60.0
   800x600        75.0     60.3
   720x576        50.0     50.1
   720x480        59.9     60.1
   640x480        75.0     59.9     59.9
Note that there’s no asterisk on DP-2’s 2650x1440 entry, which means it’s not active. In fact, it’s jammed in power-save mode and nothing other than a hard power cycle will wake it up.
The U2713 portrait monitor wakes up just fine, so X piles all the program windows into an untidy heap on that display, but, with enough Alt-Tab action, I can eventually resurface the console window and start typing:
The DP-2 and DP-3 outputs correspond to what xrandr reported above.
Then I must rearrange all the windows on both monitors again, but that’s much easier than the hocus-pocus required to recover after rebooting the PC with the U2711 shut down.
The normal (or recovered) video situation looks like this:
xrandr
Screen 0: minimum 8 x 8, current 4000 x 2560, maximum 16384 x 16384
DP-0 disconnected primary (normal left inverted right x axis y axis)
DP-1 disconnected (normal left inverted right x axis y axis)
DP-2 connected 2560x1440+0+0 (normal left inverted right x axis y axis) 597mm x 336mm
   2560x1440      60.0*+
   1920x1200      59.9
   1920x1080      60.0     59.9     50.0     24.0     60.1     60.0     50.0
   1680x1050      60.0
   1600x1200      60.0
   1280x1024      75.0     60.0
   1280x800       59.8
   1280x720       60.0     59.9     50.0
   1152x864       75.0
   1024x768       75.0     60.0
   800x600        75.0     60.3
   720x576        50.0     50.1
   720x480        59.9     60.1
   640x480        75.0     59.9     59.9
DP-3 connected 1440x2560+2560+0 left (normal left inverted right x axis y axis) 597mm x 336mm
   2560x1440      60.0*+
   1920x1200      59.9
   1920x1080      60.0     59.9     50.0     24.0     60.1     60.0     50.0
   1680x1050      60.0
   1600x1200      60.0
   1280x1024      75.0     60.0
   1280x800       59.8
   1280x720       60.0     59.9     50.0
   1152x864       75.0
   1024x768       75.0     60.0
   800x600        75.0     60.3
   720x576        50.0     50.1
   720x480        59.9     60.1
   640x480        75.0     59.9     59.9
Note that DP-2 now sports an asterisk.
The width of Screen 0 covers the U2711 in landscape and the U2713 in portrait: 4000 = 2560+1440. The height comes from the U2713 in portrait mode: 2560.
That this should not be necessary goes without saying. The U2711 run with firmware revision A09, which was supposed to fix the problem, but Dell basically walked away from it.
I’m pretty much forced to use Displayport video for both monitors, as a low-profile nVidia card with twodual-link DVI-D outputs doesn’t seem to exist. The Dell Optiplex 980 disables the system board video when it finds a PCI-E video card, so there’s no way to run the U2713 from the system board Displayport and the U2711 from a dual-link DVI PCI-E video card.
Chiplotle seems like a good way to drive the HP 7475A plotter, but some preliminary tinkering showed that the plotter pen paused quite regularly while drawing. The plotter wakes up with hardware handshaking enabled, Chiplotle has a config file that lets you specify hardware handshaking, the cable has all the right connections for hardware handshaking, but peering at Der Blinkenlights showed hardware handshaking never happened: the data didn’t overrun, the buffer never filled up, and DTR remained solidly on.
Come to find out that Chiplotle sends data in half-buffer-size chunks (all code from baseplotter.py):
class _BasePlotter(object):
   def __init__(self, serial_port):
      self.type = '_BasePlotter'
      self._logger = get_logger(self.__class__.__name__)
      self._serial_port = serial_port
      self._hpgl = commands
      self._margins = MarginsInterface(self)
      self.maximum_response_wait_time = get_config_value('maximum_response_wait_time')

      #this is so that we don't pause while preparing and sending
      #full buffers to the plotter. By sending 1/2 buffers we assure
      #that the plotter will still have some data to plot while
      #receiving the new data
      self.buffer_size = int(self._buffer_space / 2)
      self.initialize_plotter( )
Every time something goes out to the plotter, this happens:
   def _write_string_to_port(self, data):
      ''' Write data to serial port. data is expected to be a string.'''
      #assert type(data) is str
      if not isinstance(data, basestring):
         raise TypeError('string expected.')
      data = self._filter_unrecognized_commands(data)
      data = self._slice_string_to_buffer_size(data)
      for chunk in data:
         self._sleep_while_buffer_full( )
         self._serial_port.write(chunk)
In order to figure out whether the plotter has enough room, Chiplotle must ask it:
   def _sleep_while_buffer_full(self):
      '''
         sleeps until the buffer has some room in it.
      '''
      if self._buffer_space < self.buffer_size:
         while self._buffer_space < self.buffer_size:
            time.sleep(0.01)
The self._buffer_space method contains the complete handshake:
Assuming that Python can actually meter out a 0.01 second sleep, that’s a mere 10 ms; call it 10 character times at 9600 b/s. By and large, Chiplotle hammers away at the poor plotter while the buffer drains.
Now, that would be just ducky, except that the HP 7475A plotter dates back to slightly after microcontrollers were invented. The MC6802 trundles along at 1 MHz from a 4 MHz crystal, because it needed a quadrature clock, and takes a while to get things done. Responding to the buffer space request (a three-character sequence: ␛.B) requires the plotter to:
Stop plotting
Answer the phone
Figure out what to do
Compose a reply
Drop it in the serial buffer
Resume plotting
Which take enough time to produce a distinct hitch in the gitalong. Some crude print debugging showed most of the delay happens between the write() and the read() tucked inside _buffer_space.
Linux handles serial port hardware handshaking far below the Python level, so the simplest fix was to rip out the line that checks for enough buffer space:
   def _write_string_to_port(self, data):
      ''' Write data to serial port. data is expected to be a string.'''
      #assert type(data) is str
      if not isinstance(data, basestring):
         raise TypeError('string expected.')
      data = self._filter_unrecognized_commands(data)
      data = self._slice_string_to_buffer_size(data)
      for chunk in data:
#         self._sleep_while_buffer_full( )
         self._serial_port.write(chunk)
And then the plotter races along without pauses, drawing as fast as it possibly can, with the DTR output blinking like crazy as Chiplotle dumps the character stream into the output buffer and the serial port hardware (*) managing the data flow. Apparently, detecting a buffer-full situation and dropping the DTR output requires only a few 6802 CPU cycles, which is what makes hardware handshaking such a good idea.
(*) Which is, of course, a USB-to-RS232 converter. I paid extra to get one that reports an FTDI chipset, which may mean the counterfeiters have upped their game since the Windows driver disaster. I actually tried it on the Token Windows box and it still works, so maybe it’s Genuine FTDI.
The HP 7475A wakes up with hardware handshaking enabled: DTR starts high and goes low when the internal 1 KB buffer has less than 80 bytes remaining. The plotter also supports XON/XOFF handshaking, a sad software thing you’d use only if you had no other choice.
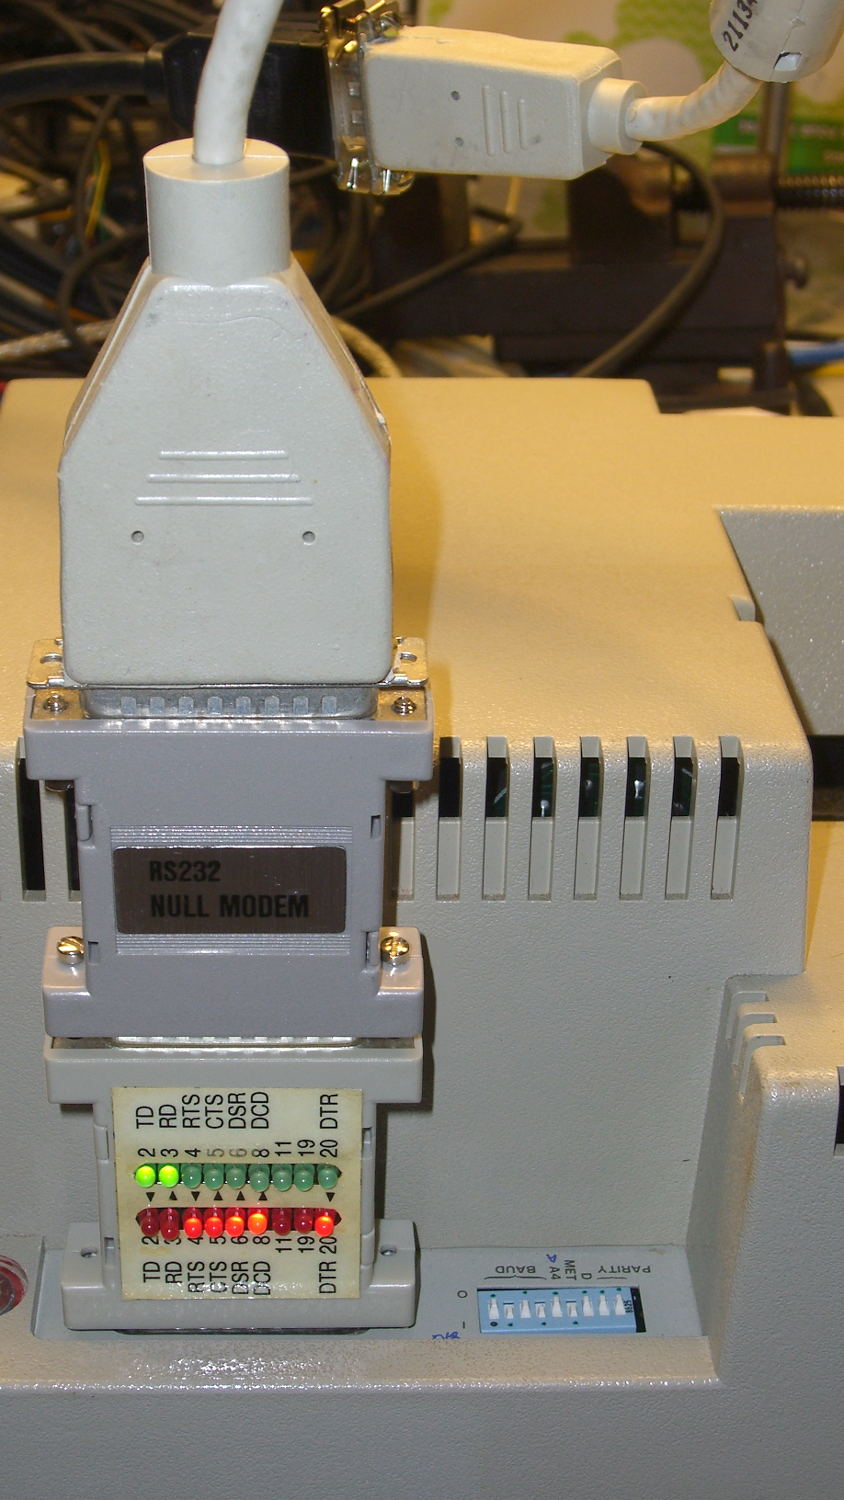
The color codes over on the left of the top diagram match a prebuilt cable I hoped to repurpose, but it had only five conductors, none of which were DSR or CTS. Pfui!
So I used a hank of gorgeous flexy 9-conductor cable (which came with premolded DE-9 ends of the wrong gender, now amputated into pigtails and back in the GCS), which supported the connections redrawn on the bottom in proper numeric order, used the obvious color sequence (Bn R O Y G Bl V W K), then soldered suitable connectors on each end:
The effort those little birds put into their nests never ceases to amaze me:
Bird box cleanout – old nests
Last year it was the same story. Of course, if we didn’t clean out the boxes, the birds would do it on their own, so perhaps we help them get started earlier.
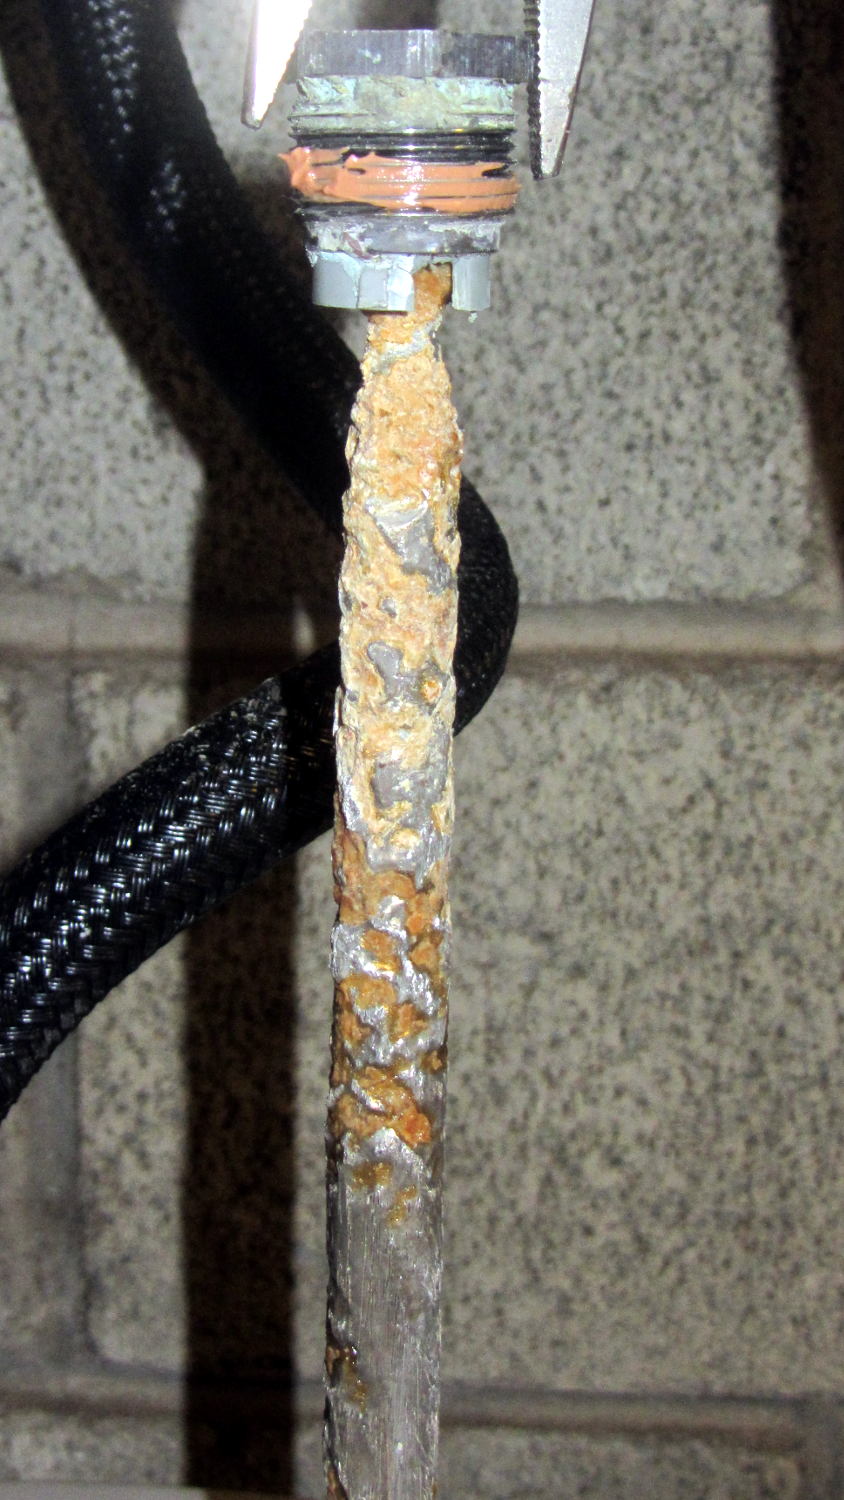
But, as before, most of the corrosion is close to the top end. The rest of the rod was covered with a thick mineral scale that I hammered off, then scuffed the rod with a shoe rasp to expose some metal.