Ed Nisley's Blog: Shop notes, electronics, firmware, machinery, 3D printing, laser cuttery, and curiosities. Contents: 100% human thinking, 0% AI slop.
Of course, I managed to swap the base resistors, which meant the LED stayed on most of the time, which accounts for the slightly off-kilter brown resistor just under the LED.
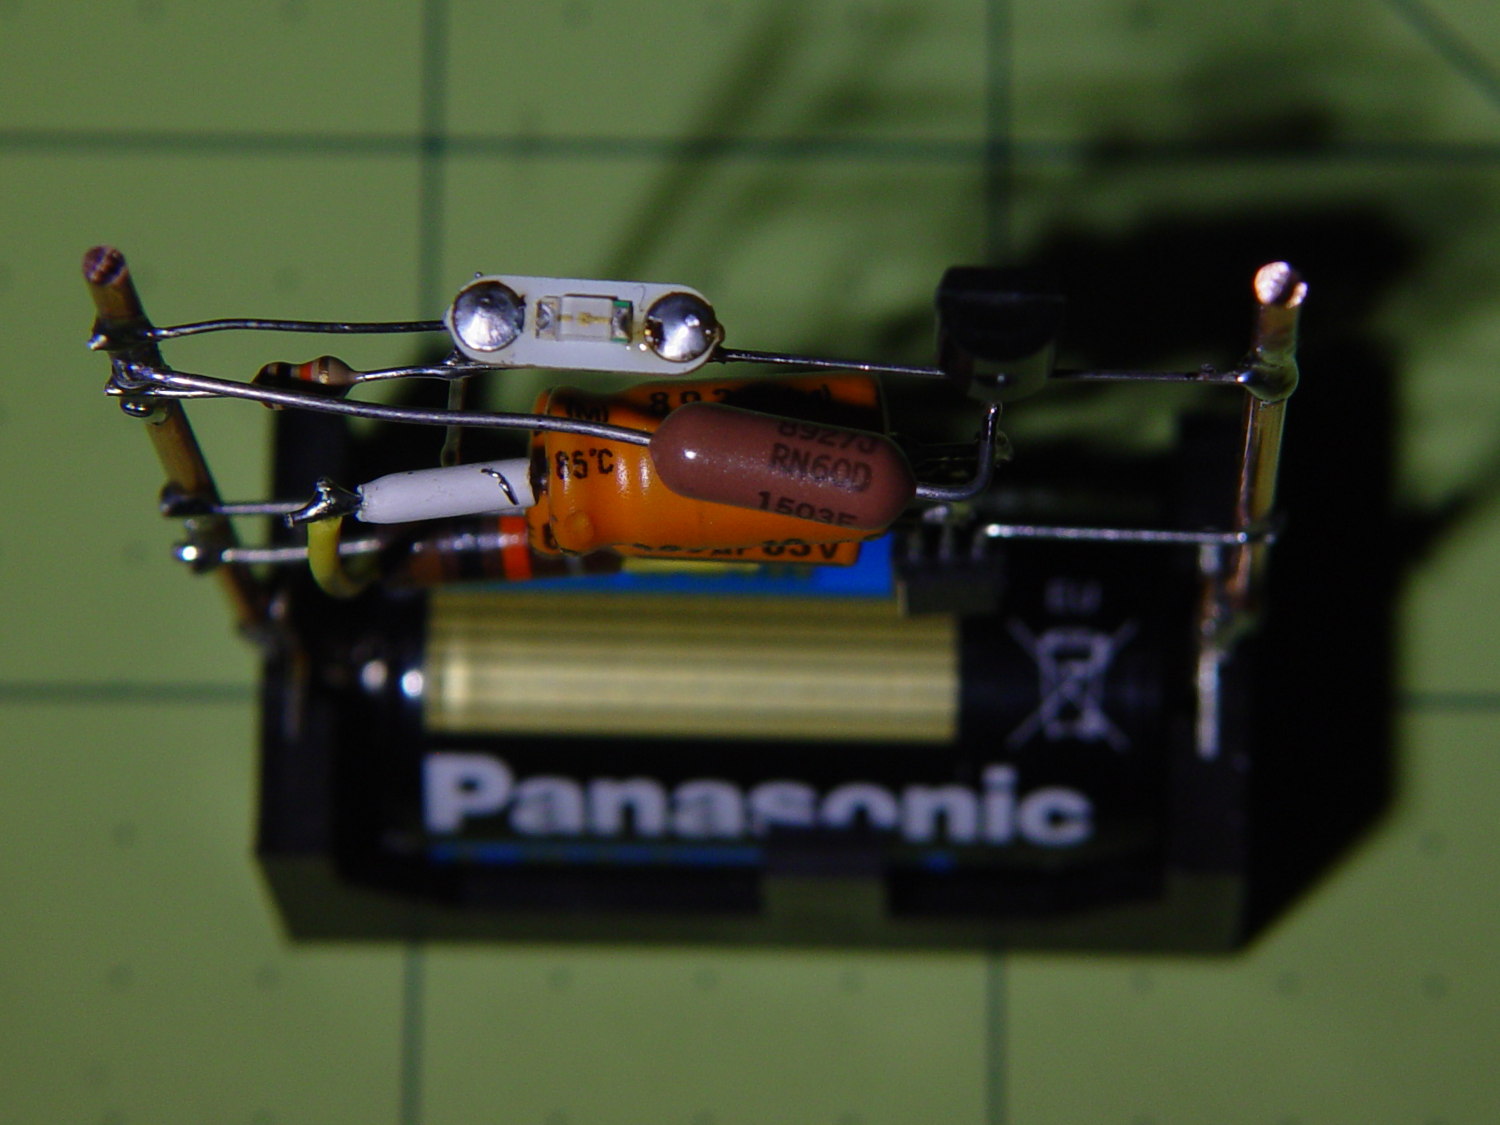
It doesn’t look like much with the LED off:
CR123A Astable – top – off
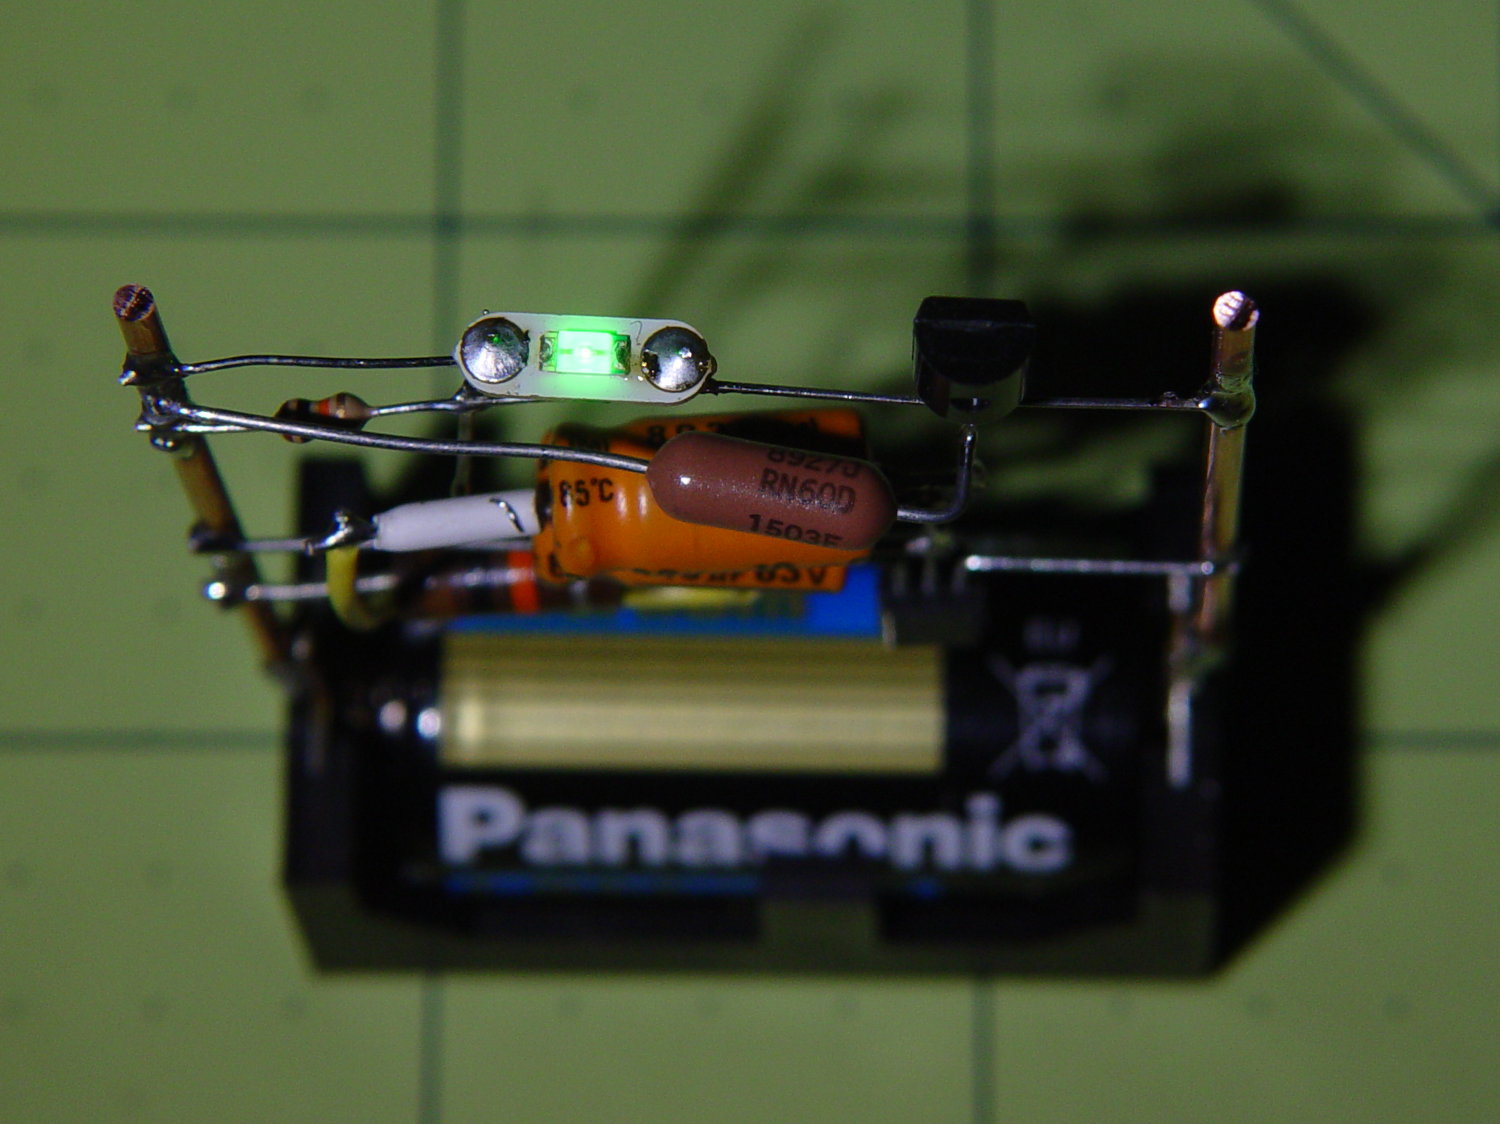
Running from a 2.8 V (= dead) lithium cell, the LED lights a dark room at 3 mA:
CR123A Astable – top – on
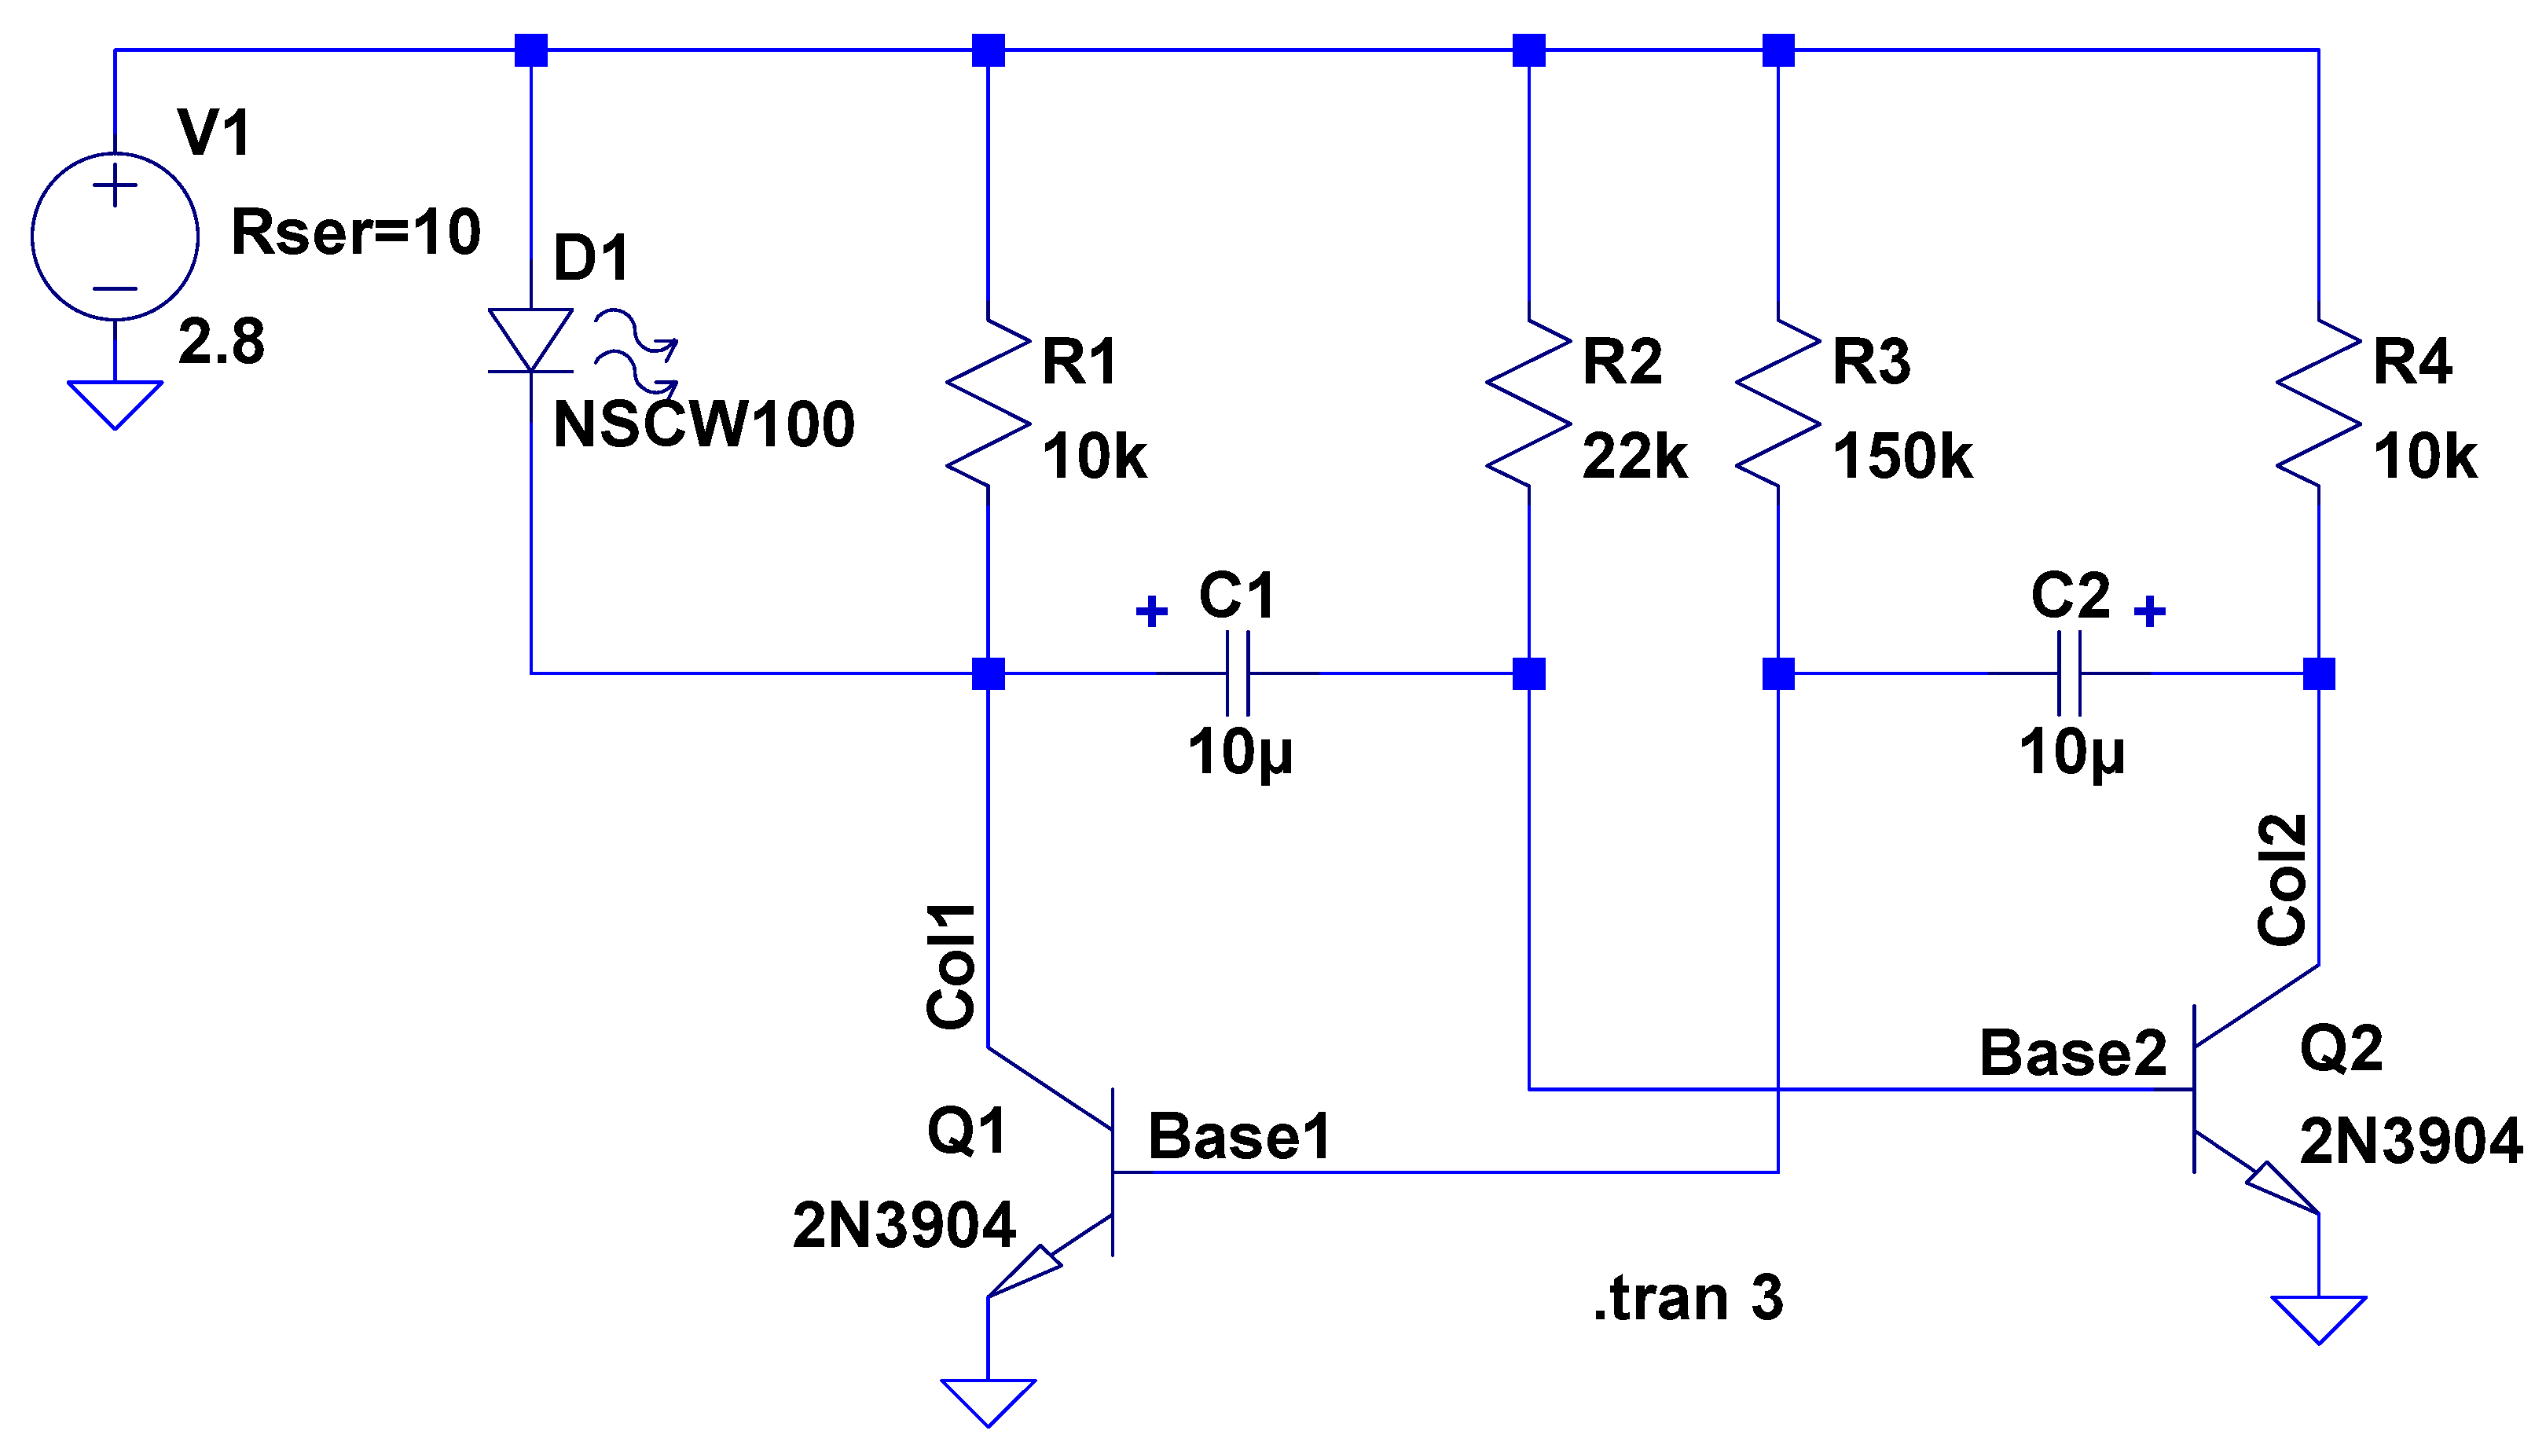
The LTSpice schematic gives the details:
Astable Multivibrator – CR2032 – schematic
The LED definitely didn’t come from Nichia and the 2N3704 transistors aren’t the 2N3904s found in the LTSpice library, but, by and large, this is the kind of circuit where nearly anything will work.
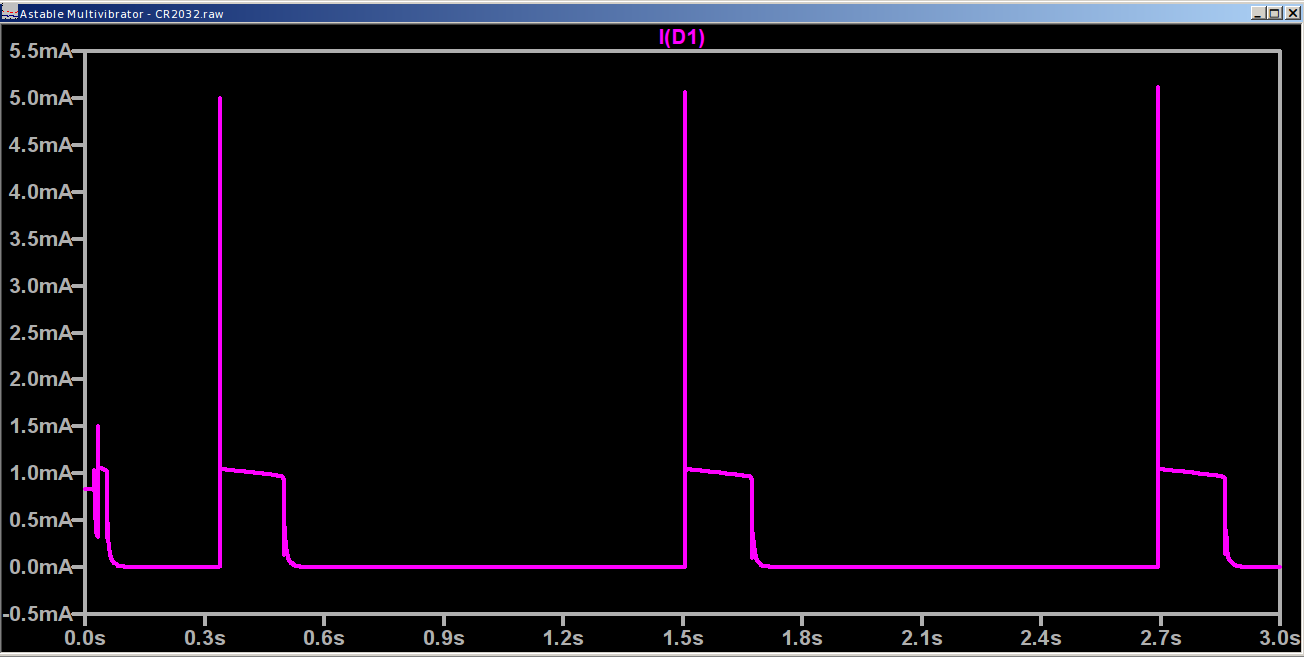
The actual LED current obviously depends critically on the particular LED and the cell voltage, so this represents more of a serving suggestion than an actual prediction:
Astable Multivibrator – CR2032 – waveform
Indeed, a Tek current probe clamped around one of those 10 AWG copper wires shows a much more enthusiastic LED current (1 mA/div):
Astable – CR123A 2.8 V – 1 mA -green
I don’t trust the baseline very much. The simulation & back of the envelope agree: the LED-off current should be around 400 µA (which doesn’t depend on the LED at all), so it’s in the right ballpark.
Your mileage will definitely differ.
It runs without a trace of software, which everybody at Squidwrench thought was wonderful …
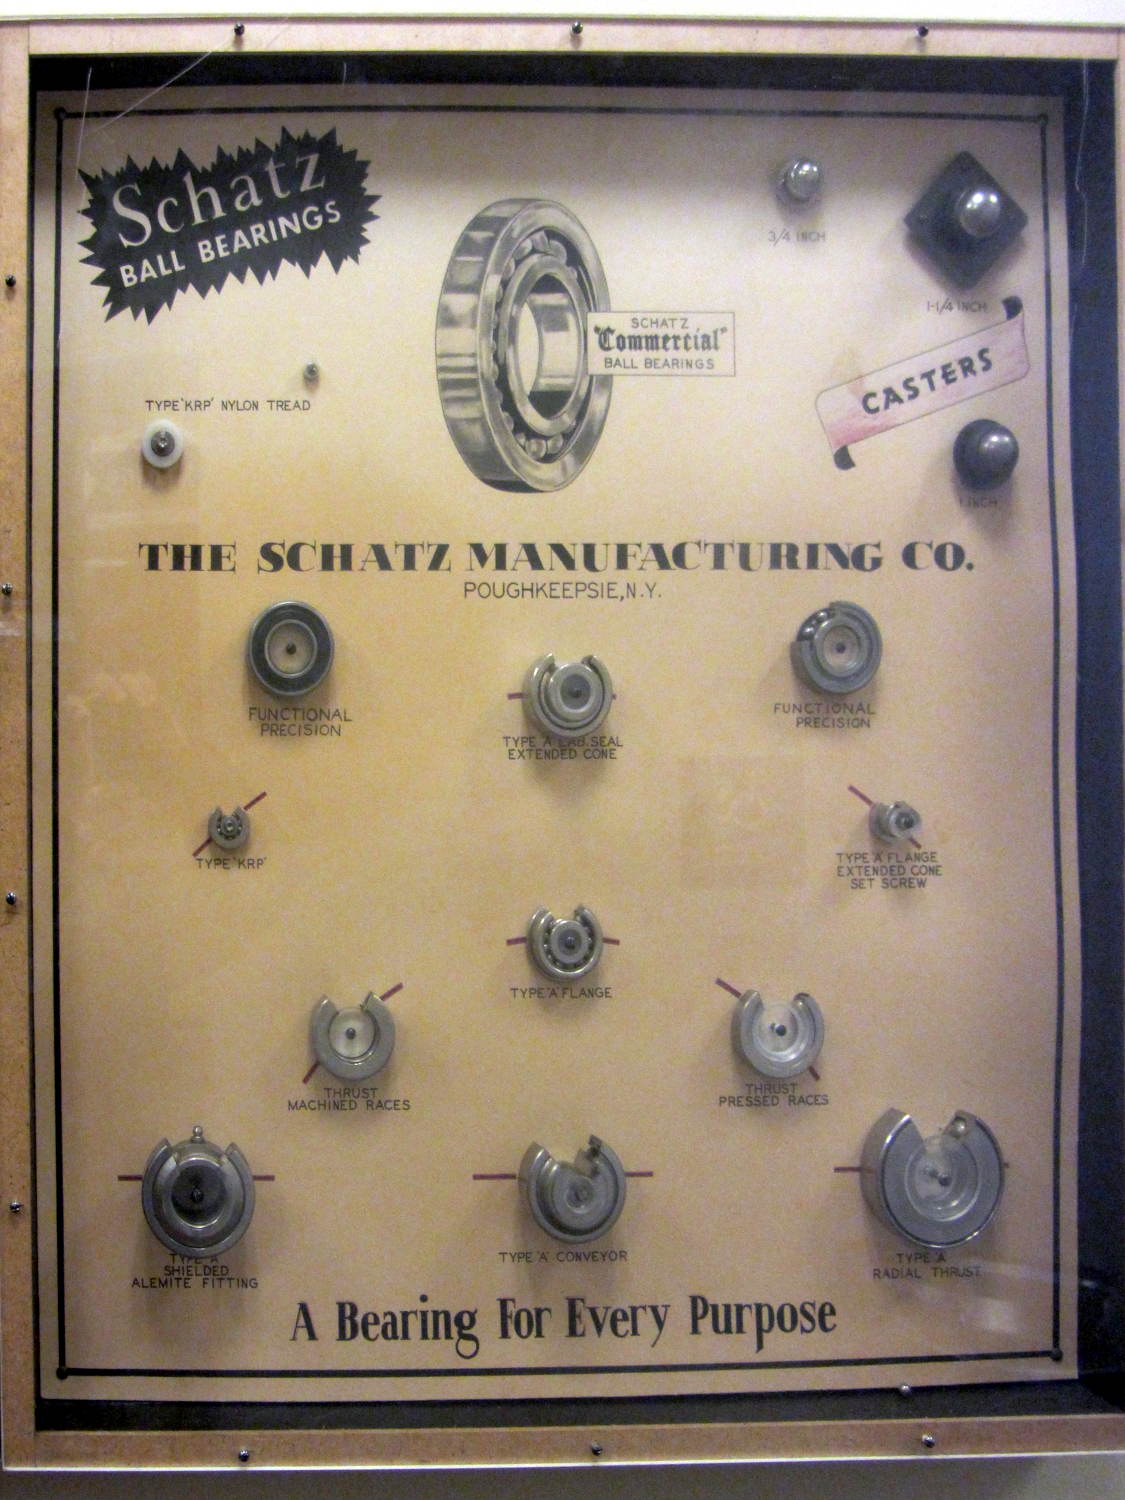
Schatz Manufacturing, a major bearing producer in Poughkeepsie, made a sample case to show off their wares:
Schatz Ball Bearings
You can tell by the yellowed backing paper that these have been around for a looong time.
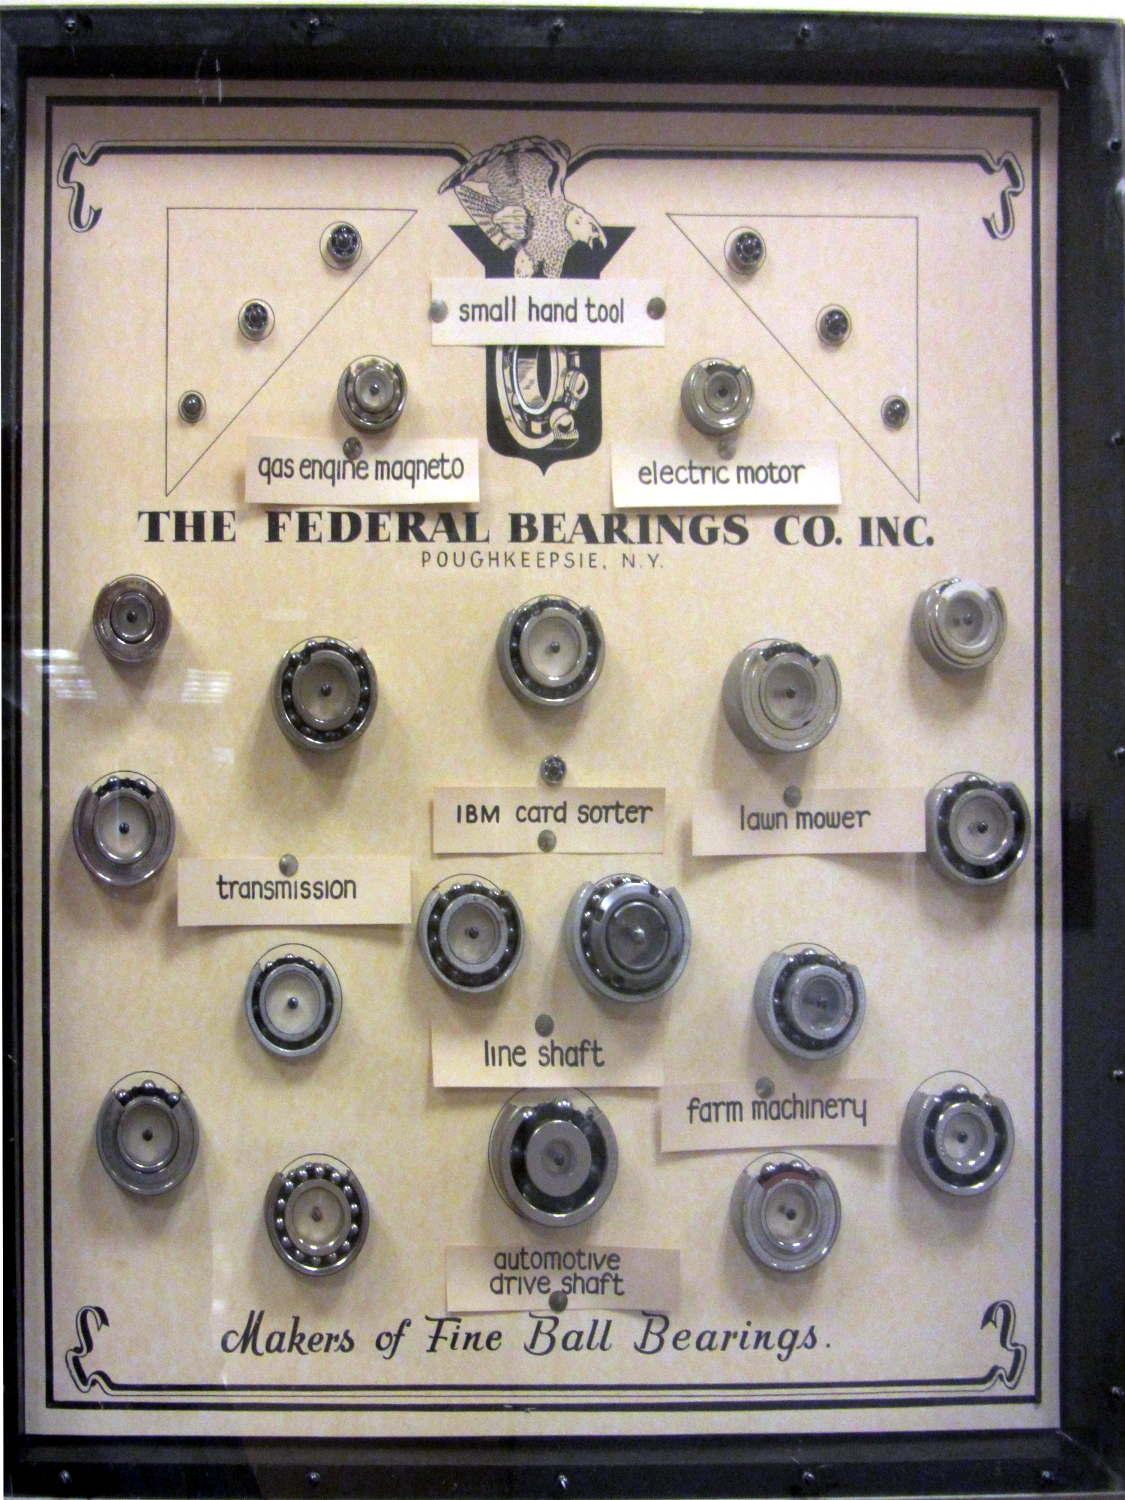
It turns out that Poughkeepsie had two bearing manufacturers. Federal Bearings went into the products of other locally important industries:
Federal Bearings
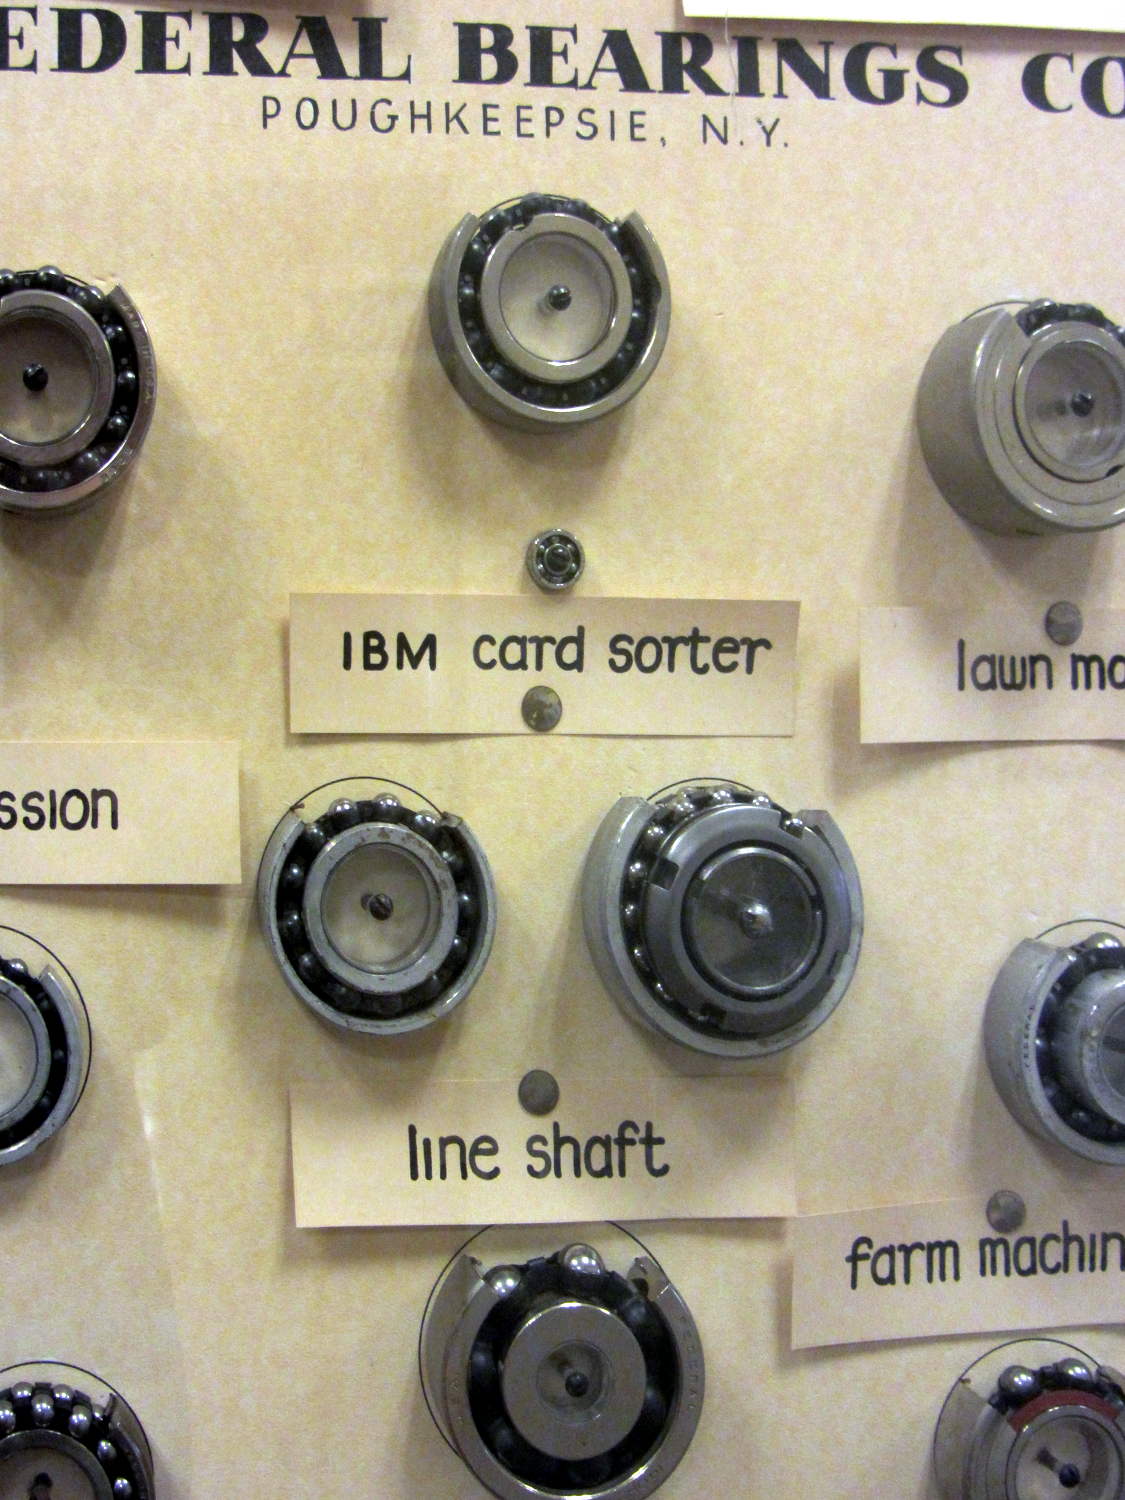
A detailed look shows what was important, back in the day:
Federal Bearings – Detail – IBM Card Sorter
Schatz and Federal later merged into Shatz Federal Bearings, eventually become Shatz Bearings, and still operate in Poughkeepsie. Some of their industrial waste remains here, too.
Out in the garage I still have a few grease pilots (*) from the final Schatz Federal downsizing / going-out-of-business / moving / whatever sale. A friend bought several sets of heavy-duty steel chests-of-drawers which contained, very much to his surprise, a huge assortment of grease pilots, ranging in size from fit-on-your-thumb to cover-a-dinner-plate, which he obviously had no use for. He unloaded them on me with a phrase that has lived on forevermore:
They’re a buck apiece, unless you take all of them, in which case they’re free.
You’ll find the sample cases on the top floor of Adriance Library, should you ever be in town.
Taken handheld in ambient light to avoid harsh flash shadows, then perspective-distorted to make them look like I was standing directly in front of the reflective plastic covers.
(*) Different from a “pilot bearing”. A “grease pilot” is a two-part circular steel assembly used to inject grease into the bearing races before snapping the shields in place. They’re painstakingly machined to cup the balls and fill the gaps, with a pipe fitting on the back surface for the grease pump.
After copying a Digital Machinist column to my Dropbox folder, I went to the site to get the link, discovered they improved the UI, declined a Flash-based tour of the new features, and got this baffling confirmation dialog:
The BigNumber library wraps the bc arbitrary precision calculator into a set of Arduino routines that seem like a reasonable basis for DDS calculations requiring more than the half-dozen digits of a floating point number or the limited range of scaled fixed point numbers tucked into an long int.
This file contains hidden or bidirectional Unicode text that may be interpreted or compiled differently than what appears below. To review, open the file in an editor that reveals hidden Unicode characters.
Learn more about bidirectional Unicode characters
This file contains hidden or bidirectional Unicode text that may be interpreted or compiled differently than what appears below. To review, open the file in an editor that reveals hidden Unicode characters.
Learn more about bidirectional Unicode characters
All that happened incrementally, as you might expect, with the intent of seeing how it works, rather than actually doing anything.
Some musings, in no particular order:
The library soaks up quite a hunk of program space:
Sketch uses 13304 bytes (43%) of program storage space. Maximum is 30720 bytes.
I think you could cut that back a little by eliminating unused bc routines, like square root / exponential / modulus.
That test code also blots up quite a bit of RAM:
Global variables use 508 bytes (24%) of dynamic memory, leaving 1540 bytes for local variables. Maximum is 2048 bytes.
All the BigNumber variables live inside the setup() function (or whatever it’s called in Arduino-speak), so they count as local variables. They’re four bytes each, excluding the dynamically allocated storage for the actual numbers at roughly a byte per digit. With 10 decimal places for all numbers, plus (maybe) an average of half a dozen integer digits, those ten BigNumbers soak up 200 = 10 × (4 + 16) bytes of precious RAM.
You can load a BigNumber from an int (not a long) or a string, then export the results to a long or a string. Given that controlling a DDS frequency with a knob involves mostly adding and subtracting a specific step size, strings would probably work fine, using snprintf() to jam the string equivalent of a long into a BigNumber as needed.
You must have about ten decimal places to hold enough significant figures in the HertzPerCount and CountPerHertz values. The library scale factor evidently forces all the numbers to have at least that many digits, with the decimal point stuck in front of them during string output conversions.
The biggest integers happen in the Oscillator and ThirtyTwoBits values, with 9 and 10 digits, respectively.
It looks useful, although I’m uncomfortable with the program space required. I have no way to estimate the program space for a simpleminded DDS controller, other than knowing it’ll be more than I estimate.
While poking around, however, I discovered the Arduino compiler does provide (limited) support for long long int variables. Given a 64 bit unit for simple arithmetic operations, a simpler implementation of fixed point numbers may be do-able: 32 bits for the integer and fraction should suffice! More on that shortly.
If I were serious, I’d figure out a better way to hold the parts. For now, I jammed a watch crab into the back and trapped the bezel on a watch holder, but … ick.
Weighing the components seems the least-awful way to get the small quantities I need. The instructions recommend 100:43 by weight of resin (A) : hardener (B):
XTC-3D Epoxy – weighing pan
For these tiny parts, 2 g + 0.9 g was way too much and 1 g + 0.4 g seemed entirely adequate. If you slowly drool resin into the pan, drool slightly less than half that much hardener, and it’ll be about as close as you can get. The hardener is much less viscous than the resin: drool carefully.
The stuff might be self-leveling on larger parts, but on these small surfaces it’s better (IMO) to dry-brush multiple layers: you can see thicker and thinner sections in the first picture. The recoat time runs about 1-½ h.
The instructions recommend acetone or denatured alcohol as a thinning agent, at 10 to 25% of the resin volume, with curing times up to 24 h. Alcohol seems less likely to produce Bad Results, because it won’t evaporate instantly. Neither will affect PETG, but if you’re using another plastic, keep its solvent list in mind.
I tried alcohol with a by-weight amounts around 0.7 : 0.3 : 0.3 g, obviously overshooting both the hardener and the alcohol by a few drops. The end result resembled thick water, brushed on easily, and penetrated the surface easily.
A first coat of thinned epoxy should fill voids and unify the surface without changing the dimensions very much, with subsequent coats leveling the striations.
So: jouncing over the larg(er) potholes / pavement discontinuities / debris on the roads around here wobbulates the front fender enough to pull the stays out of those tidy 18 mm = 6 diameter deep sockets on the fender clip.
Waving a heat gun around a 3D printed part seems fraught with peril, even with PETG’s glass transition temperature around 80 °C = 175 °F, as ordinary polyolefin tubing shrinks at 140-ish °C. Aiming the hot air stream more-or-less away from the clip (and the tire!) carried the day. PLA would surely have gotten bendy.
The proper solution surely involves screw clamps and suchlike. I really dislike fiddly hardware: I hope this hack survives.
The small garage door opener I tote around in the Tour Easy’s underseat bag failed after many years of exposure to the elements, so I paid a few bucks more for a cheap replacement in order to get fast delivery from a (US!) eBay supplier:
Garage door opener remote controls
For whatever it’s worth, before buying the replacement I tried:
Cleaning the battery contacts
Installing a new CR2032 battery
Programming the hitherto-unused buttons to open the door
The remote control would occasionally work, but none of the “repairs” made much difference; I suspect corrosion hidden under the components or cracked solder joints.
The eBay item description clearly, if inarticulately, specifies the compatibility requirement:
key chain remote control
compatible for purple learn button
So I trotted out to the garage and inspected the button:
Sears Garage Door Opener – purple button
Looks purple to me, but, being that type of guy, I also read the adjacent instruction sticker:
Sears Garage Door Opener – instructions
Nobody, nobody, maintains the documentation. [sigh]
I figured if they went to all the trouble of ordering a bazillion switches with purple caps, then the PCB surely holds the corresponding RF filters & firmware & whatever else that button signifies.
Seeing as how we have exactly one garage door opener and no lights or other doodads, I told the opener to obey both the 1 and 2 buttons, thereby dramatically reducing the dexterity required to open the door while pedaling up the driveway. The opener can remember an unspecified number of transmitters, so I didn’t go for all four buttons.