The Smell of Molten Projects in the Morning

Ed Nisley's Blog: Shop notes, electronics, firmware, machinery, 3D printing, laser cuttery, and curiosities. Contents: 100% human thinking, 0% AI slop.

Author: Ed

  • Monthly Image: Barred Owl In Daytime

    A pair of Barred Owls set up housekeeping nearby and we’ve watched them swoop down on rodents in the yard. We hope they succeed in raising their owlets!

    This one kept watch on us as we cleared out a dead holly bush near the garden:

    Barred Owl - daytime
    Barred Owl – daytime

    I took another picture at +1 EV to show more of the owl’s face; while blowing out the highlights:

    Barred Owl - daytime - 1 EV
    Barred Owl – daytime – 1 EV

    Go, owls, go!

    Taken with the Sony DSC-H5 and 1.7× teleadapter, because the Pixel phone’s camera just doesn’t have enough moxie at full zoom.

  • Summer Downshift

    We have several high-intensity / long-attention-span home projects scheduled this summer, all of which will keep me away from the Basement Laboratory.

    We’re OK, all is right with our world, but painting rooms and yard maintenance always take way more time than they should, while having close to zero intellectual content.

    Like, for example, the result of a strenuous morning devoted to removing a severely overgrown holly bush:

    Mother of All Holly Bush Stumps
    Mother of All Holly Bush Stumps

    I’ll post odd & ends a few times a week until maybe mid-August, whereupon I should get back to more usual pursuits.

    Enjoy your downtime …

  • Subaru Forester Relamping

    Prompted by RCP’s battery misadventure, I replaced a handful of the Forester’s incandescent bulbs:

    Subaru Forester 2015 - replaced bulbs
    Subaru Forester 2015 – replaced bulbs

    Despite what look like “squeeze here” markings, you must push the license plate bulb holders toward the center of the car:

    Subaru Forester 2015 - license plate bulb holders
    Subaru Forester 2015 – license plate bulb holders

    They were both stuck firmly to the trim plate, so I braced a screwdriver against the outboard edge of the trim panel, after which it becomes obvious how pressing inward compresses the (plastic) spring clip so you can pull the outward side of the holder away from the hatch.

    Casual searching turned up a bunch of exceedingly helpful advice for anyone DIY-ing through a Forester.

    The bulbs with conical ends, known as “festoon” lamps, (unsurprisingly) come in  several lengths. The Forester bulbs are about 25 mm long, (unsurprisingly) much shorter than the 31 mm LEDs that seem to be the smallest available replacements, but (surprisingly) the socket tabs have barely enough compliance for the extra half dozen millimeters:

    Subaru Forester 2015 - dome with 31 mm festoon LED bulb
    Subaru Forester 2015 – dome with 31 mm festoon LED bulb

    The LEDs are much much much brighter than the incandescents, although I’d prefer warm white to cool white. The cargo compartment lamp in the back is still way too dim; I don’t understand how Subaru decided on a plastic cover tinted dark smoke gray.

    All in all, a worthwhile upgrade!

    I wonder how long they’ll last? I have one spare of each type …

  • Turtles All The Way Down

    Spotted another big turtle ready to cross the Dutchess Rail Trail along Daley Rd:

    Rail Trail Turtle - 2018-06-04
    Rail Trail Turtle – 2018-06-04

    This must be the best season ever for turtles crossing vast expanses of asphalt, because I don’t recall seeing this many turtles during any previous spring. Confirmation bias in full effect, to be sure.

    The picture is a dot-for-dot crop from the Sony HDR-AS30V helmet camera, demonstrating why image compression has more to do with resolution than the number of dots.

  • Snapping Turtle Teleportation

    The dark spot in the grass, barely visible over on the left, is a dinner-plate-size snapping turtle recently teleported from the middle of Rt 376 just north of Robinson Lane:

    Snapping Turtle Teleportation - Rt 376 - 2018-06-02
    Snapping Turtle Teleportation – Rt 376 – 2018-06-02

    The driver of the white van managed to stop both lanes during the rescue and, judging from the lack of gore, handled the snapper without incurring organic damage.

    Color me impressed!

  • Tour Easy Front Derailleur Cable Clamp

    In addition to sawing through the side of the cable ferrule, the front derailleur cable began breaking at the edge of the derailleur arm:

    Tour Easy Front Derailleur Cable - frayed
    Tour Easy Front Derailleur Cable – frayed

    It wouldn’t have survived another ride!

    Dan pointed out CNC machined aluminum cable clamps are a thing, but those are sized for larger frame tubes than the 1.0 inch steel used on our Tour Easy ‘bents and, although I’ve shimmed everything else on the frame, I wanted to tweak the cable angle to match the arm on the derailleur.

    A bit of OpenSCAD wrangling produces a likely candidate:

    Front Derailleur Cable Clamp - Slic3r
    Front Derailleur Cable Clamp – Slic3r

    That’s a bulked-up revision of the prototype:

    Tour Easy Front Derailleur Cable Clamp - installed
    Tour Easy Front Derailleur Cable Clamp – installed

    Done up in orange PETG, it demonstrated the idea worked, but two perimeter threads wrapped around 15% infill isn’t quite up to the task. Note the split along the screw on the far half and various irregularities around the ferrule.

    The cable angle isn’t quite right, either, as the proper compound angle would, alas, aim the cable into the pedal crank. The bulky bushings get in the way of putting the ferrule where it should be with the screws aligned in a tidy manner, so I must get used to the jaunty angle.

    The bulkier version, done with 50% infill and four perimeter threads, has the same tilt angle, but the ferrule sits further from the screws:

    Tour Easy Front Derailleur Cable Clamp V2 - rear quarter view
    Tour Easy Front Derailleur Cable Clamp V2 – rear quarter view

    The view from the left side shows the cable angles slightly to the rear, but the smaller angle should make it happier:

    Tour Easy Front Derailleur Cable Clamp V2 - side view
    Tour Easy Front Derailleur Cable Clamp V2 – side view

    Probably should have used black PETG. Next time, for sure!

    The OpenSCAD source code as a GitHub Gist:

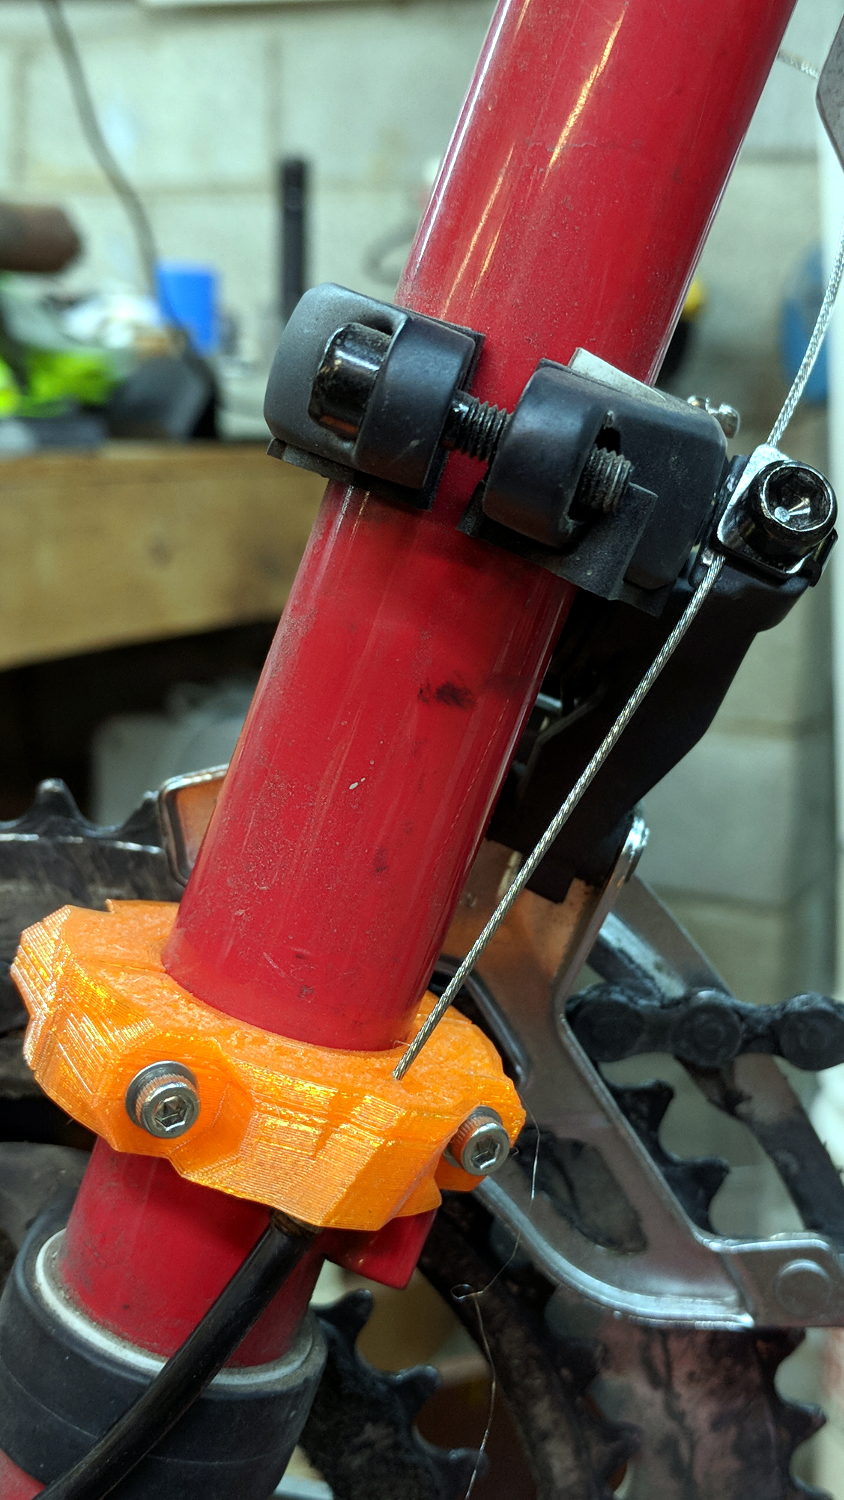
    // Tour Easy Derailleur Cable Clamp
    // Ed Nisley KE4ZNU – June 2017
    /* [Build Options] */
    Layout = "Build"; // [Build, Show]
    /* [Extrusion] */
    ThreadThick = 0.25; // [0.20, 0.25]
    ThreadWidth = 0.40; // [0.40]
    function IntegerMultiple(Size,Unit) = Unit * ceil(Size / Unit);
    /* [Hidden] */
    Protrusion = 0.01; // [0.01, 0.1]
    HoleWindage = 0.2;
    ID = 0;
    OD = 1;
    LENGTH = 2;
    /* [Cable Clamp] */
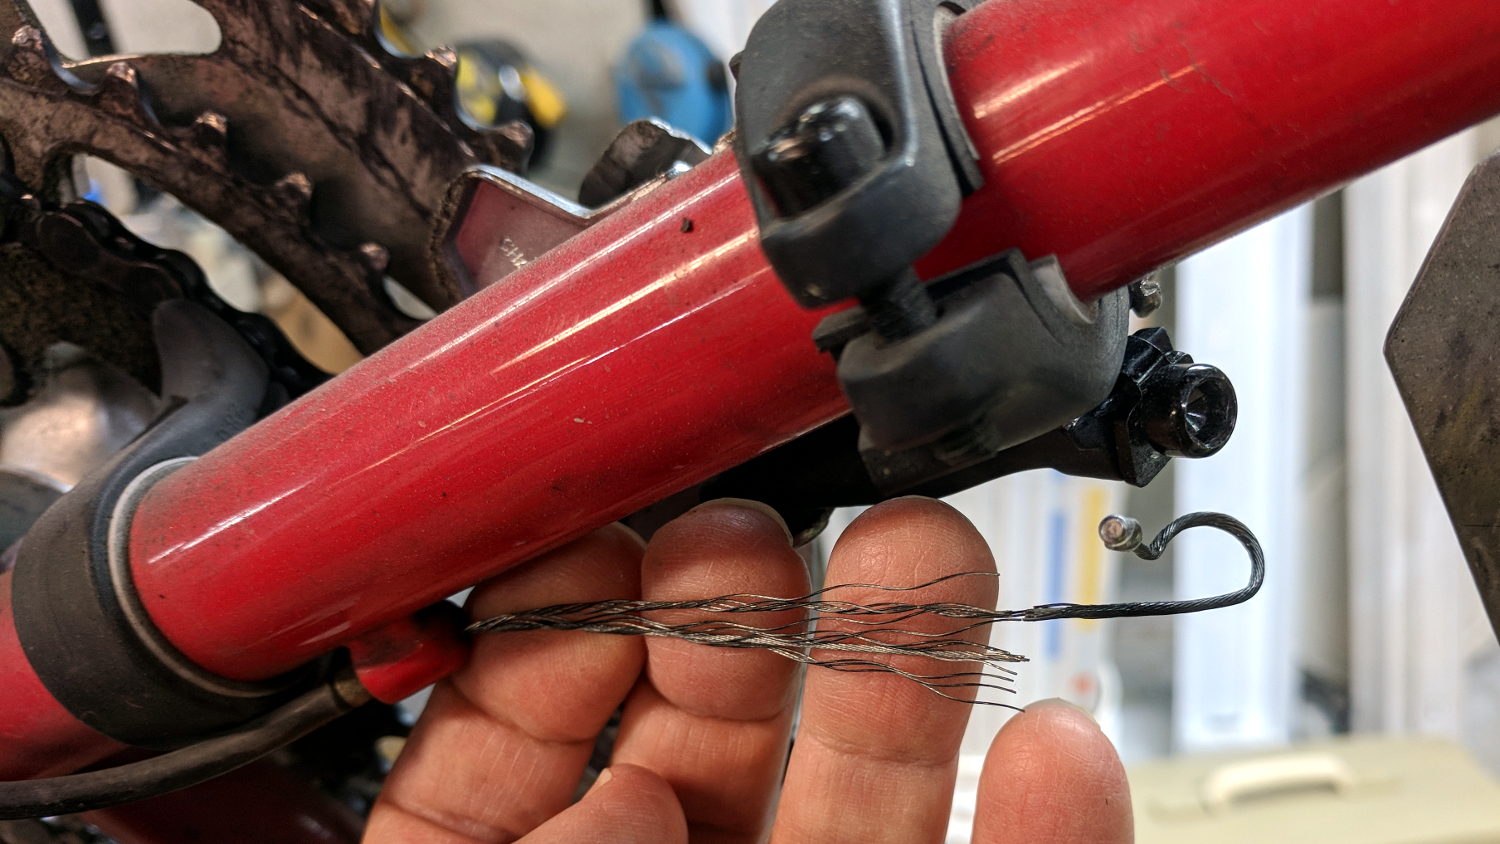
    FrameOD = 25.7; // Tour Easy has hard inch tubing + paint
    Ferrule = [1.5,5.1,12.0]; // cable ferrule
    EntryPoint = [0,13,60]; // cable entry to derailleur, +Y to rear of bike
    CableTilt = -20; // tilt from parallel to frame tube
    CableTheta = 0; // rotation around clamp from +X axis
    /* [Screws and Inserts] */
    ClampScrew = [3.0,5.5,35.0]; // M3 button / socket head cap screw
    ClampWasher = [3.7,7.0,0.7]; // M3 washer
    ClampNut = [3.0,6.0,4.0]; // M3 nylock nut
    /*
    ClampScrew = [4.0,7.0,25.0]; // M4 button head cap screw
    ClampWasher = [4.5,9.0,0.8]; // M4 washer
    ClampNut = [4.0,8.0,5.0]; // M4 nylock nut
    */
    NutShift = -0; // slide bushing toward nut for clearance
    //- Set clamp ring dimensions
    WallThick = 10.0;
    BushingSides = 8;
    Bushing = [ClampScrew[ID],
    // ClampWasher[OD]/cos(180/8) + 4*ThreadWidth,
    Ferrule[LENGTH]/cos(180/BushingSides),
    ClampScrew[LENGTH] – 2*ClampWasher[LENGTH] – ClampNut[LENGTH]];
    Ring = [FrameOD + HoleWindage,FrameOD + 2*WallThick,Ferrule[LENGTH]];
    ClampScrewOC = IntegerMultiple(FrameOD + ClampWasher[OD],1);
    echo(str(" screw OC: ",ClampScrewOC));
    ClampKerf = 0.75; // kerf between separated halves
    NumSides = 8*4;
    //- Adjust hole diameter to make the size come out right
    module PolyCyl(Dia,Height,ForceSides=0) { // based on nophead's polyholes
    Sides = (ForceSides != 0) ? ForceSides : (ceil(Dia) + 2);
    FixDia = Dia / cos(180/Sides);
    cylinder(r=(FixDia + HoleWindage)/2,h=Height,$fn=Sides);
    }
    // Construct things
    module ClampRing() {
    difference() {
    union() {
    cylinder(d=Ring[OD],h=Ring[LENGTH],$fn=NumSides); // basic ring
    for (j=[-1,1]) // screw bushings
    translate([Bushing[LENGTH]/2 + NutShift,j*ClampScrewOC/2,Ring[LENGTH]/2])
    rotate([0,-90,0]) rotate(180/BushingSides)
    cylinder(d=Bushing[OD],h=Bushing[LENGTH],$fn=BushingSides);
    intersection() {
    rotate([CableTilt,0,CableTheta]) // reinforce cable ferrule
    translate([(Ring[ID] + Ring[OD])/4,0,Ferrule[LENGTH]/2])
    rotate(180/8)
    cylinder(d=3*Ferrule[OD] + 0*ThreadWidth,2*Ferrule[LENGTH],center=true,$fn=8);
    cylinder(d=2*Ring[OD],h=Ring[LENGTH],$fn=NumSides); // basic ring
    }
    }
    translate([0,0,-Protrusion]) // frame tube
    cylinder(d=Ring[ID],h=Ring[LENGTH] + 2*Protrusion,$fn=NumSides);
    rotate([CableTilt,0,CableTheta]) // cable ferrule
    translate([(Ring[ID] + Ring[OD])/4,0,-0.25*Ferrule[LENGTH]]) {
    rotate(180/8)
    PolyCyl(Ferrule[OD],Ferrule[LENGTH],8);
    rotate(-22.5)
    PolyCyl(Ferrule[ID],2*Ferrule[LENGTH],4);
    }
    for (j=[-1,1]) // screw holes
    translate([Ring[OD]/2,j*ClampScrewOC/2,Ring[LENGTH]/2])
    rotate([0,-90,0]) rotate(180/6)
    PolyCyl(Bushing[ID],Ring[OD],6);
    for (i=[-1,1], j=[-1,1]) // screw & nut seats
    translate([i*(Bushing[LENGTH]/2) + NutShift,j*ClampScrewOC/2,Ring[LENGTH]/2])
    rotate([0,i*90,0]) rotate(180/BushingSides)
    cylinder(d=Bushing[OD],h=Bushing[LENGTH],$fn=BushingSides);
    translate([0,0,Ring[LENGTH]/2]) // slice it apart
    cube([ClampKerf,2*Ring[OD],2*Ring[LENGTH]],center=true);
    }
    }
    //- Build things
    if (Layout == "Show") {
    translate(EntryPoint)
    cube(1,center=true);
    ClampRing();
    }
    if (Layout == "Build") {
    ClampRing();
    }

  • Mint Extract: The Beginning

    Mary harvested a great bunch of spearmint from a place where it wouldn’t be missed and, after rinsing, plucking, and chopping, we now have a liter of Mint Extract in the making:

    Mint Extract - start - 2018-05-29
    Mint Extract – start – 2018-05-29

    The big jars got 3 oz of coarse-chopped leaves apiece, the smaller jar 1 oz, and the (removed) stems added up to 3.5 oz, so call it 1/3 waste. Not that this is an exact science, but I’d say 3/4 pound of just-picked mint, packed slightly tighter than those jars, would produce a liter of extract.

    Because we started with fresh-picked leaves, a liter of 190 proof = 95% ethanol Everclear (*) will extract the oil better than the 80 proof = 40% ethanol vodka I used for dried vanilla beans.

    A day later, the leaves definitely look dehydrated:

    Mint Extract - browning leaves - 2018-05-30
    Mint Extract – browning leaves – 2018-05-30

    Those bottles are lying on their sides with the camera above, looking through the air bubble to the leaves. Unlike commercial mint extract, this stuff is green!

    It’ll be finished after a month of daily agitation, but surely it’s an exponential process: a few hundred μl already pep up a mug o’ cocoa just fine.

    In very round numbers, I get 10 drops / 0.1 ml, so 1 drop = 10 μl.

    Bonus: the cutting board smells wonderful.

    (*) It may be Olde White Guy Privilege, but clerks don’t even blink when I stagger up to the counter clutching a bottle of high-octane hooch; they don’t even card my age!