The Smell of Molten Projects in the Morning

Ed Nisley's Blog: Shop notes, electronics, firmware, machinery, 3D printing, laser cuttery, and curiosities. Contents: 100% human thinking, 0% AI slop.

Author: Ed

  • Monthly Science: Concrete Bridge Flexing

    Riding south on Rt 376 takes us across the Mighty Wappinger Creek on a four-lane concrete bridge built about 1995. This Dutchess County Aerial Access photo shows it in 2016:

    Rt 376 - Wappinger Bridge - 2016 overhead
    Rt 376 – Wappinger Bridge – 2016 overhead

    A pothole opened up on the south end of the span last year:

    Rt 376 bridge deterioration - marker 1102 - 2018-05-07
    Rt 376 bridge deterioration – marker 1102 – 2018-05-07

    NYS DOT patched it a while ago:

    Rt 376 - Wapp Bridge - 2019-09-11 - 0490
    Rt 376 – Wapp Bridge – 2019-09-11 – 0490

    This year, we’ve been avoiding a new pothole opening on the north end:

    Rt 376 - Wapp Bridge - 2019-09-11 - 0295
    Rt 376 – Wapp Bridge – 2019-09-11 – 0295

    It’s difficult to ride between the right side of the hole and the weeds growing from the curb joint under the guide rail, so we take the lane whenever we can. The extensive vegetation growing in the bridge structure can’t possibly be a good thing.

    The bridge deck rests on steel beams across the creek, with plenty of corroded concrete along the edge:

    Red Oaks Mill bridge - dangling concrete
    Red Oaks Mill bridge – dangling concrete

    The concrete seems to be failing by tension overload as the beams flex downward under traffic loading and pull the top surface apart. The surface has irregular transverse cracks across the deck width, not all of which look like control joints.

    With potholes and surrounding cracks allowing brine into the deck, we expect much worse deterioration during the next few years.

    My Professional Engineer license has long lapsed, not that I ever knew anything about bridge design, so this is mostly observational.

  • CNC 3018-Pro: Hard Drive Platter Fixture

    A variation on the CD fixture produces a 3.5 inch hard drive platter fixture:

    Platter Fixtures - Hard Drive on 3018
    Platter Fixtures – Hard Drive on 3018

    Which needed just a touch of milling for a snug fit around the platter:

    CNC 3018-Pro - HD platter fixture - test fit
    CNC 3018-Pro – HD platter fixture – test fit

    Tape it down on the 3018’s platform, set XY=0 at the center, and It Just Works™:

    CNC 3018-Pro - HD platter fixture - 70 g
    CNC 3018-Pro – HD platter fixture – 70 g

    The rather faint line shows engraving at -1.0 mm = 70 g downforce isn’t quite enough. Another test with the same pattern at -3.0 mm = 140 g came out better:

    CNC 3018-Pro - HD platter fixture - 140 g
    CNC 3018-Pro – HD platter fixture – 140 g

    It’s in the same OpenSCAD file as the CD fixture, in the unlikely event you need one.

  • Praying Mantis vs. Bumblebee

    The Butterfly Bush outside the living room continues to attract flying insects, but, with the arrival of this year’s bumper crop of Praying Mantises, it has become something of a killing field.

    If I hadn’t seen this, I wouldn’t have believed it:

    Mantis vs Bumblebee - grapple
    Mantis vs Bumblebee – grapple

    Perhaps grabbing the bumblebee at the tip of the abdomen neutralizes the sting, but I only saw the flash of motion, not the actual capture.

    The mantis changed her (?) grip several times while removing various accessories:

    Mantis vs Bumblebee - disassembly
    Mantis vs Bumblebee – disassembly

    Although a bee’s leg may not seem edible, she chewed through them like Pocky.

    Minus most of the bits and pieces, serious eating commenced:

    Mantis vs Bumblebee - lunch
    Mantis vs Bumblebee – lunch

    Having watched several insects go through this process, the mantis proceeds from the head downward, eventually squeezing the abdomen like a tube of toothpaste.

    A mantis can eat a bumblebee in about twenty minutes, from capture to discarding the empty husk. After a few minutes of body maintenance, ranging from leg cleaning to eye scraping, she begins waiting for the next meal to arrive …

  • Suet Feeder Bracket Painting

    The 4 inch column on the rear patio holds a bracket, probably intended for a welcoming sign or some such, which keeps the suet feeder mostly out of reach. It desperately wanted a coat of black paint to match the railing, so I stripped the old paint and applied Evapo-Rust:

    Suet Feeder Bracket Hardware - Evapo-Rust bath
    Suet Feeder Bracket Hardware – Evapo-Rust bath

    The dark areas are iron oxide being converted to loose iron sulfide, which is what Evapo-Rust does for a living.

    One could, of course, simply buy new eye screws & nuts, but we’re deep into historical preservation around here.

    An hour of soaking and a few minutes of wire-wheeling got everything down to bare metal, ready for some rattle-can primer and black paint action:

    Suet Feeder Bracket Hardware - installed
    Suet Feeder Bracket Hardware – installed

    It’s a version of what Eks calls a “used car finish”: high shine over deep pits.

    Discussion of why one should not paint threaded parts will be unavailing; in this case, paint serves as permanent threadlock. I re-spritzed the eyescrews & nuts after getting everything aligned, so as to produce a lovely two-coat over-all finish.

    The birds won’t care one way or the other and, as long as the paint lasts, neither will we.

  • Cateye Astrale Cyclocomputer Battery Life

    The display on Mary’s Cateye Astrale “Cyclocomputer” had once again faded to gray, so it’s time for a new CR2032 lithium cell:

    Cateye Astrale - battery change 2019-09-22
    Cateye Astrale – battery change 2019-09-22

    The old cell read 2.5 V, well below what it should be.

    The notes scrawled on the cell become readable under better light:

    Cateye Astrale - CR2032 life
    Cateye Astrale – CR2032 life

    Seven years (at 1942 mile/yr) ain’t bad at all!

    To replace the cell fast enough to maintain the odometer reading, just unscrew & remove the battery cover, slam the back of the Astrale on the bench, and pop in the new cell.

    Maybe I should replace the cell twice a decade, regardless of how feeble it might be?

  • MPCNC: Z-Axis Height Probe

    A slight modification to the MPCNC LM12UU collet pen holder turns it into a long-reach Z-Axis Height Probe:

    CNC 3018-Pro - Z-Axis height probe - overview
    CNC 3018-Pro – Z-Axis height probe – overview

    A flange on the top plate holds a Makerbot-style endstop switch:

    Collet Holder - LM12UU - switch plate - solid model
    Collet Holder – LM12UU – switch plate – solid model

    The brass probe rod sports a 3/32 inch ball epoxied on its tip, although for my simple needs I could probably use the bare rod:

    CNC 3018-Pro - Z-Axis height probe - ball tip detail
    CNC 3018-Pro – Z-Axis height probe – ball tip detail

    I clamped the rod to extend a bit beyond the plate, where it can soak up most of the switch release travel, leaving just enough to reset the clickiness after each probe:

    CNC 3018-Pro - Z-Axis height probe - detail
    CNC 3018-Pro – Z-Axis height probe – detail

    The probe responds only to Z motion, not tip deflection in XY, so it’s not particularly good for soft objects with sloped sides, like the insole shown above. It works fine for rigid objects and should suffice to figure the modeling workflow.

    The bCNC Auto-Level probe routine scans a grid over a rectangular region:

    Insole - bCNC AutoLevel Probe Map - detail
    Insole – bCNC AutoLevel Probe Map – detail

    Which Meshlab turns into a solid model:

    Insole - Meshlab triangulation
    Insole – Meshlab triangulation

    That’s the bottom of the insole probed on a 5 mm grid, which takes something over an hour to accomplish.

    The OpenSCAD code as a GitHub Gist:

    // Collet pen cartridge holder using LM12UU linear bearing
    // Ed Nisley KE4ZNU – 2019-04-26
    // 2019-06 Adapted from LM12UU drag knife holder
    // 2019-09 Probe switch mount plate
    Layout = "Build"; // [Build, Show, Puck, Mount, Plate, SwitchPlate]
    /* [Hidden] */
    // Extrusion parameters
    ThreadThick = 0.25; // [0.20, 0.25]
    ThreadWidth = 0.40; // [0.40]
    // Constants
    Protrusion = 0.1; // [0.01, 0.1]
    HoleWindage = 0.2;
    inch = 25.4;
    function IntegerMultiple(Size,Unit) = Unit * ceil(Size / Unit);
    ID = 0;
    OD = 1;
    LENGTH = 2;
    //- Adjust hole diameter to make the size come out right
    module PolyCyl(Dia,Height,ForceSides=0) { // based on nophead's polyholes
    Sides = (ForceSides != 0) ? ForceSides : (ceil(Dia) + 2);
    FixDia = Dia / cos(180/Sides);
    cylinder(r=(FixDia + HoleWindage)/2,h=Height,$fn=Sides);
    }
    //- Dimensions
    // Basic shape of DW660 snout fitting into the holder
    // Lip goes upward to lock into MPCNC mount
    Snout = [44.6,50.0,9.6]; // LENGTH = ID height
    Lip = 4.0; // height of lip at end of snout
    // Holder & suchlike
    PenShaft = 3.5; // hole to pass pen cartridge
    WallThick = 4.0; // minimum thickness / width
    Screw = [4.0,8.5,25.0]; // thread ID, washer OD, length
    Insert = [4.0,6.0,10.0]; // brass insert
    Bearing = [12.0,21.0,30.0]; // linear bearing body
    Plate = [PenShaft,Snout[OD] – WallThick,WallThick]; // spring reaction plate
    echo(str("Plate: ",Plate));
    SpringSeat = [0.56,7.5,2*ThreadThick]; // wire = ID, coil = OD, seat depth = length
    PuckOAL = max(Bearing[LENGTH],(Snout[LENGTH] + Lip)); // total height of DW660 fitting
    echo(str("PuckOAL: ",PuckOAL));
    Key = [Snout[ID],25.7,(Snout[LENGTH] + Lip)]; // rectangular key
    NumScrews = 3;
    //ScrewBCD = 2.0*(Bearing[OD]/2 + Insert[OD]/2 + WallThick);
    ScrewBCD = (Snout[ID] + Bearing[OD])/2;
    echo(str("Screw BCD: ",ScrewBCD));
    NumSides = 9*4; // cylinder facets (multiple of 3 for lathe trimming)
    // MBI Endstop switch PCB
    PCB = [40.0,1.6,16.5]; // endstop PCB, switch downward, facing parts
    Touchpoint = [-4.8,4.8,4.5]; // contact point from PCB edges, solder side
    TapeThick = 1.0; // foam mounting tape
    SwitchMount = [PCB.x,WallThick,PCB.z + Touchpoint.z + Plate.z];
    module DW660Puck() {
    translate([0,0,PuckOAL])
    rotate([180,0,0]) {
    cylinder(d=Snout[OD],h=Lip/2,$fn=NumSides);
    translate([0,0,Lip/2])
    cylinder(d1=Snout[OD],d2=Snout[ID],h=Lip/2,$fn=NumSides);
    cylinder(d=Snout[ID],h=(Snout[LENGTH] + Lip),$fn=NumSides);
    translate([0,0,(Snout[LENGTH] + Lip) – Protrusion])
    cylinder(d1=Snout[ID],d2=2*WallThick + Bearing[OD],h=PuckOAL – (Snout[LENGTH] + Lip),$fn=NumSides);
    intersection() {
    translate([0,0,0*Lip + Key.z/2])
    cube(Key,center=true);
    cylinder(d=Snout[OD],h=Lip + Key.z,$fn=NumSides);
    }
    }
    }
    module MountBase() {
    difference() {
    DW660Puck();
    translate([0,0,-Protrusion]) // bearing
    PolyCyl(Bearing[OD],2*PuckOAL,NumSides);
    for (i=[0:NumScrews – 1]) // clamp screws
    rotate(i*360/NumScrews)
    translate([ScrewBCD/2,0,-Protrusion])
    rotate(180/8)
    PolyCyl(Insert[OD],2*PuckOAL,8);
    }
    }
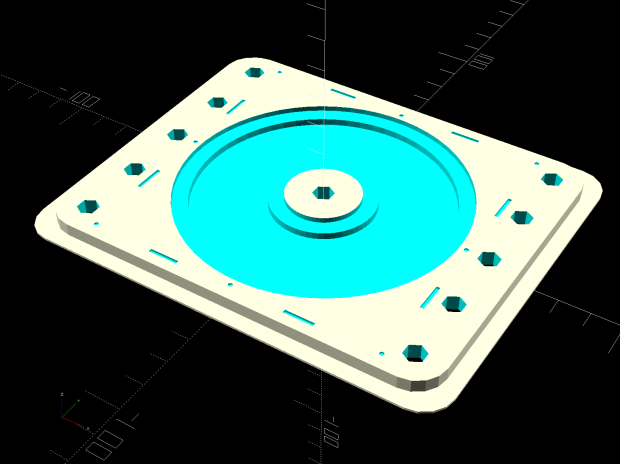
    module SpringPlate() {
    difference() {
    cylinder(d=Plate[OD],h=Plate[LENGTH],$fn=NumSides);
    translate([0,0,-Protrusion]) // pen cartridge hole
    PolyCyl(PenShaft,2*Plate[LENGTH],NumSides);
    translate([0,0,Plate.z – SpringSeat[LENGTH]]) // spring retaining recess
    PolyCyl(SpringSeat[OD],SpringSeat[LENGTH] + Protrusion,NumSides);
    for (i=[0:NumScrews – 1]) // clamp screws
    rotate(i*360/NumScrews)
    translate([ScrewBCD/2,0,-Protrusion])
    rotate(180/8)
    PolyCyl(Screw[ID],2*PuckOAL,8);
    }
    }
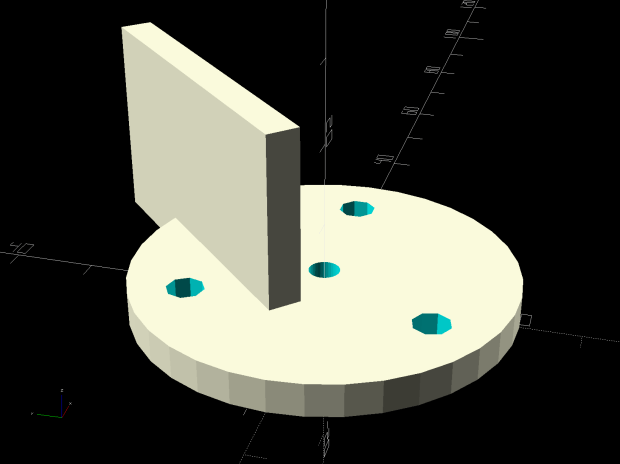
    module SwitchPlate() {
    translate([0,0,Plate.z])
    rotate([180,0,0])
    SpringPlate();
    rotate(45)
    translate([Touchpoint.x,Touchpoint.y + TapeThick,0])
    cube(SwitchMount,center=false);
    }
    //—–
    // Build it
    if (Layout == "Puck")
    DW660Puck();
    if (Layout == "Plate")
    SpringPlate();
    if (Layout == "SwitchPlate")
    SwitchPlate();
    if (Layout == "Mount")
    MountBase();
    if (Layout == "Show") {
    MountBase();
    translate([0,0,1.6*PuckOAL])
    rotate([180,0,0])
    SpringPlate();
    }
    if (Layout == "Build") {
    translate([0,Snout[OD]/2,PuckOAL])
    rotate([180,0,0])
    MountBase();
    translate([0,-Snout[OD]/2,0])
    SpringPlate();
    }

  • Branson Ultrasonic Cleaner Switch Cover

    Back in the early 90s, I bought a Branson Ultrasonic Cleaner for small parts. It turned out to be ideal for eyeglasses, migrated to the bathroom, and has been used at least daily ever since. After nigh onto three decades, this happened:

    Branson ultrasonic cleaner - failed switch cover
    Branson ultrasonic cleaner – failed switch cover

    We tend to push the ON button and let it turn off by itself after a little over four minutes (exactly 255 seconds!), so the gray plastic sheet over the ON switch failed first. You can barely see the outline of the transparent film previously covering both switches, which probably helped waterproof the switches.

    The gray plastic disk sits atop the switch actuator, so I punched a slightly larger polypropylene disk (from my stash of clamshell packages), stuck it to the disk with double-sided tape, lined it up over the hole, and covered the mess with Kapton tape:

    Branson ultrasonic cleaner - expedient fix
    Branson ultrasonic cleaner – expedient fix

    This is in the nature of an expedient fix, as I’m not sure the polypro disk is flexible enough. The next iteration will cover the entire gray area and I’ll see about a transparent tape covering.

    Maybe in another decade?