The Smell of Molten Projects in the Morning

Ed Nisley's Blog: Shop notes, electronics, firmware, machinery, 3D printing, laser cuttery, and curiosities. Contents: 100% human thinking, 0% AI slop.

Month: July 2022

  • Miroco LED Floor Lamp: MOSFET Replacement

    Miroco LED Floor Lamp: MOSFET Replacement

    The only LED floor lamp I bought which didn’t require extensive hackery to lower the business end to suit Mary’s preferences failed after two years. The warm white LEDs continued to work fine:

    Miroco LED Floor Lamp - warm white LEDs
    Miroco LED Floor Lamp – warm white LEDs

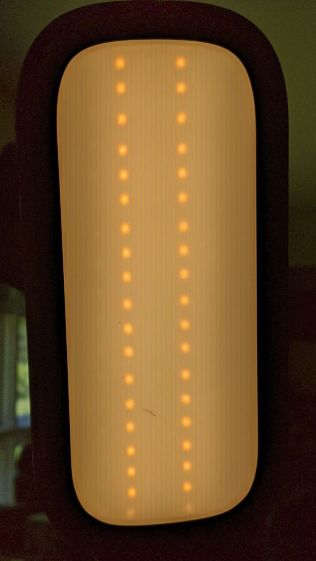
    But the cool white LEDs were permanently on at a very low level and did not respond to any of the brightness controls:

    Miroco LED Floor Lamp - cool white LEDs
    Miroco LED Floor Lamp – cool white LEDs

    You can’t tell, but the cool whites are on in the first picture, too.

    The symptoms suggested the driver transistor for the cool whites has failed partially on, although I’d expect it to be either a dead short or completely open.

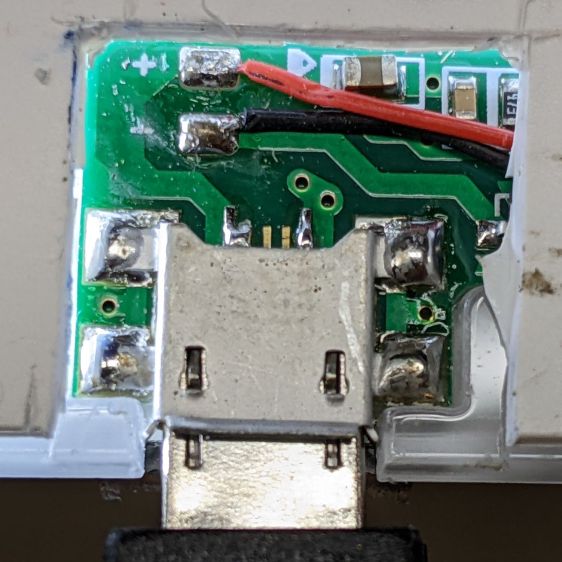
    The lamp being a year or more out of warranty and having come from one of the myriad Amazon sellers banned during the Great Paid Review Purge, there’s nothing to do but remove the four screws from the back of the control lump and see what’s inside:

    Miroco LED Floor Lamp - PCB packing
    Miroco LED Floor Lamp – PCB packing

    How this was assembled I cannot say, because the three wires going to the LED head (on the far right) have less than an inch of slack. Maybe they pulled wire into the head while screwing things together?

    I think the HC8T1212 microcontroller sticking out of the foam is a distant descendant of the Motorola (remember Motorola?) MC68HC05 family. I’m mildly surprised they didn’t use a 32-bit ARM / MIPS / whatever micro, with WiFi capability and a strong desire to siphon my private bits.

    The two pieces of closed-cell foam seemed firmly glued to the PCB, but eventually yielded to brute force. Scraping brittle yellowish goo off the right end revealed the LED ballast resistors and the wire labels:

    Miroco LED Floor Lamp - ballast resistors - LED wiring
    Miroco LED Floor Lamp – ballast resistors – LED wiring

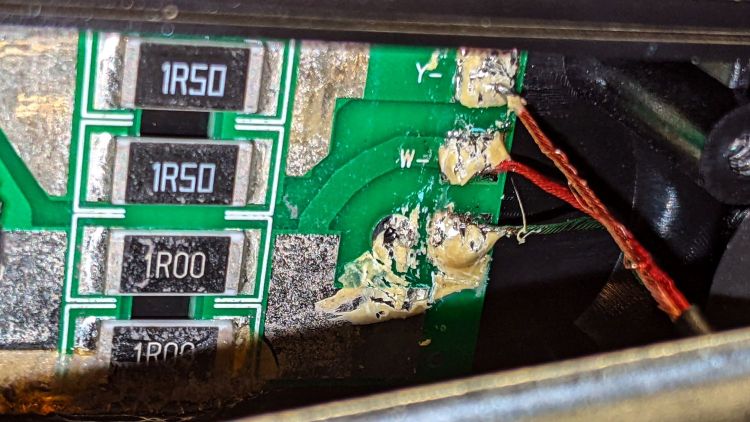
    Note the bar-taut Y- wire going to the warm-white (“yellow”?) LEDs.

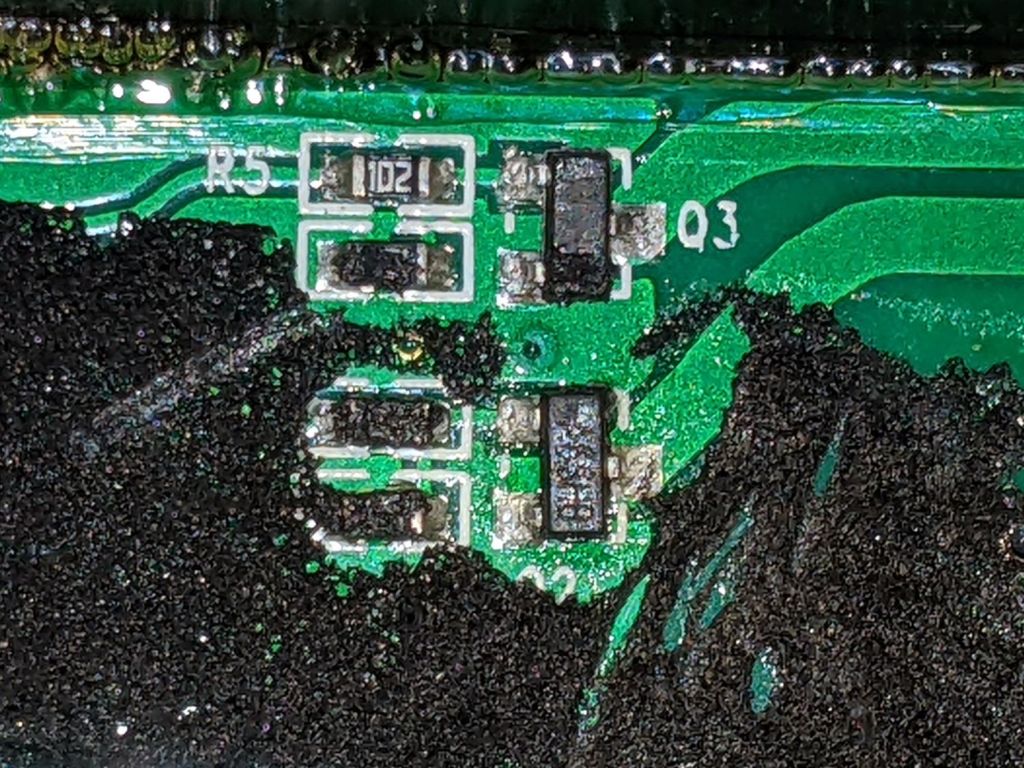
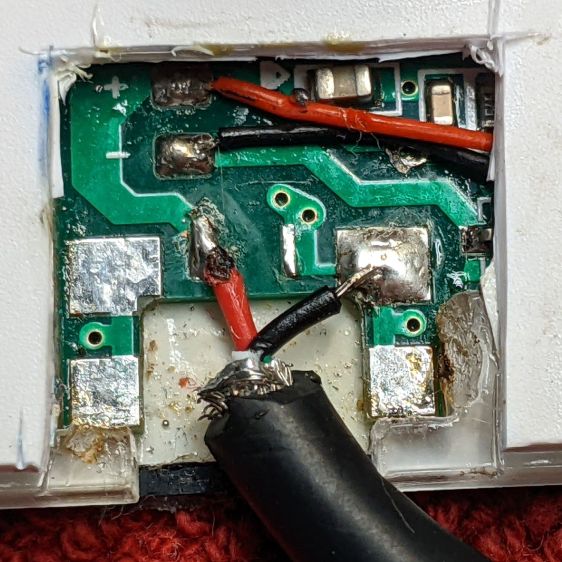
    The black foam left a mess over most of the PCB, but diligent scraping eventually revealed the driver transistors:

    Miroco LED Floor Lamp - A6SHB MOSFETs
    Miroco LED Floor Lamp – A6SHB MOSFETs

    You can’t read it, but the topmarks were A6SHB: an old Siliconix (remember Siliconix?) SI2306 30 V / 3 A MOSFET. Turns out you can get new-production SI2306 transistors from the usual Asian foundries through eBay, which I did.

    It’s not the neatest soldering job ever, but it’ll suffice:

    Miroco LED Floor Lamp - A6SHB MOSFET replaced
    Miroco LED Floor Lamp – A6SHB MOSFET replaced

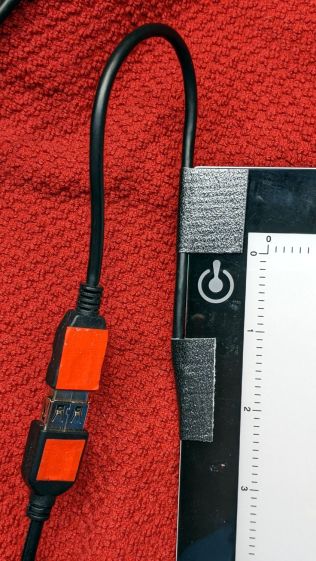
    The colorful wires over on the right added enough length for a pair of Tek current probes:

    Miroco LED Floor Lamp - 200 mA-div
    Miroco LED Floor Lamp – 200 mA-div

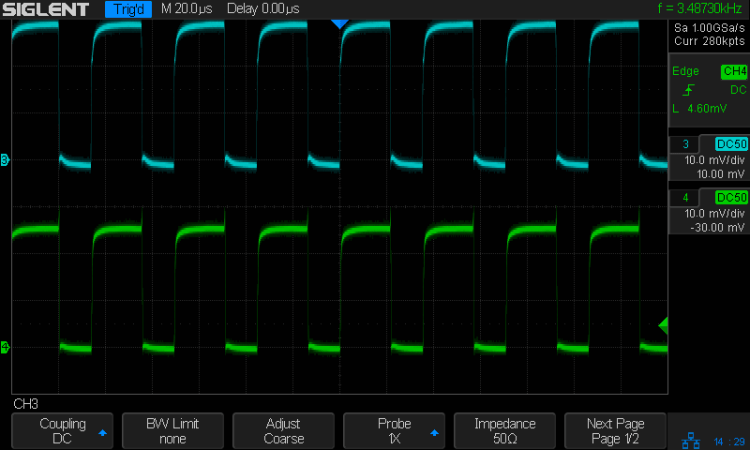
    The top (cyan) trace is the (repaired) cool LEDs, drawing 600 mA from the 10 V supply, so the 0.5 Ω ballast dissipates 180 mW. The bottom (green) trace is the warm LEDs at 500 mA through a 0.75 Ω ballast for 190 mW. That end of the control lump does feel a bit warm after a while, but nothing out of the ordinary.

    Stuff the foam back in place, tuck the longer wires around the edges, snap the cover in place, reinstall the screws, and the lamp is at least as good as new.

  • LitUp LED Light Pad: Direct Wiring

    LitUp LED Light Pad: Direct Wiring

    Unfortunately, reinforcing the USB Micro-B jack on the side of the LitUp LED Light Pad only delayed the inevitable: the light became erratic even without the slightest touch. The pad consists of three acrylic sheets glued together around the entire perimeter, so there’s no way to get access to the no-user-serviceable-parts within. Apparently, you’re supposed to just throw it out.

    On the other paw, it’s already dead, so there’s nothing to lose:

    LitUp LED Light Pad - failed USB jack
    LitUp LED Light Pad – failed USB jack

    A little deft razor knife work chopped through the rear sheet without doing any (more) damage to the PCB within. The LEDs can still be convinced to light, but the USB jack is definitely wrecked.

    Applying some ChipQuik let me extract the jack without (too much) more damage. Rather than replace it, I just soldered a pigtail USB cable to the obvious PCB pads:

    LitUp LED Light Pad - direct power wiring
    LitUp LED Light Pad – direct power wiring

    If I’d noticed that little solder ball, I’d have removed it before filling the cavity with hot melt glue and squishing the cut-out piece of white acrylic in place.

    A little black duct tape should keep the wiring stable enough for the foreseeable future:

    LitUp LED Light Pad - redirected cable
    LitUp LED Light Pad – redirected cable

    That was another (relatively) easy zero-dollar repair that should not be necessary.

  • High-Impact Art: Smashed Glass Earrings, Proof of Concept

    High-Impact Art: Smashed Glass Earrings, Proof of Concept

    If you’re a particularly sharp person, these may accentuate your wardrobe:

    Earrings - 12mm - finished
    Earrings – 12mm – finished

    They’re fragments of smashed tempered glass, epoxied into laser-cut disks, with a ring providing some structural support. Although it’s hard to tell from the photos, the fragments sit flush with one side of the disk, which is likely the side you want closest to your carotid artery:

    Earrings - 12mm - finished
    Earrings – 12mm – finished

    Each chunk consists of a few smaller cuboids, so you get internal reflections from the minute air gaps between them. They’re not diamonds, but they’re surprisingly glittery in the proper light. Bonus: you can see right through!

    The “gold” band around the disk is a beading ring held in a notch engraved around both disks:

    Earrings - rings
    Earrings – rings

    The smaller ring is 12 mm OD, the larger is 25 mm, with 16 mm (the descriptions says 15, but ya get what ya get) and 20 mm available for other glass fragment sizes.

    The engraved recess (green) is slightly larger than the OD to allow the perimeter cut to proceed through a thinner section:

    Earring templates - 25 20 16 12 mm
    Earring templates – 25 20 16 12 mm

    Cross-hatch engraving puts a steep edge all around the recess, so the ring fits with just a little slack and turns freely around the disks.

    You will, of course, have different glass fragments requiring different shapes, but the outlines came from the same process I used to make the palette organizing the fragments:

    Smashed glass palette - fresh cut
    Smashed glass palette – fresh cut

    You (well, I) can just import that layout, copy the outline of the chunk to be used, then delete the rest. Mirror the outline so the engraved sides of the disks fit together around the chunk, position symmetrically in the template halves, and fire the laser.

    Affixing the fresh-cut disk and its glass chunk to a strip of Kapton tape (sticky side up) holds them in proper alignment and prevents the epoxy from leaking out the bottom:

    Earrings - 12mm - taped
    Earrings – 12mm – taped

    With everything lined up, run a small bead of epoxy around the chunk, squish the top disk in place, and line up the notches. When the epoxy cures, peel the earring off the tape and slide a jump ring into the notch.

    As a finishing touch, you’d add a suitable ear hook or stud, but I think it’s fair to assume anything from Amazon would consist of the finest arsenic-plated plutonium and be completely unsuitable for skin contact. Neither of us have any piercings, so I cannot provide enticing action photos.

    The 25 mm versions failed because I made the outlines such a snug fit around the chunks they didn’t quite fit:

    Earrings - 25mm - failed
    Earrings – 25mm – failed

    Protip: do not attempt to coerce two rigid bodies into alignment by applying firm pressure, particularly when one of them is already-broken glass.

    The small earrings weigh 0.7 g each and a 25 mm one (well, the parts for a large one) comes in a bit over 3 g, plus whatever hardware goes in / on / around your ear.

    This was (obviously) an exercise in small-scale laser machining, rather than a venture into haute couture. In the highly unlikely event you can’t live without a pair of custom-designed high-impact earrings, I’ll shut up and take your money … let me know if you want little or big. Black is the new black; I do have other colors, but who are you kidding?

    The SVG images as a GitHub Gist:

    Loading
    Sorry, something went wrong. Reload?
    Sorry, we cannot display this file.
    Sorry, this file is invalid so it cannot be displayed.

  • Smashed Glass Work Palette

    Smashed Glass Work Palette

    Having a myriad small glass fragments and an idea for their use created the problems of organizing the pieces while not losing them under the bench.

    As with the shattered shot-glass coaster, start by lining up the suspects on the scanner:

    Small fragments
    Small fragments

    Blow out the contrast, flip right-to-left, then mask them en masse:

    Small fragments - masked
    Small fragments – masked

    Delete the images (inside their selection masks) to create a binary mask:

    Small fragments - masks
    Small fragments – masks

    Have LightBurn trace the binary images, wrap a rounded rectangle around the lot of them, duplicate the rectangle as a base plate, then fire the laser:

    Smashed glass palette - fresh cut
    Smashed glass palette – fresh cut

    They’re not secured in their sockets, but they won’t fall out unless I fat-finger the whole affair:

    Smashed glass palette - loaded
    Smashed glass palette – loaded

    The thing that takes getting used to: the whole process was about two hours of wall clock time from start to finish, with a leisurely breakfast and KP in the middle.

  • BatMax vs. Newmowa NP-BX1 Camera Batteries: 2022

    BatMax vs. Newmowa NP-BX1 Camera Batteries: 2022

    Two years ago, a quartet of new BatMax NP-BX1 batteries performed about as well as could be expected and, by last fall, had deteriorated about as much as expected:

    Batmax NP-BX1 - 2021-09 vs 2020-03
    Batmax NP-BX1 – 2021-09 vs 2020-03

    In round numbers, the total capacity declined from 3.25 W·hr to 2.5 W·hr, which means a single battery can’t quite power the camera for the duration of our normal hour-long rides. I do not know what voltage trips the camera’s decision, but the batteries definitely shut down sooner.

    So, based on their previous track record, I bought another quartet of Batmax batteries. Being that type of guy, I tested both the old (2020) and new (2022) sets:

    NP-BX1 - BatMax 2022 vs 2020 - used-new
    NP-BX1 – BatMax 2022 vs 2020 – used-new

    The blue traces are the C/D batteries from the as-new tests back in early 2020, the green traces are C/D after two years of use, and the red traces are the “new” quartet after their first charge in the Official BatMax Charger.

    It looks very much like BatMax is selling used batteries repackaged as new items, because they are indistinguishable from my used ones. They definitely are not the “Premium Grade A cells” touted in the description.

    I returned them for a refund and sent the test results to BatMax; they sent “new replacements” even though I said I would not pay for any future shipments. The batteries had a slightly different wrapper, but the test results were still indistinguishable from used batteries. I offered to return the package and was told that would not be needed.

    Just a few more batteries for the blinkies.

    So I bought a trio of NP-BX1 batteries from Newmowa, an Amazon supplier with a few more vowels than usual, and repeated the exercise:

    NP-BX1 - Newmowa 2022 ABC - 2022-06-29
    NP-BX1 – Newmowa 2022 ABC – 2022-06-29

    It seems three good batteries now cost about as much as four crap batteries, under the reasonable assumption chargers are essentially free.

    Three batteries isn’t quite enough for my usual rotation and, for unknown reasons, one cannot buy only batteries, so in short order I will have two chargers and six batteries.

    The consolidated test results:

    NP-BX1 - Newmowa Batmax 2022 comparison
    NP-BX1 – Newmowa Batmax 2022 comparison

    The color code:

    • Newmowa: red
    • BatMax 2020 new: blue
    • BatMax 2020 used: orange
    • BatMax 2022 new: green + lime

    I stopped writing Amazon reviews after having a few detailed-writeups-with-graphs rejected for the usual unspecified reasons. As the Finn put it, “You wanna download, you know the access code already.”

  • High Impact Art: Smashed Glass Coaster

    High Impact Art: Smashed Glass Coaster

    Given a few pounds of smashed tempered glass:

    NHR Crash - tempered glass
    NHR Crash – tempered glass

    Lay some pieces atop an acetate sheet (to prevent scratching) on the scanner, grab the whole thing, then isolate an interesting chunk:

    Smashed Glass - dark - piece 1
    Smashed Glass – dark – piece 1

    Next time: flip the image left-to-right to match the glass piece as seen from the top, because the scanner was looking at the bottom.

    The weird purple background started as black, but blowing out the contrast while ignoring the color mis-correction makes the next step easier.

    Trace around the perimeter with Scissors Select, clean up the result in Quick Mask mode, expand the selection by a few pixels to improve clearance, then turn it into a two-color image mask:

    Smashed Glass - piece 1 - outline
    Smashed Glass – piece 1 – outline

    Import the mask into Lightburn, trace it into vector paths (which is trivially easy and accurate given such a high-contrast image), then cut a chipboard prototype to make sure it fits:

    Smashed Glass - piece 1 - acrylic mount
    Smashed Glass – piece 1 – acrylic mount

    Clean up any misfits, test as needed, cut the inner shape and outer perimeter from 1.5 mm black acrylic, cut just the outer perimeter from 3 mm clear acrylic. Put the piece of black acrylic matching the glass shape into the scrap box.

    Mix up a few milliliters of clear pourable epoxy, butter up the clear acrylic, lay the black acrylic on top, line up the edges, then gently place the shattered glass into the cutout:

    Smashed Glass - piece 1 - acrylic top
    Smashed Glass – piece 1 – acrylic top

    Next time: apply gentle pressure, perhaps through a flexy sheet, to ensure the entire glass surface contacts the epoxy layer while squeezing out the bubbles. This will surely skate the glass across the acrylic, so don’t leave it unsupervised.

    The relatively clear areas show where epoxy eased its way into the cracks between the granules; there is no correlation between the air bubbles and unfilled cracks. The epoxy had the viscosity of warm honey and I didn’t expect it to flow so easily, but it doesn’t affect the outcome.

    Wait for a day, no matter how hard that may seem, for the epoxy to cure. Leave the small cup holding the remnants of the mixed epoxy nearby so you can test the cure without disturbing the Main Event.

    The bottom looks pretty much like the top:

    Smashed Glass - piece 1 - acrylic bottom
    Smashed Glass – piece 1 – acrylic bottom

    The shattered edge reflects off the bottom of the clear acrylic, as seen through the side:

    Smashed Glass - piece 1 - acrylic side
    Smashed Glass – piece 1 – acrylic side

    Matching the perimeter to the fragment would be interesting, despite my low-vertex-polygon fixation.

    It could become a paperweight or a (shot glass) coaster.

  • High Impact Art(ifact)

    High Impact Art(ifact)

    At first we thought a mighty crunch in the morning meant the trash collection truck had dropped a garbage bin from a great height, but the sound of sirens and a myriad flashing lights revealed the true cause in our neighbor’s front yard:

    NHR Crash - frontal view
    NHR Crash – frontal view

    The extent of the damage was more apparent from the road side:

    NHR Crash - passenger side
    NHR Crash – passenger side

    Another one that ain’t gonna buff right out.

    The driver was walking around uninjured and the ambulance left quietly.

    A day later, the trajectory became apparent:

    NHR Crash - trajectory
    NHR Crash – trajectory

    The right side barely kissed the tree on the right, but the front wheel hooked the utility pole (that’s the new pole in the picture), snapped it off at ground level in addition to the usual break maybe ten feet up, and bounced a piece off the other tree:

    NHR Crash - utility pole
    NHR Crash – utility pole

    I didn’t know you could shatter a cast aluminum alloy wheel, but the missing half of the outer face was lying amid the rather scrambled stone wall along driveway.

    We’re reasonably sure we know the cause. Feel free to draw your own conclusions.

    After the flatbed hauled away the car and everybody left, I harvested a few pounds of interesting debris from the lawn:

    NHR Crash - tempered glass
    NHR Crash – tempered glass

    It’s tempered glass from the driver-side windows, shattered into small chunks and barely hanging together in those sheets. Laminated windshield glass is entirely different stuff.

    The smaller chunks glitter like jewels:

    NHR Crash - tempered glass fragments
    NHR Crash – tempered glass fragments

    Obviously, the window had a bit of tint.

    The smallest chunk, seen from its flat surface, shows the cuboid fragments:

    NHR Crash - tempered glass fragment - front
    NHR Crash – tempered glass fragment – front

    A side view shows more complexity:

    NHR Crash - tempered glass fragment - side
    NHR Crash – tempered glass fragment – side

    Tempering prevents a glass sheet from shattering into long knife-blade shards. Although the edges of the fragments are not keen, we are dealing with broken glass: they are sharp.

    How sharp? They make glass knives for slicing eyes and cells.

    Broken tempered glass also sheds razor-edged flakes perfectly shaped to penetrate bike tires, although most roadside glass comes from ordinary beverage bottles. The tiniest flakes can make a mess of your eyes, so exercise at least some rudimentary shop safety practices.

    Those slabs ought to be good for something, even if they fall apart at the slightest touch …