Ed Nisley's Blog: Shop notes, electronics, firmware, machinery, 3D printing, laser cuttery, and curiosities. Contents: 100% human thinking, 0% AI slop.
While replacing the rear derailleur on Mary’s Tour Easy, I rediscovered that I have two different cable sizes in my stash: large brake cables and small derailleur cables.
The large ferrules are 0.235 inches in diameter, the smaller 0.187 inches. The brazed-on cable-stop sockets are obviously sized for the larger ferrules, which makes perfect sense.
If you put a small ferrule in a large stop, it tends to cant whichever way the cable pulls it. That results in the cable sawing into the edge of the ferrule… and that results in excess friction and sometimes a broken cable.
In the past I’ve snipped out little brass shimstock rectangles, wrapped them around mandrels, and generally spent a lot of time fiddling around. This time I remembered to rummage in my collection of brass tubing cutoffs, which yielded a pair of very-nearly-perfect slip fit pieces that neatly adapted the small ferrules to the large stops.
Rear shift cable with modified ferrules
Life is good…
I have no idea what the cables look like on weight-weenie exotic-frame bikes. For sure, this isn’t a trick for hydraulic disk brakes.
Incidentally, the cable housing length worked out to 130 mm. Neither of the charts in the SRAM X.7 instructions matched the TE’s butt end; the seat stay angle is halfway between what’s normal for diamond-frame bikes. So we picked a reasonable length and it seems to be OK.
The radio on Mary’s bike has been misbehaving over the last few months: the PTT button on the handlebars occasionally had no effect. Debugging this sort of intermittent problem is quite difficult, as it would sometimes fail and repair itself before we could get stopped in a safe place where I could poke around in the wiring.
After months of this nonsense, I narrowed the failure down to the short cable from the HT’s mic jack to the interface board: by positioning the cable just so, the radio would work fine for days or weeks at a time. I taped the thing in position and all was well, at least for a few days or weeks at a time.
These two pictures show what the interface looked like back in 2001 when I put it together (modified from another version I did in 1997!) and what it looks like today. The most significant change is in the plugs connecting the whole affair to the HT: a CNC-machined plate holds them perfectly parallel at the proper spacing and an epoxy-putty turd fuses them into a rigid mass. More on that sub-project tomorrow…
Loose plugs, it turns out, vibrate the HT’s jacks right off the circuit board in short order and those jacks are a major pain to replace. Ask me how I know…
The wire break seemed to be precisely where the mic cable exits the epoxy turd. You’d expect a fatigue fracture to occur at that spot, so I wasn’t particularly surprised, although I was amazed that the thing hadn’t failed completely over the months I spend fiddling with it. I finally resolved to fix this once and for all, which meant either flaying the cable and patching the wire in situ or rebuilding the whole connector assembly. Either choice requires enough fiddly work to discourage even me.
Sooo, disconnect everything & haul it to the Basement Laboratory, Electronics Workbench Division…
Before cutting into the cable, I measured the mic voltage on the PCB and tried to make the thing fail on the bench. The HT (an ancient ICOM IC-Z1A) normally presents 3.5 V DC on the mic wire and the external PTT switch pulls it to ground through a 22 kΩ (or 33 kΩ or thereabouts) resistor. The mic audio is a small AC signal riding a volt or so of DC bias with the PTT active.
The wire measured maybe 0.25 volts and the PTT dragged it flat dead to ground. Yup, through that honkin’ big resistor. Well, maybe the last conductor in that mic wire had finally broken, right there on the bench?
Measured from the 2.5 mm plug tip conductor (tip = mic, ring = 3.5 V DC, sleeve = mic common) to the PCB pad on the PC, the mic wire stubbornly read 0.0 Ω, regardless of any wiggling & jiggling I applied to the cable. But no voltage got through from the radio to the board…
Sticking a bare 2.5 mm plug into the HT mic jack produced a steady 3.5 V on the tip lug. Reinstalling my epoxy-turd plug assembly produced either 0.25 or 3.5 V, depending on whether I twisted the thing this way or that way.
Ah-ha! Gotcha!
Pulled out my lifetime supply of Caig DeoxIT Red, applied a minute drop to the end of the mic plug, rammed it home & yanked it out several times, wiped off the residue, and the PTT now works perfectly. Did the same thing to the adjacent speaker plug, just on general principles, and I suspect that’ll be all good, too.
Diagnosis: oxidation or accumulated crud on the mic jack inside the radio.
Now, to try it out on the bike and see how long this fix lasts. Anything will work fine on the bench, but very few things survive for long on a bicycle.
Memo to Self: It’s always the connectors. Unless it’s the wires.
Here’s the schematic, just in case you’re wondering. I wouldn’t do it this way today, but that’s because I’ve learned a bit over the last decade or so…
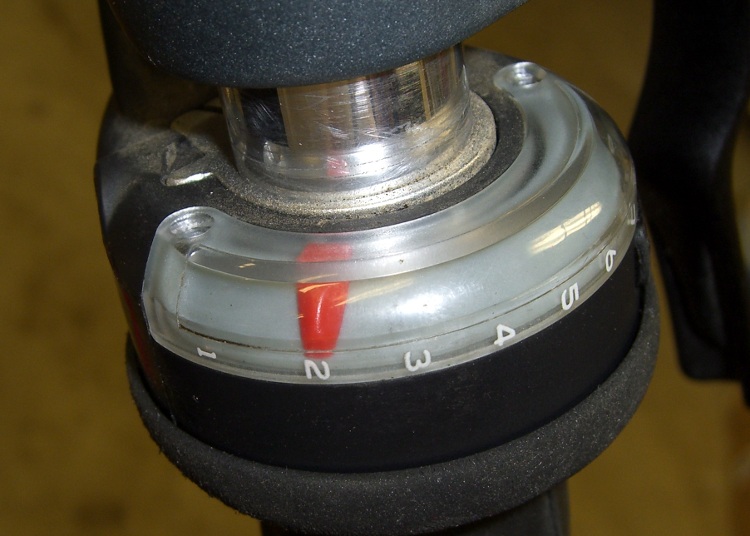
The little red pointer inside my Tour Easy’s rear SRAM Grip-Shift broke. Back in the old days, this wouldn’t be a problem, as we used friction shifters on the downtube (as we rode to school, uphill, in the snow, both ways) and knew by feel which gear was engaged. But that was then, this is now, and fixing things is what I do anyway.
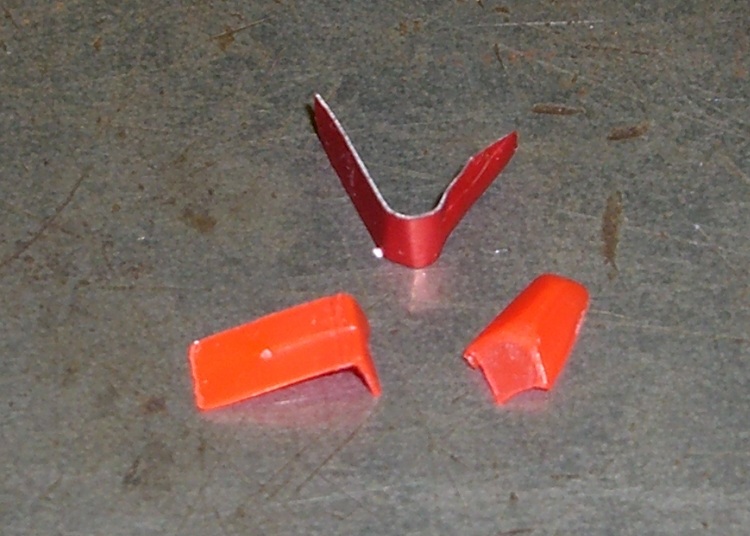
The pointer turned out to be a thin plastic strip, molded into an L with a domed arch over the pointy end. It simply rests in a slot in the shifter mechanism, held in place by the transparent cover (which, mercifully, came off without dismantling the bike or even removing the cable).
I made a similar replacement from thin red-anodized aluminum, but that didn’t work out at all. The mechanism snaps from one gear to the next at roughly the speed of heat, accelerating the pointer so rapidly that the aluminum deformed. Score one for plastic!
Actually, I made two aluminum pointers. Prototype One vanished into the Sargasso heap in front of the Solvents & Lubricants Shelves at the first upshift; that’s when I discovered just how much snap that shifter applies to the pointer. Made another one, installed the cover, and then discovered it wasn’t going to work.
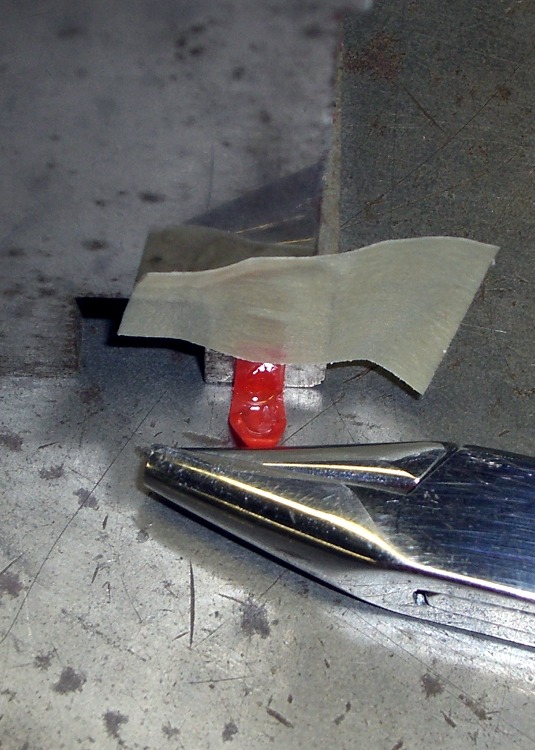
So I applied some Plastruct solvent adhesive to the broken plastic bits, lined the parts up on my crusty surface plate, applied a bit of gentle pressure overnight, and in the morning had a like-new pointer. It installed just fine and works like the original.
Solvent-bonded plastic is supposed to be just about as strong as the original material. We’ll see just how long this repair lasts…
Pop Quiz: Do you know the first four derivatives of position w.r.t. time?
Answer: Velocity, acceleration, jerk, and snap. You could look it up…
Update: Alas, the repair lasted only about two weeks before failing at the same spot. Some deep rummaging produced a similar (but more thoroughly dead) SRAM shifter. Turns out the pointers are similar, so I salvaged the older one. Ya gotta have stuff… and remember it, too, which is becoming something of a challenge.
Mary’s shifter cable broke at the rear derailleur, causing the Avid Rollamajig to undergo spontaneous auto-disassembly. The only part we couldn’t find was the socket between the ball and the derailleur’s adjusting thimble.
Good news: my parts heap had the Rollamajig from my bike, which I’d replaced because the most recent derailleur has an integrated gadget that serves much the same purpose.
Bad news: the socket had a chunk broken out of it and I didn’t want to put a broken part on Mary’s bike.
Good news: at least I could measure the dimensions to build a new socket.
Bad news: it needs a spherical socket for what measures out to be a 6.8 mm (0.268 inch) plastic ball and that’s not one of the three ball-end mills I have in the tooling cabinet.
Good news: this isn’t a really critical high-speed / high-stress rotating joint. Pretty good will be close enough.
Sherline chuck in lathe chuck
Turning the part was a quick lathe job on a random hunk of what’s probably nylon.
Bad news: the nylon was a rectangular cutoff from a slab and the three-jaw chuck on my lathe has been firmly stuck for the last year. It’s resisted all the non-Armageddeon-scale techniques; I fear I must machine the damn thing off.
So I…
mounted the nylon in the Sherline 4-jaw chuck
grabbed that teeny little chuck in the lathe’s much bigger 3-jaw
converted one end of the square hunk into a cylinder
removed the small chuck
mounted the cylinder end in the 3-jaw
completed the mission
Offset roughing mill
Lacking the appropriate ball-end mill, I offset a ball-end roughing mill in the tailstock chuck so the near side was at the right radius from the lathe axis, then poked it into the end of the socket-to-be.
Which, of course, produced a not-quite-spherical dent that was a bit too shallow, so I chucked up a too-small ball mill (on the centerline) and carved out the bottom of the socket. The result was a more-or-less spherical socket of about the right depth, pretty much.
The right way to do this, and what I was going to do before I came to my senses, was turn the part on the lathe, drill the axial cable hole, then chuck it up on the Sherline CNC mill. Getting a spherical socket of exactly the right radius and depth using a too-small ball-end mill is then a simple matter of G-Code. Maybe I should write that up for my Digital Machinist column…
Yeah, you could use a ball-turning attachment, if you should happen to have one. Sue me.
Broken and new sockets
Anyhow, it all worked out OK. The new socket is slightly longer than the old one, as it’s made to fit the derailleur thimble at hand. The end around the socket is slightly thicker, too, as it seemed more meat would add more durability where it was most needed.
The Rollamajig seems to be discontinued, although some of the smaller online sources still offer it. Building one looks like a straightforward shop project to me.
Ball socket dimensions
The sketch has dimensions in inches, because I was doing this on the lathe. Our daughter measured it in metric and came out with much the same answers, so it’s all good.
I installed a Terracycle Idler on Mary’s Tour Easy when the old chain tensioner wore out. It’s significantly quieter than a double-idler tensioner, but the rear derailleur can barely handle the 11-34 sprocket / 30-42-52 chainring combination.
She likes it, that’s what counts.
Anyhow, while poking around under the bike, I noticed that the idler no longer slid left-to-right on the shaft through the bearing. The bearing itself spun fine, but the shaft… ugh, they should have used stainless steel.
The sliding motion is important, as the idler should self-adjust to the chainline during shifting. I don’t know how long this one has been jammed, but it could contribute to the noises she’s been mentioning of late and that have prompted me to embark on a major maintenance project.
Cleaned Shaft Installed
It shined up nicely with a Scotchbrite wheel in the drill press and now looks merely horrible; you can see the copper plating (wrong: see Update below) showing through. I had to hit one end of it with a medium diamond file to knock off an invisible high spot.
I added a bit of lube and reinstalled it; the bearing slides back & forth like it used to, but I have my doubts as to how long this will last. Fairly obviously, the plating is shot.
The next time it fails, I’m sure I’ll wind up trying to turn an exact 0.3125-inch diameter stainless-steel shaft with a polished surface…
Oh, and the three orange retro-reflective strips? The idler turns backwards because it’s on the return side of the chain: it’s rather disconcerting and I figured it’d be fun to highlight it.
Update: The folks at Terracycle say it’s plated zinc over a brass bushing… which (Ah-ha!) explains the corrosion.
The zinc forms an anode against everything else on the bike; nothing is more anodic than zinc. Because the plating has no volume, it turns into a Fizzy at the merest sight of the usual road salt around here.
Unplated brass would be better: more volume, cathodic against steel, anodic but pretty close to stainless, just as slippery. Might tend to wear against the inner bearing race, but I’d expect it to be at least as durable as the plating.
Worn Terracycle Idler shaft
Here’s a pic of the shaft from another Terracycle Idler I had on my TE for a while. While it’s not corroded, it’s worn through to the brass underneath. So maybe the plating isn’t buying much, anyway.
I spent some quality one-on-one shop time with a random hunk o’ stainless hex rod, came up with a good-looking 0.304-inch OD (a nasty bit of overshoot, but I haven’t done any lathe filing in recent memory and forgot how fast it removes metal), and verified that the race will cock-and-jam rather than sliding nicely.
The Terracycle folks will send a replacement shaft; they’re good folks who build quality stuff and stand by their products. I’m obviously abusing the poor thing…
Update: The stainless shaft arrived and is sized for the 6 mm bolt they’re using in new production. When we discussed this, I said it’d be no big deal for me to adapt it to the existing 5 mm bolt. A length of heat-shrink tubing does the deed, as it’s rigidly held on both ends. A dab of Loctite, a dot of oil, and it’s back in service. We’ll see what happens after a few months of riding under my regime of benign neglect.
Old brass shaft, new stainless steel shaft, 5 mm bolt with heatshrink
I fire up the Token Windows Laptop more or less monthly, to download data from our gaggle of Onset Computer Hobo dataloggers. As a result, the laptop gets broadsided with Windows updates from the Mother Ship and, although I look at ’em before installation to see wassup, I don’t really remember any particular update from month to month.
It seems that, in order to solve the really-disable-Autorun-dammit problem, the patch described in KB967715 must update a registry entry that’s nailed down by some other program. As a result, the patch either doesn’t install, installs-but-fails-quietly, or installs-but-fails-loudly.
It eventually percolated to the front of my dim consciousness that I’d seen all of those outcomes over the last few months…
A bit of trawling turned up the usual collection of uninformed blather, plus what seems to be the Definitive Answer direct from the Mother Ship. Go there for the details.
Update 967715 may be reoffered if the HonorAutorunSetting registry setting that is described in this article is not added to the registry hive. This issue may occur if some other program that is installed on the computer blocks the update from writing the registry entry. Such software may block the update during the installation of the update or may remove the registry entry after the computer is restarted.
(“Registry hive”? WTF?)
Basically, you download the patch as an executable file, save it somewhere convenient, reboot in Safe Mode (hold F8 down as Windows starts up, then pick Safe Mode from the menu), clickety-click on the patch program, and give it permission to have its way with your PC.
So far, it’s all good. Maybe I won’t have to remember this for another month…
Memo to Self: if all else fails, MS doesn’t charge for security-related patch assistance phone support.
The thumb roller fell off my digital caliper in the heat of a project, forcing me to deploy a hot backup from the upstairs desk.
This looks like a clear-cut case of underdesign, because it broke exactly where you’d expect: at the midpoint of the arch. Having my thumb right over the spot marked X, though, meant that I had all the pieces and could, at least in principle, glue everything back together.
Glued and clamped
As with all repairs involving adhesives, the real problem is clamping the parts together while the glue cures. I clamped a stack of random plastic sheets to the back of the case to establish a plane surface behind the mount, with a small steel shim to prevent the top sheet from becoming one with the repair.
The roller shaft was about the same size as a #33 drill and the opening was about 110 mils. Some 3/32″ (actually about 96 mils) rectangular telescoping brass tubing was about the right size & shape to hold the opening in alignment. Another length of tubing kept the broken part from sliding to the left.
A dab of solvent glue (I still use Plastruct, but it’s not like it used to be before it became less toxic) on both pieces, line ’em up, apply a clamp to hold it in place, and let it cure overnight.
I have no confidence that this will stay together for very long, so I’ll probably be forced to mill a little replacement mounting doodad.
Ought to be good for a few hours of quality shop time…
Memo to Self: Don’t run the slide off the end of the body, because that rubber boot is an absolute mumble to put back in place.