The Smell of Molten Projects in the Morning

Ed Nisley's Blog: Shop notes, electronics, firmware, machinery, 3D printing, laser cuttery, and curiosities. Contents: 100% human thinking, 0% AI slop.

Category: Machine Shop

Mechanical widgetry

  • Tour Easy: Rear Fender Bracket Installed

    Tour Easy: Rear Fender Bracket Installed

    A rainy day finally produced an opportunity to install the rear fender bracket on my bike:

    Tour Easy Rear Fender Bracket - improved
    Tour Easy Rear Fender Bracket – improved

    It’s actually another iteration, tweaked to hold the fender snugly against the bracket, because it’s tucked in a location where I can’t measure anything.

    The brake noodle isn’t connected yet, but it has plenty of room in front of the fender block.

  • Felco C7 Cable Cutter: Spring Repair

    Felco C7 Cable Cutter: Spring Repair

    The back of the Pliers & Cutters drawer produced an ancient Felco C7 Cable Cutter minus its spring:

    Felco C7 cutter - missing spring pin
    Felco C7 cutter – missing spring pin

    That’s an M4 screw serving as a size test for the hole where the other pin used to be.

    Surprisingly, Felco still exists, still makes the C7 Cable Cutter, and actually sells a replacement spring as part number C7/10. Unfortunately, their online sales apparatus and cart seem broken: I put the spring in the cart, but found no way to pay for it. Worryingly, the usual Terms & Conditions link produced a modal dialog with one word: TEST.

    So I got a spring (part number 5/11, available only as a pair in kit 5/91) for a Felco C3 cutter (no, the numbers do not match) from Amazon. Later I found a sketchy seller offering a sketchy C7/10 spring that might fit correctly or could be total trash.

    Felco swaged the original spring pins into the handle, a manufacturing technique I certainly cannot duplicate, but an M3 screw will just barely fit inside a 4 mm stud, so I made some measurements:

    Felco replacement spring pin - dimension doodle
    Felco replacement spring pin – dimension doodle

    Fitting action to words:

    Felco C7 cutter - replacement spring pin
    Felco C7 cutter – replacement spring pin

    That started as a 1/4 inch rod of no particular provenance and is reasonably close to the actual dimensions.

    The spigot on the screw end is threaded M3 and is just barely shorter than the thickness of the handle, so the button-head screw can pull it snug:

    Felco C7 cutter - button screw
    Felco C7 cutter – button screw

    And then the spring just snapped into place:

    Felco C7 cutter - spring installed
    Felco C7 cutter – spring installed

    It it obviously grossly excessively too long, but that really doesn’t matter for the number of power-on hours it’s likely to see during my administration. In truth, it feels pretty good in the hand after releasing the latch and having it expand smoothly.

    If I ever run across a C7/10 spring, it’ll be an easy swap.

  • Sticky Trap Screen Frames

    Sticky Trap Screen Frames

    The objective being to reduce the number of onion maggots in Mary’s Vassar Farm plot without chemical agents, I conjured sticky trap screen frames from the vasty digital deep:

    Sticky Trap - first production run
    Sticky Trap – first production run

    Each one contains half a sheet of yellow sticky plastic, which is easy enough to cut before peeling off the protective covering sheets. The cage is half-inch galvanized hardware cloth snipped with hardened diagonal cutters. A bead of acrylic adhesive around the base holds the cage in place

    Although you can deploy sticky sheets without cages, they tend to attract and affix beneficial critters: butterflies, small birds, furry critters, toads, gardeners, and the like. We don’t know how effective the cages will be, but they seemed better than nothing.

    They mount on ski poles cut in half:

    Sticky Trap - ski pole installed
    Sticky Trap – ski pole installed

    And on fence posts around the perimeter:

    Sticky Trap - angle bracket installed
    Sticky Trap – angle bracket installed

    To my untrained eye, some of those doomed critters are, indeed, onion maggot flies. The rest seem to be gnats and other nuisances, so IMO we’re applying population pressure in the right direction.

    Each base-and-cap frame takes about three hours to print, so I did them one at a time over the course of a few days while applying continuous product improvement.

    The sheets rest on small V blocks intended to keep them centered within the cage:

    Sticky Sheet Cage - angle bracket - solid model
    Sticky Sheet Cage – angle bracket – solid model

    The ski pole attachment must build with the cap on top, but it bridges well enough for the purpose:

    Sticky Sheet Cage - ski pole - solid model
    Sticky Sheet Cage – ski pole – solid model

    The overhanging hooks on the blocks (just barely) engage the grid to keep the lid in place, while remaining short enough to not droop too badly. You could probably delete the hooks from the bottom plate, but they align the cage while the adhesive cures.

    The sheets tend to bend in the middle, so I’ll stick a thin slat or two vertically to keep them straight.

    The OpenSCAD source code as a GitHub Gist:

    // Sticky Sheet Cage
    // Ed Nisley KE4ZNU May 2021
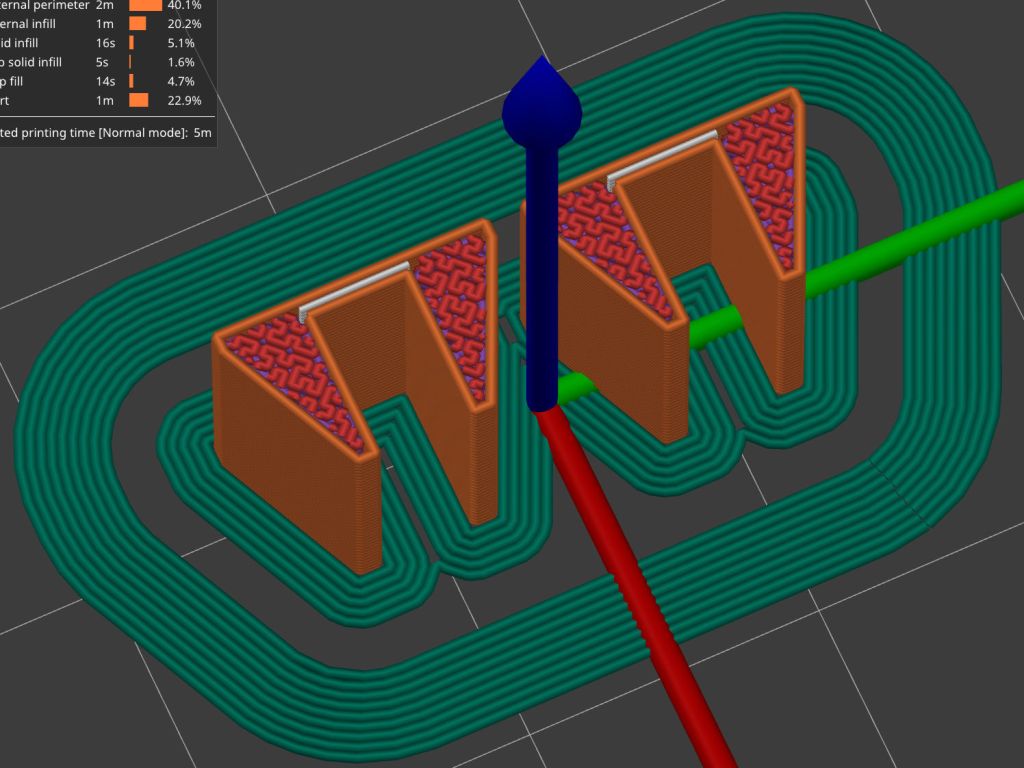
    Layout = "Build"; // [Build, Show, Cap, Attachment]
    Bracket = "Ski"; // [Angle, Ski, Post]
    //- Extrusion parameters must match reality!
    /* [Hidden] */
    ThreadThick = 0.25;
    ThreadWidth = 0.40;
    HoleWindage = 0.2;
    Protrusion = 0.1; // make holes end cleanly
    inch = 25.4;
    ID = 0;
    OD = 1;
    LENGTH = 2;
    function IntegerMultiple(Size,Unit) = Unit * ceil(Size / Unit);
    //———————-
    // Dimensions
    Sheet = [1,100,150]; // sticky sheet
    Grid = 0.5*inch;
    Cage = [2*Grid + 5.0, 8*Grid + 5.0, 12*Grid + 2.0]; // grid wire cage bent around sheet
    CageRad = 2.5; // wire bending radius
    CageThick = 2.0; // grid thickness
    WallThick = 3.0; // min wall and bottom thickness
    Recess = 5.0; // inset to capture cage edge
    Plate = [Cage.x,Cage.y,Recess] + [2*WallThick,2*WallThick,WallThick];
    PlateRad = 5.0;
    SkiPole = [20.0,20.0 + 2*WallThick,50];
    AnglePlate = [30,30,50];
    ScrewClear = 5.0;
    BuildGap = 5.0;
    //———————-
    // Useful routines
    module PolyCyl(Dia,Height,ForceSides=0) { // based on nophead's polyholes
    Sides = (ForceSides != 0) ? ForceSides : (ceil(Dia) + 2);
    FixDia = Dia / cos(180/Sides);
    cylinder(r=(FixDia + HoleWindage)/2,
    h=Height,
    $fn=Sides);
    }
    //———————-
    // Pieces
    module Cap() {
    union() {
    difference() {
    hull()
    for (i=[-1,1], j=[-1,1])
    translate([i*(Plate.x/2 – PlateRad),j*(Plate.y/2 – PlateRad),0])
    cylinder(r=PlateRad,h=Plate.z,$fn=12);
    translate([0,0,Plate.z – Recess])
    hull()
    for (i=[-1,1], j=[-1,1])
    translate([i*(Cage.x/2 – CageRad),j*(Cage.y/2 – CageRad),0])
    cylinder(r=CageRad,h=Plate.z,$fn=12);
    }
    difference() {
    Strut = Cage.x – 2*CageThick;
    Latch = [Cage.x,WallThick,0.75*Plate.z];
    union() {
    for (j=[-1,1])
    translate([0,j*2.5*Grid,Plate.z])
    cube([Strut,WallThick,2*Plate.z],center=true);
    for (j=[-1,1])
    translate([0,j*2.5*Grid,2*Plate.z – Latch.z/2])
    cube(Latch,center=true);
    }
    translate([0,0,2*Plate.z + (Cage.z – Sheet.z)/4])
    rotate([0,45,0])
    cube([Strut/sqrt(2),Plate.y,Strut/sqrt(2)],center=true);
    }
    }
    }
    module Attachment() {
    if (Bracket == "Angle") {
    translate([0,Plate.y/2,0])
    rotate(45)
    difference() {
    union() {
    cube(AnglePlate,center=false);
    rotate(-45)
    translate([0,WallThick,Plate.z/2])
    cube([Plate.x – 2*PlateRad,4*WallThick,Plate.z],center=true);
    }
    translate([WallThick,WallThick,-Protrusion])
    cube(AnglePlate + [0,0,2*Protrusion],center=false);
    translate([AnglePlate.x/2,-Protrusion,2*AnglePlate.z/3])
    rotate([-90,0,0])
    PolyCyl(ScrewClear,2*AnglePlate.x,6);
    translate([-Protrusion,AnglePlate.x/2,1*AnglePlate.z/3])
    rotate([90,0,90])
    PolyCyl(ScrewClear,2*AnglePlate.x,6);
    }
    }
    else if (Bracket == "Ski") {
    translate([0,Plate.y/2 + SkiPole[OD]/2,0])
    difference() {
    union() {
    PolyCyl(SkiPole[OD],SkiPole[LENGTH],24);
    translate([0,-3*WallThick,Plate.z/2])
    cube([Plate.x – 2*PlateRad,4*WallThick,Plate.z],center=true);
    }
    translate([0,0,-2*WallThick])
    PolyCyl(SkiPole[ID],SkiPole[LENGTH],24);
    }
    }
    }
    //———————-
    // Build it
    if (Layout == "Cap")
    Cap();
    if (Layout == "Attachment") {
    Attachment();
    }
    if (Layout == "Show") {
    translate([0,0,Sheet.z/2 + Plate.z])
    color("Yellow")
    cube(Sheet,center=true);
    Cap();
    Attachment();
    translate([0,0,Sheet.z + 2*Plate.z])
    rotate([180,0,0])
    Cap();
    }
    if (Layout == "Build") {
    translate([-(Plate.x/2 + BuildGap),0,0]) {
    Cap();
    Attachment();
    }
    translate([(Plate.x/2 + BuildGap),0,0])
    Cap();
    }

  • Deer Fence Hangers

    Deer Fence Hangers

    For what should be obvious reasons, we armored Mary’s “kitchen garden” with buried concrete blocks and deer fence. I secured the fence to 7 foot plastic-coated steel-core posts strapped to shorter stakes supporting the lower wire fence, using cable ties we both knew wouldn’t survive exposure to the sun.

    As part of the spring garden prep, I summoned proper supports from the vasty digital deep:

    Deer Fence Hanger - Build view
    Deer Fence Hanger – Build view

    The general idea is to plunk one atop each post and tangle wrap the netting through the hooks, thusly:

    Deer Fence Hanger - installed
    Deer Fence Hanger – installed

    The garden looks like we killed an entire chess set and impaled their carcasses as a warning to others of their kind, but the fence now hangs neatly from the top of the posts rather than drooping sadly.

    Each one of those things takes nigh onto two hours to emerge from the M2, so I printed them one by one over the course of a few days while making continuous product improvements.

    The “natural” PETG isn’t UV stabilized, either, but it ought to last longer than those little bitty nylon cable ties. We shall see.

    The OpenSCAD source code as a GitHub Gist:

    // Deer Fence Hangers
    // Ed Nisley KE4ZNU May 2021
    Layout = "Show"; // [Build, Show, Cap, Hook]
    // net grid spacing
    NetOC = 55.0; // [40.0:5.0:70.0]
    // stake OD
    PoleDia = 23.0; // [20.0:30.0]
    //- Extrusion parameters must match reality!
    /* [Hidden] */
    ThreadThick = 0.25;
    ThreadWidth = 0.40;
    HoleWindage = 0.2;
    Protrusion = 0.1; // make holes end cleanly
    inch = 25.4;
    ID = 0;
    OD = 1;
    LENGTH = 2;
    function IntegerMultiple(Size,Unit) = Unit * ceil(Size / Unit);
    //———————-
    // Dimensions
    Notch = 5.0; // hook engagement
    WallThick = 3.0; // min wall and end thickness
    Shell = [PoleDia,PoleDia + 2*WallThick,NetOC + 2*Notch];
    HookBlock = [10.0,Shell.y/4,2*Notch]; // hanger inside length
    LegendBlock = [0.7*Shell.z,Shell.y/2,2*ThreadThick]; // legend size
    //———————-
    // Useful routines
    module PolyCyl(Dia,Height,ForceSides=0) { // based on nophead's polyholes
    Sides = (ForceSides != 0) ? ForceSides : (ceil(Dia) + 2);
    FixDia = Dia / cos(180/Sides);
    cylinder(r=(FixDia + HoleWindage)/2,
    h=Height,
    $fn=Sides);
    }
    //———————-
    // Pieces
    module Hook() {
    //%Cap();
    translate([Shell[OD]/2 – Protrusion,HookBlock.y/2,0])
    rotate([90,0,0])
    linear_extrude(height=HookBlock.y)
    difference() {
    scale([1,2])
    intersection() {
    circle(r=HookBlock.x);
    square(HookBlock.x,center=false);
    }
    square(Notch,center=false);
    }
    }
    module Cap() {
    difference() {
    rotate(180/6)
    PolyCyl(Shell[OD],Shell[LENGTH],6);
    translate([0,0,-WallThick])
    rotate(180/24)
    PolyCyl(Shell[ID],Shell[LENGTH],24);
    translate([-Shell[OD]/2,0,Shell[LENGTH]/2])
    rotate([0,90,0])
    cube(LegendBlock,center=true);
    }
    translate([-(Shell[OD]/2 – LegendBlock.z/2),0,Shell[LENGTH]/2])
    rotate([0,-90,0])
    resize(0.8*LegendBlock,auto=[true,true,false])
    linear_extrude(height=LegendBlock.z)
    text(text=str(NetOC," ",PoleDia),
    size=6,spacing=1.00,font="Bitstream Vera Sans:style=Bold",
    halign="center",valign="center");
    }
    module Hanger() {
    Cap();
    for (k=[0,1])
    translate([0,0,k*Shell.z])
    for (a=[-1:1])
    rotate([k*180,0,a*60])
    Hook();
    }
    //———————-
    // Build it
    if (Layout == "Cap")
    Cap();
    if (Layout == "Hook")
    Hook();
    if (Layout == "Show")
    Hanger();
    if (Layout == "Build")
    translate([0,0,Shell[LENGTH]])
    rotate([180,0,0])
    Hanger();

  • Bafang Brake Sensor Magnet Realignment

    Bafang Brake Sensor Magnet Realignment

    As mentioned earlier, the Bafang brake sensors on Mary’s Tour Easy require a magnet on the brake levers to activate the switches. They arrived with disk magnets that did not suit the levers, so I used neodymium “bar magnets”:

    Tour Easy Bafang BBS02 - brake sensor - installed
    Tour Easy Bafang BBS02 – brake sensor – installed

    That worked for a few rides, but the alignment turned out to be entirely too critical, because the magnetization is through the bar’s thin dimension, rather than along its length, making the field weakest in the direction of the switch.

    Magnetic field visualization film shows the field null along the thin edge of the bar:

    Neodymium bar magnet - edge field
    Neodymium bar magnet – edge field

    That’s a slightly shorter magnet from a different toothbrush head, cemented edgewise into a holder conjured from the vasty digital deep:

    Brake Magnet Mount - PrusaSlicer prevew
    Brake Magnet Mount – PrusaSlicer prevew

    The field is much more uniform on the flat side of the bar:

    Neodymium bar magnet - side field
    Neodymium bar magnet – side field

    Some double-sided foam tape snuggles the sensor and the magnet together on the brake lever:

    Bafang Brake Sensor - released detail
    Bafang Brake Sensor – released detail

    I coated the magnet with JB Plastic Bonder urethane adhesive in the hope of filling any gaps in its nickel coating caused while extricating it from the toothbrush head.

    The rusty screw head in the upper right positions the lever at the proper distance from the grip to suit Mary’s hand. An earlier version of the holder shows the alignment:

    Bafang Brake Sensor - released position
    Bafang Brake Sensor – released position

    The switch trips (opens) with the lever roughly parallel to the grip, again with the earlier holder:

    Bafang Brake Sensor - activated position
    Bafang Brake Sensor – activated position

    A detailed view of the gap with the lever at the tripped position:

    Bafang Brake Sensor - activated detail
    Bafang Brake Sensor – activated detail

    The levers have enough travel to prevent accidental trips due to light finger pressure, which turned out to be a problem with the original end-on alignment.

    The brake pads don’t quite touch the rim when the switch trips, so the motor has plenty of time to shut off before the brakes take effect. It also stops when the pedals stop turning, so we should not see any disagreement between motor and brakes as to the bike’s momentum.

    The wider base on the new mounts makes them much more stable on the levers, although I don’t like having them stick up so far. Mounting everything underneath the levers would look better, but any problems will be more obvious with everything in plain sight.

    I may affix the magnets directly to the levers with Plastic Bonder if the foam tape doesn’t live up to its reputation. Removing them would be more challenging; a shot with a small chisel should suffice.

  • Amazon Packaging: Grease Cartridge

    Amazon Packaging: Grease Cartridge

    I knew this would happen, so I made sure to not order anything that could possibly arrive at the same time:

    Grease cartridge - casual packaging
    Grease cartridge – casual packaging

    I’ll apply the grease by hand, so the fact the cartridge cannot fit into a piston-fed gun doesn’t matter:

    Grease cartridge - cap damage
    Grease cartridge – cap damage

    I recently placed one order for a BFW and another for four small bottles, all of which arrived in a single box with a thoroughly flattened air pillow strip. Fortunately, the bottles were plastic and survived unscathed, but I’m sure it got ugly in there.

    Given that one order for multiple items has arrived in three different boxes on two different days, it’s exceedingly difficult to work around Amazon’s corporate-level indifference for safe packaging.

  • Tour Easy Front Fender Bracket Replacement

    Tour Easy Front Fender Bracket Replacement

    After nearly two and a half years, this happened:

    Tour Easy front fender bracket - fracture
    Tour Easy front fender bracket – fracture

    Yup, it broke just where I expected!

    The front fender on Mary’s bike suffers a bit more stress than you might expect, as she must wheel it through high grass to her Vassar Farms garden plot and the low-hanging spray flap can snag on the taller greenery.

    Re-slicing the original model, printing the result, and installing it took about an hour:

    Tour Easy front fender bracket - installed
    Tour Easy front fender bracket – installed

    Affixing the strut with duct tape and a cable tie looks déclassé, but continues to work better than anything else I’ve tried: simple, flexible, easily readjusted, totally nonfussy.

    At least I now use black outdoor-rated double-stick foam tape, so life is increasingly good …