Ed Nisley's Blog: Shop notes, electronics, firmware, machinery, 3D printing, laser cuttery, and curiosities. Contents: 100% human thinking, 0% AI slop.
I picked up a Lenovo headset on sale and over the course of a few weeks the mic boom pivot worked itself loose, until I finally dismantled the left ear cup to see what was inside. Come to find out that the mic boom has a molded threaded section held into the cup with a simple nut and no locking mechanism at all:
Lenovo headset – OEM mic boom pivot nut
I think the metal washer was intended as a low-friction pivot atop the compliant silicone (?) washer underneath, but the net effect was that the nut unscrewed a little bit more every time the mic boom moved. By the time I got in there, the nut was completely off the threads.
The original nut left a thread or two showing, so I found a thicker replacement nut with a better grip. The obvious solution involves a dab of Loctite to jam the nut in position, but we all know that some plastics, most notably acrylic, react badly to threadlocker and tend to disintegrate. Although I considered just epoxying the nut in place, that seems so, well, permanent.
So I dutifully tested a dab of Loctite on an inconspicuous spot inside the ear cup, got no reaction at all, put a drop on the boom pivot threads, and reassembled everything:
Lenovo headset – replacement mic boom pivot nut
Alas, by the time I got back upstairs and hung the mic on the rack, the boom fell completely out of the earcup! Back in the Basement Laboratory, I dismantled the thing again and confronted this mess:
Lenovo headset- Acrylic plastic vs. threadlock
Huh. The ear cup isn’t made of the same plastic as the mic boom: one shrugs off threadlock, the other disintegrates.
That’s obvious in retrospect, eh?
The only threads that aren’t ruined lie completely within the ear cup frame, with just a stub sticking up around the wire. So I cleaned things up and did what I should have done originally: put a dab of epoxy inside the nut to bind the pivot firmly in place. A snippet of unshrunk heatshrink tubing around the wire provides a bit of strain relief:
Lenovo headset – boom pivot nut with epoxy
There’s no longer any space for the compliant washer in that stack, so we’ll see how long this lasts. The next repair will certainly venture far inside non-economical territory. I like the headphones, though.
Memo to Self: Check in an inconspicuous spot on the same material.
The replacement metal latch handle fit perfectly and works fine.
That skinny protruding arm shouldn’t break off, but now it has a metal-to-metal sliding joint that will eventually gall. With any luck, though, it’ll outlast the van… which, admittedly, that kludged repair probably would have, too.
This call from Credit Card Services lasted about a minute, but was highly informative. I pressed 1 to lower my interest rates, then …
CCS: This call is regarding an issue with your Visa and Mastercard credit card accounts. Based on changes in your credit score and repayment history over the last twelve months, you may be eligible for a lower interest rate. In order to qualify, you must have a balance on at least one card of at least $4000. Is that the case?
Me: Sure.
CCS: The interest rate on that account must average more than 12 percent. Is that the case?
Me: Sure.
CCS: I must verify your phone number. Our records show that it is [reads off number].
Me: Sure.
CCS: And your name is [reads off my formal name, which shows he doesn’t know me from Adam Smith].
Me: Sure.
CCS: What is the total balance on all your credit cards?
Me: Well, that’s hard to say.
CCS: All we need is an estimate.
Me: Let’s call it ten grand. [This is a lie. Next time, I’ll say twenty grand.]
CCS: And how many credit cards do you have?
Me: Four. [Also a lie. Next time, I’ll say eight.]
Previous Credit Card Services contestants have sworn that they do not know what number they dialed. After you pass a minimum qualification, well, suddenly they do know your number and your name. Huh. Who’d’a thunk it?
This contestant did not pass me to the CCS Level 2 Closer, the guy who attempts to tongue-wrestle victims into divulging a credit card number that he will instantly siphon money out of. We recently burned the balance in a gift card obtained for test-driving a Toyota (hey, I won’t pass up free money), so maybe I’ll feed those digits into the next call.
If I sounded more enthusiastic, I’m sure I could reach the Closer!
I used to think that a sensible person running a scam like CCS would make it a point to not re-call smartasses who jerk my reps around. Now, I’m sure the reps run on pure commission and the marginal cost of making a phone call sits right around zero, so the sensible person running CCS has nothing to lose.
Search herein for Credit Card Services (or just CCS) to find previous installments of this continuing adventure.
The title is a tip o’ the cycling helmet to Zappa:
Motorcycle Man: Well, let’s make a deal if you think that’s true
I mean, you’re the devil, so whatcha gonna do?
Devil: Wait a minute. A tinge of doubt crosses my mind
When you say that you want to make a deal with me.
The endcaps of that fan motor have a crimped-in-place aluminum disk capturing a felt washer that held oil and a circular spring that presses the spherical bronze bearing in place:
Fan motor endcap – interior
Pulling all that out reveals the bearing (tilted on its side to show the spherical outer shape):
Fan motor endcap – parts
The shaft is a scant 3/16 inch in diameter, about 0.181 instead of 0.1875 inch. I have some 3/16 inch ID cartridge bearings in the heap that are a sloppy fit on the shaft, but nothing that a wrap of 2 or 3 mil shimstock and a dab of green Loctite wouldn’t cure.
A bit of doodling suggests two of these bearing holders should fit in the endcaps, stand over the spherical bearing mounts, capture the ball bearing OD, keep dust out of the balls, and perhaps have enough compliance to let the bearings self-adjust to the right fit:
Fan Bearing Holder
The fan tries to pull the rotor out of the frame, although I think the bearings & Loctite can handle that much axial load. I must try this out on the bench and see how long it takes for the Freezer Dog to return…
It needs a trial print and some sizing adjustment, plus maybe an allowance for end play, but it’s close.
The OpenSCAD source code:
// Refrigerator Fan Bearing Support
// Ed Nisley KE4ZNU - May 2012
// Layouts
Layout = "Show"; // Show Fit Build
Gap = 5.0; // between parts in Show mode
BuildOffset = 5.0; // offset between parts on build plate
//- Extrusion parameters must match reality!
// Print with +1 shells and 3 solid layers
ThreadThick = 0.25;
ThreadWidth = 2.0 * ThreadThick;
HoleWindage = 0.2;
function IntegerMultiple(Size,Unit) = Unit * ceil(Size / Unit);
Protrusion = 0.1; // make holes end cleanly
//----------------------
// Dimensions
CapID = 32.0; // bearing endcap
CapHeight = 7.0; // ... below aluminum cap recess
SupportOD = 10.3; // spherical bearing support
SupportHeight = 3.0;
BearingOD = 12.7; // ball bearing race
BearingID = 4.68; // ... shaft dia
BearingThick = 4.0;
Ribs = 8; // number of support ribs
RibLength = 2.0; // length beyond cylinder
RibWidth = 4*ThreadWidth;
LidOD = CapID/2; // bearing retainer lid
LidThick = 2*ThreadThick;
//----------------------
// Useful routines
module PolyCyl(Dia,Height,ForceSides=0) { // based on nophead's polyholes
Sides = (ForceSides != 0) ? ForceSides : (ceil(Dia) + 2);
FixDia = Dia / cos(180/Sides);
cylinder(r=(FixDia + HoleWindage)/2,
h=Height,
$fn=Sides);
}
module ShowPegGrid(Space = 10.0,Size = 1.0) {
Range = floor(50 / Space);
for (x=[-Range:Range])
for (y=[-Range:Range])
translate([x*Space,y*Space,Size/2])
%cube(Size,center=true);
}
//-------------------
// Objects
module Retainer() {
color("Green")
difference() {
PolyCyl(LidOD,LidThick);
translate([0,0,-Protrusion])
PolyCyl(BearingID,(LidThick + 2*Protrusion),8);
}
}
module Holder() {
color("Chocolate")
difference() {
union() {
cylinder(r=(CapID - 2*RibLength)/2,h=(CapHeight + LidThick));
for (Index = [0:Ribs-1]) {
rotate(Index*360/Ribs)
translate([0,-RibWidth/2,0])
cube([CapID/2,RibWidth,CapHeight],center=false);
}
}
translate([0,0,-Protrusion])
PolyCyl(SupportOD,(CapHeight + 2*Protrusion)); // clear old support
translate([0,0,SupportHeight])
PolyCyl(BearingOD,CapHeight); // bearing pocket
translate([0,0,(SupportHeight + BearingThick)])
PolyCyl(LidOD,CapHeight); // bearing retainer
}
}
//-------------------
// Build things...
ShowPegGrid();
if (Layout == "Show") {
Holder();
translate([0,0,(CapHeight + Gap)])
Retainer();
}
if (Layout == "Fit") {
Holder();
translate([0,0,CapHeight])
Retainer();
}
if (Layout == "Build") {
translate([(CapID/2 + BuildOffset),0,0])
Holder();
translate([-(LidOD/2 + BuildOffset),0,0])
Retainer();
}
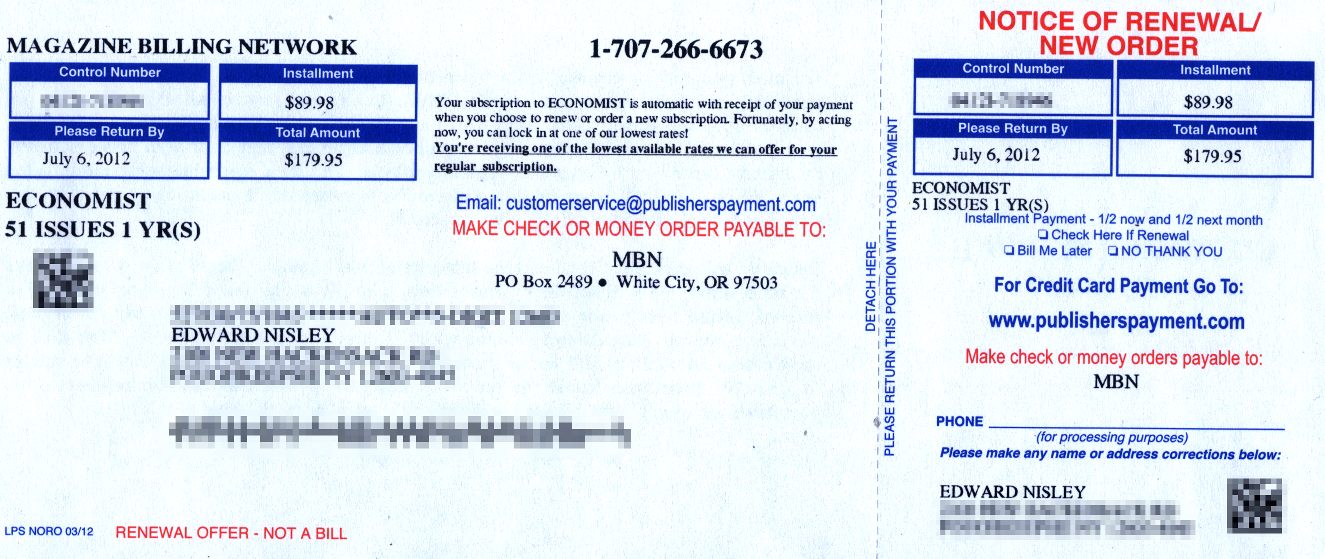
This sort of thing arrives quite often, looking very official with all its Control Numbers, three-color printing, good production values, and suchlike:
Subscription Billing Service – front
Generally, Subscription Billing Service offers subscriptions / renewals to magazines I’d never subscribe to. As it turns out, we actually subscribe to Science News and their subscription reminder arrived a few days later, which gave me the opportunity to fish the SBS form out of the recycling bin and compare prices. Turns out that the SBS “one of the lowest available rates we can offer” deal is just about exactly twice what you’d pay directly to Science News.
Huh. What a surprise.
The Fine Print on the back of the SBS form shows how they get away with this nonsense, at least given an unending supply of new suckers to exploit. You have seven days to “cancel” and you’ll pay $20 for the privilege of not having a middleman double the price:
Subscription Billing Service – back
I do wonder how they can act as an “agent” without having a “direct relationship with the publishers”. Just one of those little mysteries of the universe, somewhat like how dark matter can be everywhere and nowhere at once.
It’s a perfectly legitimate business, I suppose, but that doesn’t mean they’re not scum…
The Plumbing Treasure Chest started life as a first-aid box designed to hang on a wall. Inside the drop-down lid appears this list of Instructions For First Aid:
The plastic handle for the rear hatch snapped as I opened it to load some groceries. I slapped some tape over the opening to keep the loose parts from falling out on the way home: if you lose the parts, you’ve lost the game.
It turns out that the hatch doesn’t have an interior handle:
Sienna van hatch – interior
So we unloaded the groceries through the side doors, crawling over the middle seats. We don’t use the van all that much, but this was the height of the Vassar Farms garden setup season and we needed the back end for fenceposts, deer fencing, and suchlike.
Searching with the obvious keywords shows that this is a common problem for Toyota Sienna vans, many people experience it just a few years after buying a new van, it’s an extremely expensive dealer repair ($75-ish for the handle and $300-ish for labor half a decade ago), and that the Genuine Toyota replacement handle is made of the same plastic and tends to break the same way in short order. I ordered a metal handle from the usual eBay supplier for $20 and it should arrive shortly.
But an expedient repair is in order…
Pull the trim plates off the grab handle and dangling strap, apply a 10 mm socket to the three bolts thus exposed, work fingers under the cover near the latch near the center bottom, pull hard, and work your fingers around the cover as the dozen-or-so expanding button rivet fasterer thingies pop free with alarming sounds:
Sienna hatch – trim fasteners
The handle / latch handle assembly fits neatly between the exterior bodywork and the interior hatch frame, where it’s barely visible. The claw-like doodad sticking up from the left should pull down on the metal (!) lever just above it, which pivots on a pin and pulls upward on a cable (the round button visible near the top of the assembly) that actually does the unlatching:
broken latch
Remove the three nuts (one visible in that picture), squeeze the expanding plastic snap with pliers, and push it through the hole. Then you can loosen the bezel holding the handle assembly and the two license plate lamps:
Sienna hatch – bezel released
Disconnect the lamp cable connector, push the sealing button through the hole with a screwdriver, and then you can pull the entire bezel off the hatch. That exposes the problem:
Sienna hatch – latch parts
You can’t quite see the two screws that secure the handle assembly to the bezel, but they’re just inboard of the two bolts that hold it to the hatch. Undo those, remove the Jesus Clip from the long rod, slide it out, and extract the handle. That claw-like doodad snapped off the plastic handle:
Sienna hatch – handle
Of course, it’s an engineering plastic that shrugs off ordinary solvent glue, which you wouldn’t trust for a permanent repair anyway. The general ideal is to reposition the broken part, epoxy it in place, drill a hole through it and the handle, run a long 4-40 screw through the mess, and butter it up with more epoxy.
The first step is to put the two pieces in the right alignment and secure them well enough to permit drilling. Other folks swear by cyanoacrylates, but for a job like this I invoke the mantra The Bigger the Blob, the Better the Job. Believe it or not, the broken part stands on its own amid the epoxy around its base:
Sienna hatch – handle epoxy
Unfortunately, it tilted slightly, but not enough to matter, as the epoxy cured. I couldn’t figure out how to both hold it in position and hold it in exact alignment on the handle; maybe positioning a few clamps around it would have been better. In any event, the result was close enough.
Grab the handle in the drill press, align the claw vertically, face it with an end mill to let a twist drill start properly, and drill right down the middle:
Sienna hatch – handle drilling
Flip it over, use the same drill to align the bore, and mill a counterbore for the screw head:
Sienna hatch – handle counterboring
That may not be strictly necessary, but there’s not much clearance between the handle and the rest of the frippery in the assembly. Reduce the diameter of the screw head to fit the counterbore, do the same for the nut that’ll go on the other end:
Sienna hatch – nut shaping
Butter up the counterbore with epoxy, slide the screw in place, secure with the nut, and butter up that end, too. Reassemble everything and you can see how far off-center the claw is:
Sienna hatch – latch rebuilt
You can just barely make out the epoxy blob covering the nut below the claw, but it still engages the metal lever that will pull the cable:
Sienna hatch – latch assembly
Reassemble everything in reverse order and it works fine. I left the interior trim cover off, pending installing the metal replacement handle, and discovered that the brake lights spill plenty of light inside the van after dark.
Memo to Self: The fixtures are the hardest part of any adhesive repair. Get those right and the rest is easy!