Ed Nisley's Blog: Shop notes, electronics, firmware, machinery, 3D printing, laser cuttery, and curiosities. Contents: 100% human thinking, 0% AI slop.
Continuing the experiment with forced air, I added some of those fans. Same thermocouple arrangement as before, heatsink sitting on the bench with the fins horizontal and the fan blowing across the bench. This obviously leaves a bit to be desired as far as air flow control goes, but it’s close enough to get a general idea of what’s going on.
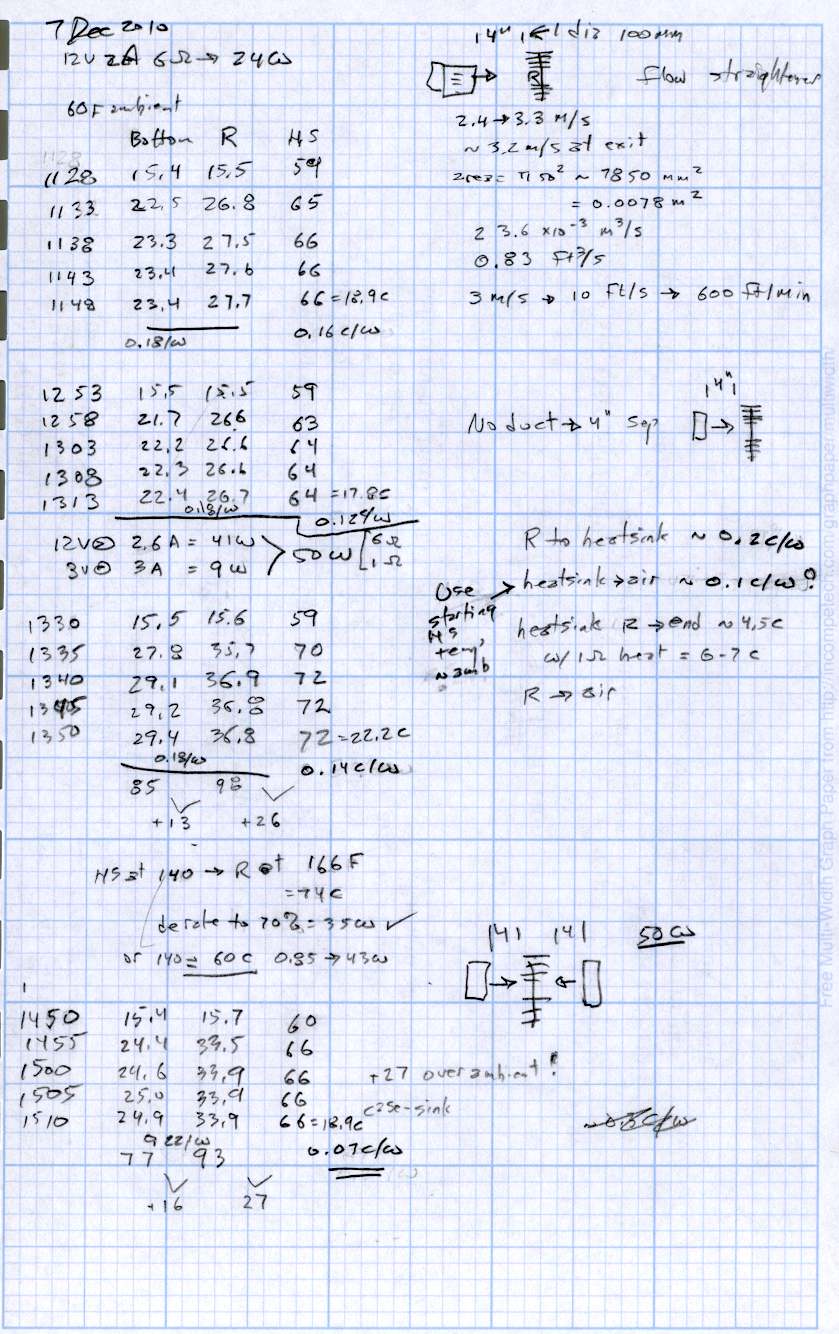
With the fan in the air flow straightener, exit about 1 diameter (4 inches, 100 mm) away from the heatsink, flow perpendicular to the heatsink body, 24 W to the 6 Ω resistor:
R = 27.7 °C
Bot = 23.4 °C
HS = 66 °F = 18.9 °C
Thermal resistance resistor to heatsink: ΘRB = 0.18 °C/W
Thermal resistance heatsink to ambient: ΘHA = 0.16 °C/W
That’s more like it!
With the bare fan sitting on the bench, exit about 1 diameter (4 inches, 100 mm) away from the heatsink, flow perpendicular to the heatsink body, 24 W to the 6 Ω resistor:
R = 26.7 °C
Bot = 22.4 °C
HS = 64 °F = 17.8 °C
Thermal resistance resistor to heatsink: ΘRB = 0.18 °C/W
Thermal resistance heatsink to ambient: ΘHA = 0.12 °C/W
The bare fan actually does a better job than the flow straightener. Just from the general feel of the breeze, I think the fan’s air flow entrains a bunch of ambient air and slams it across the entire heatsink, rather than hitting just the central area.
Encouraged by that, I doubled the power to 50 W: 2.6 A in the 6 Ω resistor = 41 W and 3 A (the limit of my bench supplies) in the 1 Ω resistor = 9 W. Because the heatsink is now getting energy from two sources, the heatsink temperatures won’t be directly comparable to the previous ones.
With the bare fan in the same position as before, 50 W dissipation:
R = 36.8 °C
Bot = 29.4 °C
HS = 72 °F = 22.2 °C
Thermal resistance resistor to heatsink: ΘRB = 0.18 °C/W
Thermal resistance heatsink to ambient: ΘHA = 0.14 °C/W
The heatsink will be 7 °C above ambient at 50 W and the resistors 4.5 °C at 25 W each above that. The resistors will be 11.5 °C = 21 °F over ambient.
Again, the average of the Bot and HS temperatures might be more meaningful.
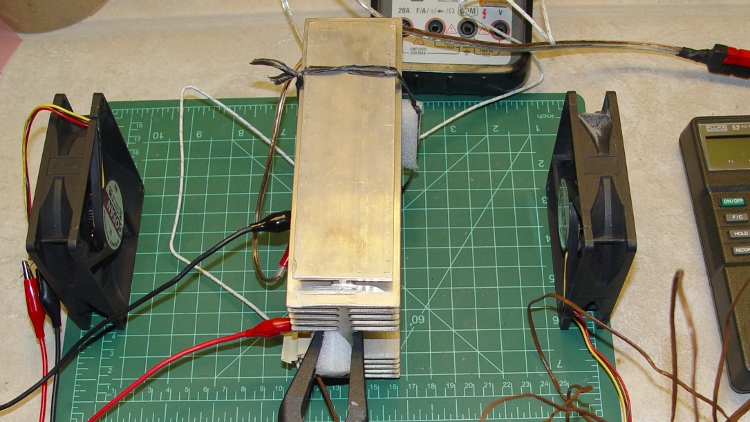
The heatsink has fins on both side, but so far I’ve been using only one fan. Putting another bare fan on the opposite side, also 1 diameter away, so the heatsink gets ambient air from sides, thusly:
Heatsink – forced air
That produces even better results:
R = 33.9 °C
Bot = 24.9 °C
HS = 66 °F = 18.9 °C
Thermal resistance resistor to heatsink: ΘRB = 0.22 °C/W
Thermal resistance heatsink to ambient: ΘHA = 0.067 °C/W
The 6 Ω resistor is dissipating 41 W, rather than the 24 W I plan to use: figuring the resistor-to-heatsink thermal coefficient at 0.2 °C/W seems OK. The heatsink-to-ambient coefficient is breathtakingly good: cooling both sides seems like it ought to cut the thermal resistance in half and it does! Call it 0.1 °C/W.
So, bottom line: with two fans and 50 W, the heatsink will be 5 °C over ambient. Dissipating 25 W in each resistor will raise them 5 °C over the heatsink and 10 °C = 18 °F above ambient.
With the box ambient at 140 °F and two fans per heatsink, the resistors should tick along under 160 °F. That’s plenty toasty, but only slightly above my rule of thumb: If you can’t hold your thumb on it, it’s too damn hot. And, heck, we’re building a heater here, right?
On the other paw: six fans?
In reality, that layer of thermal goop between the case and heatsink determines much of the resistor temperature. One fan per heatsink should be entirely adequate. I should try this with one fan blowing parallel to the fins, with the notion of putting a fan directly upstream of each heatsink or between each pair of heatsinks.
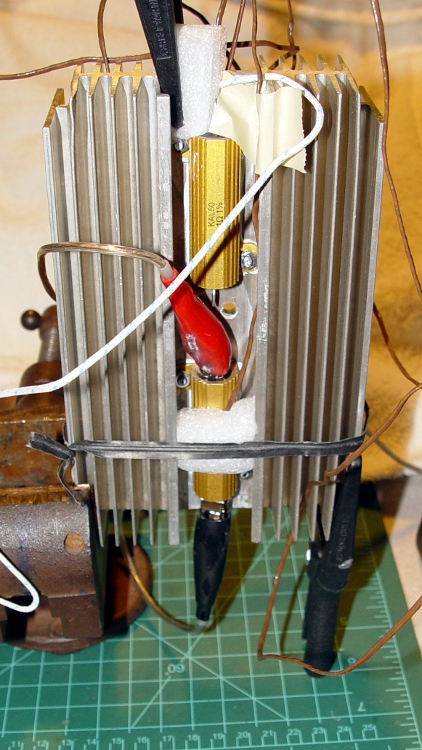
Having plugged the previous holes, I screwed down a pair of power resistors atop some heat sink compound: 6 Ω and 1 Ω. The general idea is that a stock PC power supply will dump about 50 W into the heatsink: 2 A @ 12 V = 24 W and 5 A @ 5 V = 25 W.
Thermocouples atop the 6 Ω resistor (R), on the opposite side of the heatsink just below that resistor (Bot), and at the far end of the heatsink (HS). They’re all held in place with foam blocks, in the hope that the steady-state air temperature between the foam and the resistor / heatsink will be pretty close to the temperature of the source.
Ambient in the Basement Laboratory is hovering around 60 °F = 15.6 °C, which is pretty mumble chilly. The numbers use the actual ambient for each test.
The first test powered just the 6 Ω resistor, because I wanted to find the natural convection capability of the heatsinks, which will be pretty low. Reaching steady state required a bit over an hour in each case; I recorded temperatures every ten minutes, which really chops up the day, but prevents forest fires.
Heatsink flat on its back in the worst possible orientation, atop a pair of wood blocks 35 mm off the bench:
R = 64.3 °C
Bot = 60.9 °C
HS = 133 °F = 56.1 °C
Thermal resistance resistor to heatsink: ΘRB = 0.14 °C/W
Thermal resistance heatsink to ambient: ΘHA = 1.7 °C/W
Heatsink on edge, fins horizontal, clamped in a vise a few inches off the bench:
R = 57.0 °C
Bot = 52.4 °C
HS = 121 °F = 49.4 °C
Thermal resistance resistor to heatsink: ΘRB = 0.19 °C/W
Thermal resistance heatsink to ambient: ΘHA = 1.4 °C/W
Heatsink on end, fins vertical (best orientation), same vise:
R = 51.6 °C
Bot = 46.4 °C
HS = 114 °F = 45.6 °C
Thermal resistance resistor to heatsink: ΘRB = 0.22 °C/W
Thermal resistance heatsink to ambient: ΘHA = 1.2 °C/W
All those numbers are suspect, of course, but the general trend is comforting. The heatsink temperature might be better figured as the average of the Bot and HS values, but they’re pretty close.
Figuring ΘRB = 0.2 °C/W says the resistor will be 5 °C above the heatsink, which means we’re not dealing with insanely high temperature differentials. This is a Good Thing and shows that thermal compound helps.
Figuring ΘHA = 1.5 °C/W means convection really isn’t going to work, because at 50 W the heatsink will be 75 °C above ambient. That’s much too hot, but I need forced air flow to circulate hot air inside the box, anyway, so this is something of a worst-case situation.
The heatsinks will probably be in the second configuration, with fans blowing along the horizontal fins. If the fans fail, things will get downright toasty. We need a mechanical thermal cutout switch, heatsink temperature monitoring, and fan status feedback.
However, the head puts the two 5 Ω resistors in parallel, directly across the +12 V supply: each 25 W (* see bottom) resistor dissipates 29 W. To make matters worse, the heater block is wrapped in ceramic cloth tape thermal insulation, bundled up in Kapton, and servo-controlled to something over 200 °C.
What’s wrong with that picture?
Here’s the note I put up on the Google MakerBot Operator’s group a few days ago, with slightly cleaned-up formatting:
———————–
MK5 / Thing-O-Matic Heater Problems
My TOM is on order, halfway through its 7-week leadtime. In the meantime, I’ve been reading the mailing lists and poring over the documentation. One thing stands out: a disturbing number of “my MK5 extruder stopped heating” problems.
Right up front, I’m not slagging the folks at MakerBot. I attended Botacon Zero, toured their “factory”, and ordered a Thing-O-Matic the next day. This is my contribution to tracking down what looks like a problem, ideally before my TOM runs into it. I *want* to be shown that my analysis is dead wrong!
What follows is, admittedly, a technical read, but that’s what I *do*.
Background
The heater uses two 5-ohm 25-watt panel-mount resistors in parallel across the 12 V supply to raise the thermal core to well over 200 C. Some folks run their extruders at 225 C, which seems to be near the top end of the heater’s range.
The resistors are standard items from several manufacturers. The datasheets can be downloaded from:
My back-of-the-envelope calculations suggest several problems with the heater, all of which combine to cause early failures.
1) Too much power
Putting 12 V across a 5 ohm resistor dissipates 28.8 W. Allowing for 0.5 V drop in the wiring, it’s still 26.5 W.
That exceeds the resistor’s 25 W rating, not by a whole lot, and might be OK at room temperature, but …
2) No temperature derating
The 25 W power rating applies only when mounted to the heatsink specified in the datasheet at 25 C ambient temperature. Above that temperature, the maximum allowed power decreases linearly to 2.5 W at 250 C: 0.1 W/C.
When the resistor is not mounted to a heatsink, its maximum free-air rating is 12.5 W. That limit declines by 0.044 W/C to the same 2.5 W limit at 250 C.
What this means: at 200 C *and* mounted on a heatsink, the resistors must not dissipate more than 4.7 W. The MK5 heater runs them at 28 W, six times their 200 C rating, and they’re not on a heatsink.
3) Excessive heat
The resistors will always be hotter than the thermal core: they are being used as heaters. The temperature difference depends on the “thermal resistance” of the gap between the resistor body and the core.
The MK5 resistors are dry mounted without thermal compound, so the gap consists largely of air.
I recently measured the thermal resistance of the 50 W version of these resistors on an aluminum heatsink using ThermalKote II compound in the gap. In round numbers, the thermal resistance is about 0.2 C/W: at 28 W the resistors will be 6 C hotter than the thermal core.
The default air-filled gap to the MK5 thermal core will make the resistors *much* hotter than that. With the core at 225 C, the resistors will probably heat beyond their 250 C absolute maximum operating temperature.
4) Insulation
The datasheet ratings for the resistors assume mounting on a heatsink in a given ambient temperature, so that the resistors can dump heat to the heatsink (that’s why it’s called a *sink*) and to the surrounding air. The MK5 thermal core and resistors live inside ceramic insulation and Kapton tape, specifically to prevent heat loss.
Conclusion
The resistors operate with far too much power at too high a temperature, inside a hostile environment with too much thermal resistance to the core. They will fail at a high rate because they are being operated far beyond their specifications.
Given that, the failures I’ve read here over the last few weeks aren’t
surprising. Some links:
I do not know what fraction of the MK5 extruders those messages represent. There are about 1000 members of this group, but not everybody has a MK5 extruder head. Assuming 250 MK5 heads, that’s a 2% failure rate.
The number of problem reports seem to be increasing in recent weeks, but that can be a fluke.
Observations
Depending on the room temperature, a MK5 thermal core can probably reach operating temperature with only one functional resistor, but it will take much longer than normal.
Indeed, I suspect some of the “my MK5 has difficulty extruding” problems may come from a thermal core that’s nominally at operating temperature, but with one dead resistor: the steel block is cooler on the side with the failed resistor. The thermistor reports the temperature at the block’s surface, not inside where the plastic actually melts.
It’s entirely possible that a resistor failure can lead to an extruder motor failure: too-cool plastic → difficult extrusion → high motor load → extruder motor failure. That’s a guess, but it seems reasonable.
Diagnosis
The symptoms fall into two categories, with what I think are the obvious causes:
Slow heating = one resistor failed
No heat at all = both resistors failed
To discover what’s happened, disconnect the heater power cable from the extruder controller, then measure the resistance across the wires. You should find one of three situations:
1) 2.5 ohms = both resistors good = normal condition
2) 5 ohms = one failed resistor
3) Open circuit = two failed resistors
The resistance value may vary wildly if you move the wires at the extruder head, because a failed resistor element can make intermittent contact. If you measure the resistance at the extruder controller connector end of the cable, leaving the thermal core alone, you should get more stable results.
What to do
Given that the resistors operate under such hostile conditions, I think there’s not much you can do to make them happier. Some untested ideas:
1) Use the remainder of the anti-seize thread lube as thermal compound between the resistors and the thermal core. It’ll stink something awful until the oil boils off, but ought to keep the resistors significantly cooler by improving heat transfer to the core. Standard PC CPU thermal compound (Arctic Silver, et al) deteriorates well below 225 C, so it probably won’t survive in this environment.
2) Rearrange the thermal wrap to expose the ends of the resistor leads, which will cool the resistor element end plugs and reduce the deformation causing the slug to work loose inside the aluminum shell.
3) Use thicker connecting wire, without insulation, outside the thermal wrap, to dump more heat from the resistor leads.
The last two changes will cause more heat loss from the thermal core which means the controller will turn the resistors on more often. Perhaps reducing the thermal stress on the weakest part of the resistors will delay the failures, but I don’t know.
When my TOM arrives, I’ll instrument the thermal core with a handful of thermocouples, measure what’s going on inside, try some of those ideas, and report back.
If you get there first, I’d like to know what you find!
———————–
* From above
Now, as it turns out, my TOM arrived on Christmas Eve! Given the usual holiday distractions, I’m only now getting down to construction & measurements, but one thing pops right out: contrary to what I’d assumed / read somewhere, those resistors are rated for 10 W at 25 C. Everything I wrote above applies to 25 W resistors: the situation is actually much worse: a 10 W resistor dissipating 30 W while tucked inside an insulating blanket?
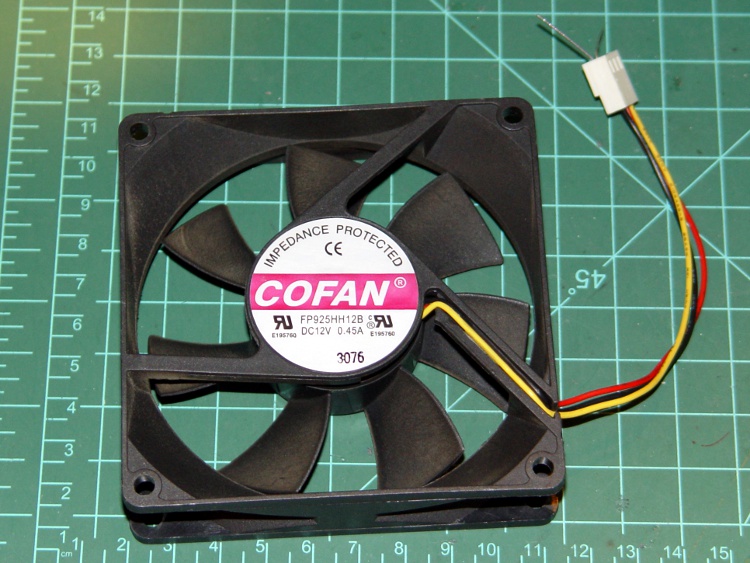
Just got a stack of surplus fans for the heatsinks I’ll probably use in the disinsector: Cofan FP925HH12B. Either these are really old or there’s a typo in the model number printed on the fan label. I’d expect it to be …9225… to indicate a 92 mm frame x 25 mm thickness. It’s close enough to get to their specs page.
Cofan axial fan
They draw 370 mA (rated 450 mA) in free air = 4.4 W. The “HH” designation means “Super High Speed” and wow are they noisy despite their 37.6 dbA spec. Fortunately, that won’t matter inside a closed box.
The label is downstream, which means the hub and bare blades are upstream. They’ll be under the shelves, so I think I can get away without guards.
The model number breakdown says that they have a “protection chip” which seems to be the thing that produces the status output. That output (yellow wire) is a square wave with a frequency twice the fan’s actual speed: 107 Hz → 6420 cycles / min → 3210 RPM. The open collector output requires a pullup resistor to +5 V. It take a while to spin up the fan enough to get a decent output waveform; don’t sample the status for maybe a second after power-on.
Putting a fan on that crude air flow straightener produces about 3.2 m/s across the exit end, which works out to 10.5 ft/s = 630 ft/min. There’s a distinct flow dent near the middle of the air column, so I suspect the baffles are too far upstream for this fan.
Making a number of barely justifiable assumptions, the output is around 1.4 m3/min = 50 ft3/min, which is close enough to the rated free air output of 1.8 m3/min = 64 ft3/min.
They will start and run at 5 V (below the 8 V minimum rating), draw 110 mA, spin at 1470 RPM, and push 1.1 m/s. For whatever that’s worth.
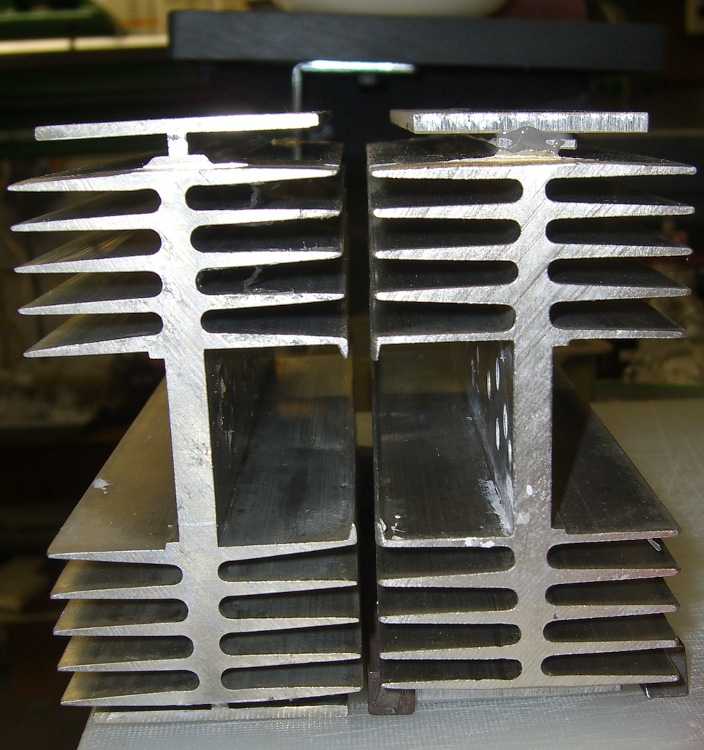
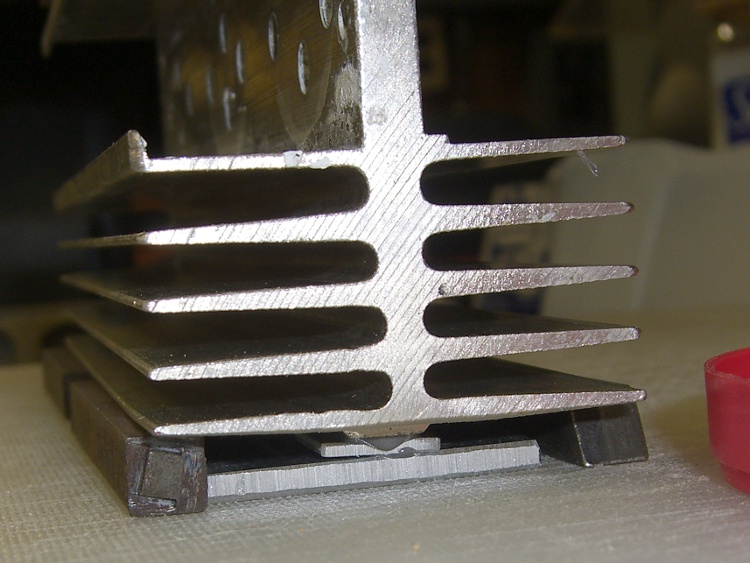
I decided to replace the sawed-off flanges on that salvaged heatsink to make all three use the same mounting arrangement, whatever that might turn out to be.
Nothing particularly fancy about it: two random chunks of aluminum sheet and two thinner strips, sanded to roughen their surfaces, and epoxied into place.
The repaired heatsink is marginally taller than its siblings, but not so anybody will ever notice, and it’s no more off-kilter than they are, either.
A quartet of 5/16-inch lathe bits provided the right spacing to hold the heatsink over its new flanges while the epoxy filled in all the gaps and irregularities. I probably should have paid a bit more attention to squaring things up, but it’s good enough for what it’ll need to do.
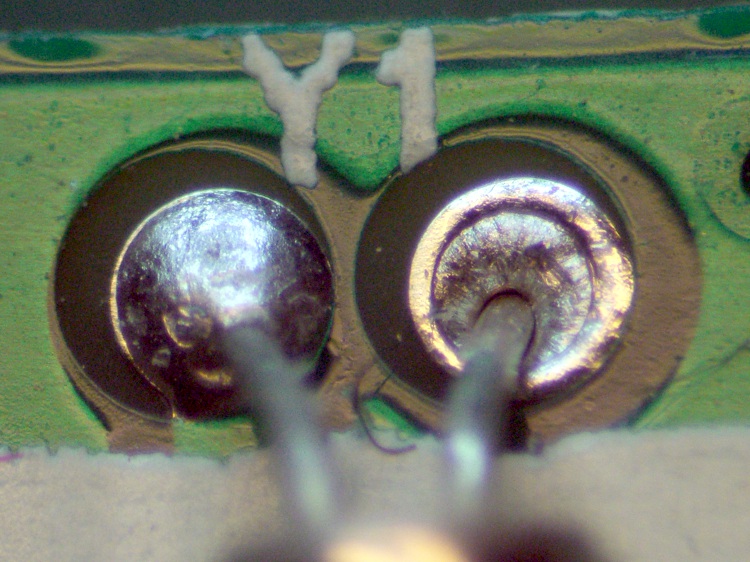
Found this inside a friend’s dead USB memory stick:
Cold solder joint in USB memory
The leads come from a teeny 12 MHz crystal. The solder blob on the other side looked just fine, but you simply can’t tell by looking.
As it turned out, the stick was dead for some other reason: the Flash memory controller chip got hot when the stick was drawing power. Resoldering all the joints had no effect, which wasn’t surprising.
I suspect a killer static discharge or some such calamity.
The big one is rated 50 W @ 25 °C ambient. Use two, derated by 50%, times three air-cooled heatsinks for 150 W of low-temperature heating. The little one is 25 W @ 25 °C.
The derating curve is linear from 100% @ 25 °C down to 10% @ 250 °C, when mounted to a square foot of flat aluminum plate: -0.40% / °C.
Assuming a max heater ambient of 150 °F = 65 °C, you can use 84% of full power. Derating by 50% isn’t all that unreasonable.
The relevant hole locations:
50 W: X=1.562 inch / 39.67 mm Y=0.844 inch / 21.44 mm
25 W: X=0.719 inch / 18.26 mm Y=0.781 inch / 19.84 mm
10 W: X=0.562 inch / 14.27 mm Y=0.625 inch / 15.88 mm
Divide those by 2.0 for from-the-center offsets, which may be more useful for manual CNC operations: zero at the resistor mounting center, then back-and-forth from there.
The mounting hole size for 25 & 50 W resistors: 0.125 inch / 3.18 mm diameter, just exactly what you want for a 4-40 mounting screw. Tap drill #43, clearance drill #32 (close fit) or #30 (loose fit).
The mounting hole size for 10 W resistors: 0.094 inch / 2.39 mm to fit a 2-56 screw. Tap drill #50 (better: #49 for 50% threads), clearance drill #43 (close) or #41 (loose).