Ed Nisley's Blog: Shop notes, electronics, firmware, machinery, 3D printing, laser cuttery, and curiosities. Contents: 100% human thinking, 0% AI slop.
Got a set of Tenergy 2600 mAh AA NiMH cells a while ago and ran some self-discharge tests.
Tenergy 8 AA NiMH Pack Self-Discharge
The three curves on the far right (two overlap pretty closely) are freshly charged. All three packs exhibit pretty much the same 1.8 Ah capacity, about 1.8 Ah or 70% of the advertised value.
I must say that Tenergy cells aren’t exactly Tier 1 quality.
The little stubby red curve on the far left is the as-received capacity. They’re not advertised as ready-to-use and, for sure, they’re not. My analysis of some RTU cells is there.
The two curves on the left of the main group, after six and seven weeks, are down to 1.4 Ah. That’s 78% of the actual fresh-charge capacity, a mere 54% of nominal.
Condensing the endpoints into a table, we have:
Pack
Charge Date
Discharge Date
Storage Time
Capacity
A
09/04/09
09/04/09
0
1.82
A
09/04/09
09/11/09
7
1.64
B
09/04/09
09/24/09
20
1.58
C
09/04/09
10/25/09
51
1.41
A
09/11/09
10/25/09
44
1.41
B
09/24/09
10/25/09
31
1.48
A picture being worth a kiloword, a quick-and-dirty graph is in order:
Tenergy AA NiMH Self-Discharge
Ignoring the first and last points, the slope is more-or-less constant at 6 mAh/day.
Call it 0.3%/day after the first week: store the cells for 50 days and you’re down 15%.
Remember, that’s measured from the actual as-charged and as-measured capacity, not the nominal as-read-about-in-the-spec-sheet capacity.
For reasons that shouldn’t require the least bit of explanation by now, I had to dismantle(*) an old 2-D-cell Maglite. The operative word here is old, because you can find plenty of instructions & pix telling you how to dismantle the newer (post-2001, evidently), cheapnified Maglites. Mine dates back to the early days.
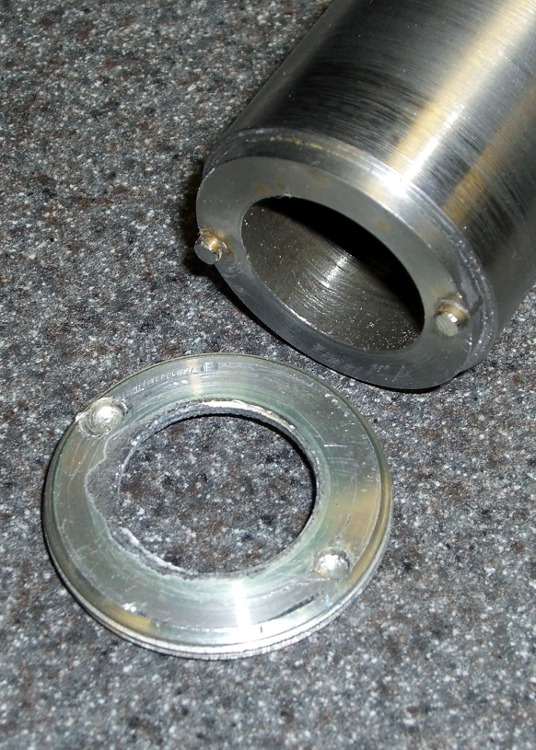
Unlike new(er) Maglites, the switch assembly in this one comes out through the front. An aluminum retaining nut holds it in place, as shown in the first picture. You’ll find directions telling you to unscrew the nut by jamming a pair of needle-nose pliers into the holes, but that’s not how it’s done.
The job calls for a pin wrench!
Measuring the dimensions is no BFD after you’ve got the damned thing apart, but I didn’t have that luxury. Given this was an American product from back in the Olde Days, I assumed everything was denominated in inches, which turned out to be close enough.
Pin Wrench Dimensions
The “Max” dimensions at the bottom are the actual ID measurements from the housing after disassembly, using telescoping gages. I made the wrench to the dimensions on the line just above and they worked fine.
Believe it or not, I found a steel cylinder in my scrap heap that was just exactly what I needed, right down to the 7/8″ bore in the middle. Not only that, it was free-machining steel. Whew!
The inner bore must clear the brass screw head sticking out of the lamp tower in the middle (which rides in a slot as part of the sliding focus mechanism). Once you’ve extricated the switch assembly, you remove that screw with a 2 mm (so much for hard inch dimensions) hex key. If you’re desperate, you can probably worry the screw out by goobering it with the aforementioned needle-nose pliers; it has an ordinary right-hand thread.
I turned the cylinder down in the lathe, then drilled the pin holes. That’s a mistake: the outside edge of the pins is exactly even with the OD of the wrench nose. If you do this, clean up the stock OD & face the ends to get a nice cylinder, drill the pin holes, then turn down the barrel clearance and nose. It need not be perfectly concentric, so stop worrying.
Pin Wrench Drill Clamping
I did the drilling using manual CNC on the Sherline mill, mostly because that’s the only way I could poke the holes in the right spots. The mill doesn’t have a lot of vertical headroom, so I clamped the wrench directly to the table and touched off the X and Y axes to put the origin in the center.
I got it all clamped down, removed the right-hand clamp to touch off on the +X side, then re-clamped it.
Drilling Pin Wrench
Center drill to fix the hole location. Drill 1/8″ about 0.250 deep: 3000 rpm, 10 ipm feed, use a little cutting lube. Do those both in sequence at each hole.
I sliced two overly long stubs from some 1/8″ drill rod with a Dremel cutoff wheel, dabbed JB Weld in the holes, and poked them in. The next morning I sliced them down to about the right length, cleaned up the ends with a file, broke the edges, and the wrench was good to go. The pin length in the drawing was what I’d have used if I could have measured the holes before taking it apart.
The pins were actually on the long side of 60 mils, just an itsy too much to keep the wrench flat on the nut. The next picture shows some gouging on one of the holes, due entirely to not engaging the wrench quite enough at first.
Pin Wrench and Maglite Retaining Nut
I thought about putting flats on the wrench, but simply grabbed it in the bench vise, swallowed it with the flashlight, engaged pins with holes, leaned into the wrench, and unscrewed the ring. It took a lot more force to get those threads turning than I expected, but the ring eventually spun out easily. Right-hand threads, of course; obvious after the fact.
Before you can remove the switch assembly, you must pry off the rubber switch cover, stick that 2 mm hex wrench down the hole thus revealed, and unscrew the setscrew ‘way down inside there. That backs the setscrew out of a recess in the housing that makes electrical contact with the negative end of the bottom D cell. Do that before you remove the ring, lest you forget.
Switch Housing and Lamp Tower Parts
Surprisingly, the blue plastic switch housing seems to be slightly soluble in potassium hydroxide. Who knew?
With the switch assembly out, you (well, I) can proceed to beat the corroded cells out by chucking the housing in the lathe (it exactly seats on the three-jaw chuck’s front face!) and ramming a fat dowel up its snout with a two-pound hammer.
Yeah, genuine Ray-O-Vac Maximum D cells: they all leak if you leave ’em in there long enough. This flashlight worked fine, right up to the point where I checked inside to see how long the cells had been in there. Oops.
I’m thinking of rebuilding it with some killer LED clusters up front; scrap the reflector, rework the switch assembly. Certainly that’d have better heatsinking than those absurd 3-watt LED bulb-like thingies.
(*) Yes, Maglite has a lifetime replacement warranty that even covers death due to battery corrosion. Now, I ask you, what’s the fun in that?
OK, this is shooting the low-hanging fish right off the barrel (or some such mixed metaphor), but why does anybody still use Internet Explorer and Windows for embedded systems?
The proximate cause is a dead Internet link, but somebody obviously didn’t take that problem into account during the design phase. I’m sure there’s a keyboard hidden inside the box, wherever the box might be, but the rest of us are left to snicker at a jammed display.
The problem resolved itself (or somebody plugged in the cable) by the time we walked past the display again.
There’s now There was a webcam[Update: dead link] watching the recently opened Walkway Over the Hudson, put on by the Dutchess County Tourism folks.
I couldn’t quite figure out where it was, though, because there aren’t any tall buildings or towers near the Walkway. The area used to be hard industrial, with plenty of smokestacks, but those days and those structures are long gone.
On a recent trip I parked the bike at the end of the chain-link fence on the north side of the bridge, eyeballed back five-and-a-half sections of fence on the south side, and spotted what I’d been missing.
The camera is a bit more than half a mile away, atop the Interfaith Towers building at 66 Washington St, on the northwest corner at Mansion Street. The Google overhead view isn’t up to date; the Walkway’s concrete decking is done and they’re tweaking some of the electrical work even as I type.
The camera’s gooseneck mount lets that loooong telephoto lens vibrate in high winds. When the webcam image looks broken up, new weather is on its way!
The picture is a crop from a larger image, with a bit of color correction and gamma tweakage.
The S.S. President Coolidge, a luxury steamship converted to a troop transport, carried my father to the Solomon Islands during World War II.
All the way across the Pacific, my father and his buddies saved their chocolate and cigarette rations, because they knew supplies would be short during the actual battles.
Long story short, the captain didn’t get a vital message about the location of the American minefield at the Espiritu Santo (my father always spelled it Espirito Santo) harbor entrance and sailed right into the channel. A pair of American mines blew the bottom out of the ship, the captain ran it aground on the beach, and all but two men escaped; some actually walked from the ship to the beach. My father said one casualty was in a card game in the bilge, but that’s likely a tall tale. The other was the ship’s an Army Artillery Captain who rescued a bunch of guys in the galley infirmary. [Update: it’s been a long time since I heard him tell the story, OK?]
Anyhow, the Coolidge took all their weapons, supplies, ammunition, and the chocolate and cigarettes to the bottom of the harbor on 26 October 1942, 67 years ago today. They were right about the subsequent ration situation, too, as the Army had to resupply the entire shipload of troops before they could get down to warfare. They completely missed the battle for Guadalcanal, an event that would have probably changed my personal history.
My father passed on his hard-won lesson:
When you go to a buffet, they’ll have the desserts set out on the right side of the table. Get a dessert first and then pick up the rest of your meal. If you don’t, there might not be any when you come back.
Words to live by. I always get a dessert first and usually wind up telling that tale, hoisting a cookie to his memory.
You can find far more information about the Coolidge using the obvious search terms; start with a good summary of the events[Update: dead link. Go there or to a comprehensive narrative.] It’s evidently a spectacular wreck-diving site. Dad was in the 172nd Regiment, 43rd Infantry Division, if that helps pin it down. His Company E comrades held a reunion every year for nigh onto half a century at my parents’ house in Hummelstown PA.
[Update: An Australian movie crew making Grave of a President about the wreck asked my father if they could film the next reunion. He agreed. They then asked if the reunion, which was always held during the last weekend of September, could happen in October, because it wasn’t convenient for them to get halfway around the world on short notice. Dad said the reunion wasn’t held for their convenience. They showed up on schedule and made my father a movie star.
If you happen to have a good copy of that film, let me know.
I haven’t seen this picture anywhere else on The Web, but it’s been hanging in my parents’ house forever. It’s a photographic enlargement of a newspaper picture and in rather crappy condition after all these years, so you can’t tell that one of those guys swarming down the side (yes, like rats leaving a sinking ship) is my father…
If you’re an alpha geek, this is how you tell time…
Absolute Geek Clock
It’s a WWVB receiver wired up to a CR123A primary lithium cell. The time display is a single red LED, driven by a low-threshold FET. Yeah, you can package it up in a cute little box (which is the picture on hackaday.com), but this is the essence of the thing.
Over the course of a minute, the LED blinks out the hour, minute, year, day-of-year, Daylight Saving Time, leap year, leap second, and some other stuff in binary-coded decimal.
The key to the format is there and the bit format is straightforward:
Long = frame marker
Medium = binary 1
Short = binary 0
You just watch the LED, catch the frame marker, decode BCD data on the fly, convert from UTC to local time, and that’s all there is to it.
Sheesh, it’s only one bit a second: anybody can handle that, right?
Truth to tell, I can hang on long enough to get the minute, but I taper off pretty quickly after that.
Tech detail…
Basically, you get the receiver and CR123 cell holder from DigiKey for maybe fifteen bucks. Wire up a FET (ZVNL110A or some such) to the receiver’s inverted-polarity output, so the LED is ON during the data bit’s active time (carrier drops 10 dB). I blobbed on a 300 ohm SMD resistor, so the total current is maybe 250 µA with the LED on. If you’re going crude, you can probably wire the LED & resistor directly to the receiver’s positive-polarity output.
A primary CR123A is good for 1500 mAh and the average current is maybe 150 µA, so the clock will run for nearly a year. The LED is pretty dim, but perfect for late-night viewing.
Reception is iffy during the day here in the Hudson Valley. At night it’s just fine. Interference from LCD panels with near-60-kHz refresh is a real problem, so it doesn’t play well near PCs.
I put the clock on a shelf where I can watch it when I wake up in the middle of the night: it knocks me out again pretty quickly.
In real life, I put this together to verify my WWVB simulator… but I might just box up a spare for the shelf, too.
Found this in a church restroom, which is pretty much a benign public environment.
If you put a pushbutton control at the usual place for a light switch and give it a light-switch affordance, then you shouldn’t be surprised when people push it.
Now, if the pushbutton happens to both turn off the light and disable the automatic light function, well, that’s hardly the user’s fault, is it?
Methinks it should be an automatic light switch with a manual override tucked inside a cover that doesn’t look at all like a pushbutton. Of course, the IR lens over the sensor would then require some up-armoring, as it’d look a lot like a button.