Ed Nisley's Blog: Shop notes, electronics, firmware, machinery, 3D printing, laser cuttery, and curiosities. Contents: 100% human thinking, 0% AI slop.
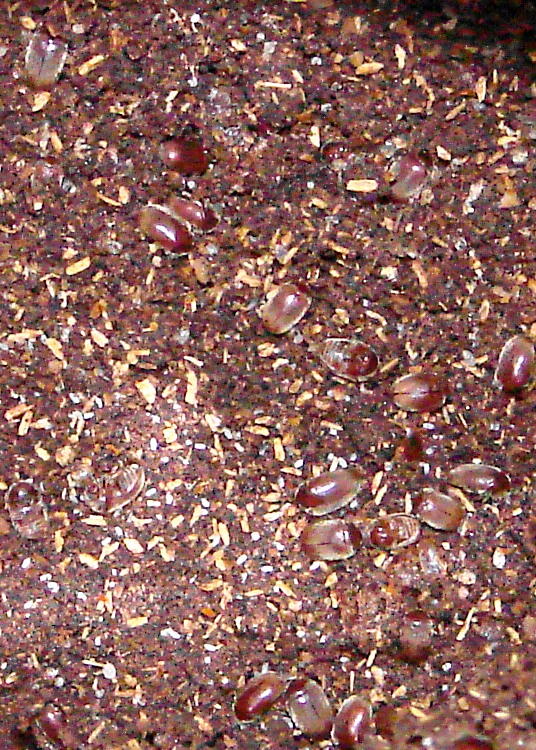
Mary cleaned out the kitchen cabinets, which entailed sorting out all the various spice jars. She thought the Chili Powder looked a bit odd and, indeed, it did: a whole colony of beetles and their larvae was a-squirm in there!
The label states:
All Natural
non irradiated — no preservatives
Frankly, I don’t see any particular problem with food irradiation.
Beetle larvae
Beetle larvae – detail
Beetles atop Chili Powder
Chili Powder Beetle – dorsal
Chili Powder Beetle – ventral
If you’re the sort of person who cooks your meals, as we are, then you’re eating plenty of denatured proteins and broken DNA anyway. In this case, snuggling that jar up to a nice warm Cobalt-60 slug for a few minutes would have been a great improvement.
The main ingredient, of course, is “chili peppers”. The remainder doesn’t sound particularly life-sustaining, though: oregano, cumin, garlic, sea salt, and spices. Anything that can live off that brew must have a bad attitude, the way I see it.
Being that sort of bear, I’d written the date on the label: 19 Aug 08. So, in round numbers, we use two ounces of Chili Powder a year. Obviously, we shouldn’t buy that stuff in bulk…
Those are millimeters on the scale it’s crawling on, so these are little bitty bugs.
It occurred to me that a better measure of the WWVB reception quality is the time since the last synch, because that measures the number of consecutive glitch-free minutes, which is a number that’s very difficult to pick out of the Glitchiness vs Time plots.
A synch occurs only after four consecutive glitch-free frames, with the last three differing only by having properly incrementing minutes based on the first synch. That eliminates successive frames that span hours, as the minutes don’t increment properly from 59 to 00.
This is the number of minutes since the most recent synch, versus the number of elapsed minutes, for a 24-hour period starting at UTC 0257 on 25 Dec 2009 (9:57 EST Christmas Eve 2009).
Synch Age – 24 hrs – 2009-12-24
Here’s the spline-smoothed Glitchiness graph I put up yesterday for comparison:
Glitchiness – splines – 24 hrs – 2009-12-24
An eyeballometric comparison shows my conclusion that synchs happen at the downward spikes in that plot is totally bogus.
Memo to Self: If you haven’t graphed it, it’s not science yet.
Here on the East Coast of the US, WWVB reception is iffy during the day, due to low signal strength and high ambient noise. Actual data seems hard to come by, so here’s a small contribution.
This is a plot of the number of glitches per minute, where a glitch is any pulse that’s not within ±60 ms of the expected pulse durations (200, 500, and 800 ms), for a 24-hour period starting at UTC 0257 on 25 Dec 2009 (9:57 EST Christmas Eve 2009). There are 1448 data points, each representing the glitches during the previous minute; each minute starts within 2 seconds of the WWVB on-time frame marker.
Here’s the raw data, log-scaled on the Y axis to cover the dynamic range. Log scaling can’t handle 0-valued points, so I forced counts of 0 to 0.1 to make them visible.
Glitchiness – raw – 24 hrs – 2009-12-24
Here’s the same data, Bezier smoothed to make the trends more obvious; all the points below 1.0 are approximations of a trend toward counts of 0.
Glitchiness – smoothed – 24 hrs – 2009-12-24
Even better, splines show the glitch-free minutes without forcing the data points.
Glitchiness – splines – 24 hrs – 2009-12-24
My firmware requires four successive glitch-free minutes of reception (plus some additional verification) before synching its local time to WWVB, so it’s exceedingly fussy. Despite that, it still synched 17 times during those 24 hours. The longest free-running time between synchs was 6.8 hours.
Note that there are 17 downward peaks below 1.0 in that last graph.
Winter is, of course, the time of best ground-wave propagation from WWVB, so this is about as good as it’s ever going to get.
Memo to Self: useful Bash and Gnuplot commands…
grep Glitch WWVB_2009-12-24a.log | cut -d H -f 1 > Glitches.txt

set logscale y

set samples 250

plot 'Glitches.txt' using ($2<1?0.1:$2) with points lt 3 pt 2

plot 'Glitches.txt' using 2 smooth csplines with linespoints lt 3 pt 0
log-scaled on the Y axis to cover the dynamic range. Log scaling can’t handle 0-valued points, so I forced them to 0.1;
Our travels took us past a mall, in which I discovered another generation of waterless urinals. The general notion is that the cartridge contains a light oil that allows urine through to the drain, while blocking sewer gases just like an ordinary pipe trap.
IIRC, the Hynes restroom retrofit installed waterless drain cartridges in a standard urinal. Unfortunately, with no flush water to rinse the bowl, the urine simply dried in place with exactly the olfactory effect you’d expect.
This urinal is obviously a custom-designed hunk of ceramic technology and, according to their copious literature, whizz just slides right off and runs through the Sloan cartridges on its way to the drain. I’m not sure how all that works, but things have certainly improved… or, perhaps, the mall does maintenance much more frequently than Hynes.
Waterless urinal target
Anyhow, that small dot a few inches above the cartridge seems like an aiming target. Speaking strictly as an amateur apiarist, the notion of “pee on the bee” isn’t all that attractive, but I suppose they needed some way to direct the stream away from the inlets …
With the planetary reducer off, I could remove all the bits and pieces holding the Z-axis slide to the rest of the positioner.
Rack drive casing
Note carefully the three spacing washers near each mounting screw. They hold the slide off the casting body by a very precise amount: they’re each 4 mils thick and prone to vanish in a light breeze. I discovered that each screw had three washers when I flicked one off the workbench and discovered two on the floor.
The metal plate holding the pinion in place has two flat-head screws to the left and two ramps to the right. The conical points of the two long setscrews on the right bear on the ramps, providing a convenient, if obscure from the outside, way to adjust the slide friction by clamping the pinion shaft. One of the setscrews was partially removed, so a previous owner had evidently tried to reduce the overwhelming stickiness.
With the washers in a safe place, the pinion cover comes off with only slight encouragement.
Pinion parts
Plenty of congealed lubricating oil to be found.
Even without the pinion gear, it was exceedingly difficult to urge the two parts of the slide apart: more congealed oil. Much to my surprise, the slide does not have adjustable gibs: it’s one of those precision-ground gadgets that Just Works. This picture shows all the parts in their gunky glory. Note the random dirt in the rack teeth, along with the goo on the pinion shaft.
Rack and pinion – disassembled
With everything apart, removing the gunk was a simple matter of toxic solvents and mechanical poking with wood picks and splints
I filed off the burrs on the shafts, thought briefly about grinding some flats for the setscrews, and decided to leave well enough alone.
A few dabs of clock oil here & there, reassemble everything in reverse order, and the Z-axis moves gracefully with minimal knob torque. It’s very sensitive to the clamping force of those pointed setscrews, though.
It’s now easy to discover that the planetary reducer has a 5:1 ratio and the Z-axis moves about 6 mm per turn. Because the reducer uses balls, it slips when the slide jams against something, rather than strip its gears.
I should clean the other two slides, but a dot of clock oil on each cheered them up enough to let me punt that for a while…
An old 3-axis micropositioner recently found itself on my electronics workbench, where it should come in handy for SMD soldering, microscopic examination, and similar projects requiring the ability to move something in tiny, precise increments. This picture gives you the general idea; it’s mounted on a magnetic base stuck to a random chunk of sheet steel.
The knob on the front drives the vertical (Z) axis, with the other two controlling the front-to-back (Y) and left-to-right (X) axes. A rotary joint between the X and Y axes, plus another at the tip of the arm, mean you’re not restricted to orthogonal axes; that may be either a blessing or a curse, depending on what you’re trying to accomplish.
Unfortunately, the Z axis was essentially immovable: that big knurled knob took a remarkable amount of force to drive the slide. Some Quality Shop Time was in order.
Planetary reducer – cover
The thing is a chunk of old-school German engineering: nary a gratuitous plastic part to be seen. The planetary reducer has a cast metal cover secured to the torque arm with an acorn nut, which had obviously been removed several times before, as the cover was somewhat chewed beneath the nut.
I loosened the two setscrews holding the knob in place, gave it a pull, and … nothing. After a protracted struggle and considerable sub-vocal muttering, the knob came off to reveal a thoroughly scarred shaft. Contrary to what I expected, the shaft did not have flats below the setscrews, so the inevitable screw burrs locked the shaft to the knob.
Planetary reducer – torque arm
The picture to the left shows the planetary drive and torque arm after I filed off the burrs. Two plastic washers (the top one sits on the spring; it’s not shown here) provide smooth bearing surfaces that hold the knob under firm spring pressure, which prevents the Z axis from descending unless you turn the knob manually.
Planetary drive output shaft screws
Two more setscrews secure the planetary drive’s output bushing to the Z axis pinion shaft. The picture to the right shows that they’re pretty much inaccessible; one was directly behind a tab holding the drive together, the other was aimed at the shoulder of the casting holding the Z axis slide.
And, of course, even with the knob in place, I can’t turn the mumble shaft, which is why I’m doing this in the first place. The planetary drive uses balls, rather than gears, and the lubricating oil had long since turned into gummy varnish. I slobbered enough light oil into the drive to loosen the gunk enough to make the drive turn-able, albeit with considerable effort. I urged the input shaft barely enough this-a-way and that-a-way to get access to both of the screws.
Pinion shaft
As you’d expect, removing the drive required even more muttering and the application of dangerous tools. The pinion shaft was badly scarred in several places, so this poor thing has been dismantled several times before.
That was entirely enough for one day. Tomorrow, disassembling the Z-axis slide and cleaning things up…
I suppose this shouldn’t be surprising, but the nature of groundwave propagation pretty much requires vertical polarization: the E-field is perpendicular to the ground.
Perforce, that means the H-field is parallel to the ground, which means that ferrite bar antennas must be horizontal in order to work properly.
A simple experiment with the Alpha-Geek Clock conclusively demonstrates this. Turning it vertically is just as bad as aiming a bar end directly at Colorado: the signal drops right into the noise.
Horizontal and broadside to Colorado, it’s fine.
Alas, I’d been hoping to tuck the bar antenna inside the Totally Featureless Clock I’ve been building. The ideal location, mounted vertically behind the right-hand digit at the end of the circuit board, as far from the Arduino Pro as possible, just isn’t going to work. Good location, wrong orientation!
I want to avoid an external antenna or a tall case. Drat!