Ed Nisley's Blog: Shop notes, electronics, firmware, machinery, 3D printing, laser cuttery, and curiosities. Contents: 100% human thinking, 0% AI slop.
The Dell AC511 USB SoundBars have volume control knobs, which this udev rule turns into the /dev/input/volume device:
ATTRS{name}=="Dell Dell AC511 USB SoundBar", SYMLINK+="input/volume"
I recently wanted to use an ordinary USB “sound card” that did not, of course, have a volume knob:
Sabrent USB Audio Adapter
This hack skips the configuration that makes the knob’s events visible to the Python program:
import os.path

... snippage ...

# if volume control knob exists, then set up its events

VolumeDevice = '/dev/input/volume'

vp = select.poll()
if os.path.exists(VolumeDevice):
  v = InputDevice(VolumeDevice)
  v.grab()
  vp.register(v.fileno(),select.POLLIN + select.POLLPRI + select.POLLERR)
It turns out that if you never register a device with the event polling interface, then the interface never reports any events and the rest of the code remains blissfully undisturbed: the non-existent knob doesn’t do anything, while the volume control buttons on the keypad continue to function as usual.
The end result of this fiddling puts a Raspberry Pi 2 Model B to work as a streaming player on my Electronics Workbench, untethering the laptop from those powered speakers:
RPi 2 Streaming Player – USB sound gadget
It’s a shame that USB audio gadget is so big, because it crowds out standard USB plugs to the side.
The most satisfactory LED configuration for a translucent case with an external WiFi adapter seems to be:
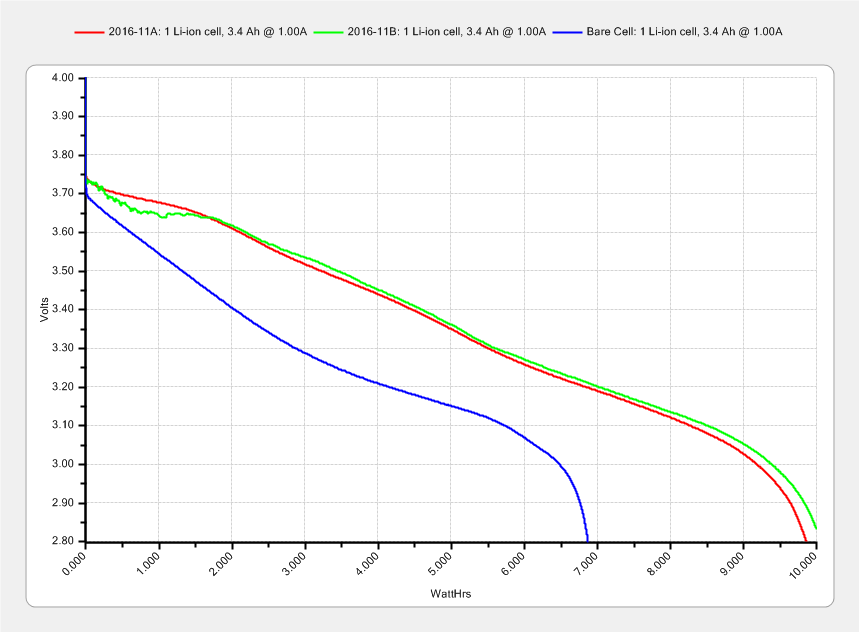
The lower curve comes from an old unprotected cell harvested from a defunct media player and retrieved from the to-be-recycled pile.
I picked 1 A as a reasonable value for their intended use in flashlights and maybe a helmet camera. Unlike some other cells in the recent past, these deliver 3.0 A·h, reasonably close to their rated 3.4 A·h capacity at a (presumably) lower current.
Replotting the voltage vs. energy delivered doesn’t show any surprises:
The voltage declines more-or-less linearly, without the relatively flat discharge curve for smaller cells, which explains why the J5 V2 flashlight becomes seriously dim after a few hours. On the upside, that allows a reasonably accurate state-of-charge display.
Assuming the Sony HDR-AS30V camera burns 0.1 W·h/min while recording (which is a fancy way of saying it dissipates 6 W), then it should run for (10 W·h)/(0.1W·h/min) = 100 min from one of these cells fitted as an outrigger. The best of the NP-BX1 cells for the camera delivers something like 90 minutes from a measured capacity of 4 A·h at 500 mA; I don’t know what to make of those numbers. Perhaps the camera runs the NP-BX1 cells below the 2.8 V cutoff I’ve been assuming?
That works out to a bit under 1000 page views/day of purely organic traffic.
As always, way more people than I’d expect come here with plumbing problems. On the upside, much of the bedbug saga has fallen off the trailing edge of the wedge; life is good!
Poughkeepsie lies under the southbound airliner routes to the NYC airports, so we often see airplanes high overhead. With a few inches of snow on the ground, a sunny day turns them brilliant white against a blue sky:
Air Canada Flight 706 – Embraer ERJ-190 – snow uplight
Feeding “Poughkeepsie NY” into FlightAware produces a map centered over us with (in this case) two candidates, one of which was Air Canada Flight 706, an Embraer ERJ-190. The obvious search produces pictures confirming the ID.
Air Canada’s current livery shows white paint on the bottom, but plain aluminum bodies shine brilliantly, too.
Back when I used to fly, light snow highlighted the networks of stone walls around all the old farms across the Northeast, from back when this area was NYC’s breadbasket. Those days are gone, but the stones remain where those farmers hauled them out of the fields.
As before, I put the larger spool on the floor under the lathe and let the thread spill straight off the top toward the smaller spool. This time, I didn’t have a twist accumulating in the loose thread between the two spools:
Grab longer lengths of the loose thread
Absolutely no slippage between the fingers!
Put more tension on the thread at the takeup spool
As nearly as I can tell, the thread still has a slight twist coming off the larger spool, but grabbing longer lengths captures the twist and more tension lays it on the smaller spool. After cutting the thread, what was left had maybe three turns of twist, which was no big deal and obviously hadn’t accumulated.