The Smell of Molten Projects in the Morning

Ed Nisley's Blog: Shop notes, electronics, firmware, machinery, 3D printing, laser cuttery, and curiosities. Contents: 100% human thinking, 0% AI slop.

Month: January 2018

  • MPCNC: Emergency Stop / Feed Hold / Resume Pendant

    The Protoneer CNC Shield has pin headers for GRBL’s Feed Hold and Resume inputs, so it seemed appropriate to put big buttons on the far end of the cable:

    MPCNC - E-stop Hold Resume switch box
    MPCNC – E-stop Hold Resume switch box

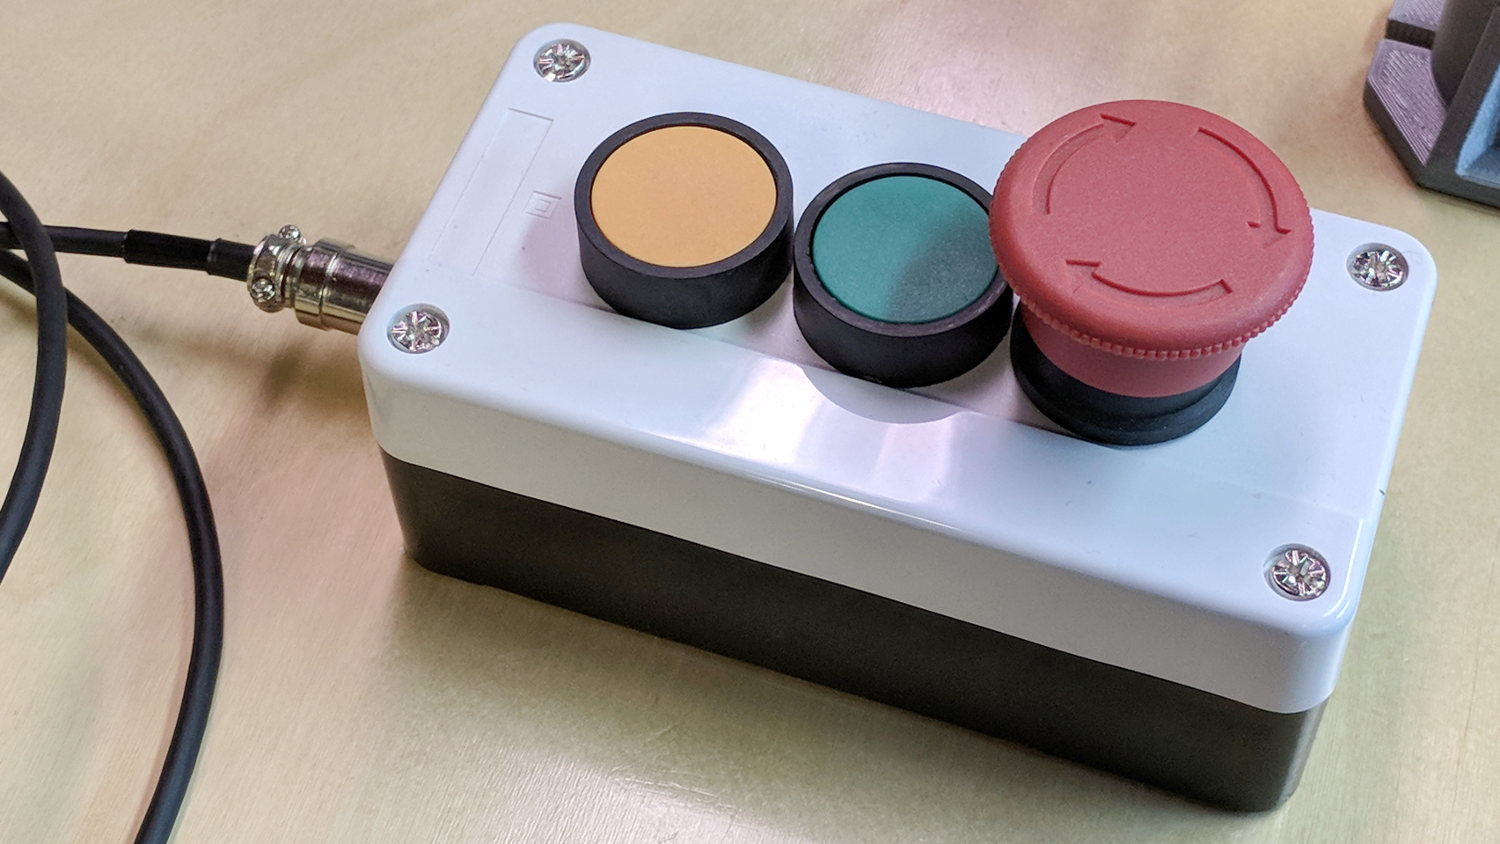
    The Emergency Stop Push Button Switch Station arrived for ten bucks delivered halfway around the planet.

    There’s not much to the wiring inside the box:

    MPCNC - E-Stop switch box - interior
    MPCNC – E-Stop switch box – interior

    I drilled a hole to fit the 6 pin Aviation Wire Connectors  I got for this very purpose:

    MPCNC - E-stop switch box - drilling
    MPCNC – E-stop switch box – drilling

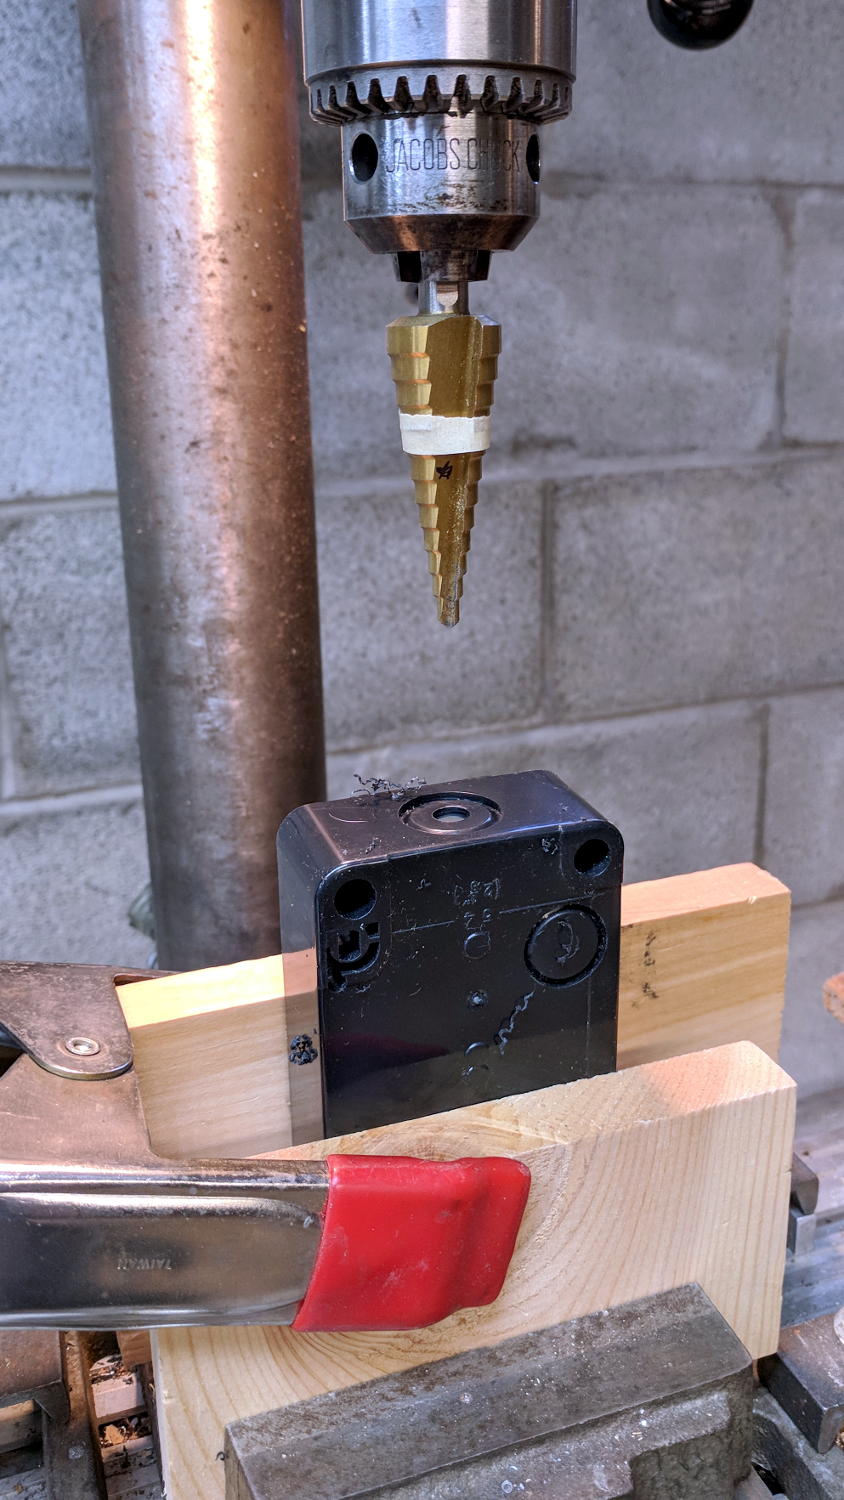
    You could CNC machine a precise D-hole, but let’s stay realistic about the application. Applying a deburring tool enlarged the 9/16 inch hole enough to force the 16 mm threads into it, with the drill press holding the connector perpendicular to the box while I hand-turned the chuck to screw it in.

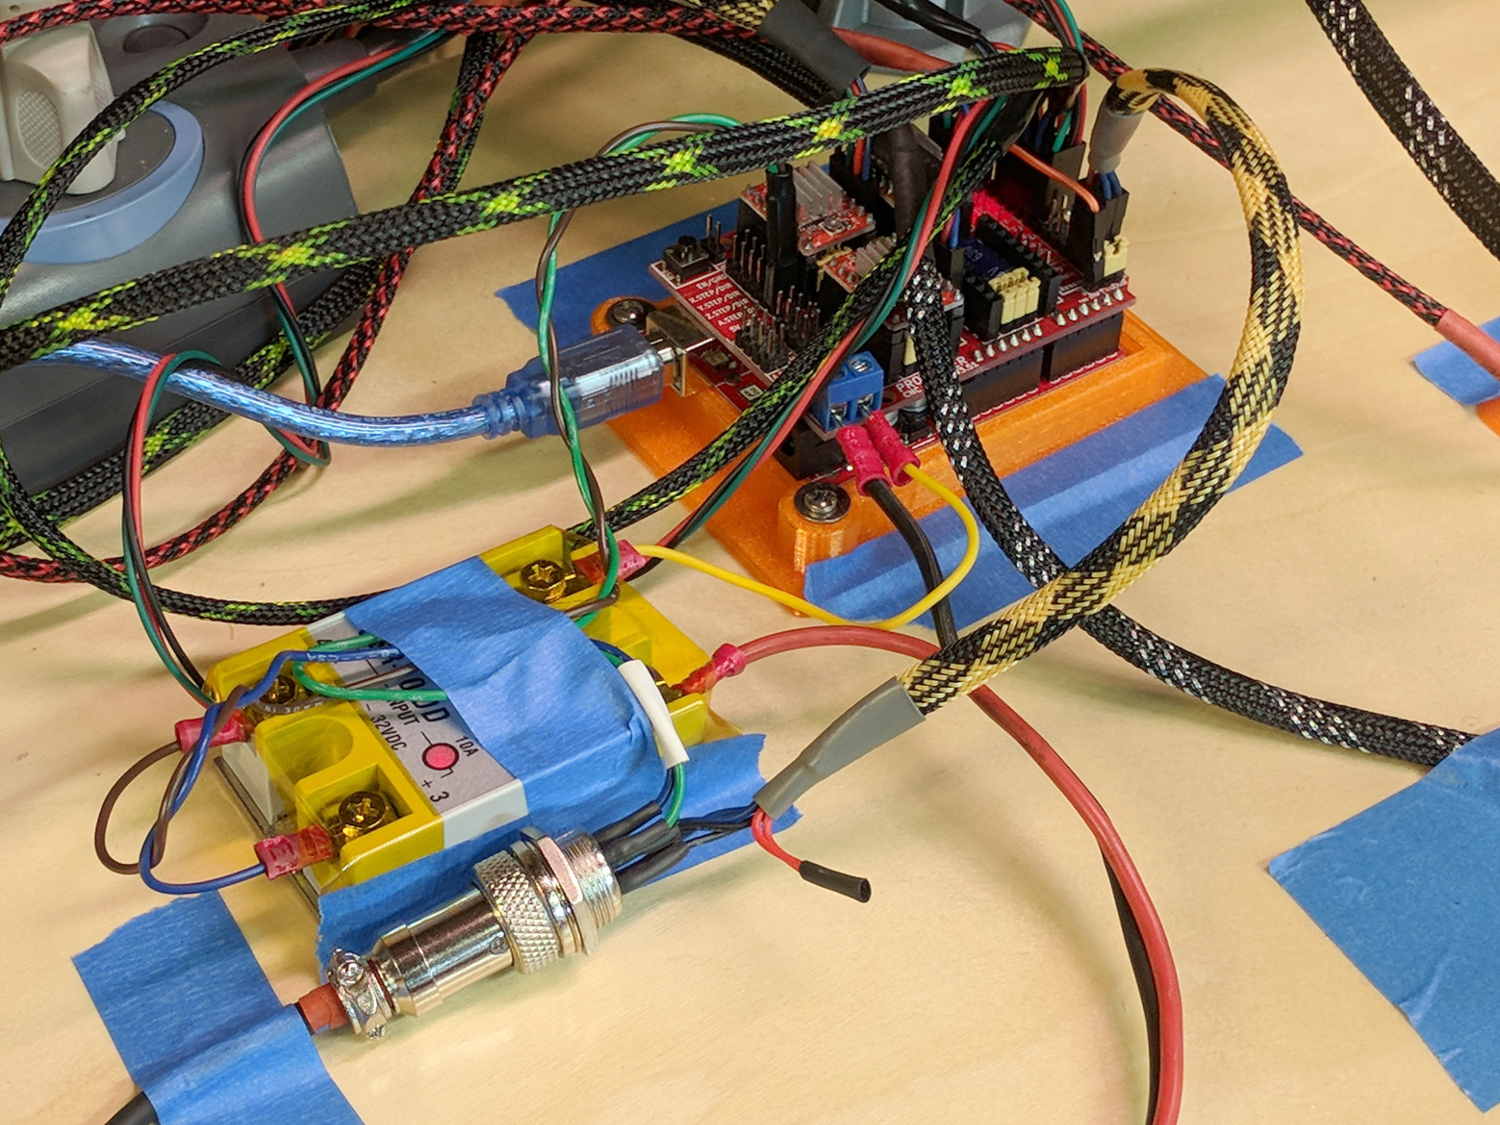
    Although I like the Protoneer CNC Shield, I really really dislike using header pins as connectors:

    MPCNC - Protoneer Wiring - SSR
    MPCNC – Protoneer Wiring – SSR

    Those pins are much too delicate.

    The DC-DC solid state relay input connects to the Arduino’s +5 V power supply through the red mushroom disconnect switch. The mushroom is normally closed to turn on the SSR and connect the power brick’s +24 V supply to the motors; it opens when slapped. GRBL will continue about its business, but without any power to the steppers the MPCNC will stop dead in its tracks. Turn the mushroom cap clockwise to unlatch and reset.

    The disconnect switch should also kill AC power to the router, when I get around to adding one to the mix, probably through a DC-AC SSR.

    AFAICT, the cable should come out of the box on the end with the mushroom switch, putting the “normal” pushbuttons closer to me. I did it the other way around, because I want the panic button to be the most easily reached thing on the benchtop. If I have time to think about it, I can reach around the mushroom to the Hold switch.

  • Reading a Vernier Height Gage

    The first time around, I simply set both pairs of MPCNC rails to equal heights using my height gage (*) as a reference, rather than as a measurement tool:

    MPCNC - Rail height measurement
    MPCNC – Rail height measurement

    By now, I assume all the plastic bits have shaken themselves down and the rails have settled into their more-or-less permanent locations, so it’d be useful to measure the actual rail heights and adjust as needed. The scale along the vertical bar of the height gage gives the height of the top surface of the projecting arm above the bench:

    Brown and Sharpe 585 Height Gage
    Brown and Sharpe 585 Height Gage

    Normally, the gage base would sit on a surface plate. Building an MPCNC on a big granite slab would certainly cut down on the shakes from overly enthusiastic acceleration settings!

    The nicely reshaped and polished lathe bit transfers the top surface of the gage arm to the top of the MPCNC rail, so whatever height shows up on the vernier gives the rail height. The exact value, of course, doesn’t really matter in this situation, but when you need an actual measurement, it’s got you covered.

    The two brackets slide along the height gage, with the thumbscrews on the right locking them in position. To measure a height, you loosen both thumbscrews, slide the whole affair to put the arm bracket at about the right height, tighten the top thumbscrew to anchor the adjusting bracket, twirl the knurled wheel to precisely position the arm bracket, then read the height from the scale.

    This requires reading a vernier height gage scale:

    Vernier Height Gage - 132.20 mm
    Vernier Height Gage – 132.20 mm

    The other scale on the other side has inches, but nobody uses those any more. Right?

    Things I didn’t get quite right the first time around:

    • The numbers along the right side are in centimeters
    • The smallest lines on that scale mark 0.5 mm increments
    • The numbers on the vernier have units of 1/50 mm = 0.02 mm

    So, to read the scale:

    • Multiply centimeters by 10 to get millimeters: 130
    • Add the number of whole millimeters below the 0 vernier index: 2
    • Add a half millimeter if needed: 0
    • Find the matching vernier increment: 10
    • Multiply the increment by 2: 20
    • Slap the decimal point two places left and add: 132.20

    OK, try this one:

    Vernier Height Gage - 159.84 mm
    Vernier Height Gage – 159.84 mm

    As I see it:

    • Read 15 cm
    • Count 9 ticks
    • Add the 0.5 mm tick
    • Match vernier tick 17, multiply and slap decimal = 0.34 mm
    • Add: 150 + 9 + 0.5 + 0.34 = 159.84 mm

    There, now, that wasn’t so hard, was it?

    There’s obviously a parallax issue between the edge of the vernier scale and the main scale; it’s easier to get it right in person than in the photograph.

    I pronounced the reading as “160 minus point 5 is 159 and a half plus point 34 is point 84”, but I also take eight photographs as I work my way around the MPCNC frame to review any suspicious results.

    Obviously, reading a digital height gage would be much easier & faster, but we don’t want to deskill the workforce, do we?

    The maker’s mark on my height gage says it’s a Brown & Sharpe 585 with a 19 inch scale; B&S has long since been Borged. Back in the day, this painstakingly applied etching distinguished it from all the other height gages in the shop:

    Brown and Sharpe 585 Height Gage - D.E 1-I-3 etching
    Brown and Sharpe 585 Height Gage – D.E 1-I-3 etching

    We’ll never know the rest of the story.

    (*) When Starrett spells it “gage”, it’s good enough for me.

  • Blog Summary: 2017

    Page views for 2017:

    Top Posts 2017
    Top Posts 2017

    Plumbing and car troubles continue to plague folks in Search Engine City.

    If I could monetize my broom handle thread IP, I’d be rich, I tell you, rich.

    Some interesting (and rounded) numbers from the ads you (presumably) don’t see, because adblocking.

    The blog gets just under 30 k page views/month, call it 1 k/day. Because most of the traffic arrives from search engines, each viewer looks at only 1.6 pages. Dividing the two suggests 18 k viewers/month.

    WordPress now shows 90 k ad impressions/month. Dividing 90 k impressions by 18 k viewers gives 5 ad impressions/viewer, which is about what you’d expect from the three ads appearing on the main page and each post seen individually: 3 ads/page × 1.6 page views/visitor = 4.8 ads/visitor.

    Before the big WP advertising push, they reported 15 k ad impressions/month for roughly the same 30 k page views/month and 1.6 pages/visitor. At one ad per page (which I don’t know for sure, but it seems reasonable), 30 k views should produce 30 k ad impressions. I can’t account for the discrepancy.

    Those of you using ad blockers (which I highly recommend!) don’t know what you’re missing.

    Onward, into the New Year …