Ed Nisley's Blog: Shop notes, electronics, firmware, machinery, 3D printing, laser cuttery, and curiosities. Contents: 100% human thinking, 0% AI slop.
The Sienna lit up the tire pressure warning light and the ABS trouble light on the trip from Rochester. The pressures were OK, if a bit low, but the early Toyota TPMS used wheel rotation sensors rather than direct pressure sensors, and we suspect a sensor went bad.
The ABS doesn’t report errors through the OBD II interface, requiring a jumper between TC and E1 in the ABS diagnostic interface block under the hood. Our Larval Engineer shows much respect for the engineer who included the pin ID layout under the flip-top lid, eliminating the need for scratch paper.
Despite diligent searching, there seems to be no Official Documentation of the blink codes appearing on the ABS trouble indicator. Fragmentary evidence suggests that a table applying to a Toyota MR2 MKII sports car would be generally applicable, which is hereby ripped to forestall link rot:
Code Number
Diagnosis
11
open circuit in solenoid relay circuit
12
short circuit in solenoid relay circuit
13
open circuit in pump motor relay circuit
14
short circuit in pump motor relay circuit
21
open or short circuit in 3 position solenoid of front right wheel
22
open or short circuit in 3 position solenoid of front left wheel
23
open or short circuit in 3 position solenoid of rear wheels
31
front right wheel speed sensor signal malfunction
32
front left wheel speed sensor signal malfunction
33
rear right wheel speed sensor signal malfunction
34
rear left wheel speed sensor signal malfunction
35
open circuit in front left or rear right wheel speed sensor
36
open circuit in front right or rear left wheel speed sensor
41
abnormal battery voltage ( < 9.5 or > 17 )
51
pump motor of actuator locked or open circuit in pump motor circuit in actuator
ALWAYS ON
computer malfunction
The 3-4 blink code indicates a left rear wheel sensor failure. Such sensors (or their cables) seem to be either $35 or $175 from the usual sources, with no indication of why some are far more expensive than others. The pictures and descriptions are unhelpful, to say the least.
We’ll try cleaning the sensor, which probably won’t improve the situation, and then replace the poor thing.
Having found my lifetime supply of DeoxIT slouched against something that didn’t appreciate a thin coating of red oil:
Caig DeoxIT bottle holder
The solid model consists of two squashed cylinders atop a slab:
DeoxIT Bottle Holder
Applying the resize() operator to both cylinders separately, before the difference() operation, maintains a uniform (and grossly overqualified) 5 mm wall thickness, which you wouldn’t get by squashing them after the difference().
The 2.5 mm slab gets nice, rounded corners from a hull() shrinkwrapping a quartet of squat cylinders; Slic3r applies Hilbert Curve infill to the top & bottom surfaces to produce a nice pattern. I admit to being easily pleased.
The OpenSCAD source code took about ten minutes to write and two hours to print:
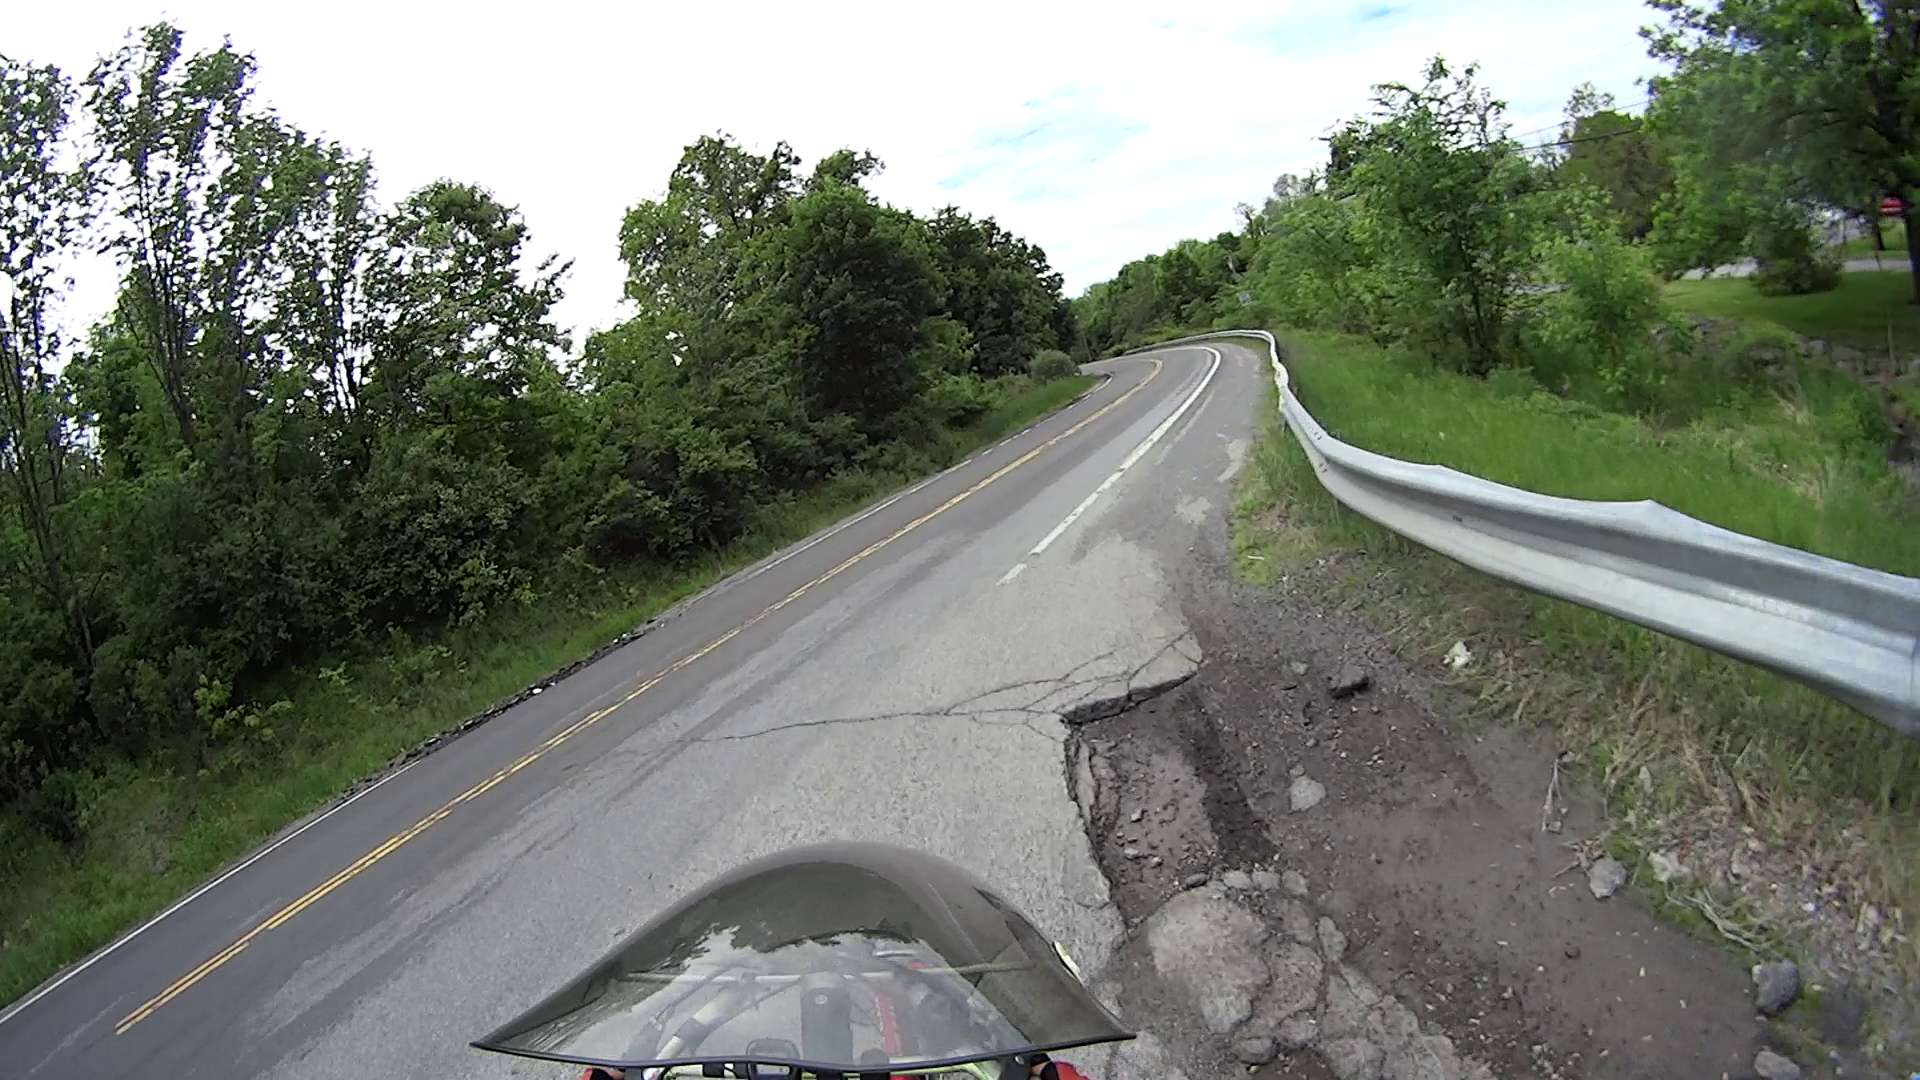
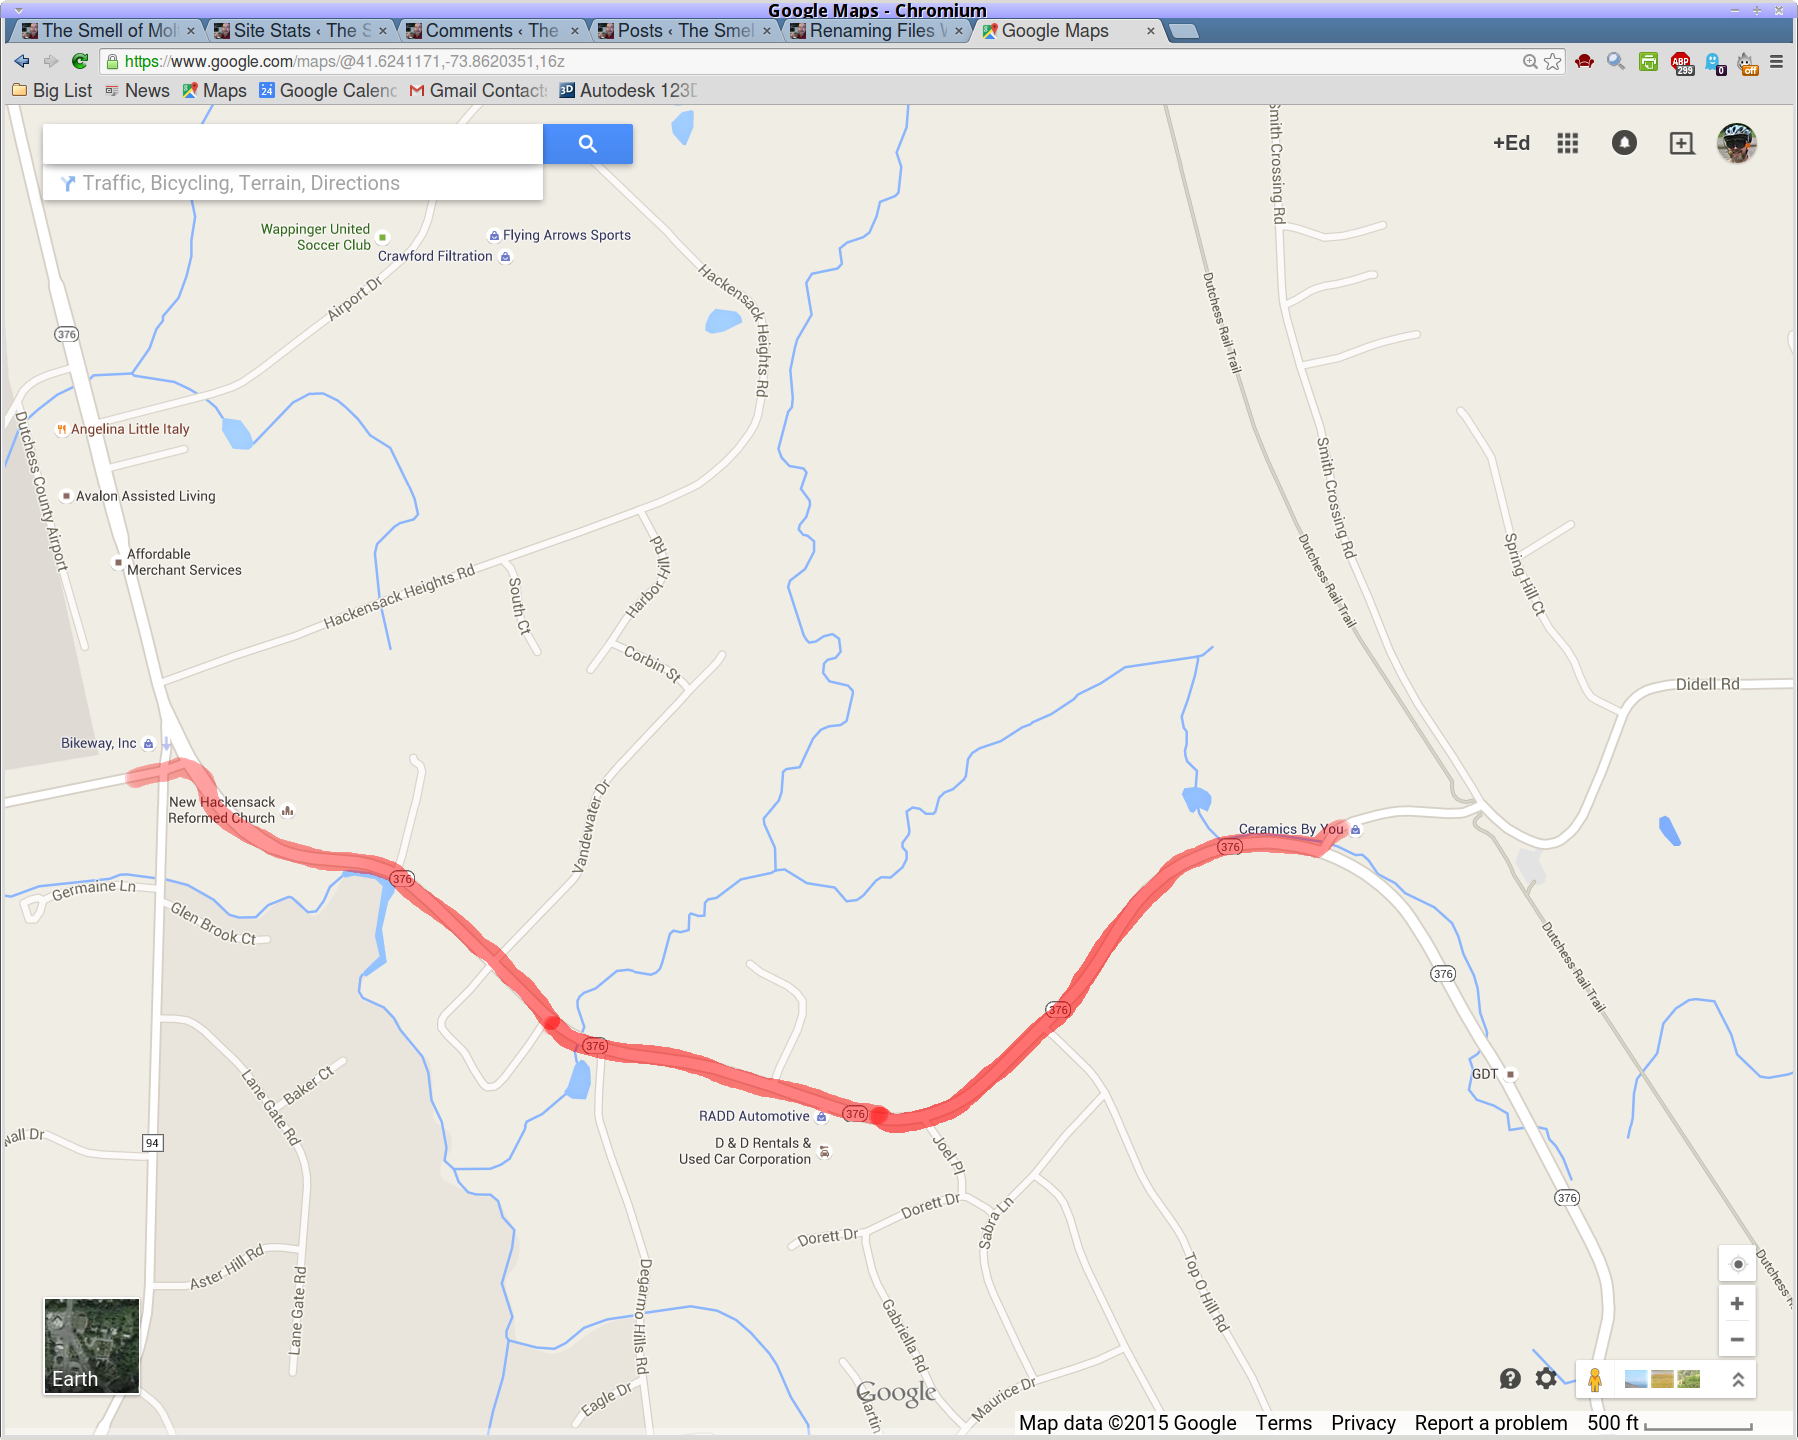
Entering Rt 376 from Diddell Road after leaving the Dutchess Rail Trail:
Rt 376 – Diddell to New Hackensack – 1
All of Rt 376 has thick gravel along the shoulder from the deteriorating asphalt.
The wheel-trapping longitudinal cracks on the shoulder show where the previous surface extended beyond the bottom paving layer. Basically, you must ride to the right of the edge of the “new” cap over the travel lane and left of the parallel cracks:
Rt 376 – Diddell to New Hackensack – 2
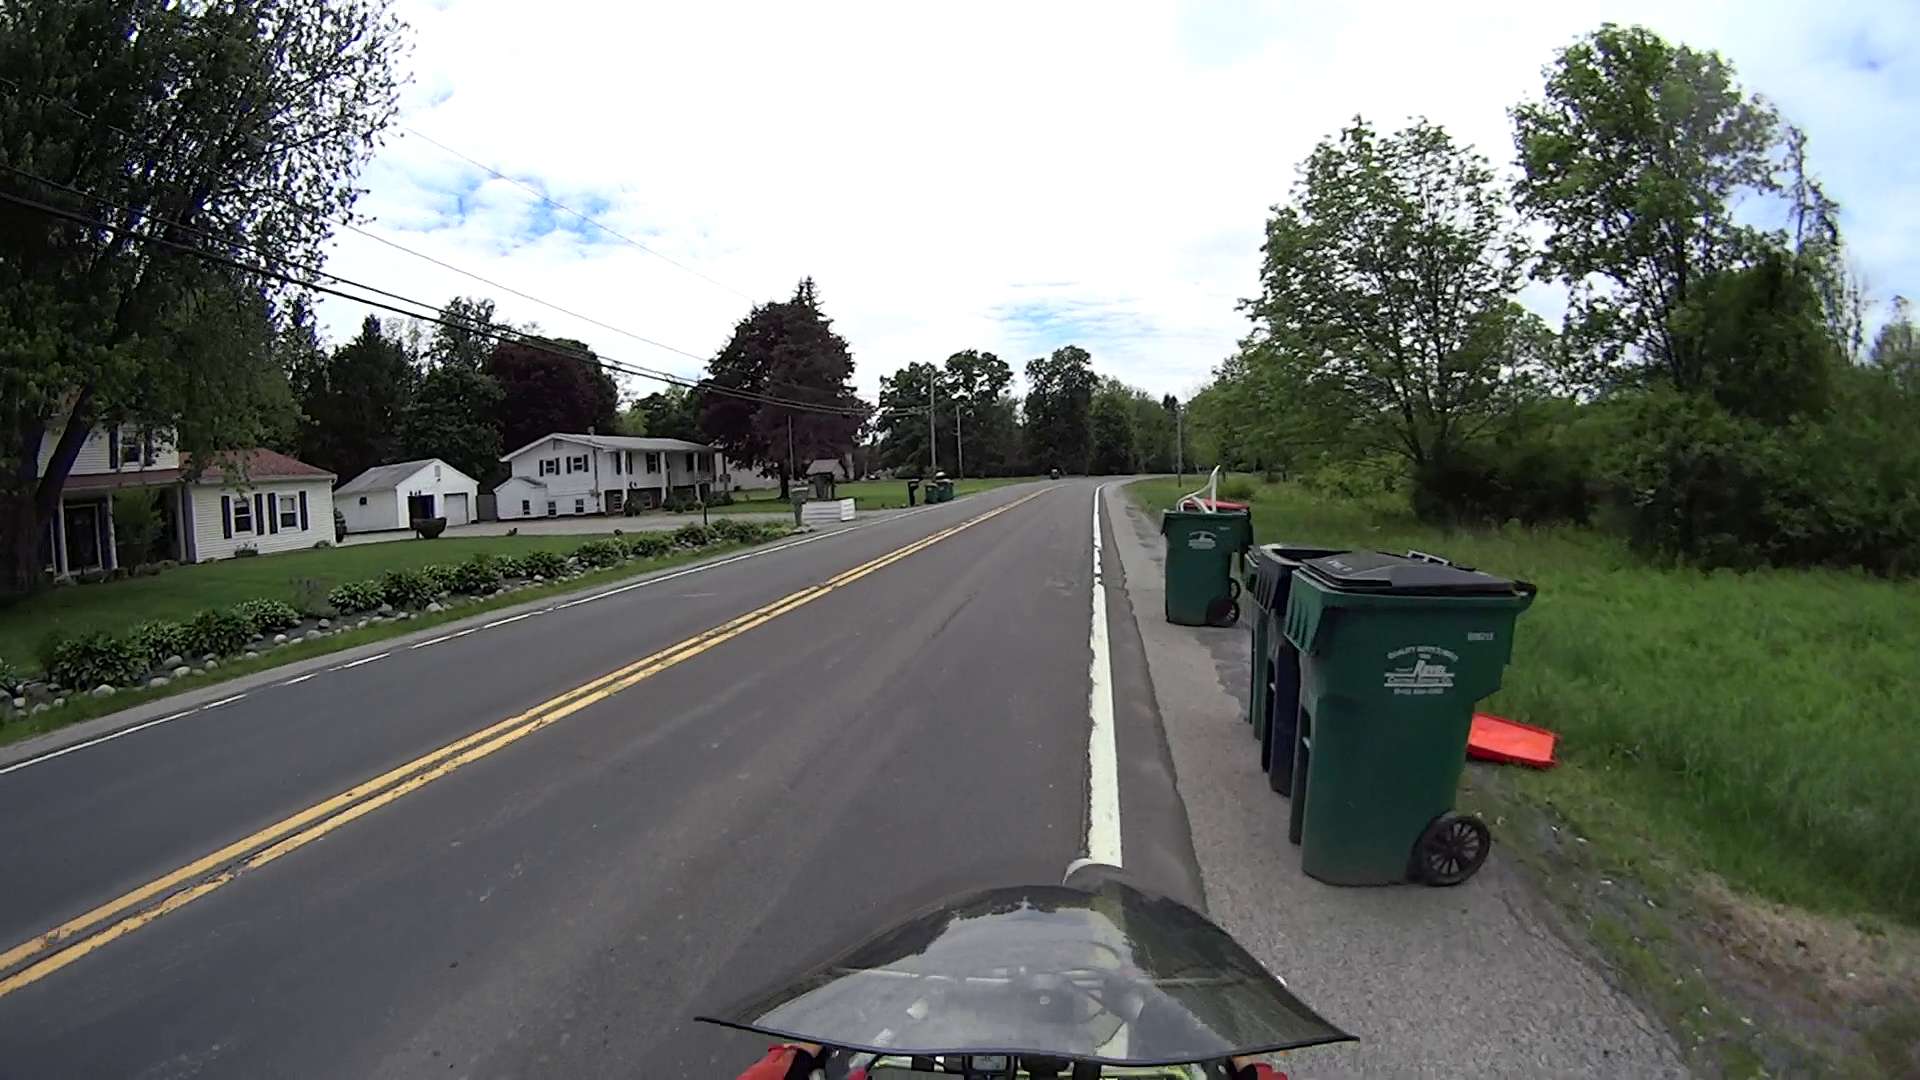
Sometimes, you must use the road surface. Fortunately, it’s not too bad at this spot:
Rt 376 – Diddell to New Hackensack – 3
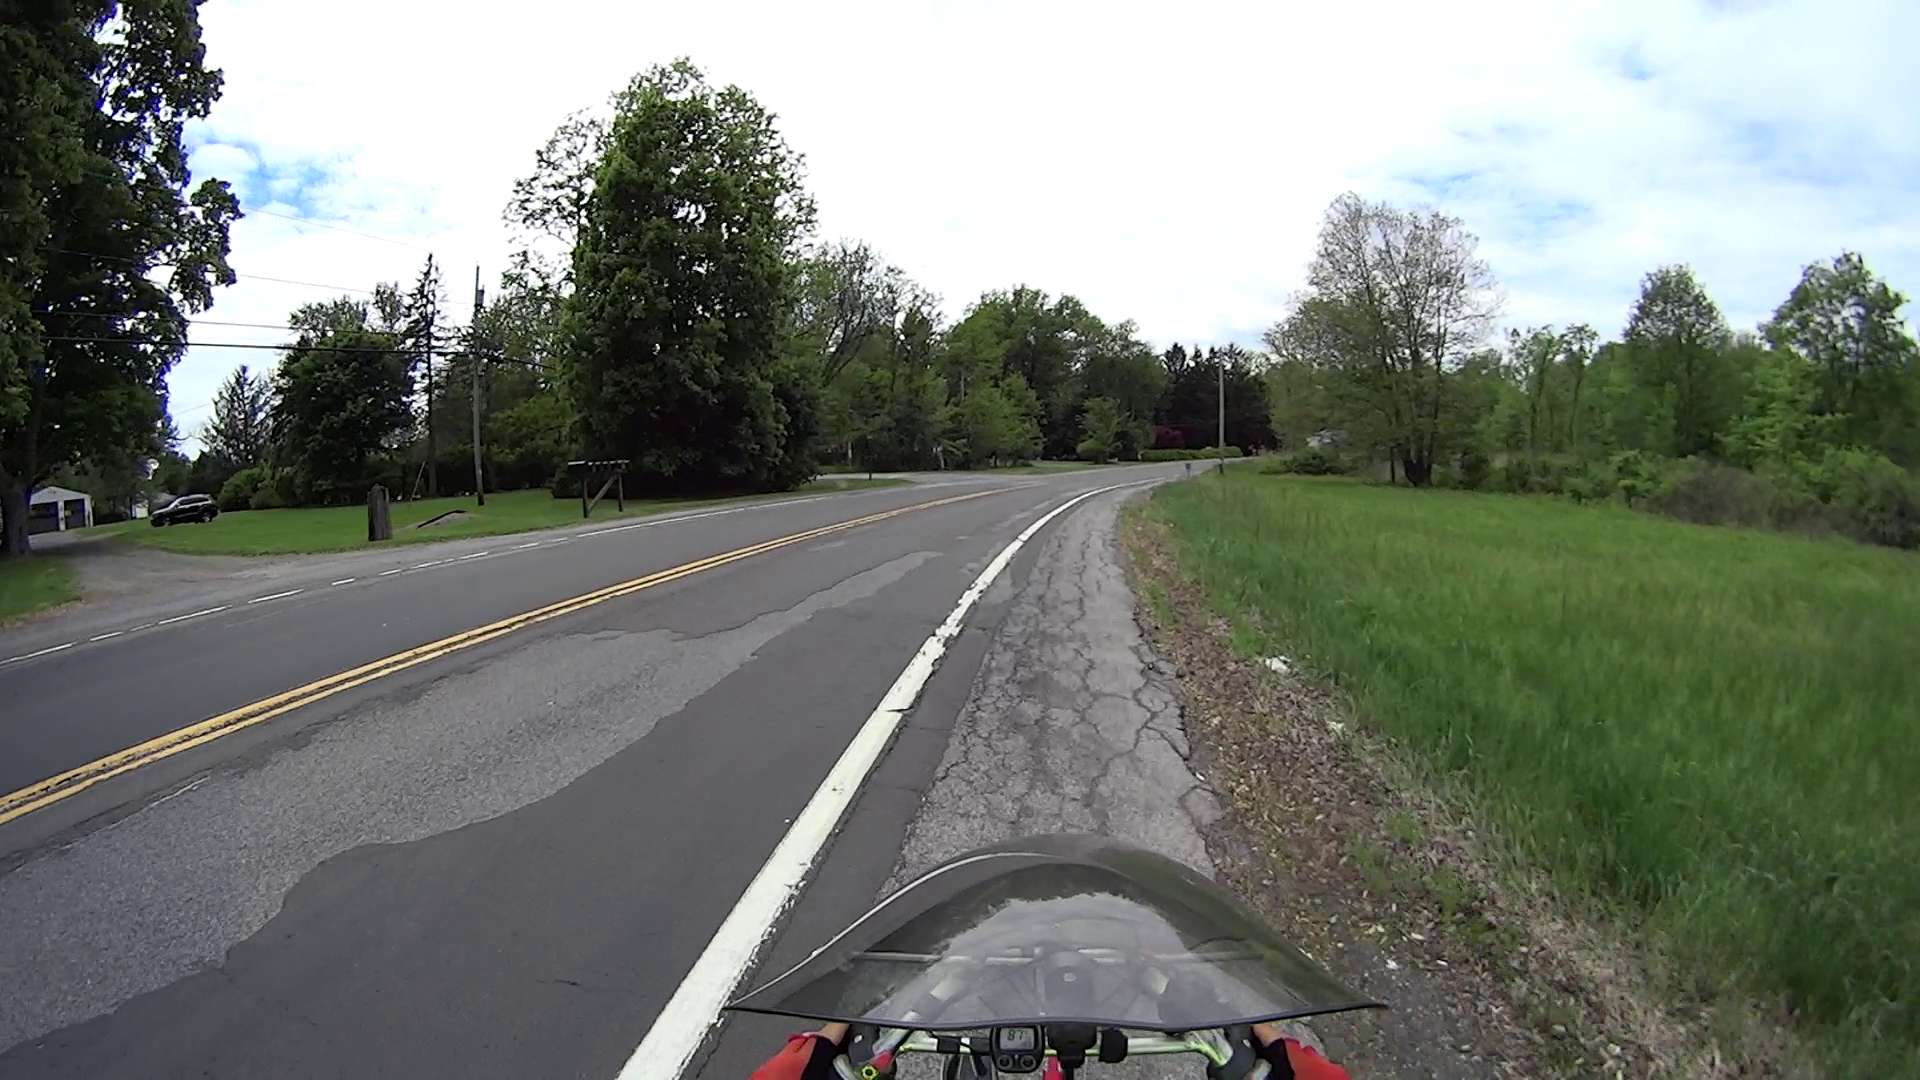
But it quickly returns to normal:
Rt 376 – Diddell to New Hackensack – 4
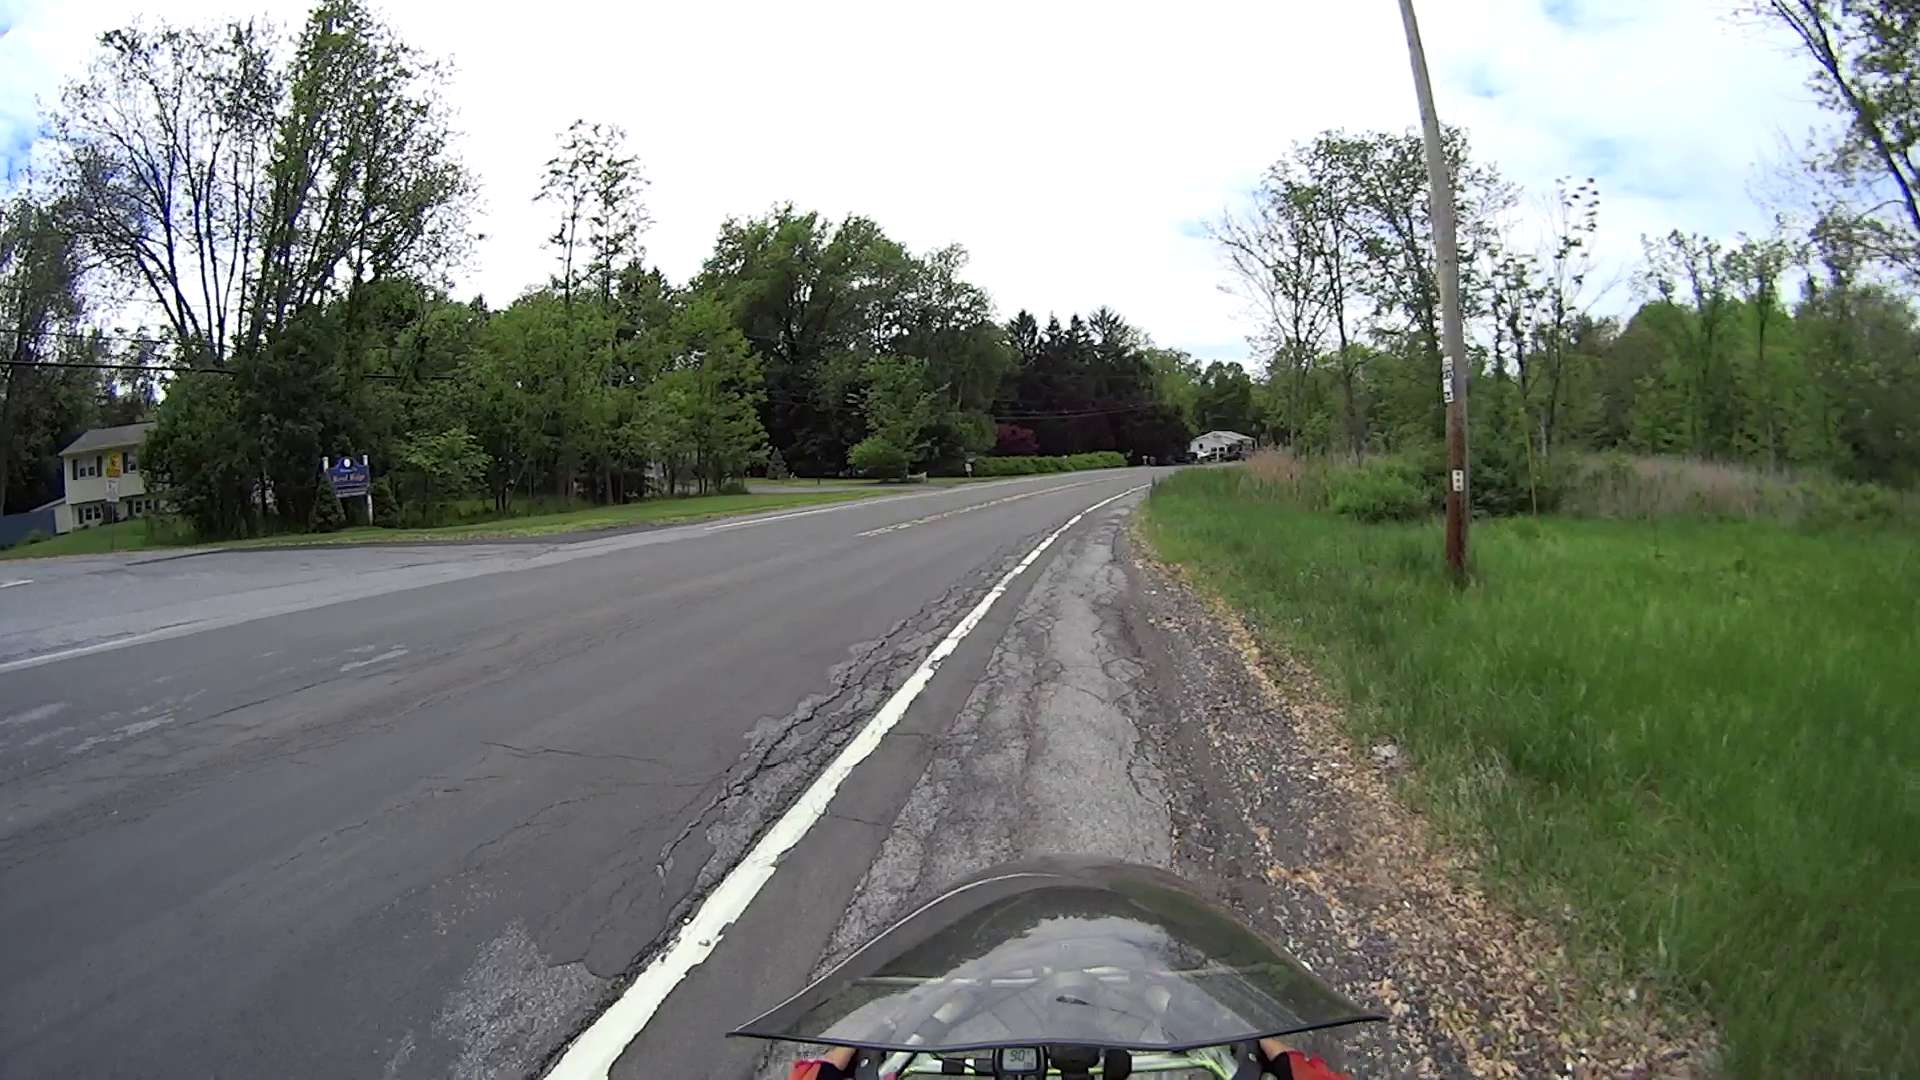
In some places, the travel lane is developing longitudinal cracks, so moving off the shoulder will require taking the lane:
Rt 376 – Diddell to New Hackensack – 5
Chooosing your line requires the ability to ride precisely between gravel, cracks, and traffic:
Rt 376 – Diddell to New Hackensack – 6
I can ride along this plateau every time, but it seems unreasonable to expect that level of ability from every bicyclist:
Rt 376 – Diddell to New Hackensack – 7
In this spot, the potholes expose three layers of paving. The only “safe” line seems to be on the very edge of the “new” cap, just to the right of the potholes:
Rt 376 – Diddell to New Hackensack – 8
The “new” cap didn’t adhere to the previous asphalt very well, perhaps because the thickness dropped below the spec. I’m crossing the travel lane to reach the left turn storage lane at the New Hackensack signal, having avoided a drain grate that occupies the ever-narrowing shoulder:
Rt 376 – Diddell to New Hackensack – 9
A map showing the route:
Rt 376 – Diddell to New Hackensack – map
[Edit: A comment from someone who shall remain anonymous:
This person has found an amusing way to get attention to potholes: he just adds a penis drawing to the pothole with spray paint.
After a bit of sorting, I had a quartet of “disposable” liquid ink pens with contents ranging from desiccated to gummy. With nothing to lose (and having already cut a clearance slot in the plotter case), I drilled a small hole in the top of each reservoir, squirted some inkjet printer ink into the void, and taped the hole closed.
Surprisingly, a little liquid love restored all but the black pen to working condition, if not perfect heath:
HP7475A disposable liquid pen – refilled
I think the blurred white disk floating in the reservoir sealed the end where you jam the tip in place to activate the pen. The blob of dark gunk shows the reservoir didn’t start with yellow ink, but I had nothing to lose.
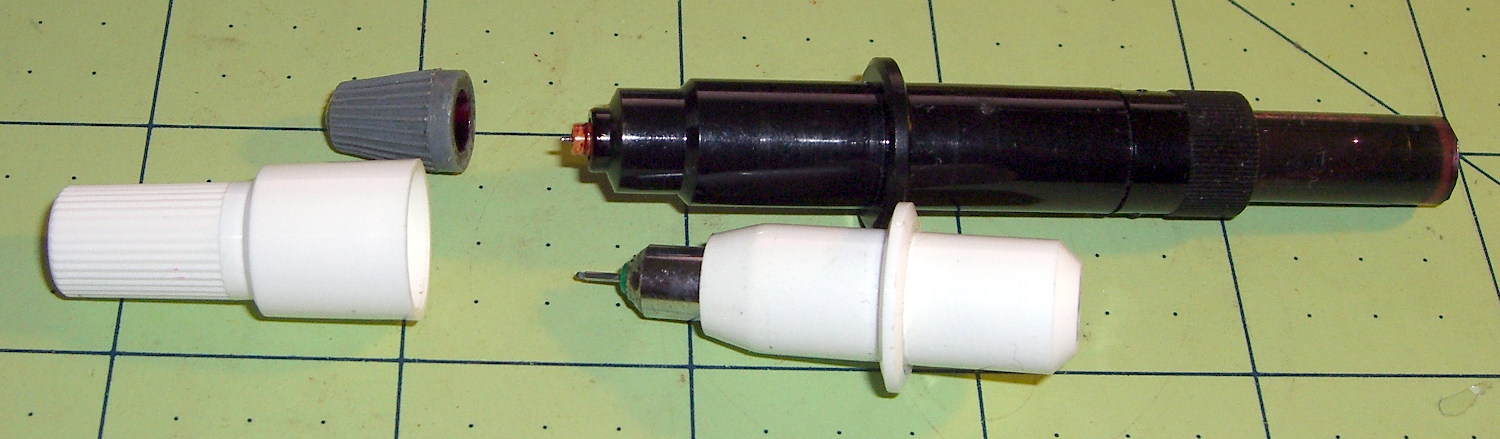
The top pen in this picture is another style / brand with a smaller reservoir:
HP7475A pens – disposable liquid and ceramic tip
The white pen in the foreground has a 0.3 mm ceramic tip, contains its original green ink, and works as well as it ever did; it might be refillable, too.
The liquid-ink pens have a serpentine vent in the tip. This is a Genuine New-Old-Stock pen in a four-pen case labeled HP 5061-7566:
HP7475A disposable liquid pen – new
The serpentine path connects the exterior vent opening (facing you) to a tiny hole (on the other side of the blue shaft) into the ink chamber. As it turns out, a new hole drilled in the reservoir admits enough air to drain the (freshly refilled) liquid ink through the serpentine path all over the workbench. Having some experience with refilling inkjet cartridges, I deployed a towel decorated with colorful splotches in anticipation of such an unexpected event, although my fingers looked considerably more cheerful than usual for a few days.
The black pen never worked quite right, but the other three did fine. The ceramic pen is at the top:
HP7475A – KBR to YCM Refilled disposable pens – G ceramic pen
Protip: the blown contrast and rear-surface bleedthrough behind the yellow ink should tell you it isn’t visible in normal room light. I must mix yellow with another color if I ever refill that pen that again.
KiCad uses only one pen for the entire schematic, even when you select “plot in color”, suggesting nobody has sent the “plotter” output stream to an actual plotter in a long, long time.
Despite the charm of watching the plotter crank out an entire schematic page, it’s not a compelling enough user experience to replace an inkjet printer. For an art project, one might be seeking an entirely different user experience and the answer might be different, too.
The parameter order matters: the -ss must come before the -i input file name and the -t must come after it. Otherwise, avconv will copy the entire file before extracting the clip, which can be tedious.
The Fly6 camera produced a video file containing ten minutes of variations on this theme:
Fly6 – 0842001.AVI – Video compression failure
The top of the image looked pretty good, but then the decompression stalls and smears a single, slowly degenerating, line down the rest of the frame. The other files from that trip looked just fine.
As it turned out, extracting a few seconds with avconv or binary-copying the first few megabytes with dd produced playable copies: the original file tripped vlc’s decompression, but the source data was in the file and the copies worked.
Soooo, I could recover the video. Not that it was particularly important, but knowing how might matter some day.
Video is weird.
The Cycliq tech support folks recommend regularly formatting the MicroSD card using the Official SD Association Program (Windows-only, of course), not erasing any video files, and generally letting the camera handle the card. This whole affair seems remarkably fragile.
A sampling of the various Y connectors and manifolds that water Mary’s gardens:
Y valve 1
Y valve 2
Garden hose manifold
Those little handles don’t turn nearly as easily as they should and some require far more finger pressure than Mary can exert. Lubrication being unavailing, the solution is to apply torque through a wrench, rather than fingertips, but fiddling around to match the proper wrench with the valve in hand isn’t acceptable.
The first pass at a Universal Wrench:
Hose Valve Knob – with measurements
The embossed sheet (the back of my Geek Scratch Paper) carried the knob shapes & dimensions from the garden to the desk, where I measured & laid out the wrench:
Hose Connector Knob – Build layout
I filched the knob design from the OXO Can Opener Handle, made it somewhat taller, and applied a scale() operation to mash it into an ellipse aligned with the wrench slot. That huge hexagonal socket in the middle bridged just fine, even though the threads came out as distinct cylinders:
Adding one thread width of clearance around the stem to form the socket produced a slip fit, with a dollop of fast-cure epoxy holding the pieces together.
The wrench fits the largest valve knob with enough clearance to eliminate fiddling. A cylinder punched into the middle of the slot accommodates those teardrop handles:
Hose Connector Knob – Show layout – bottom view
It’s oversized for the smallest “knob”, a vicious triangular stalk that’s murder on the fingers (and not shown here), but fits well enough that, should we deploy any of those, she’ll be ready.
The stem diameter can’t be any larger, because the knobs on Valve 1 don’t allow any clearance. It could be more circular, but I doubt that buys anything. The open ends of the slot won’t let mulch pack into the recesses.
I expect a wrench jaw will eventually snap off as the layers delaminate. In that case I’ll either sink a pair of steel pins into each jaw or, more likely, combine the handle & stem into one object, split the whole affair across the jaws, print the two halves, and glue them together so that the threads run in the proper direction to meet the stress.
Be that as it may, as of right now this is The Best Thing I’ve Ever Built…
The OpenSCAD source code:
// Hose connector knob
// Ed Nisley KE4ZNU - June 2015

Layout = "Build";				// Show Build Knob Stem

//- Extrusion parameters - must match reality!

ThreadThick = 0.25;
ThreadWidth = 0.40;

function IntegerMultiple(Size,Unit) = Unit * ceil(Size / Unit);

Protrusion = 0.1;

HoleWindage = 0.2;

//------
// Dimensions

StemOD = 30.0;					// max OD for valve-to-valve clearance

BossOD = 16.0;					// single-ended handle boss

SlotWidth = 13.0;
SlotHeight = 10.0;

StemInset = 10.0;
StemLength = StemInset + SlotHeight + 25.0;
StemSides = 2*4;

KnobOD1 = 70;						// maximum dia without chamfer
KnobOD2 = 60;						// top dia

KnobSides = 4*4;

DomeHeight = 12;					// dome shape above lobes

KnobHeight = DomeHeight + 2*SlotHeight;

DomeOD = KnobOD2 + (KnobOD1 - KnobOD2)*(DomeHeight/KnobHeight);

DomeArcRad = (pow(KnobHeight,2) + pow(DomeOD,2)/4) / (2*DomeHeight);

//- Adjust hole diameter to make the size come out right

module PolyCyl(Dia,Height,ForceSides=0) {			// based on nophead's polyholes

  Sides = (ForceSides != 0) ? ForceSides : (ceil(Dia) + 2);

  FixDia = Dia / cos(180/Sides);

  cylinder(r=(FixDia + HoleWindage)/2,h=Height,$fn=Sides);
}

//-- Stem for valve handles

module Stem() {

	difference() {
		rotate(0*180/StemSides)
			cylinder(d=StemOD,h=StemLength,$fn=StemSides);
		translate([0,0,SlotHeight/2 - Protrusion/2])
			cube([2*StemOD,SlotWidth,(SlotHeight + Protrusion)],center=true);
		translate([0,0,-Protrusion])
			cylinder(d=BossOD,h=SlotHeight,$fn=2*StemSides);
	}

}

//-- Hand-friendly knob

module KnobCap() {
	difference() {
		scale([1.0,0.75,1.0])
		intersection() {
			translate([0,0,(KnobHeight-DomeArcRad)])
				rotate(180/KnobSides)
					sphere(r=DomeArcRad,$fa=180/KnobSides);
				rotate(180/KnobSides)
					cylinder(r1=KnobOD1/2,r2=KnobOD2/2,h=KnobHeight,$fn=KnobSides);
				rotate(180/KnobSides)
					cylinder(r1=KnobOD2/2,r2=KnobOD1/2,h=KnobHeight,$fn=KnobSides);
		}
		translate([0,0,-Protrusion])
			rotate(0*180/StemSides)
				cylinder(d=(StemOD + 2*ThreadWidth),h=(StemInset + Protrusion),$fn=StemSides);
	}
}

//- Build it

if (Layout == "Knob")
	KnobCap();

if (Layout == "Stem")
	Stem();

if (Layout == "Build") {
	translate([-KnobOD1/2,0,0])
		KnobCap();
	translate([StemOD/2,0,StemLength])
		rotate([180,0,0])
			Stem();
}

if (Layout == "Show") {
	translate([0,0,0])
		Stem();
	translate([0,0,StemLength - StemInset])
		KnobCap();
}
So I stuck a snippet of ordinary “transparent” (it’s actually translucent) adhesive tape across the top of the Cycliq Fly6 camera lens:
Cycliq Fly6 Camera – blur tape
That smoothly blurs the top third of the frame:
Fly6 – Tape-blurred frame
The motivation for using translucent tape: it should maintain roughly the same brightness and color balance across the whole image. Opaque tape would burn out the remaining image as the camera desperately tries to maintain an average gray level.
Fast-forwarding VLC with the video stopped forces it to display the inter-frame compression blocks spanning several seconds of video:
Fly6 – Forced compression artifacts
The upper third of the frame has big, simple blocks that pegged the files at a uniform 475 MB per ten minute file, somewhat lower than the un-blurred 500 to 700 MB. So the compression definitely isn’t working nearly as hard.
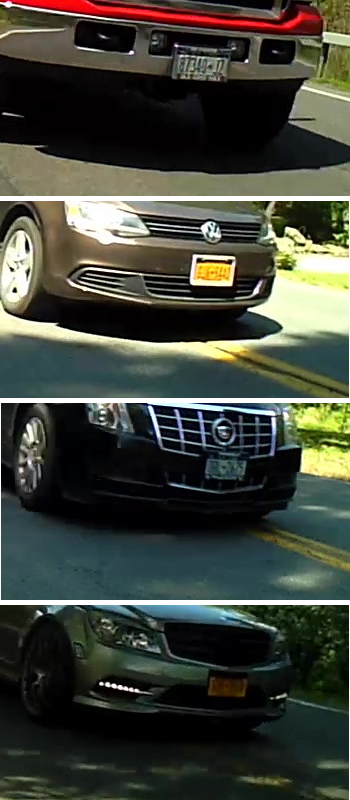
I hoped that simplifying the uninteresting part of the image would leave more bits for license plates and other interesting details, which might be the case. New York has two main licence plate color schemes (the obsolete high-contrast blue-on-white and the current low-contrast blue-on-orange “Empire Gold”) and both the Fly6 and the Sony AS30V cameras do much better with white plates in full sun.
Some samples at full size:
Fly6 – License Plates
Those were chosen based on:
Similar range / angle: just over the center line
Same-size crop box: 350 x 197
Sun vs. shade
I think those are somewhat sharper than the plates from un-blurred frames, but it’s not like the camera suddenly woke up smarter and started paying attention to the important stuff.