The Smell of Molten Projects in the Morning

Ed Nisley's Blog: Shop notes, electronics, firmware, machinery, 3D printing, laser cuttery, and curiosities. Contents: 100% human thinking, 0% AI slop.

Tag: Arduino

All things Arduino

  • Hard Drive Platter Mood Light: Improved Trigonometry

    The original Mood Light firmware used the current time in milliseconds as a factor in the sin() argument, assuming that the Arduino runtime would Do The Right Thing. Having been gently disabused of that notion, here’s another pass that resets the argument after every full cycle to keep the trig from going crazy. Thanks to all of you for helping out… [grin]

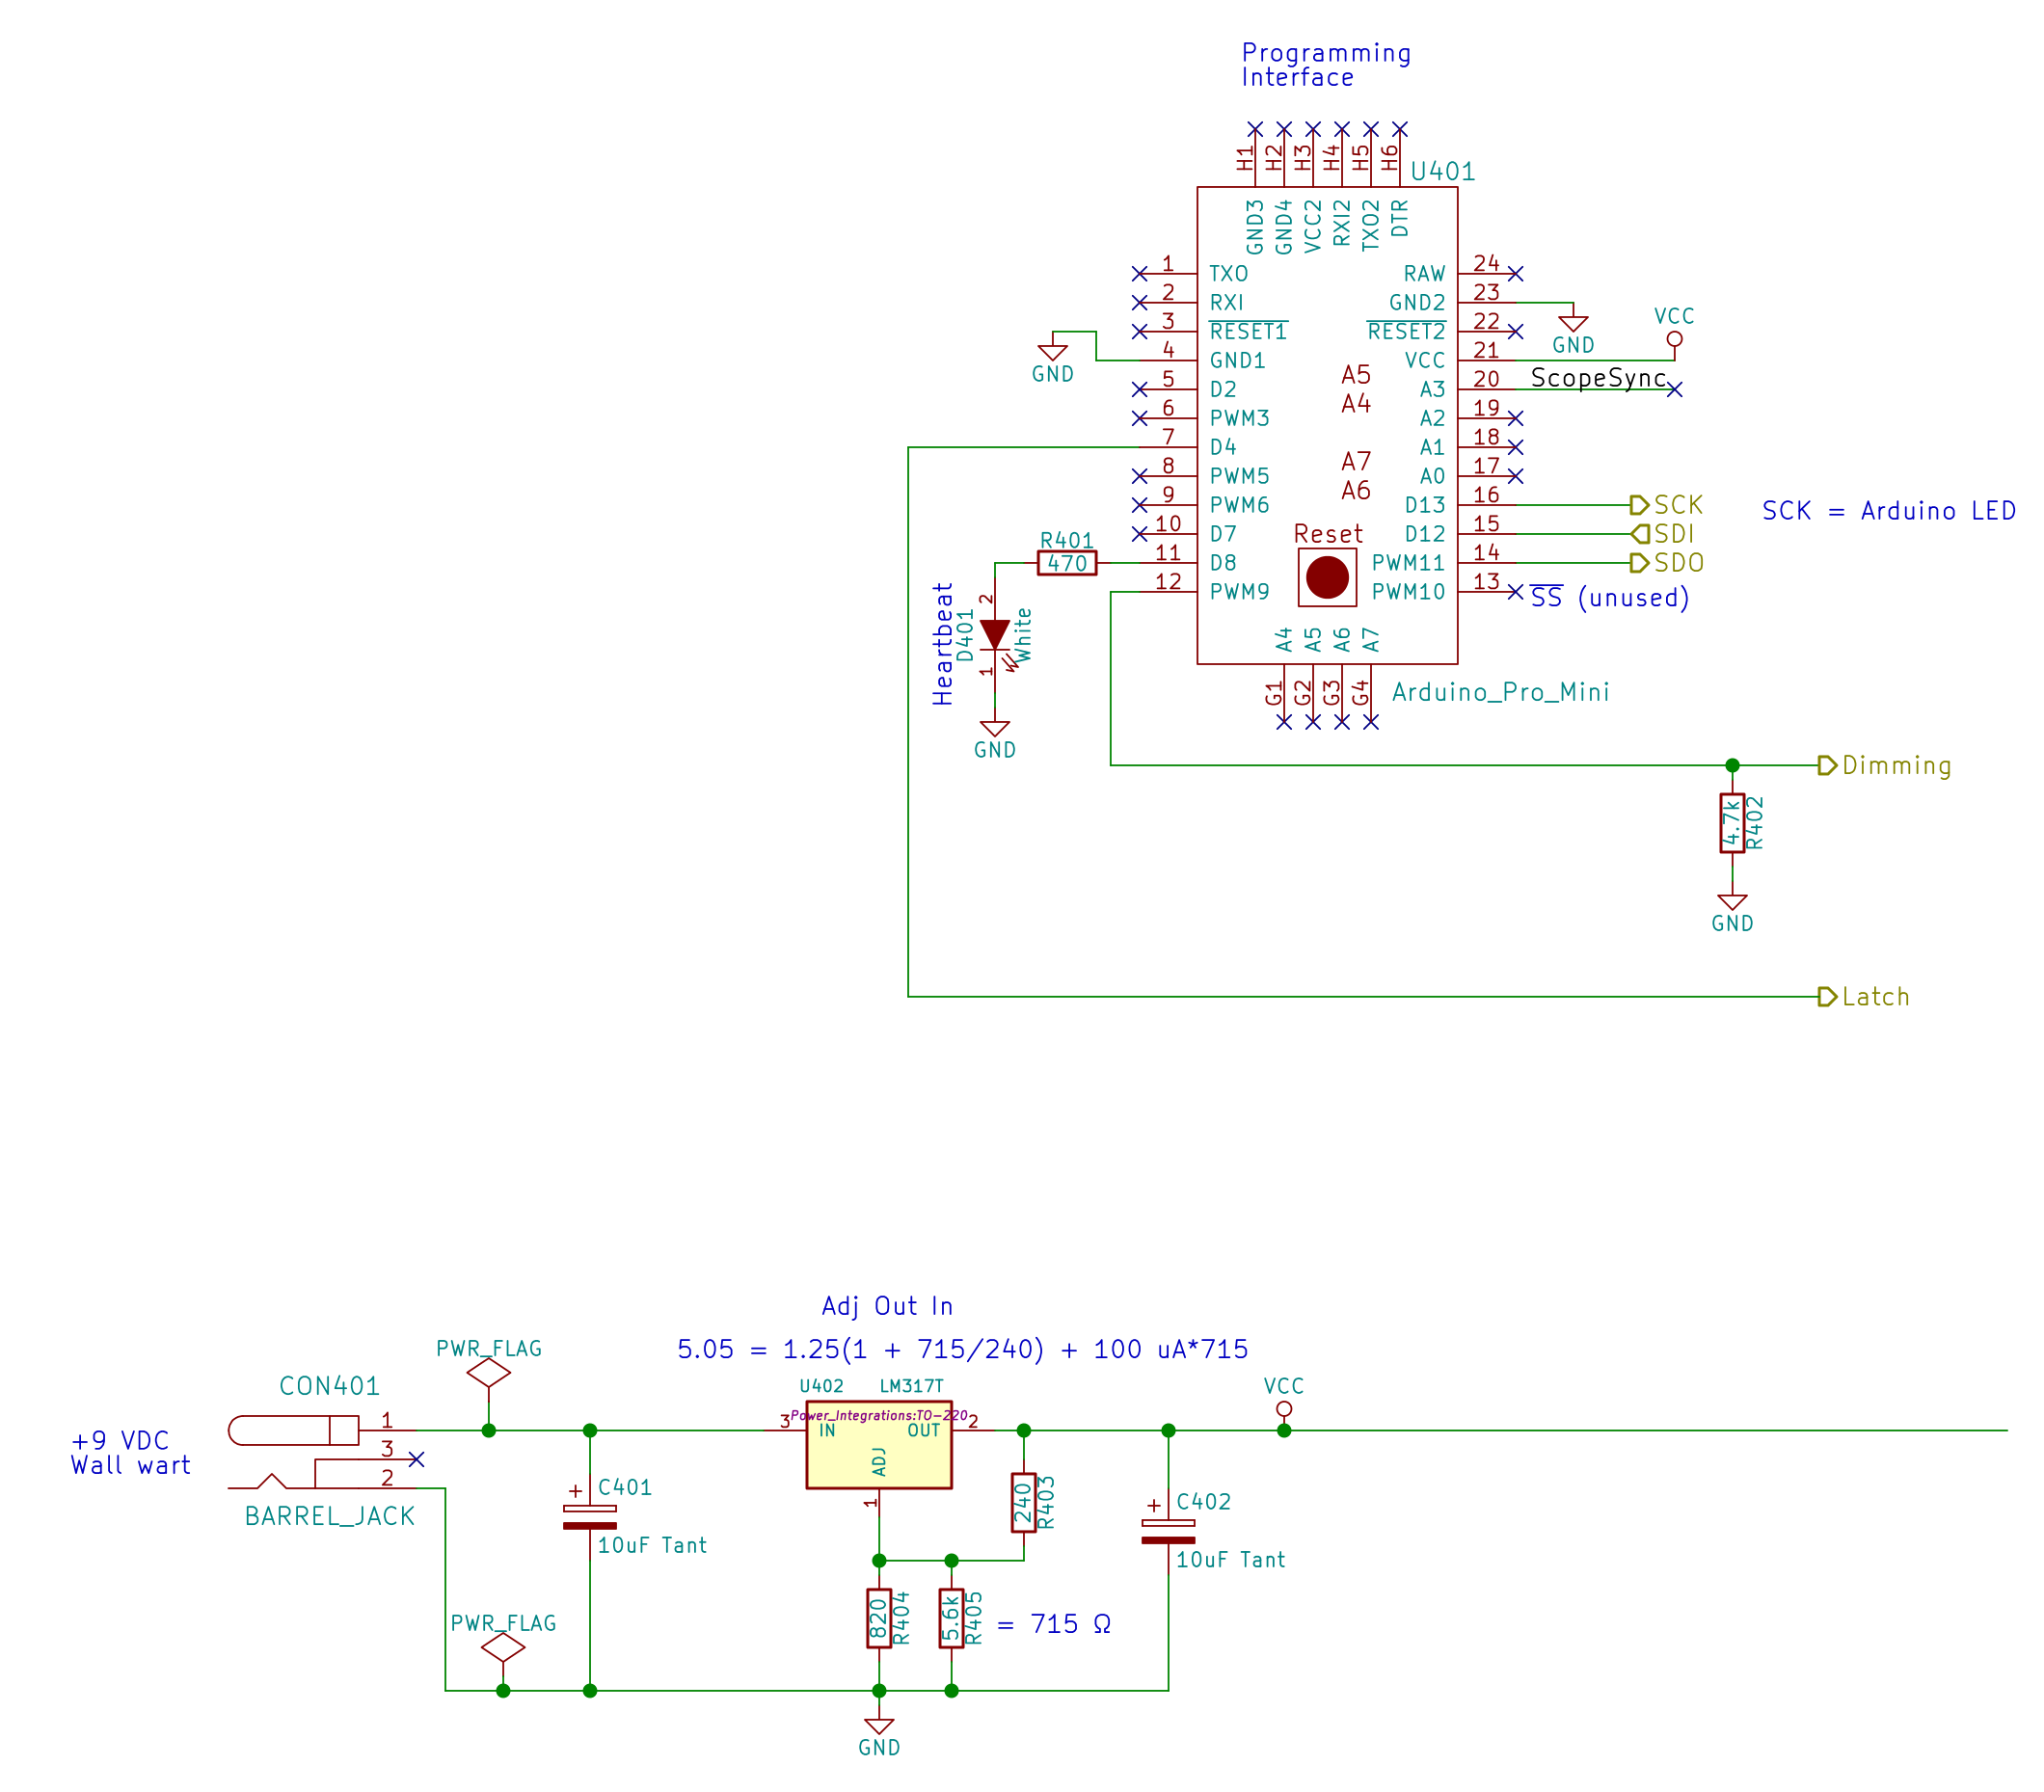
    The hardware still looks like this, though:

    Hard Drive Mood Light - high angle
    Hard Drive Mood Light – high angle

    Define a structure to hold everything needed to calculate each color, then make an array holding one structure per color:

    struct pixcolor_t {
    	byte Prime;
    	unsigned int NumSteps;
    	unsigned int Step;
    	float StepSize;
    	byte MaxPWM;
    	byte Value;
    };
    
    enum pixcolors {RED, GREEN, BLUE, PIXELSIZE};
    
    #define RESOLUTION 1000
    
    struct pixcolor_t Pixels[PIXELSIZE];
    

    The general idea is to increment the integer Step from 0 through NumSteps - 1 to create the sine wave, with the total number of steps per cycle being Prime times the RESOLUTION.

    The angular argument is Step * StepSize, with the size of each step equal to 2π / NumSteps. Because Step gets reset to zero after reaching NumSteps - 1, the argument never exceeds 2π and the trig never falls off the rails.

    Soooo, calculating the PWM value for each color goes like this:

    byte StepColor(byte Color) {
    
        Pixels[Color].Value = (Pixels[Color].MaxPWM / 2.0) * (1.0 + sin(Pixels[Color].Step * Pixels[Color].StepSize));
    	
    	Pixels[Color].Step = (Pixels[Color].Step >= Pixels[Color].NumSteps) ? 0 : Pixels[Color].Step + 1;
    	
    	if (0 == Pixels[Color].Step) {
    		printf("Color %d cycle end at %d\r\n",Color,Pixels[Color].NumSteps);
    	}
    
        return Pixels[Color].Value;
    }
    

    The MaxPWM parameter limits the perceived brightness, although not the peak current. Each Neopixel dissipates 300-ish mW at full throttle, they’re mounted on a plastic structure, and there’s not a lot of air flowing between those platters; running at half power makes a lot of sense.

    Initializing the structure values happens in the setup() function, because it’s easier than filling in all the array structure entries by hand:

    	Pixels[RED].Prime = 5;
    	Pixels[GREEN].Prime = 7;
    	Pixels[BLUE].Prime = 11;
    	
    	for (byte c=0; c < PIXELSIZE; c++) {
    		Pixels[c].NumSteps = RESOLUTION * Pixels[c].Prime;
    		Pixels[c].Step = random(Pixels[c].NumSteps);
    		Pixels[c].StepSize = TWO_PI / Pixels[c].NumSteps;
    		Pixels[c].MaxPWM = 128;
    		StepColor(c);
    	}
    

    The Phase value has Gone Away, because it really didn’t add anything to the proceedings. Instead, I randomize the starting Step, although there’s not a lot of randomness to be had early on in an Arduino program; that needs a bit more work. Adding a little PCB with a random noise source doesn’t seem cost-effective, although a photodetector peering out the side and adjusting the MaxPWM values might be a Good Thing.

    Come to think of it, limiting the sum of the PWM values might be more useful than limiting their individual maximum values. That’s a simple matter of software…

    The main() loop doesn’t have a lot to do. Every 25 ms it updates the three color PWM values, sets the new values into all 12 LED buffer locations, and sends the whole mess to the Neopixels. The RESOLUTION value acts as a gearshift between the 25 ms update rate and the speed at which complete cycles zip past. Absent the Prime factor, each cycle would require 25 ms * RESOLUTION ms to complete: call it 25 seconds.

    The Prime factors slow that down proportionally and push the repetition interval out to the product of all the factors. For the (5, 7, 11) factors shown below, that’s 5x7x11x253 s = 6×10⁶ s = 70 days,

    Now it doesn’t matter how often the millis() value wraps. Every now & again, MillisThen will be just under 232 and MillisNow will be just over 0, but their (unsigned) difference will be some huge number, the conditional will trip, and nobody will notice the timing glitch…

    The Arduino source code:

    // Neopixel mood lighting for hard drive platter sculpture
    // Ed Nisley - KE4ANU - November 2015
    
    #include <Adafruit_NeoPixel.h>
    
    //----------
    // Pin assignments
    
    const byte PIN_NEO = 6;				// DO - data out to first Neopixel
    
    const byte PIN_HEARTBEAT = 13;		// DO - Arduino LED
    
    //----------
    // Constants
    
    const unsigned long UpdateMS = 25ul - 4ul;		// update LEDs only this many ms apart minus loop() overhead
    
    //----------
    // Globals
    
    unsigned long MillisNow;
    unsigned long MillisThen;
    
    Adafruit_NeoPixel strip = Adafruit_NeoPixel(12, PIN_NEO, NEO_GRB + NEO_KHZ800);
    
    uint32_t FullWhite = strip.Color(255,255,255);
    uint32_t FullOff = strip.Color(0,0,0);
    
    struct pixcolor_t {
    	byte Prime;
    	unsigned int NumSteps;
    	unsigned int Step;
    	float StepSize;
    	byte MaxPWM;
    	byte Value;
    };
    
    enum pixcolors {RED, GREEN, BLUE, PIXELSIZE};
    
    #define RESOLUTION 1000
    
    struct pixcolor_t Pixels[PIXELSIZE];								// everything that calculates the pixel colors
    
    byte Map[] = {0,5,6,11, 1,4,7,10, 2,3,8,9};							// pixel numbers around platter, bottom to top.
    
    //-- Figure PWM based on current state
    
    byte StepColor(byte Color) {
    
        Pixels[Color].Value = (Pixels[Color].MaxPWM / 2.0) * (1.0 + sin(Pixels[Color].Step * Pixels[Color].StepSize));
    	
    	Pixels[Color].Step = (Pixels[Color].Step >= Pixels[Color].NumSteps) ? 0 : Pixels[Color].Step + 1;
    	
    	if (0 == Pixels[Color].Step) {
    		printf("Color %d cycle end at %d\r\n",Color,Pixels[Color].NumSteps);
    	}
    	
    //	printf("Step: %d Color: %d Value: %d\r\n",Pixels[Color].Step,(word)Color,(word)Pixels[Color].Value);
    	
        return Pixels[Color].Value;
    }
    
    
    //-- Helper routine for printf()
    
    int s_putc(char c, FILE *t) {
      Serial.write(c);
    }
    
    //------------------
    // Set the mood
    
    void setup() {
    	
    	pinMode(PIN_HEARTBEAT,OUTPUT);
    	digitalWrite(PIN_HEARTBEAT,LOW);	// show we arrived
    
    	Serial.begin(57600);
    	fdevopen(&s_putc,0);				// set up serial output for printf()
    
    	printf("Mood Light with Neopixels\r\nEd Nisley - KE4ZNU - November 2015\r\n");
    	
    /// set up Neopixels
    	
    	strip.begin();
    	strip.show();
    	
    // lamp test: run a brilliant white dot along the length of the strip
    	
    	printf("Lamp test: walking white\r\n");
    	
    	strip.setPixelColor(0,FullWhite);
    	strip.show();
    	delay(500);
    	
    	for (int i=1; i<strip.numPixels(); i++) {
    		digitalWrite(PIN_HEARTBEAT,HIGH);
    		strip.setPixelColor(i-1,FullOff);
    		strip.setPixelColor(i,FullWhite);
    		strip.show();
    		digitalWrite(PIN_HEARTBEAT,LOW);
    		delay(500);
    	}
    	
    	strip.setPixelColor(strip.numPixels() - 1,FullOff);
    	strip.show();
    	delay(500);
    	
    // and around the disks
    	
    	printf(" ... using Map array\r\n");
    	
    	strip.setPixelColor(Map[0],FullWhite);
    	strip.show();
    	delay(250);
    	
    	for (int i=1; i<strip.numPixels(); i++) {
    		digitalWrite(PIN_HEARTBEAT,HIGH);
    		strip.setPixelColor(Map[i-1],FullOff);
    		strip.setPixelColor(Map[i],FullWhite);
    		strip.show();
    		digitalWrite(PIN_HEARTBEAT,LOW);
    		delay(250);
    	}
    	
    	strip.setPixelColor(Map[strip.numPixels() - 1],FullOff);
    	strip.show();
    	delay(250);
    	
    	MillisNow = MillisThen = millis();
    	randomSeed(MillisNow + analogRead(7));
    	printf("First random number: %ld\r\n",random(10));
    	
    	Pixels[RED].Prime = 5;
    	Pixels[GREEN].Prime = 7;
    	Pixels[BLUE].Prime = 11;
    	
    	for (byte c=0; c < PIXELSIZE; c++) {
    		Pixels[c].NumSteps = RESOLUTION * Pixels[c].Prime;
    		Pixels[c].Step = random(Pixels[c].NumSteps);
    		Pixels[c].StepSize = TWO_PI / Pixels[c].NumSteps;
    		Pixels[c].MaxPWM = 128;
    		StepColor(c);
    	}
    	printf("Prime scales: (%d,%d,%d)\r\n",Pixels[RED].Prime,Pixels[GREEN].Prime,Pixels[BLUE].Prime);
    	printf("Initial step: (%d,%d,%d)\r\n",Pixels[RED].Step,Pixels[GREEN].Step,Pixels[BLUE].Step);
    	printf("  ...  color: (%d,%d,%d)\r\n",Pixels[RED].Value,Pixels[GREEN].Value,Pixels[BLUE].Value);
    	
    	for (int i=0; i<strip.numPixels(); i++) { strip.setPixelColor(Map[i],strip.Color(Pixels[RED].Value,Pixels[GREEN].Value,Pixels[BLUE].Value)); } strip.show(); } //------------------ // Run the mood void loop() { // printf("Loop! %ld %ld\r\n",MillisNow,MillisThen); MillisNow = millis(); if ((MillisNow - MillisThen) > UpdateMS) {
    		digitalWrite(PIN_HEARTBEAT,HIGH);
    
    		for (byte c=0; c < PIXELSIZE; c++) {
    			StepColor(c);
    		}
    		
    		for (int i=0; i < strip.numPixels(); i++) {
    			strip.setPixelColor(i,strip.Color(Pixels[RED].Value,Pixels[GREEN].Value,Pixels[BLUE].Value));
    		}
    		strip.show();
    
    		MillisThen = MillisNow;
    		digitalWrite(PIN_HEARTBEAT,LOW);
    	}
    	
    }
    
  • Neopixel Current

    Adafruit’s Neopixels are RGB LEDs with a built-in current-limiting 400 Hz PWM controller and a serial data link. Successive Neopixels aren’t synchronized, so their PWM cycles can produce serious current spikes.

    Lighting up just the red LED in two Neopixels at PWM 16/255 produces this current waveform (at 10 mA/div):

    Neopixel current 10 mA - 16-0-0 0-1
    Neopixel current 10 mA – 16-0-0 0-1

    Each red LED draws about 20 mA, so when the two Neopixel PWM cycles coincide, you get a nasty 40 mA spike. When they don’t coincide, you get a pair of 20 mA pulses. Those pulses walk with respect to each other at a pretty good clip; the oscillators aren’t trimmed to precision.

    Lighting up three Neopixels with PWM 16/255 on the red does exactly what you’d expect. The horizontal scale  is now 100 µs/div, making the PWM pulses five times wider:

    Neopixel current 10 mA - 16-0-0 0-1-2
    Neopixel current 10 mA – 16-0-0 0-1-2

    The narrow spike comes from the brief shining instant when all three Neopixels were on at the same time. Now you have three PWM pulses, each with slightly different periods.

    Remember that these are PWM 16/255 pulses. When they’re at full brightness, PWM 255/255, there’s only a brief downtime between pulses that last nearly 2.5 ms and they’ll overlap like crazy.

    Obviously, the more Neopixels and the lower the average PWM setting, the more the average current will tend toward the, uh, average. However, it will have brutal spikes, so the correct way to size the power supply is to multiply the number of Neopixels in the string by the maximum possible 60 mA/Neopixel… which gets really big, really fast.

    A 1 meter strip of 144 knockoff Neopixels from the usual eBay supplier will draw 144 x 60 mA = 8.6 A when all the pulses coincide. Worse, the supply must be able to cope with full-scale transients and all the fractions in between. A husky filter cap would be your friend, but you need one with a low ESR and very high capacity to support the transients.

    No wonder people have trouble with their Neopixel strings; you really shouldn’t (try to) run more than one or two directly from an Arduino’s on-board regulator…

  • Hard Drive Platter Mood Light: Neopixel Firmware

    Having accumulated a pile of useless hard drives, it seemed reasonable to harvest the platters and turn them into techie mood lights (remember mood lights?). Some doodling showed that four of Adafruit’s high-density Neopixel strips could stand up inside the 25 mm central hole, completely eliminating the need to putz around with PWM drivers and RGB LEDs: one wire from an Arduino Pro Mini and you’re done:

    const byte PIN_NEO = 6;				// DO - data out to first Neopixel
    

    The firmware creates three sine waves with mutually prime periods, then updates the RGB channels with raised-sine values every 10 ms. The PdBase constant defines the common conversion from milliseconds to radians:

    const float PdBase = 0.05 * TWO_PI / 1000.0;	// scale time in ms to radians
    

    The leading 0.05 = 1/20 means the sine wave will repeat every 20 s = 20000 ms.

    Dividing that period by three small primes produces an RGB pattern that will repeat every 5x11x17 = 935 PdBase cycles = 18.7×10³ s = 5.19 h:

    const float Period[] = {PdBase/5.0,PdBase/11.0,PdBase/17.0};		// mutually prime periods
    

    That’s languid enough for me, although I admit most of the colors look pretty much the same. Obviously, you can tune for best picture by dinking with a few constants.

    A Phase array sets the starting phase to 3π/2 = -90 degrees:

    float Phase[] = {3.0 * HALF_PI,3.0 * HALF_PI,3.0 * HALF_PI};		// sin(3π/2 ) = -1, so LEDs are off
    

    Jiggling those starting phases produces a randomized initial color that’s close to dark:

    	MillisNow = MillisThen = millis();
    	randomSeed(MillisNow + analogRead(6) + analogRead(7));
    	printf("Phases: ");
    	for (byte i=0; i<3; i++) {
    		Phase[i] += random(-1000,1000) * HALF_PI / 1000.0;
    		printf("%d ",(int)(Phase[i]*RAD_TO_DEG));
    	}
    	printf(" deg\r\n");
    

    With all that in hand, converting from time to color goes like this:

    uint32_t SineColor(unsigned long t) {
    byte rgb[3];
    
    	for (byte i=0; i<3; i++) {
    			rgb[i] = Intensity[i]/2.0 * (1 + sin(t * Period[i] + Phase[i]));
    	}
    	return strip.Color(rgb[0],rgb[1],rgb[2]);
    }
    

    The rest of the code scales neatly with the strip length defined in the magic instantiation:

    Adafruit_NeoPixel strip = Adafruit_NeoPixel(12, PIN_NEO, NEO_GRB + NEO_KHZ800);
    

    Although the colors change very slowly, shifting them all one chip toward the end of the 144 Neopixel strip at each update produces a noticeable difference that reassured me this whole mess was working:

    		for (int i=strip.numPixels()-1; i>0; i--) {
    			c = strip.getPixelColor(i-1);
    			strip.setPixelColor(i,c);
    		}
    
    		c = SineColor(MillisNow);
    		strip.setPixelColor(0,c);
    		strip.show();
    

    And with that in hand, It Just Worked…

    However, it’s worth noting that each Neopixel draws a bit over 60 mA at full white, which works out to a smidge under 9 A for a 144 LED strip. Because they’re PWM devices, the LEDs are either full-on or full-off, so the peak current can actually be 9 A, regardless of any reduced duty cycle to limit the intensity.

    The Adafruit driver includes an overall intensity control, but I added an Intensity array with separate values for each channel:

    float Intensity[] = {128.0,128.0,128.0};							// pseudo current limit - PWM is always full current
    

    That would allow throttling back the blue LEDs a bit to adjust the overall color temperature, but that’s definitely in the nature of fine tuning.

    The Adafruit Neopixel guide recommends a honkin’ big cap right at the strip, plus a 470 Ω decoupling resistor at the first chip’s data input. I think those attempt to tamp down the problems caused by underpowered supplies and crappy wiring; running it at half intensity produced a maximum average current just under the supply’s 3 A limit.

    The complete Arduino source code:

    // Neopixel mood lighting for hard drive platter sculpture
    // Ed Nisley - KE4ANU - November 2015
    
    #include <Adafruit_NeoPixel.h>
    
    //----------
    // Pin assignments
    
    const byte PIN_NEO = 6;				// DO - data out to first Neopixel
    
    const byte PIN_HEARTBEAT = 13;		// DO - Arduino LED
    
    //----------
    // Constants
    
    const int UPDATEMS = 10ul - 4ul;		// update LEDs only this many ms apart minus loop() overhead
    
    const float PdBase = 0.05 * TWO_PI / 1000.0;	// scale time in ms to radians
    
    const float Period[] = {PdBase/5.0,PdBase/11.0,PdBase/17.0};		// mutually prime periods
    float Phase[] = {3.0 * HALF_PI,3.0 * HALF_PI,3.0 * HALF_PI};		// sin(3π/2 ) = -1, so LEDs are off
    float Intensity[] = {128.0,128.0,128.0};							// pseudo current limit - PWM is always full current
    
    //----------
    // Globals
    
    unsigned long MillisNow;
    unsigned long MillisThen;
    
    Adafruit_NeoPixel strip = Adafruit_NeoPixel(12, PIN_NEO, NEO_GRB + NEO_KHZ800);
    
    uint32_t FullWhite = strip.Color(255,255,255);
    uint32_t FullOff = strip.Color(0,0,0);
    
    //--- figure color from time in ms
    
    uint32_t SineColor(unsigned long t) {
    byte rgb[3];
    
    	for (byte i=0; i<3; i++) {
    			rgb[i] = Intensity[i]/2.0 * (1 + sin(t * Period[i] + Phase[i]));
    	}
    	return strip.Color(rgb[0],rgb[1],rgb[2]);
    }
    
    //-- Helper routine for printf()
    
    int s_putc(char c, FILE *t) {
      Serial.write(c);
    }
    
    //------------------
    // Set the mood
    
    void setup() {
    	
    uint32_t c;
    
    	pinMode(PIN_HEARTBEAT,OUTPUT);
    	digitalWrite(PIN_HEARTBEAT,LOW);	// show we arrived
    
    	Serial.begin(57600);
    	fdevopen(&s_putc,0);				// set up serial output for printf()
    
    	printf("Mood Light with Neopixels\r\nEd Nisley - KE4ZNU - November 2015\r\n");
    	
    /// set up Neopixels
    	
    	strip.begin();
    	strip.show();
    	
    // lamp test: run a brilliant white dot along the length of the strip
    	
    	printf("Lamp test: walking white\r\n");
    	
    	strip.setPixelColor(0,FullWhite);
    	strip.show();
    	delay(500);
    	
    	for (int i=1; i<strip.numPixels(); i++) {
    		digitalWrite(PIN_HEARTBEAT,HIGH);
    		strip.setPixelColor(i-1,FullOff);
    		strip.setPixelColor(i,FullWhite);
    		strip.show();
    		digitalWrite(PIN_HEARTBEAT,LOW);
    		delay(500);
    	}
    	
    	MillisNow = MillisThen = millis();
    	randomSeed(MillisNow + analogRead(6) + analogRead(7));
    	printf("Phases: ");
    	for (byte i=0; i<3; i++) {
    		Phase[i] += random(-1000,1000) * HALF_PI / 1000.0;
    		printf("%d ",(int)(Phase[i]*RAD_TO_DEG));
    	}
    	printf(" deg\r\n");
    	
    	c = SineColor(MillisNow);
    	printf("Initial time: %08lx -> color: %08lx\r\n",MillisNow,c);
    	
    	for (int i=0; i<strip.numPixels()-1; i++) {
    		strip.setPixelColor(i,c);
    	}
    	
    	strip.show();
    	
    }
    
    //------------------
    // Run the mood
    
    void loop() {
    	
    byte r,g,b;
    uint32_t c;
    
    	MillisNow = millis();
    	if ((MillisNow - MillisThen) > UPDATEMS) {
    		digitalWrite(PIN_HEARTBEAT,HIGH);
    		
    		for (int i=strip.numPixels()-1; i>0; i--) {
    			c = strip.getPixelColor(i-1);
    			strip.setPixelColor(i,c);
    		}
    
    		c = SineColor(MillisNow);
    		strip.setPixelColor(0,c);
    		strip.show();
    
    		MillisThen = MillisNow;
    		digitalWrite(PIN_HEARTBEAT,LOW);
    	}
    }
    
    
  • 0D3 Voltage Regulator Tube

    A quartet of ceramic octal tube sockets arrived from halfway around the planet and matched up nicely with the business end of a 0D3 voltage regulator tube from the Hollow State Electronics box:

    0D3 voltage regulator tube in socket
    0D3 voltage regulator tube in socket

    If the 1-48 on the side of the tube base (facing away in the picture) means anything, then General Electric built it in January 1948.

    The pinout view in the datasheet assumes you’re looking at the bottom of the socket, which makes perfect sense given the hand-wired chassis construction techniques of the day:

    0D3 Voltage Regulator Tube - pinout
    0D3 Voltage Regulator Tube – pinout

    So the view is backwards when seen from the top, not that you’d ever need it:

    Ceramic octal tube socket - 0D3 pinout
    Ceramic octal tube socket – 0D3 pinout

    The internal jumper across pins 3-7 allows you to disconnect the downstream circuit when the regulator isn’t in the socket, which is a Very Good Idea with a shunt regulator.

    Not having a 200 V power supply ready to hand, but having recently restocked the 9 V alkaline battery box, this actually worked:

    0D3 voltage regulator test setup
    0D3 voltage regulator test setup

    That’s 16 x 9-ish V = 150 V across the battery terminals, plus a 50 V adjustable bench power supply coming in on clip leads from the upper right, with current shown on a digital panel meter across a 1 Ω sense resistor. The classic 1.5 kΩ carbon resistor emerged from from a coffee can of parts that Came With The House™ and seemed appropriate for the occasion.

    The tube conducts a few milliamps through a small plasma filament discharge at 150 V. The current ramps up to about 10 mA as the supply voltage increases to 180 V, whereupon the tube fires and the current jumps to 30 mA (which is less than the spec, but I ran the power supply in constant-current mode to avoid whoopsies).

    Reducing the current to 10 mA slightly reduces the area involved in the plasma discharge, but the tube still produces a nice display through the mica spacer / insulator atop the plate:

    0D3 voltage regulator - 10 mA current
    0D3 voltage regulator – 10 mA current

    That isn’t quite in focus, but should give you the general idea.

    I didn’t measure the operating voltages across the tube, mostly because I didn’t want more cheap clip leads cluttering the bench.

    It’d make a very low intensity nightlight that dissipates a watt or two. Boosting the current to the absolute maximum 40 mA would brighten it up a bit, but dissipating 6 W in the tube probably won’t do it any good.

    This obviously calls for an Arduino monitoring the tube current with a Hall-effect sensor and regulating it with a hulking MOSFET…

  • Avalanche Noise Amp: Arduino Firmware

    With the hardware in hand:

    Reverse-bias noise amplifier - detail
    Reverse-bias noise amplifier – detail


    Feeding a stream of avalanche noise from a reverse-biased transistor base-emitter junction into the Arduino’s MISO pin without benefit of a shift register, this Arduino source code extracts nine bit chunks of random data to drive the 8×8 RGB LED matrix:

    // Random LED Dots - from noise source
    // Ed Nisley - KE4ANU - September 2015
    
    //----------
    // Pin assignments
    
    const byte PIN_HEARTBEAT = 8;		// DO - heartbeat LED
    const byte PIN_SYNC = A3;			// DO - scope sync
    
    const byte PIN_LATCH  = 4;			// DO - shift register latch clock
    
    const byte PIN_DIMMING = 9;			// AO - LED dimming control
    
    // These are *hardware* SPI pins
    
    const byte PIN_MOSI = 11;			// DO - data to shift reg
    const byte PIN_MISO = 12;			// DI - data from shift reg - sampled noise input
    const byte PIN_SCK  = 13;			// DO - shift clock to shift reg (also Arduino LED)
    const byte PIN_SS = 10;				// DO - -slave select (must be positive for SPI output)
    
    //----------
    // Constants
    
    #define DISPLAY_MS 10000ul
    
    //----------
    // Globals
    
    // Input noise bits can produce one of four possible conditions
    //  Use the von Neumann extractor, discarding 00 and 11 sequences
    // https://en.wikipedia.org/wiki/Randomness_extractor#Von_Neumann_extractor
    // Sampling interval depends on SPI data rate
    // LSB arrives first, so it's the earliest sample
    
    #define VNMASK_A 0x00000001
    #define VNMASK_B 0x01000000
    
    enum sample_t {VN_00,VN_01,VN_10,VN_11};
    
    typedef struct {
    	byte BitCount;					// number of bits accumulated so far
    	unsigned Bits;					// random bits filled from low order upward
    	int Bias;						// tallies 00 and 11 sequences to measure analog offset
       unsigned SampleCount[4];	// number of samples in each bin
    } random_t;
    
    random_t RandomData;
    
    // LED selects are high-active bits and low-active signals: flipped in UpdateLEDs()
    // *exactly* one row select must be active in each element
    
    typedef struct {
    	const byte Row;
    	byte ColR;
    	byte ColG;
    	byte ColB;
    } leds_t;
    
    // altering the number of rows & columns will require substantial code changes...
    #define NUMROWS 8
    #define NUMCOLS 8
    
    leds_t LEDs[NUMROWS] = {
    	{0x80,0,0,0},
    	{0x40,0,0,0},
    	{0x20,0,0,0},
    	{0x10,0,0,0},
    	{0x08,0,0,0},
    	{0x04,0,0,0},
    	{0x02,0,0,0},
    	{0x01,0,0,0},
    };
    
    byte RowIndex;
    
    #define LEDS_ON 0
    #define LEDS_OFF 255
    
    unsigned long MillisNow;
    unsigned long DisplayBase;
    
    //-- Helper routine for printf()
    
    int s_putc(char c, FILE *t) {
      Serial.write(c);
    }
    
    //-- Useful stuff
    
    // Free RAM space monitor
    //  From http://playground.arduino.cc/Code/AvailableMemory
    
    uint8_t * heapptr, * stackptr;
    
    void check_mem() {
      stackptr = (uint8_t *)malloc(4);          // use stackptr temporarily
      heapptr = stackptr;                     // save value of heap pointer
      free(stackptr);      // free up the memory again (sets stackptr to 0)
      stackptr =  (uint8_t *)(SP);           // save value of stack pointer
    }
    
    void TogglePin(char bitpin) {
    	digitalWrite(bitpin,!digitalRead(bitpin));    // toggle the bit based on previous output
    }
    
    void PulsePin(char bitpin) {
    	TogglePin(bitpin);
    	TogglePin(bitpin);
    }
    
    //---------
    //-- SPI utilities
    
    void EnableSPI(void) {
    	digitalWrite(PIN_SS,HIGH);					// make sure this is high!
    	SPCR |= 1 << SPE;
    }
    
    void DisableSPI(void) {
    	SPCR &= ~(1 << SPE);
    }
    
    void WaitSPIF(void) {
    	while (! (SPSR & (1 << SPIF))) {
    //		TogglePin(PIN_HEARTBEAT);
    		continue;
    	}
    }
    
    byte SendRecSPI(byte DataByte) {					// send one byte, get another in exchange
    	SPDR = DataByte;
    	WaitSPIF();
    	return SPDR;									// SPIF will be cleared
    }
    
    //---------------
    // Update LED shift registers with new data
    // Returns noise data shifted in through MISO bit
    
    unsigned long UpdateLEDs(byte i) {
    	
    unsigned long NoiseData = 0ul;
    	
    	NoiseData |= (unsigned long) SendRecSPI(~LEDs[i].ColB);				// correct for low-active outputs
    	NoiseData |= ((unsigned long) SendRecSPI(~LEDs[i].ColG)) << 8;
    	NoiseData |= ((unsigned long) SendRecSPI(~LEDs[i].ColR)) << 16;
    	NoiseData |= ((unsigned long) SendRecSPI(~LEDs[i].Row))  << 24;
    
    	analogWrite(PIN_DIMMING,LEDS_OFF);			// turn off LED to quench current
    	PulsePin(PIN_LATCH);						// make new shift reg contents visible
    	analogWrite(PIN_DIMMING,LEDS_ON);
    
    	return NoiseData;
    }
    
    //---------------
    // Extract random data from sampled noise input
    //  ... tuck it into the global bit structure
    // Returns von Neumann status of the sample
    
    byte ExtractRandomBit(unsigned long RawSample) {
    	
    byte RetVal;
    
    	switch (RawSample & (VNMASK_A | VNMASK_B)) {
    	case 0:							// 00 - discard
    		RetVal = VN_00;
    		RandomData.Bias--;
    		break;
    	case VNMASK_A:					// 10 - true
    		RetVal = VN_10;
    		RandomData.BitCount++;
    		RandomData.Bits = (RandomData.Bits << 1) | 1;
    		break;
    	case VNMASK_B:					// 01 - false
    		RetVal = VN_01;
    		RandomData.BitCount++;
    		RandomData.Bits  = RandomData.Bits << 1;
    		break;
    	case (VNMASK_A | VNMASK_B):		// 11 - discard
    		RetVal = VN_11;
    		RandomData.Bias++;
    		break;
    	}
    	
    	RandomData.Bias = constrain(RandomData.Bias,-9999,9999);
    	RandomData.SampleCount[RetVal]++;
    	RandomData.SampleCount[RetVal] = constrain(RandomData.SampleCount[RetVal],0,63999);
    
    	return RetVal;
    }
    
    //---------------
    // Set LED from random bits
    // Assumes the Value contains at least nine low-order random bits
    // On average, this leaves the LED unchanged for 1/8 of the calls...
    
    void SetLED(unsigned Value) {
    	
    byte Row =   Value        & 0x07;
    byte Col =   (Value >> 3) & 0x07;
    byte Color = (Value >> 6) & 0x07;
    	
    byte BitMask = (0x80 >> Col);
    	
    //	printf("%u %u %u %u\r\n",Row,Col,Color,BitMask);
    
    	LEDs[Row].ColR &= ~BitMask;
    	LEDs[Row].ColR |= (Color & 0x04) ? BitMask : 0;
    	
    	LEDs[Row].ColG &= ~BitMask;
    	LEDs[Row].ColG |= (Color & 0x02) ? BitMask : 0;
    	
    	LEDs[Row].ColB &= ~BitMask;
    	LEDs[Row].ColB |= (Color & 0x01) ? BitMask : 0;
    	
    }
    
    //------------------
    // Set things up
    
    void setup() {
    	
    	pinMode(PIN_HEARTBEAT,OUTPUT);
    	digitalWrite(PIN_HEARTBEAT,HIGH);		// show we arrived
    	
    	pinMode(PIN_SYNC,OUTPUT);
    	digitalWrite(PIN_SYNC,LOW);
    
    	pinMode(PIN_MOSI,OUTPUT);				// SPI-as-output is not strictly necessary
    	digitalWrite(PIN_MOSI,LOW);
    
    	pinMode(PIN_SCK,OUTPUT);
    	digitalWrite(PIN_SCK,LOW);
    
    	pinMode(PIN_SS,OUTPUT);
    	digitalWrite(PIN_SS,HIGH);				// OUTPUT + HIGH is required to make SPI output work
    	
    	pinMode(PIN_LATCH,OUTPUT);
    	digitalWrite(PIN_LATCH,LOW);
    	
    	Serial.begin(57600);
    	fdevopen(&s_putc,0);					// set up serial output for printf()
    
    	printf("Noisy LED Dots\r\nEd Nisley - KE4ZNU - September 2015\r\n");
    	
    //-- Set up SPI hardware
    // LSB of SPCR set bit clock speed:
    //  00 = f/4
    //  01 = f/16
    //  10 = f/64
    //  11 = f/128
    	
    	SPCR = B01110011;						// Auto SPI: no int, enable, LSB first, master, + edge, leading, speed
    	SPSR = B00000000;						// not double data rate
    
    	EnableSPI();							// turn on the SPI hardware
    	
    	SendRecSPI(0);							// set valid data in shift registers: select Row 0, all LEDs off
    	
    //-- Dimming pin must use fast PWM to avoid beat flicker with LED refresh rate
    //   Timer 1: PWM 9 PWM 10
    
    	analogWrite(PIN_DIMMING,LEDS_OFF);		// disable column drive (hardware pulled it low before startup)
    
    	TCCR1A = B10000001; 					// Mode 5 = fast 8-bit PWM with TOP=FF
    	TCCR1B = B00001001; 					// ... WGM, 1:1 clock scale -> 64 kHz
    	
    //-- lamp test: send a white flash through all LEDs
    //	 collects noise data to get some randomness going
    
    	printf("Lamp test begins: white flash each LED...");
    
    	digitalWrite(PIN_HEARTBEAT,LOW);		// turn off while panel blinks
    	
    	analogWrite(PIN_DIMMING,LEDS_ON);		// enable column drive
    
    	for (byte i=0; i<NUMROWS; i++) {
    		for (byte j=0; j<NUMCOLS; j++) {
    			LEDs[i].ColR = LEDs[i].ColG = LEDs[i].ColB = 0x80 >> j;
    			for (byte k=0; k<NUMROWS; k++) {
    				ExtractRandomBit(UpdateLEDs(k));
    				delay(25);
    			}
    		LEDs[i].ColR = LEDs[i].ColG = LEDs[i].ColB = 0;
    		}
    	}
    	UpdateLEDs(NUMROWS-1);					// clear the last LED
    	
    	printf(" done!\r\n");
    
    //-- Preload LEDs with random values
    //   We take whatever number of random bits arrived in RandomData during lamp test
    
    	digitalWrite(PIN_HEARTBEAT,LOW);
    	printf("Preloading LED array\r\nRandom bits %04x\r\n",RandomData.Bits);
    	
    	randomSeed(RandomData.Bits);
    	
    	for (byte Row=0; Row<NUMROWS; Row++) {
    		for (byte Col=0; Col<NUMCOLS; Col++) {		// Col runs backwards, but we don't care
    			LEDs[Row].ColR |= random(2) << Col;
    			LEDs[Row].ColG |= random(2) << Col;
    			LEDs[Row].ColB |= random(2) << Col;
    		}
    		UpdateLEDs(Row);
    	}
    	
    	RandomData.BitCount = 0;
    	RandomData.Bits = 0;
    	RandomData.Bias = 0;
       for (byte i=0; i<4; i++) {
    	   RandomData.SampleCount[i] = 0;
       }
    	
    	check_mem();
    	printf("SP: %u HP: %u Free RAM: %u\r\n",stackptr,heapptr,stackptr - heapptr);
    
    	printf("Running...\r\n");
    	
    	DisplayBase = millis();
    
    }
    
    //------------------
    // Run the test loop
    
    void loop() {
    	
    byte ThisBit;
    	
    	MillisNow = millis();
    	
    	if (RowIndex >= NUMROWS) {							// set up LED row index for this pass
    		RowIndex = 0;
    		PulsePin(PIN_SYNC);
    	}
    	
    	if ((MillisNow - DisplayBase) >= DISPLAY_MS) {
    		analogWrite(PIN_DIMMING,LEDS_OFF);				// turn off LED to prevent bright glitch
    		printf("Bias: %5d of %5u - %5u %5u %5u %5u\r\n",
             RandomData.Bias,
             RandomData.SampleCount[VN_00] + RandomData.SampleCount[VN_11],
             RandomData.SampleCount[0],
             RandomData.SampleCount[1],
             RandomData.SampleCount[2],
             RandomData.SampleCount[3]
             );
    		RandomData.Bias = 0;
          for (byte i=0; i<4; i++) {
             RandomData.SampleCount[i] = 0;
          }
     //		check_mem();
    //		printf("SP: %u HP: %u Free RAM: %u\r\n",stackptr,heapptr,stackptr - heapptr);
    		DisplayBase = MillisNow;
    	}
    		
    // Update one LED row per pass, get at most one random bit
    
    	ThisBit = ExtractRandomBit(UpdateLEDs(RowIndex++));
    	
    // Update the heartbeat LED to show bit validity
    
    	switch (ThisBit) {
    		case VN_00:
    		case VN_11:
    			digitalWrite(PIN_HEARTBEAT,HIGH);
    			break;
    		case VN_01:
    		case VN_10:
    			digitalWrite(PIN_HEARTBEAT,LOW);
    			break;
    	}
    	
    // If we have enough random data, twiddle one LED
    	
    	if (RandomData.BitCount >= 9) {
    //		analogWrite(PIN_DIMMING,LEDS_OFF);				// turn off LED array to prevent bright glitch
    		
    		SetLED(RandomData.Bits);
    		RandomData.BitCount = 0;
    		RandomData.Bits = 0;
    	}
    
    	digitalWrite(PIN_HEARTBEAT,LOW);
    
    }
    

    Now I can point folks at the whole thing…

  • Avalanche Noise Amp: Hardware

    Finally, the as-built hardware for the Avalanche Noise Random Number Display gadget:

    Reverse-bias noise amplifier - detail
    Reverse-bias noise amplifier – detail

    The noise interconnection consists of one little wire:

    High Speed Randoms - Schematic - overview
    High Speed Randoms – Schematic – overview

    The noise generator, amplifier, and bias power supply:

    High Speed Randoms - Schematic - avalanche noise amplifier
    High Speed Randoms – Schematic – avalanche noise amplifier

    The Arduino (Pro Mini, at least) and the logic / LED power supply:

    High Speed Randoms - Schematic - Arduino and power
    High Speed Randoms – Schematic – Arduino and power

    The row drivers:

    High Speed Randoms - Schematic - row drivers
    High Speed Randoms – Schematic – row drivers

    And the red-green-blue LED column drivers:

    High Speed Randoms - Schematic - column drivers
    High Speed Randoms – Schematic – column drivers

    All of which make the common-anode RGB LED matrix blink merrily away:

    High Speed Randoms - Schematic - 8x8 RGB LED Matrix
    High Speed Randoms – Schematic – 8×8 RGB LED Matrix

    Now all it needs is a dollop of source code…

  • Avalanche Noise Amp: Sampling

    The relatively low bandwidth of the amplified noise means two successive samples (measured in Arduino time) will be highly correlated. Rather than putz around with variable delays between the samples, I stuffed the noise directly into the Arduino’s MISO pin and collected four bytes of data while displaying a single row:

    unsigned long UpdateLEDs(byte i) {
    	
    unsigned long NoiseData = 0ul;
    	
    	NoiseData |= (unsigned long) SendRecSPI(~LEDs[i].ColB);				// correct for low-active outputs
    	NoiseData |= ((unsigned long) SendRecSPI(~LEDs[i].ColG)) << 8;
    	NoiseData |= ((unsigned long) SendRecSPI(~LEDs[i].ColR)) << 16;
    	NoiseData |= ((unsigned long) SendRecSPI(~LEDs[i].Row))  << 24;
    
    	analogWrite(PIN_DIMMING,LEDS_OFF);			// turn off LED to quench current
    	PulsePin(PIN_LATCH);						// make new shift reg contents visible
    	analogWrite(PIN_DIMMING,LEDS_ON);
    
    	return NoiseData;
    }
    

    The bit timing looks like this:

    SPI Sample - noise data - 01
    SPI Sample – noise data – 01

    The vertical cursors mark the LSB position in the first and last bytes of the SPI clock. The horizontal cursors mark the minimum VIH and maximum VIL, so the sampled noise should produce 0 and 1 bits at the vertical cursors. Note that there’s no shift register on the input: MISO just samples the noise signal at each rising clock edge.

    I picked those two bit positions because they produce more-or-less equally spaced samples during successive rows; you can obviously tune the second bit position for best picture as you see fit.

    Given a pair of sequential samples, a von Neumann extractor whitens the noise and returns at most one random bit:

    #define VNMASK_A 0x00000001
    #define VNMASK_B 0x01000000
    
    enum sample_t {VN_00,VN_01,VN_10,VN_11};
    
    typedef struct {
    	byte BitCount;					// number of bits accumulated so far
    	unsigned Bits;					// random bits filled from low order upward
    	int Bias;						// tallies 00 and 11 sequences to measure analog offset
       unsigned SampleCount[4];	// number of samples in each bin
    } random_t;
    
    random_t RandomData;
    
    ... snippage ...
    
    byte ExtractRandomBit(unsigned long RawSample) {
    	
    byte RetVal;
    
    	switch (RawSample & (VNMASK_A | VNMASK_B)) {
    	case 0:							// 00 - discard
    		RetVal = VN_00;
    		RandomData.Bias--;
    		break;
    	case VNMASK_A:					// 10 - true
    		RetVal = VN_10;
    		RandomData.BitCount++;
    		RandomData.Bits = (RandomData.Bits << 1) | 1;
    		break;
    	case VNMASK_B:					// 01 - false
    		RetVal = VN_01;
    		RandomData.BitCount++;
    		RandomData.Bits  = RandomData.Bits << 1;
    		break;
    	case (VNMASK_A | VNMASK_B):		// 11 - discard
    		RetVal = VN_11;
    		RandomData.Bias++;
    		break;
    	}
    	
    	RandomData.Bias = constrain(RandomData.Bias,-9999,9999);
    	RandomData.SampleCount[RetVal]++;
    	RandomData.SampleCount[RetVal] = constrain(RandomData.SampleCount[RetVal],0,63999);
    
    	return RetVal;
    }
    

    The counters at the bottom track some useful statistics.

    You could certainly use something more complex, along the lines of a hash function or CRC equation, to whiten the noise, although that would eat more bits every time.

    The main loop blips a pin to show when the extractor discards a pair of identical bits, as in this 11 sequence:

    SPI Sample - noise flag - 11
    SPI Sample – noise flag – 11

    That should happen about half the time, which it pretty much does:

    SPI Sample - noise flag - 1 refresh
    SPI Sample – noise flag – 1 refresh

    The cursors mark the same voltages and times; note the slower sweep. The middle trace blips at the start of the Row 0 refresh.

    On the average, the main loop collects half a random bit during each row refresh and four random bits during each complete array refresh. Eventually, RandomData.Bits will contain nine random bits, whereupon the main loop updates the color of a single LED, which, as before, won’t change 1/8 of the time.

    The Arduino trundles around the main loop every 330 µs and refreshes the entire display every 2.6 ms = 375 Hz. Collecting nine random bits requires 9 x 330 µs = 3 ms, so the array changes slightly less often than every refresh. It won’t completely change every 64 x 8/7 x 3 ms = 220 ms, because dupes, but it’s way sparkly.

    In the spirit of “Video or it didn’t happen!”, there’s a low-budget Youtube video about that…