-
Fu Mask Cutting Templates
A local hospital contacted Mary’s quilting group to sew up cloth covers to prolong the life of their medical-grade N95 masks. Their recommended pattern, the Fu Face Mask from the FreeSewing group, comes in three sizes:
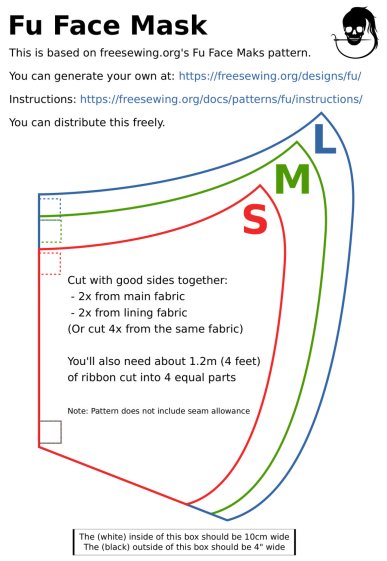
Freesewing – Fu Mask N.B.: Use their original PDF, because a JPG picture probably won’t come out at the right size.
Also N.B.: Used by itself, this is not a medical-grade filter mask.
The patterns do not include the usual 1/4 inch seam allowance around the outside, so I cranked out 3D printed plastic cutting templates.
If you’re not interested in 3D printing, 2D print the PDF file on cardboard, sketch a seam allowance, and cut it out, as quilters have been doing since slightly after home printers happened.
The plan of attack:
- Convert mask outlines into a bitmap image (GIMP)
- Create Bezier curves by tracing outlines (Inkscape)
- Save curves as SVG files
- Convert SVG into solid model (OpenSCAD)
- Add stiffening ribs &c
- Save as STL solid model
- Slice into G-Code file (Slic3r)
- Fire the M2!
So, we begin …
Import the PDF into The GIMP, delete the text & suchlike, convert to monochrome, and save the pattern outlines as a PNG file:
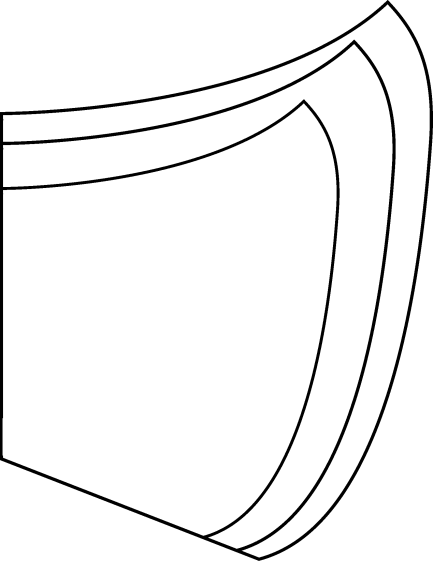
Fu Facemask – outlines It turns out Inkscape can directly import the PDF, but it valiantly tries to convert all the text and the incidental graphic elements, none of which will be useful in this situation. It’s easier to delete them in The GIMP and make a bank shot off a PNG file.
Update: Scruss’s comment provides a much simpler workflow!
Import the PNG into Inkscape and trace one outline with the Bezier curve tool:

Fu Mask – Inkscape Bezier trace If you squint really carefully, you’ll see Bezier control handles sticking out of the nodes. I laid three nodes along the top arc and four along the right side, but do what’cha like; the
Insertkey orShift+Iinserts andDeleteremoves nodes. It’s easier to center a node in the middle of the PNG line with snapping turned off:Shift+dragwhile mousing or globally with#.You could unleash the bitmap auto-tracer, but it generates a bazillion uselessly tiny Bezier curves.
When you’re happy, select and copy the path with
Ctrl+C, paste it into a shiny new Inkscape document (Ctrl+N) withCtrl-V, save it with a catchy file name likeFu Mask - Small - nominal.svg, and close that document to return to the document with the PNG outlines and the original path.Select the original path again, create a dynamic offset with
Ctrl+J, open the XML editor withCtrl+Shift+X(which automagically selects the proper SVG element), and change theinkscape:radiusvalue from 0 to 6.35 (mm, which everyone should use) to get a 1/4 inch seam allowance:
Fu Mask – Inkscape XML Editor – Offset radius The path will puff out with curved corners:

Fu Mask – Inkscape offset Copy into a new document, save as
Fu Mask - Small - seam allowance.svg, and close.Repeat that process for each of the three mask sizes to create three pairs of SVG files: the nominal mask outline and the corresponding seam allowance outline for each size.
The OpenSCAD program imports the SVG files, removes the nominal outline from within the seam allowance to leave the outline, adds stiffening ribs, and stamps an ID letter on both sides of the central button:

Fu Mask Cutting Template – Small – solid model Choose one of the three sizes with the OpenSCAD customizer, save the resulting model as an STL file, repeat for the three sizes, and you’re done.
This process can convert any outline paths in SVG files into cutting templates, so, should the Fu Mask not suit your fancy, Use The Source.
For convenience, the STL files are on Thingiverse.
From the comments, a Washington hospital uses a similar pattern: their PDF with assembly instructions.
The OpenSCAD source code as a GitHub Gist:
This file contains hidden or bidirectional Unicode text that may be interpreted or compiled differently than what appears below. To review, open the file in an editor that reveals hidden Unicode characters. Learn more about bidirectional Unicode characters// Fu Mask cutting templates // Ed Nisley – KE4ZNU – 2020-03 // Mask patterns from: // https://freesewing.org/blog/facemask-frenzy/ // More info on my blog: // https://softsolder.com/2020/03/29/fu-mask-cutting-templates/ /* [Mask Size] */ Name = "Small"; // [Small, Medium, Large, Test] /* [Hidden] */ Templates = [ // center ID letter and file name ["S","Small"], ["M","Medium"], ["L","Large"], ["T","Test"], // for whatever you like ]; T_ID = 0; // Template indexes T_NAME = 1; BarThick = 4.0; // template thickness HubOD = 20.0; // center button diameter // These should match slicer values ThreadThick = 0.25; ThreadWidth = 0.40; Protrusion = 0.1; // make clean holes //— Build it t = Templates[search([Name],Templates,1,1)[0]]; // find template index Dir = "./"; FnOuter = str(Dir,"Fu Facemask – ",t[T_NAME]," – seam allowance.svg"); FnInner = str(Dir,"Fu Facemask – ",t[T_NAME]," – nominal.svg"); difference() { linear_extrude(BarThick,convexity=5) { intersection() { import(FnOuter,center=true); union() { square([200.0,5.0],center=true); // horizontal bar square([5.0,200.0],center=true); // vertical bar } } circle(d=HubOD); // central button difference() { // cutting template! import(FnOuter,center=true); import(FnInner,center=true); } } translate([0,0,BarThick – ThreadThick]) // top ID recess cylinder(d=HubOD – 6*ThreadWidth,h=ThreadThick + Protrusion); translate([0,0,-Protrusion]) // bottom ID recess cylinder(d=HubOD – 6*ThreadWidth,h=ThreadThick + Protrusion); } translate([0,0,2*BarThick/3]) // top ID linear_extrude(height=BarThick/3,convexity=2) text(text=t[T_ID],size=10, font="Arial:style:Bold",halign="center",valign="center"); mirror([1,0,0]) // bottom ID linear_extrude(height=BarThick/3,convexity=2) text(text=t[T_ID],size=10, font="Arial:style:Bold",halign="center",valign="center"); Verily, there’s nothing like a good new problem to take your mind off all your old problems …
-
Subscribe
Subscribed
Have a WordPress.com account? Log in now.

