The Smell of Molten Projects in the Morning

Ed Nisley's Blog: Shop notes, electronics, firmware, machinery, 3D printing, laser cuttery, and curiosities. Contents: 100% human thinking, 0% AI slop.

Month: December 2021

  • Bafang Battery Charge Port: Internal Wiring

    Bafang Battery Charge Port: Internal Wiring

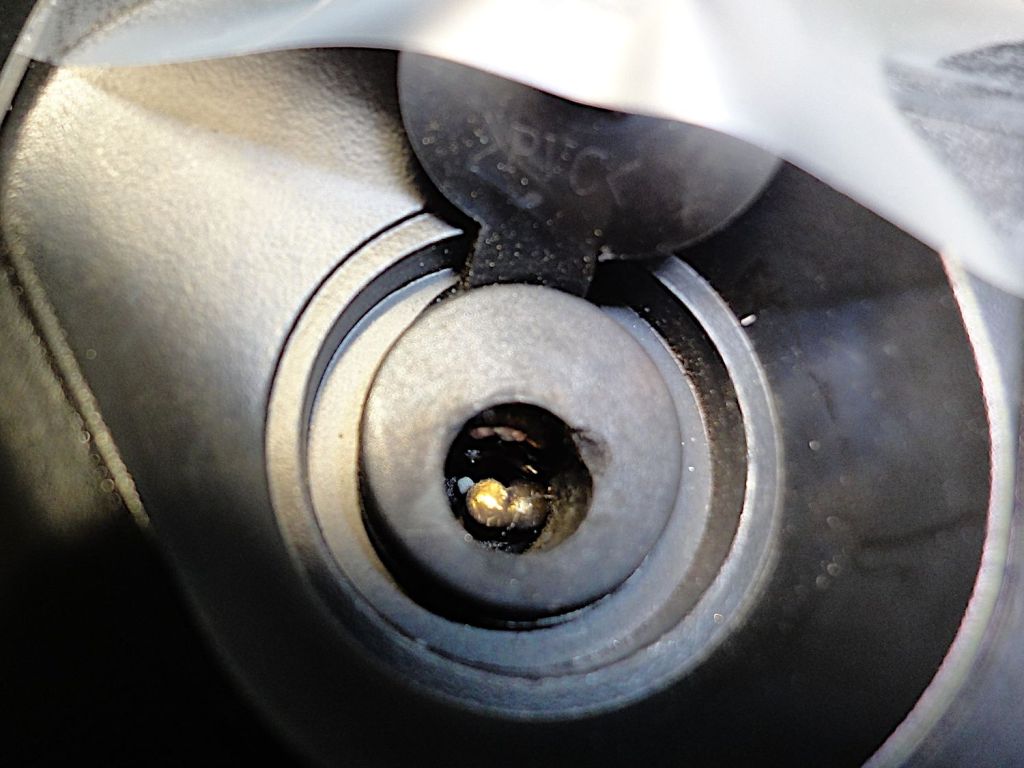
    Short-circuiting the Bafang battery’s charge port may have done anything from completely destroying the battery management circuit to just welding a brass nugget onto the port’s center pin. The main output to the bike motor remained functional, so my friend used it on rides over the next few days to reduce the charge level.

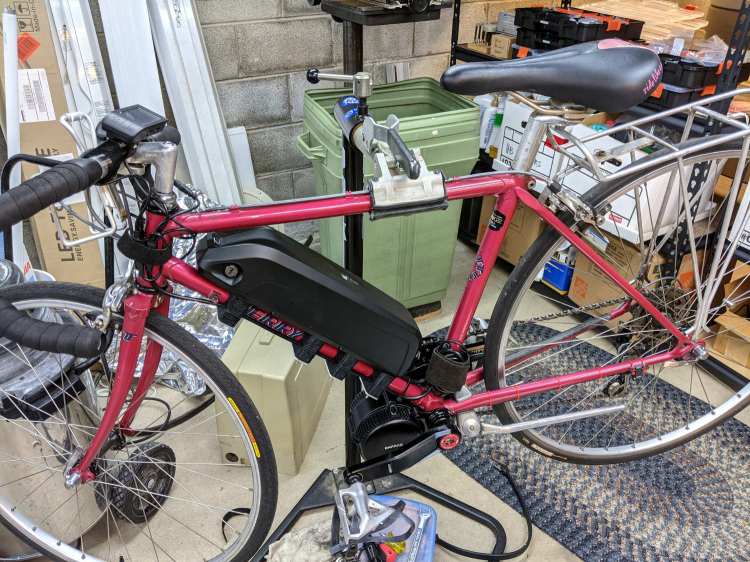
    Meanwhile, I peeked inside the undamaged battery on Mary’s bike:

    Bafang battery interior - overview
    Bafang battery interior – overview

    The battery pack is neatly shrink-wrapped and firmly glued into the plastic shell, with the battery management PCB on the other side of the battery. Some gentle prying suggests it will be difficult to disengage the adhesive, so getting the pack out will likely require cutting the blue wrap, extricating the cells as an unbound set, then cutting the blue wrap to release the wires.

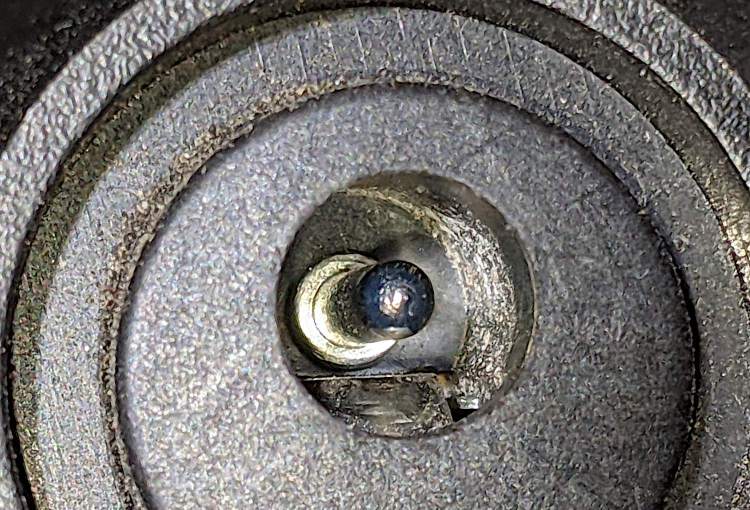
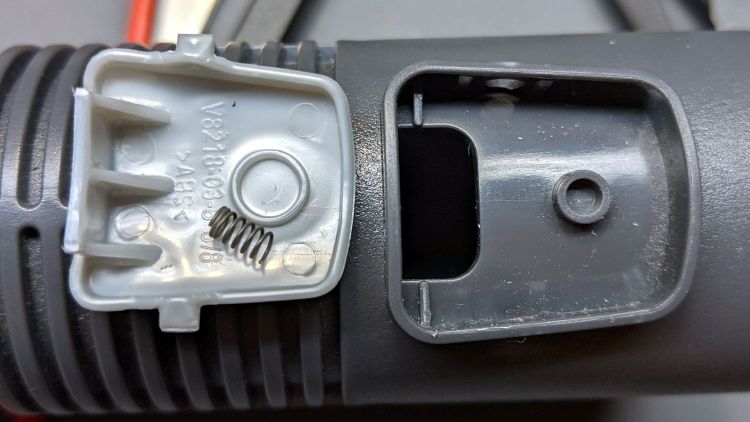
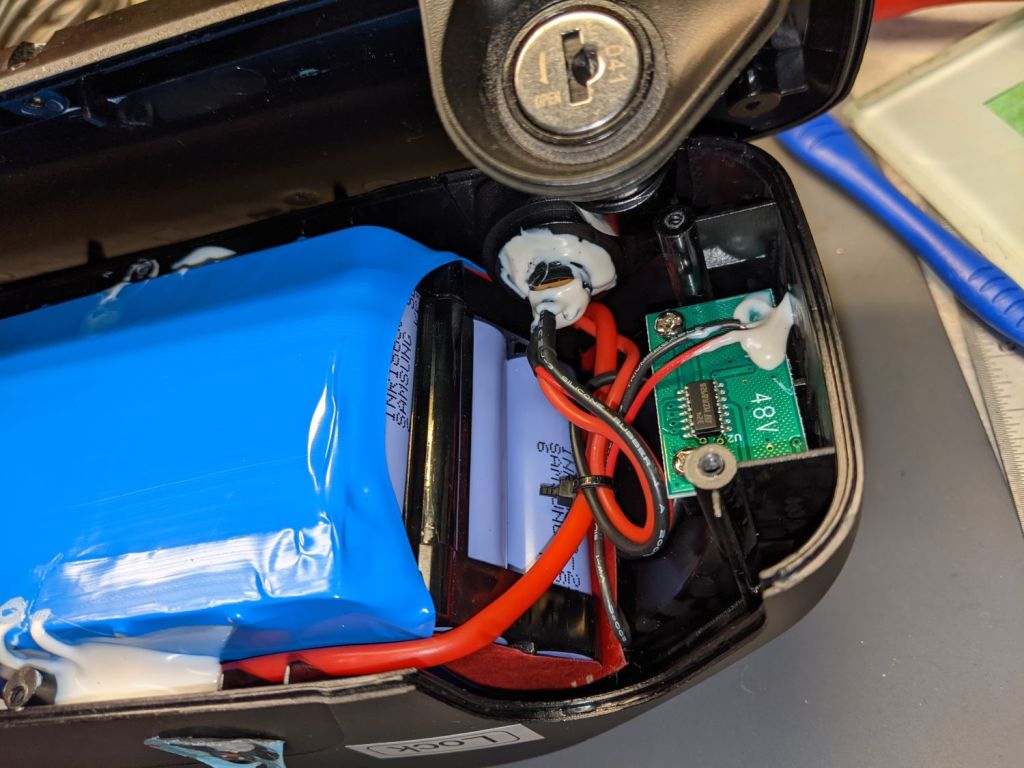
    A closer look at the nose of the battery:

    Bafang battery interior - front
    Bafang battery interior – front

    The large red wire entering on the left comes from the motor connector, loops around the nose of the battery, and probably connects to the battery’s most positive terminal or, perhaps, to the corresponding BMS terminal.

    The medium black wire from the side contact of the coaxial jack (atop the pair of red wires) burrows under the battery and likely connects to the most negative battery terminal. This is the charger plug’s outer terminal.

    The small red wire from the center contact of the coaxial jack (between the medium black and red wires) goes to the charge indicator PCB in the nose of the battery. This is basically a push-to-test voltmeter with four LEDs indicating the charge state from about 40 V through 54 V. The small black wire from that PCB burrows under the battery on its way to the BMS.

    The medium red wire from the center contact goes to the BMS.

    There is no way to determine how much damage the short might have done, although the silicone-insulated wires should have survived momentary heating, unlike cheap PVC insulation that slags down at the slightest provocation.

    Removing and replacing the coaxial jack requires Cutting Three Wires then rejoining them, a process fraught with peril. You must already have a profound respect for high voltages, high currents, and high power wiring; this is no place for on-the-job learning and definitely not where you can move fast and break things.

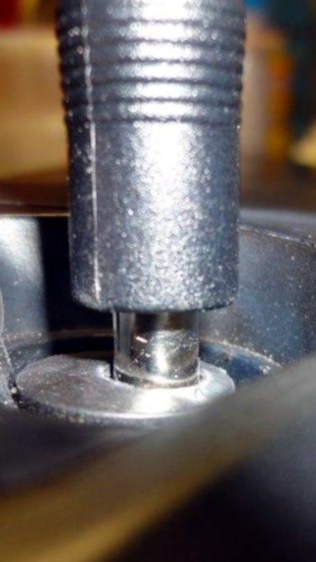
    With this in mind, the only hope is to remove the nugget and see if the battery charges properly.

    The trick will be to do this without any possibility of shorting a metallic tool between the center pin and the side contact.

  • Bafang Battery Charge Port: Whoopsie

    Bafang Battery Charge Port: Whoopsie

    The Bafang mid-drive e-bike kits I installed on Mary’s Tour Easy recumbent and a friend’s Terry Symmetry used the “Ultra-Slim Shark” lithium battery, a rectangular lump with a tapered snout:

    Bafang BBS02 - Terry Symmetry full assembly
    Bafang BBS02 – Terry Symmetry full assembly

    The battery has a key lock on its left side:

    Bafang battery - lock
    Bafang battery – lock

    The lock might deter casual thievery, but really prevents the battery from bouncing out of its mounting plate while riding.

    The right side has a charge port closed with a rubber plug:

    Bafang battery - charge port - closed
    Bafang battery – charge port – closed

    The cover protects a coaxial jack with a 5.5 mm OD and a 2.1 mm center pin:

    Bafang battery - charge port
    Bafang battery – charge port

    My friend in Raleigh generally removes the battery before hoisting the bike into the back of her car to haul it to a friend’s house for their companionable rides: not lifting an additional seven pounds is a Good Idea™.

    A momentary distraction in the middle of that process caused her to insert the brass key into the charging port, rather than the lock. The key put a very short circuit between the coaxial jack’s side contact and the center pin, melting the key tip and welding a brass nugget onto the side of the pin:

    Bafang battery - damaged charge port
    Bafang battery – damaged charge port

    The charger plug normally sits almost flush to the port’s surface:

    Bafang battery - charge plug
    Bafang battery – charge plug

    The nugget keeps the plug out the damaged port, preventing the plug from making electrical contact:

    Bafang battery - damaged port - plug
    Bafang battery – damaged port – plug

    She owned the problem and immediately bought another battery, which tells you the value she places on riding her e-bike.

    Verily it is written: let someone who is without whoopsie cast the first shade.

    Any takers? Yeah, the way I see it, someone who says they’ve never done anything quite like that is either not doing anything or not telling the complete truth. For sure, I’ve done plenty of inadvertent damage!

    Here’s the problem:

    • The damaged battery is the better part of 600 miles away from my shop
    • Civilians cannot ship 560 W·hr lithium batteries through any parcel delivery service
    • Civilians cannot fly or take the train with such a battery, either
    • Driving 1200 miles twice is out of the question for either of us

    How would you proceed?

    More to come …

    For reference:

    Basically, it is possible to ship lithium batteries up to 100 W·h.

  • Dirt Devil Vacuum: Stuck Adapter

    Dirt Devil Vacuum: Stuck Adapter

    My tool adapters for the Dirt Devil stick vacuum cleaner worked fine when inserted into the power unit, but got stuck in the floor brush extension tube:

    Dirt Devil Floor Tube - stuck adapter
    Dirt Devil Floor Tube – stuck adapter

    The adapter rotated freely inside the socket, so its diameter was correct and it wasn’t jammed, but pushing the latch button (at the depression on the right) didn’t release the adapter.

    Popping the latch out of the tube let the adapter slide easily out of the socket and exposed the innards:

    Dirt Devil Floor Tube - latch internals
    Dirt Devil Floor Tube – latch internals

    The two bosses inside the latch originally captured a nice conical spring:

    Dirt Devil Floor Tube - conical latch spring
    Dirt Devil Floor Tube – conical latch spring

    The tab on the left side of the latch button engages a slot in the OEM brush head and the recessed ring around my adapters:

    Dirt Devil Nozzle Bushing - solid model
    Dirt Devil Nozzle Bushing – solid model

    It turns out the molded tab was slightly too long, so pushing the latch button all the way down didn’t retract the tab out of the bore, so it remained engaged in the adapter’s ring.

    The conical spring also didn’t seem to collapse completely flat, so the bosses inside the latch button couldn’t quite bottom out, leaving the tab protruding even further inside the bore. It also required an inordinate amount of force to push the latch all the way down.

    While fiddling with all this, I noticed that the OEM floor brush would sometimes hang up on the tab, so the operation wasn’t all that smooth even with the original equipment.

    So I trimmed maybe half a millimeter off the tab, just enough to release the adapter with the button fully pressed and without the conical spring, then replaced the conical spring with a tiny spring (from the Big Box o’ Random Springs) trimmed to allow the full range of travel. This not only released the adapter, it also let the OEM floor brush pop out more easily.

    A zero-dollar repair, although with considerable annoyance.

  • The Machine Stops

    As foretold by E. M. Forster in 1909, we have two exhibits of the machine grinding to a halt.

    Amazon sent one of their prescription savings cards, followed a few days later by a note:

    We recently mailed you a physical copy of your Amazon Prime Rx savings card, and are writing to inform you that the BIN listed on your Prime Rx card printed incorrectly. The correct BIN is 019363.

    So I wrote the corrected number on my card, not that I will ever use it:

    Amazon RX - BIN error
    Amazon RX – BIN error

    Although the BIN (whatever that stands for) is a numeric value, it’s not treated as a number by whoever reads it. I’d lay money down that the source code’s formatting string changed from %6d to %06d or the equivalent in whatever fancy language they use nowadays.

    The Social Security Administration sent me an email telling me to check a corrected version of a statement they sent a few months ago. Unfortunately, attempting to do so while writing this post produces a heads-up notice:

    We apologize for any inconvenience accessing my Social Security. We are aware of some technical difficulties and are working on them at this time. We appreciate your patience as we work to solve the problems as quickly as possible.

    Attempting to sign on seems to proceed normally, until this technical difficulty popped up:

    We’re Sorry…
    There has been an unexpected system error.

    Your login session has been terminated. For security reasons, please close all of your internet browser windows.

    The first statement put my nearest Social Security office 130 miles away in Wilkes Barre, PA. The corrected statement put it back where it belongs, in the hot urban core of Poughkeepsie.

    Perhaps an off-by one error in the database lookup?

    As far as I can tell, the world now depends on software nobody can understand or control.

  • Halogen Blinky Test

    Halogen Blinky Test

    Dropping the ordinary flashlight bulb into the drawer where it belonged revealed what I think is a halogen flashlight bulb, so I rebuilt the blinky test setup:

    Halogen flashlight bulb test setup
    Halogen flashlight bulb test setup

    This time I used a BUZ71A MOSFET (13 A, 100 mΩ RDS) driven with a 10 V gate pulse to make sure it acted like a switch instead of a current sink.

    The first attempt looked … odd:

    Halogen 3V - no cap - 4ms 1A-div
    Halogen 3V – no cap – 4ms 1A-div

    The gate pulse is yellow, the drain voltage is magenta, the bulb current is cyan at 1 A/div, and the timebase ticks along at 2 ms/div.

    Moving the magenta trace to the supply voltage on the other side of the bulb produces even more weirdness:

    Halogen 3V - no cap - Vsupply - 4ms 1A-div
    Halogen 3V – no cap – Vsupply – 4ms 1A-div

    Apparently, slugging a 3 A bench supply with a 3 A pulse lasting only 4 ms causes distress of the output tract.

    Kludging a hulking 22 mF (yes, 22000 µF) cap across the power supply provides enough local storage to make things work properly:

    Halogen 3V - 22000µF - Vsupply - 4ms 1A-div
    Halogen 3V – 22000µF – Vsupply – 4ms 1A-div

    With the cap in place, the drain terminal looks less unruly:

    Halogen 3V - 4ms 1A-div
    Halogen 3V – 4ms 1A-div

    The drain voltage starts at about 600 mV with the 3 A pulse, a bit more than you’d expect from the alleged 100 mΩ drain-source resistance, but those numbers are generally aspirational and the test setup leaves a lot to be desired.

    A 10 ms pulse produces a distinct flash, rather than a dull orange blip (timebase now at 10 ms/div):

    Halogen 3V - 22000µF - 10ms 1A-div
    Halogen 3V – 22000µF – 10ms 1A-div

    A 30 ms pulse reaches full brightness as the filament settles at normal operating temperature:

    Halogen 3V - 22000µF - 30ms 1A-div
    Halogen 3V – 22000µF – 30ms 1A-div

    A 20 ms flash might suffice for decorative purposes, in which case each pulse requires 90 mW·s = 3 V × 1.5 A × 20 ms of energy. Running it all day requires 7.8 kW·s = 2.2 W·h, so it’s even less appealing than that old skool tungsten bulb.

    Which is, of course, why LED flashlight bulbs are a thing.

  • Incandescent Blinky Test

    Incandescent Blinky Test

    A flashlight bulb emerged from the clutter, which prompted me to ask if it might make an interesting blinky. Spoiler: probably not.

    The bulb had “2.4 V 0.7 A” stamped on its shell, so the test setup looked like this:

    Flashlight bulb test setup
    Flashlight bulb test setup

    A list seems helpful:

    • Solder wires to bulb in lieu of a socket
    • Bench supply at 2.4 V
    • Grossly abused 2N3904 NPN transistor as a switch
    • Function generator pulsing the base
    • Scope voltage probes on base (yellow) and collector (magenta)
    • Tek current probe on bench supply lead (cyan, 500 mA/div)

    The function generator has a 50 Ω output, so depend on it to limit the base current just like it was a resistor. The output voltage is symmetric around 0 V, so apply an offset of half the peak-to-peak signal to get a positive-going pulse:

    Flashlight bulb test - function gen setup
    Flashlight bulb test – function gen setup

    A 150 ms pulse gives the bulb just barely enough energy to light as a little orange blip, with the collector voltage dropping as the filament heats up and its resistance increases:

    Tungsten 2.4V 700mA - 150ms
    Tungsten 2.4V 700mA – 150ms

    Given 350 ms to heat up, the bulb produces a nice white-hot flash:

    Tungsten 2.4V 700mA - 350ms
    Tungsten 2.4V 700mA – 350ms

    The poor transistor acts as a 600 mA constant current sink, which isn’t surprising given its 300 mA absolute maximum current rating.

    Homework: figure the base drive and current gain

    Protip: don’t do that to a cherished transistor

    The bulb resistance starts out at 0.5 Ω and rises to 2.5 Ω when the filament glows white-hot at the end of the pulse.

    Something like 250 ms produces a noticeable blink, requiring 360 mW·s = 2.4 V × 600 mA × 250 ms from the power supply. Blinking once every ten seconds all day means 8640 pulses for a total energy of 864 mW·hr; call it 1 W·hr.

    A pair of (fresh) AA alkaline cells provide 7.5 W·hr for maybe a week of blinkiness.

    A not-dead-yet 18650 lithium cell might offer 15 W·hr, but running the bulb from 3.7-ish V, rather than 3-ish V, increases the energy per pulse by 20% and decreases the run time correspondingly.

    Surely not worth the effort …

  • Humana Unsubscribe FAIL

    Quite some years ago, I had a health insurance plan with Humana, although I gave it up because the premiums seemed entirely disproportional to the benefits. They have continued to bombard me with emails telling me how wonderful they are, with an obligatory sentence at the bottom:

    If you do not want us to contact you by email, you can unsubscribe from our online Humana community.

    I do not know anything about this “community” of which they speak, other than that they seem to think I want to be part of it.

    Clicking on the “unsubscribe” link takes me to a page at their randomly named email service, whereupon I check the “don’t send me anything” box and click the “Submit” button:

    Humana Unsubscribe failure
    Humana Unsubscribe failure

    Did you see the green text near the middle, where my email address should be? Apparently somebody misconfigured the email script to not include the actual address; the %25 gibberish seems to be encoded percent signs, so it may be one of those too-many / too-few / wrong-kind of character escapes.

    Just a typo that could happen to anyone. Right?

    Having once been a customer, I still have an account, but there is no way to control / shut off those messages. Not being a current customer, however, I cannot use their chat interface, which would likely not be productive. I am unwilling to wait on hold for an hour, because I know my call is not valuable to them, and their customer service rep wouldn’t be competent to solve the problem anyhow.

    Fortunately, I can set up a filter to route their emails directly to trash.