The Smell of Molten Projects in the Morning

Ed Nisley's Blog: Shop notes, electronics, firmware, machinery, 3D printing, laser cuttery, and curiosities. Contents: 100% human thinking, 0% AI slop.

Month: September 2013

  • Makergear M2: Bridge Torture Test

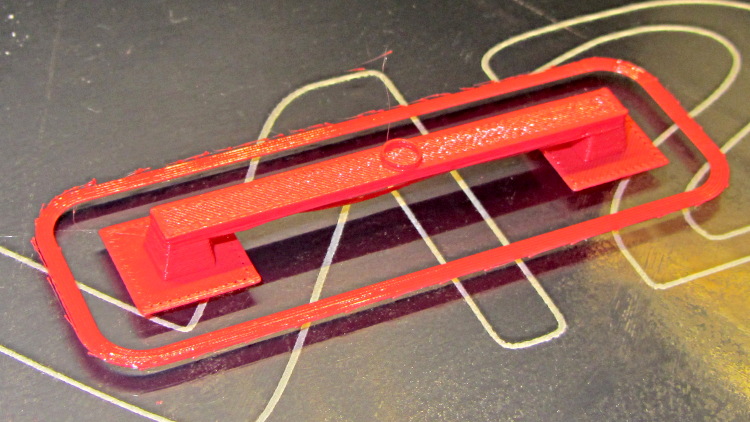
    Although I’ve pretty much given up on torture tests, I saw a note about the troubles someone had with Triffid Hunter’s Bridge Torture Test object. I did a bit of tweaking to the OpenSCAD source to shorten the struts and add the pads (which could be done with Slic3r’s Brim settings), but it’s otherwise about the same. The clear span is about 50 mm:

    Bridge Torture Test - solid model
    Bridge Torture Test – solid model

    Using my usual settings, with no special setup, the front looked OK:

    Bridge torture test - overview
    Bridge torture test – overview

    One strand came out rather droopy:

    Bridge torture test - front
    Bridge torture test – front

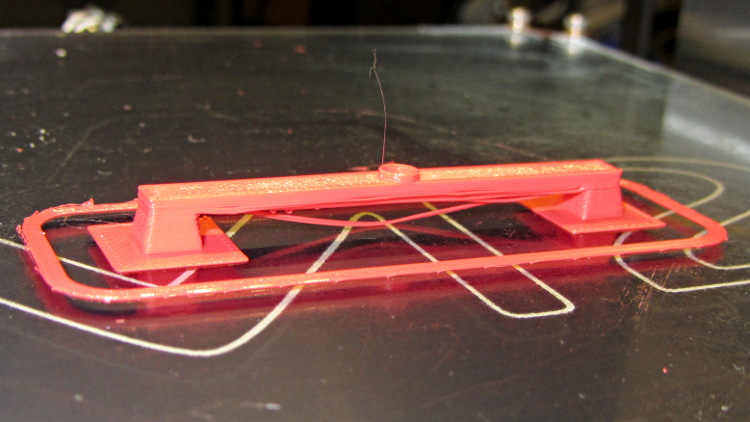
    The bottom layer of the bridge isn’t as consolidated as it could be:

    Bridge torture test - bottom
    Bridge torture test – bottom

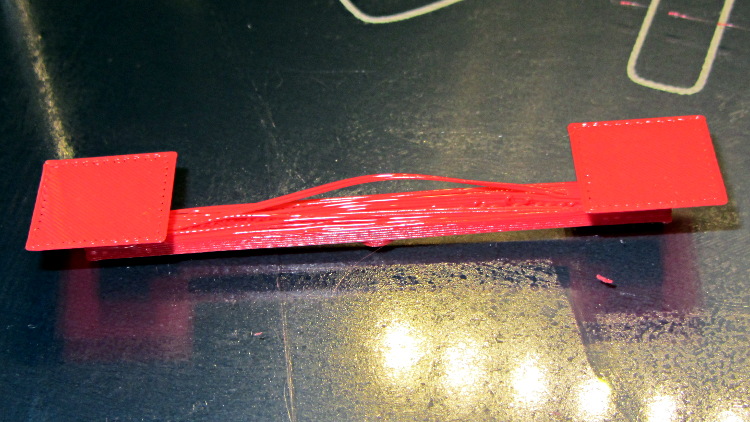
    The overall speed dropped considerably as the Cool setting limited the layer time to 20 seconds; the Bridge settings didn’t apply.

    I could probably tighten the bottom strands a bit, but it’s OK for a first pass.

    The OpenSCAD source code:

    bridge_length = 50;
    bridge_angle = 0;
    bridge_width = 5;
    
    strut_height = 4;
    
    layer_height = 0.25;
    extrusion_width = 0.5;
    
    bridge_recovery_layers = 2 / layer_height;
    
    module foot() {
    	rotate([0, 0, 180/4]) cylinder(r=bridge_width * 2, h=layer_height, $fn=4);
    }
    
    module strut() {
    	rotate([0, 0, 180/4])
    	difference() {
    		cylinder(r1=bridge_width / 1.5 / cos(45), r2=bridge_width / 2 / cos(45),
    			h=strut_height, $fn=4);
    		translate([0, 0, -1]) cylinder(r1=(bridge_width / 1.5 - extrusion_width * 2) / cos(45),
    			r2=(bridge_width / 2 - extrusion_width * 2) / cos(45), h=10, $fn=4);
    	}
    }
    
    translate([-bridge_length/2,0,0])
    rotate(bridge_angle) {
    	translate([00, 0, 0]) foot();
    	translate([bridge_length + bridge_width, 0, 0]) foot();
    
    	translate([00, 0, 0]) strut();
    	translate([bridge_length + bridge_width, 0, 0]) strut();
    
    	translate([bridge_width / -2, bridge_width / -2, strut_height]) cube([bridge_length + bridge_width * 2, bridge_width, layer_height * bridge_recovery_layers]);
    
    	translate([bridge_length / 2 + bridge_width / 2, 0, strut_height + layer_height * bridge_recovery_layers])
    	difference() {
    		cylinder(r=bridge_width / 2, h=1, $fn=32);
    		cylinder(r=bridge_width / 2 - extrusion_width, h=1.01, $fn=32);
    	}
    }
    
  • Eastern Tiger Swallowtail Butterfly

    These bits of flying jewelry enjoy the Butterfly Bush out front:

    Yellow Tiger Swallowtail - tattered
    Eastern Yellow Tiger Swallowtail – tattered

    This one has lost both “swallowtails” and a chunk of its left wing. The blue spots indicate it’s a female; we hope it laid a bunch of eggs in the magnolia bush next door…

  • Driveway Drain Debris Clog

    Alas, the nice slotted cap I put on the driveway drain can’t handle the amount of debris released by the trees next to the house and above the gutters. I’d removed the thumbscrew to simplify clearing the cap whenever I go for the mail, but that just accentuated the problem:

    Driveway drain - fountain
    Driveway drain – fountain

    The backup must be over a foot of water at the end of the pipe; that fountain emerges from the 1/4 inch hole for the thumbscrew. Fortunately, the slope is large enough that the water (probably) isn’t backing up into the retaining wall footing drain.

    When the pine trees toss their dead needles overboard, the cap plugs solid and, minus the screw, blows across the driveway:

    Driveway drain - clogged
    Driveway drain – clogged

    It usually doesn’t roll very far, although I’ve retrieved it halfway to the street.

    I still think the chipmunks will move in without a grate blocking the pipe, but I’m unsure how to proceed…

  • Baofeng BL-5 Battery: Initial Capacity

    The first two charges for those Baofeng BL-5 batteries show that the actual capacity isn’t quite up to the 1800 mA·h spec:

    Baofeng BL-5 Packs - First two charges
    Baofeng BL-5 Packs – First two charges

    The (meager) instructions say that the batteries will reach “full capacity” after three charges. Unless there’s a miracle waiting in the wings for that third charge, I very much doubt that they’ll get any better than the 1400 to 1500 mA·h you see in that graph. Note that the two batteries have quite different capacities and that the capacity for Pack B decreased on the second charge (purple vs. green trace).

    Compare that with the Wouxun batteries (plotted with Gnuplot, rather than a screen grab):

    Wouxun 7.4 V Packs
    Wouxun 7.4 V Packs

    Those are all at 250 mA, which is certainly less than the peak current and probably more than the average current. It’s close enough for now, anyway, and shows that the Wouxun batteries actually live up to their spec.

    Huh. Who’d’a thunk it?

    It looks like the blinky lights should go into power-save mode under 7 V, because there just isn’t that much capacity left when the cells start rolling over the edge of the cliff.

  • Improved M2 Heated Build Platform: First Light

    Although the M2’s heated build platform works well enough, somebody who knows what he’s doing (you know who you are: thanks!) sent me an improved version. It’s a PCB heater, laid out to compensate for the usual edge cooling, firmly attached to a tempered glass plate with genuine 3M thermally conductive tape:

    Improved M2 HBP - test setup
    Improved M2 HBP – test setup

    They designed the heater around the 30 VDC power supply used in their other equipment. Although I had high moderate hopes that a boost power supply would convert the 24 V supply I already had for the stepper driver bricks into the 30 V for the heater, it was not to be. So there’s a 36 V 9.7 A 350 W supply arcing around the planet that (I think) should work better: adjust the voltage down as far as it’ll go, soak up another few volts in the solid-state relay, and Things Should Be Close Enough to 30 V. One can buy a genuine 30 V supply, but it costs surprisingly more than either 24 V or 36 V supplies on the surplus / eBay market and won’t really provide the proper voltage without upward tweaking anyway.

    I replaced their standard 0.156 inch square terminals with Anderson Powerpoles, soldered a length of shielded cable to the 100 kΩ thermistor pads, and gimmicked up a connection to the 24 V supply; it delivered 23.7 V at the PCB terminals. The thermistor is 100 kΩ at 25 °C and 11.4 kΩ at 77 °C. The PCB heater is 5.9 Ω at 25 °C and 7.3 Ω at 77 °C; it dissipates 77 W at 77 °C (no, that’s not a typo).

    The ultimate temperature looks to be about 90 °C with a 24 V supply, which isn’t quite enough for ABS (which I’m not using in the M2 right now, but probably will eventually). The time constant, assuming the 1-e-1 point is 66 °C, works out to about 9 minutes; it’ll be up to final temperature in half an hour. Those numbers aren’t quite as accurate as one might wish, because the heater power drops as the temperature rises and the copper resistance increases.

    A 30 V supply would dissipate 120 W at 77 °C and rumor has it that the ultimate temperature is around 125 °C, which would be fine for ABS. Goosing the power a bit would produce more heat, but I’v been running the Thing-O-Matic at 110 °C and that’s good enough. More power, of course, gets it to the temperature setpoint faster, which is probably a Very Good Thing.

    Obviously, you need PWM to control the temperature; given a 9 minute time constant, a bang-bang controller will work perfectly well.

    The original data, including the thermistor resistance after I got my act together, plus a cute little temperature-vs-time graph:

    Improved M2 HBP - 24 V supply
    Improved M2 HBP – 24 V supply

    The colored flyspecks are part of the paper; I salvaged a stack of fancy menu cards from a trash can and padded them up as geek scratch paper.

  • Baofeng UV-5RE: BL-5 Battery Overview

    After I mentioned I was thinking of repurposing the nearly unused lithium-ion batteries from the Wouxun KG-UV3D radios for a blinky light, Dragorn of Kismet introduced me to his Baofeng UV-5 radio. The radio itself seems to be the worst amateur radio you’d be willing to use, but when seen as a standardized battery and drop-in charger with a free radio and antenna tossed into the deal, it’s not all that bad:

    Baofeng UV-5RE radio - overview
    Baofeng UV-5RE radio – overview

    The Wouxun and Baofeng 7.4 V batteries allegedly have similar capacities: 1700 vs 1800 mA·h. The Baofeng also has a 3800 (or 3600) mA·h pack that extends well below the base of the radio (not all large packs seem to be compatible with the UV-5RE radios I got); that would be roughly equivalent to the larger packs that power the Wouxun / APRS / voice gadgetry on the bike.

    The Baofeng battery pack is smaller and has features that seem less likely to misbehave on a bike.

    It has a latching tab with a ramp and a positive notch, with ridges around the edge that engage the radio shell:

    Baofeng UV-5RE radio - battery latch tab
    Baofeng UV-5RE radio – battery latch tab

    The radio body (which is what I must duplicate) has a movable latch tab above the battery contact pins, so the latch holds the battery into the compartment. The spring-loaded pin pairs are wired in parallel, presumably for redundant contact with each battery terminal:

    Baofeng UV-5RE radio - battery compartment latch and contacts
    Baofeng UV-5RE radio – battery compartment latch and contacts

    The battery terminal pads are reasonably well protected by the tab:

    Baofeng UV-5RE radio - battery contact pads
    Baofeng UV-5RE radio – battery contact pads

    The battery slides into the radio compartment and latches with a snap. Two holes on the battery base engage a pair of pegs on the radio case:

    Baofeng UV-5RE radio - battery base detail
    Baofeng UV-5RE radio – battery base detail

    The holes are rounded rectangles and the pegs have one corner sliced off. The pegs seem entirely too fragile and not well suited for 3D printing, so some metalwork may be in order. The pegs must resist only pulling forces perpendicular to the case back, not sliding forces, and the case constrains side-to-side motion.

    The two square posts (with two others not shown) form the “feet” that support the radio when it’s standing on the desk or in the charger.

    Now, to doodle up the dimensions and measure the actual capacity.

    Speaking of capacity, BL-5 batteries on eBay range from $23 for “genuine Baofeng” that may or may not actually have that name on the label, all the way down to $8 for the usual no-name equivalent.

  • Cheap Boost Power Supply Evaluation

    For reasons that will become apparent in a while, I got a pair (*) of boost power supplies from the usual eBay source, allegedly capable of boosting a 10-to-32 VDC input to a 12-to-35 VDC output, up to 10 A and 150 W:

    Boost power supply
    Boost power supply

    After establishing that it would not produce 30 V into a 5.9 Ω load (5.1 A, but 152 W), I got systematic.

    A 100 Ω resistor drew 1/4 A while I set the output to 28 V. Doubling up the resistors showed that it worked OK at half an amp:

    Boost supply - 50 ohm load
    Boost supply – 50 ohm load

    Four 6 Ω resistors in series draw 1.2 A, then (channeling the true spirit of DIY 3D printing) two in series drew 2.3 A:

    Boost supply - 12 ohm load
    Boost supply – 12 ohm load

    That’s 32 W each and, yes, they did get toasty, but, no, I didn’t leave them turned on all that long.

    But a 6 Ω resistance still didn’t work, so the supply can’t provide 4.7 A at 130 W. In case you were wondering, that’s two 6 Ω resistors in series and a pair of those strings in parallel, so each resistor still sees 32 W.

    In terms of driving the actual load, these supplies aren’t going to light it up.

    Ah, well, whaddaya want for five buck from halfway around the planet?

    (*) Davy’s Aphorism: Never buy only one of any surplus item, because you’ll never find another. Get at least two, maybe three if it’s something you might actually use.