-
Kenmore HE3 Washer Shock Absorber Shims
As part of diagnosing a Terrible Sound inside our two decade old washer, I replaced the OEM shock absorber struts with cheap knockoffs. Although it didn’t solve the problem (spoiler: another tub spider bites the dust), the experience may come in handy elsewhere.
The left rear (as seen from the front) shock stood in a pile of rust on the baseplate that came from a drip in the water feed nozzle to the detergent / bleach / whatever dispenser drawer. The affected parts are no longer available and I have never had any luck finding a replacement O-ring of the proper size, so I just pulled the nozzle out, ran a small bead of acrylic sealant around the O-ring, and squished it back in place:

Kenmore washer – dispenser nozzle seal It’s the Y connection between the two black hoses, held in place on the dispenser by a relentless little clip. Release the two hose clamps, remove the hoses, pull it out, apply sealant, squish, reinstall in reverse order.
As for the shocks, don a pair of work gloves and turn the upper mount (on the tub) counterclockwise as you look along the shock. The tub has molded-in latches that make turning it the wrong way difficult, but not impossible.
With the shock loose, you can now try to turn the lower mounts counterclockwise as you look along the shock, but I had to deploy the BFW in very cramped quarters to get enough traction. This will likely wreck the little latches holding the mount in place, but you were going to replace it anyway.
The new left-rear latch snapped firmly into place:

Kenmore washer shock – left rear Yes, that’s after I cleaned off as much of the rust as made sense.
The remaining three latches did not snap firmly into place, so I made shims to soak up the slop:

Kenmore washer shock – shim laser cut They slip around the central pillar with clearance for the latches, although the thicker shim didn’t leave much engagement:

Kenmore washer shock – shim installed They ranged from 0.8 mm down to 0.2, based entirely on feel, and I used PETG, LDPE, and polypropylene clamshell of the right thickness.
The left front got the thickest:
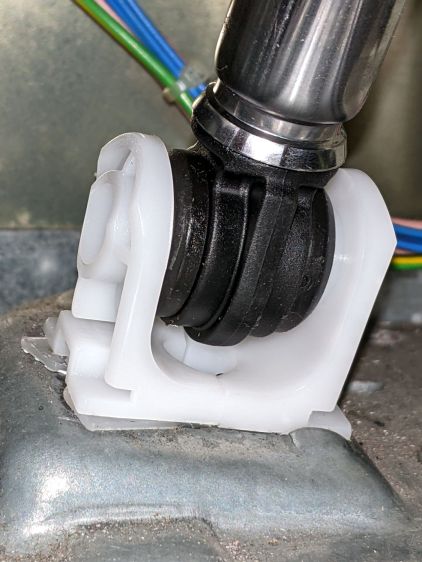
Kenmore washer shock – left front Right front thinnest:

Kenmore washer shock – right front And right rear in the middle:

Kenmore washer shock – right rear The shims aren’t precisely lined up with the feet, because I couldn’t make that work out, but they definitely prevented the mounts from shaking in their boots during the spin cycle.
You will inevitably want to take the mounts off the shocks, which will prove surprisingly difficult. The two halves are identical, with triangular latches that snap together with no provision for release:

Kenmore washer shock – foot internals Brute force applied with a small screwdriver may suffice, but don’t be surprised if strong words are required.
-
Subscribe
Subscribed
Already have a WordPress.com account? Log in now.
 The Smell of Molten Projects in the Morning