-
Improved Tool Length Probe Switch: Repeatability
After doing a repeatability test immediately after screwing the new switch to the tooling plate, I let everything sit overnight and ran the test again. In between, I’d done a few small moves, but didn’t change any of the mechanical positions.
The positions look like this:
Trial	Z-axis mm	Delta mm
1	26.303561	0.000000
2	26.305558	0.001997
3	26.304226	0.000665
4	26.304226	0.000665
5	26.303561	0.000000
6	26.305558	0.001997
7	26.305558	0.001997
8	26.303561	0.000000
9	26.303561	0.000000
10	26.304226	0.000665
11	26.304892	0.001331

	Maximum	0.001997
	Minimum	0.000000
	Range	0.001997
The initial position is 0.07 mm, about 3 mils, higher than before, which may well be due to the limited amount of fiddling I’d done in between.
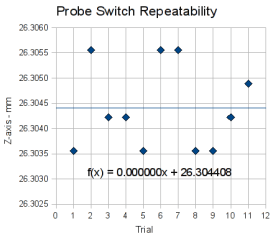
The corresponding picture shows that the values are well and truly quantized to far fewer positions than the number of digits would lead you to believe:

Probe Repeatability 2 The total range is 0.002 mm = 78 microinch, so the steps are on the order of 666 nm: separated by just about exactly one wavelength of the red He emission line.
What’s of interest is that the regression line is perfectly flat, which means the switch has pretty much stabilized. I have absolutely no reason to believe it’s repeatable to anywhere near that accuracy, particularly from day to day, but the switch is normally used to set tool lengths relative to a specific tool that’s touched off against the work surface at the start of what passes for a machining job around here.
It’s good enough!
-
Subscribe
Subscribed
Already have a WordPress.com account? Log in now.