-
Saddest Arduino Demo
The Adafruit 2.8 inch TFT Touch Shield for Arduino v2 seems just about ideal for a small control panel, such as one might use with a modified sewing machine. All you need is a few on-screen buttons, a few status display, and a bit of Arduino love: what more could one ask?
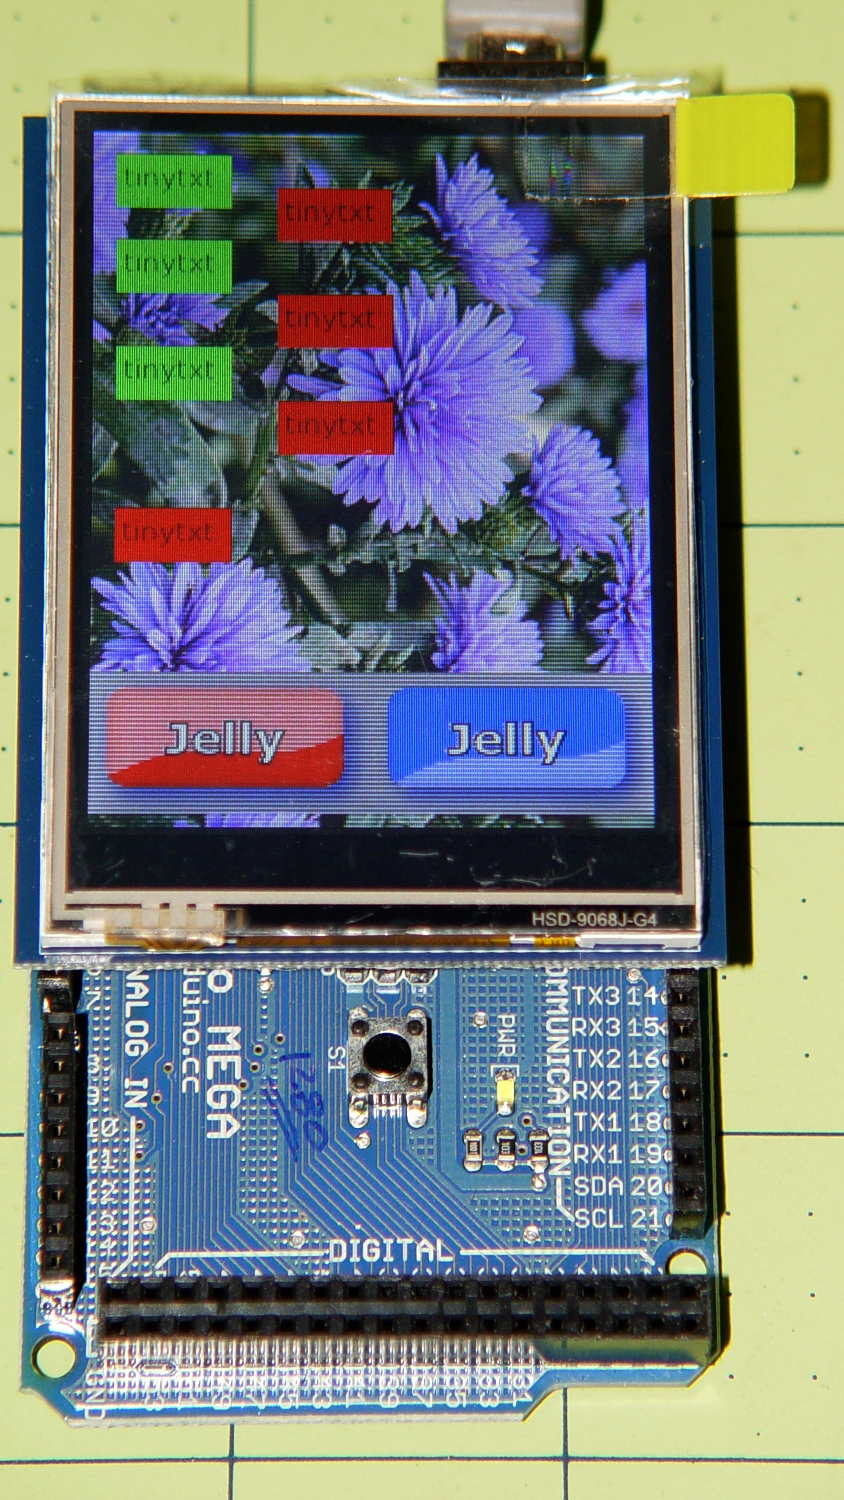
So I gimmicked up some small buttons with GIMP, made two large buttons with ImageMagick, and lashed together some Arduino code based on the Adafruit demo:

Adafruit TFT display – timing demo The picture doesn’t do justice to the display: it’s a nice piece of hardware that produces a crisp image. The moire patterns come from the interaction of TFT display pixels / camera pixels / image resizing.
It’s not obvious from the Adafruit description, but the display is inherently portrait-mode as shown. The (0,0) origin lies in the upper left corner, just over the DC power jack, and screen buffer updates proceed left-to-right, top-to-bottom from there.
The gotcha: even with the Arduino Mega’s hardware SPI, writing the full display requires nearly 4 seconds. Yeah, slow-scan TV in action. Writing the screen with a solid color requires several seconds.
After commenting out the serial tracing instructions from the Adafruit demo and tweaking a few other things, these timings apply:
-------------
Writing background
Elapsed: 3687
Writing six buttons
Elapsed: 529
Overwriting six buttons
Elapsed: 531
Rewriting buttons 10 times
Elapsed: 1767
Overwriting 2 large buttons
Elapsed: 1718
The timings work out to:
- Background: 240×320 → 48 µs/pixel
- Smaller buttons: 50×25 → 71 µs/pixel → 88 ms/button
- Rewriting one button: 71 µs/pixel
- Larger buttons: 120×64 → 56 µs/pixel → 430 ms/button
The button images come from BMP files on a MicroSD card and 8 KB of RAM won’t suffice for even a small button. Instead, the transfer loop buffers 20 pixels = 60 bytes from the card, writes them to the display, and iterates until it’s done.
Trust me on this: watching the buttons gradually change is depressing.
Yes, it could work as a control panel for the sewing machine, but it doesn’t have nearly the pep we’ve come to expect from touch-screen gadgetry. On the other paw, Arduinos are 8-bit microcontrollers teleported from the mid-90s, when crappy 20×4 LCD panels were pretty much as good as it got.
The SPI hardware clock runs at half the oscillator frequency = 16 MHz/2 = 8 MHz = 125 ns/bit. Clocking a single byte thus requires 1 µs; even allowing that each pixel = 3 bytes = 6 SPI operations, there’s a lot of software overhead ripe for the chopping block. I’d be sorely tempted to write a pair of unrolled loops that read 20 pixels and write 20 pixels with little more than a pointer increment & status spin between successive SPI transfers.
It’ll make hotshot C++ programmers flinch, but splicing all that into a single routine, throwing out all the clipping and error checking, and just getting it done might push the times down around 20 µs/pixel. Admittedly, that’s barely twice as fast, but should be less depressing.
However, even with all that effort, the time required to update the screen will clobber the motor control. You can’t devote a big fraction of a second to rewriting a button at the same time you’re monitoring the pedal position, measuring the motor speed, and updating the control voltage. That’s the same problem that makes Arduino microcontrollers inadequate for contemporary 3D printers: beyond a certain point, the hardware is fighting your efforts, not helping you get things done.
A reasonable workaround: no screen updates while the motor turns, because you shouldn’t have any hands free while you’re sewing.
There’s also no way to make up for not having enough RAM or video hardware. The same display runs full-speed video on a Raspberry Pi…
The Arduino source code, hacked from the Adafruit demo:
// 2.8 inch TFT display exercise
// Crudely hacked from Adafruit demo code: spitftbitmap.ino
// 2014-07-03 Ed Nisley KE4ZNU

/***************************************************
  This is our Bitmap drawing example for the Adafruit ILI9341 Breakout and Shield
  ----> http://www.adafruit.com/products/1651

  Check out the links above for our tutorials and wiring diagrams
  These displays use SPI to communicate, 4 or 5 pins are required to
  interface (RST is optional)
  Adafruit invests time and resources providing this open source code,
  please support Adafruit and open-source hardware by purchasing
  products from Adafruit!

  Written by Limor Fried/Ladyada for Adafruit Industries.
  MIT license, all text above must be included in any redistribution
 ****************************************************/

#include <Adafruit_GFX.h>    // Core graphics library
#include "Adafruit_ILI9341.h" // Hardware-specific library
#include <SPI.h>
#include <SD.h>

#define TFT_DC 9
#define TFT_CS 10
Adafruit_ILI9341 tft = Adafruit_ILI9341(TFT_CS, TFT_DC);

#define SD_CS 4

unsigned long MillisNow, MillisThen;

void setup(void) {
  Serial.begin(115200);

  tft.begin();
  tft.fillScreen(ILI9341_BLACK);

  Serial.print(F("Initializing SD card..."));
  if (!SD.begin(SD_CS)) {
    Serial.println(F("failed!"));
  }
  Serial.println(F("OK!"));

}

void loop() {
  Serial.println(F("--------------"));
  Serial.println(F("Writing background"));
  MillisThen = millis();

  bmpDraw("Test1.bmp", 0, 0);

  MillisNow = millis();
  Serial.print(F("" Elapsed: ""));
  Serial.println(MillisNow - MillisThen);

  Serial.println(F("Writing 6 small buttons"));
  MillisThen = millis();

  bmpDraw("Red50x25.bmp",10,10);
  bmpDraw("Red50x25.bmp",10,50);
  bmpDraw("Red50x25.bmp",10,100);

  bmpDraw("Grn50x25.bmp",80,25);
  bmpDraw("Grn50x25.bmp",80,75);
  bmpDraw("Grn50x25.bmp",80,125);

  MillisNow = millis();
  Serial.print(F("" Elapsed: ""));
  Serial.println(MillisNow - MillisThen);

  Serial.println(F("Overwriting 6 small buttons"));
  MillisThen = millis();

  bmpDraw("Grn50x25.bmp",10,10);
  bmpDraw("Grn50x25.bmp",10,50);
  bmpDraw("Grn50x25.bmp",10,100);

  bmpDraw("Red50x25.bmp",80,25);
  bmpDraw("Red50x25.bmp",80,75);
  bmpDraw("Red50x25.bmp",80,125);

  MillisNow = millis();
  Serial.print(F("" Elapsed: ""));
  Serial.println(MillisNow - MillisThen);

  Serial.println(F("Writing small button 10x2 times"));
  MillisThen = millis();

  for (byte i=0; i<10; i++) {
    bmpDraw("Grn50x25.bmp",10,175);
    bmpDraw("Red50x25.bmp",10,175);
  }

  MillisNow = millis();
  Serial.print(F("" Elapsed: ""));
  Serial.println(MillisNow - MillisThen);

  Serial.println(F("Overwriting 2 large buttons"));
  MillisThen = millis();

  bmpDraw("GelDn.bmp",0,250);
  bmpDraw("GelUp.bmp",0,250);

  bmpDraw("GelUp.bmp",120,250);
  bmpDraw("GelDn.bmp",120,250);

  MillisNow = millis();
  Serial.print(F("" Elapsed: ""));
  Serial.println(MillisNow - MillisThen);

}

// This function opens a Windows Bitmap (BMP) file and
// displays it at the given coordinates.  It's sped up
// by reading many pixels worth of data at a time
// (rather than pixel by pixel).  Increasing the buffer
// size takes more of the Arduino's precious RAM but
// makes loading a little faster.  20 pixels seems a
// good balance.

#define BUFFPIXEL 20

void bmpDraw(char *filename, uint8_t x, uint16_t y) {

  File     bmpFile;
  int      bmpWidth, bmpHeight;   // W+H in pixels
  uint8_t  bmpDepth;              // Bit depth (currently must be 24)
  uint32_t bmpImageoffset;        // Start of image data in file
  uint32_t rowSize;               // Not always = bmpWidth; may have padding
  uint8_t  sdbuffer[3*BUFFPIXEL]; // pixel buffer (R+G+B per pixel)
  uint8_t  buffidx = sizeof(sdbuffer); // Current position in sdbuffer
  boolean  goodBmp = false;       // Set to true on valid header parse
  boolean  flip    = true;        // BMP is stored bottom-to-top
  int      w, h, row, col;
  uint8_t  r, g, b;
  uint32_t pos = 0, startTime = millis();

  if((x >= tft.width()) || (y >= tft.height())) return;

//  Serial.println();
//  Serial.print(F("Loading image '"));
//  Serial.print(filename);
//  Serial.println('\'');

  // Open requested file on SD card
  if ((bmpFile = SD.open(filename)) == NULL) {
//    Serial.print(F("File not found"));
    return;
  }

  // Parse BMP header
  if(read16(bmpFile) == 0x4D42) { // BMP signature
//    Serial.print(F("File size: "));
//	Serial.println(read32(bmpFile));
	read32(bmpFile);
    (void)read32(bmpFile); // Read & ignore creator bytes
    bmpImageoffset = read32(bmpFile); // Start of image data
//    Serial.print(F("Image Offset: ")); Serial.println(bmpImageoffset, DEC);
    // Read DIB header
//    Serial.print(F("Header size: "));
//	Serial.println(read32(bmpFile));
	read32(bmpFile);
    bmpWidth  = read32(bmpFile);
    bmpHeight = read32(bmpFile);
    if(read16(bmpFile) == 1) { // # planes -- must be '1'
      bmpDepth = read16(bmpFile); // bits per pixel
//      Serial.print(F("Bit Depth: ")); Serial.println(bmpDepth);
      if((bmpDepth == 24) && (read32(bmpFile) == 0)) { // 0 = uncompressed

        goodBmp = true; // Supported BMP format -- proceed!
//        Serial.print(F("Image size: "));
//        Serial.print(bmpWidth);
//        Serial.print('x');
//        Serial.println(bmpHeight);

        // BMP rows are padded (if needed) to 4-byte boundary
        rowSize = (bmpWidth * 3 + 3) & ~3;

        // If bmpHeight is negative, image is in top-down order.
        // This is not canon but has been observed in the wild.
        if(bmpHeight < 0) {
          bmpHeight = -bmpHeight;
          flip      = false;
        }

        // Crop area to be loaded
        w = bmpWidth;
        h = bmpHeight;
        if((x+w-1) >= tft.width())  w = tft.width()  - x;
        if((y+h-1) >= tft.height()) h = tft.height() - y;

        // Set TFT address window to clipped image bounds
        tft.setAddrWindow(x, y, x+w-1, y+h-1);

        for (row=0; row<h; row++) { // For each scanline...

          // Seek to start of scan line.  It might seem labor-
          // intensive to be doing this on every line, but this
          // method covers a lot of gritty details like cropping
          // and scanline padding.  Also, the seek only takes
          // place if the file position actually needs to change
          // (avoids a lot of cluster math in SD library).
          if(flip) // Bitmap is stored bottom-to-top order (normal BMP)
            pos = bmpImageoffset + (bmpHeight - 1 - row) * rowSize;
          else     // Bitmap is stored top-to-bottom
            pos = bmpImageoffset + row * rowSize;
          if(bmpFile.position() != pos) { // Need seek?
            bmpFile.seek(pos);
            buffidx = sizeof(sdbuffer); // Force buffer reload
          }

          for (col=0; col<w; col++) { // For each pixel...
            // Time to read more pixel data?
            if (buffidx >= sizeof(sdbuffer)) { // Indeed
              bmpFile.read(sdbuffer, sizeof(sdbuffer));
              buffidx = 0; // Set index to beginning
            }

            // Convert pixel from BMP to TFT format, push to display
            b = sdbuffer[buffidx++];
            g = sdbuffer[buffidx++];
            r = sdbuffer[buffidx++];
            tft.pushColor(tft.color565(r,g,b));
          } // end pixel
        } // end scanline
//        Serial.print(F("Loaded in "));
//        Serial.print(millis() - startTime);
//        Serial.println("" ms"");
      } // end goodBmp
    }
  }

  bmpFile.close();
  if(!goodBmp) Serial.println(F("BMP format not recognized."));
}

// These read 16- and 32-bit types from the SD card file.
// BMP data is stored little-endian, Arduino is little-endian too.
// May need to reverse subscript order if porting elsewhere.

uint16_t read16(File &f) {
  uint16_t result;
  ((uint8_t *)&result)[0] = f.read(); // LSB
  ((uint8_t *)&result)[1] = f.read(); // MSB
  return result;
}

uint32_t read32(File &f) {
  uint32_t result;
  ((uint8_t *)&result)[0] = f.read(); // LSB
  ((uint8_t *)&result)[1] = f.read();
  ((uint8_t *)&result)[2] = f.read();
  ((uint8_t *)&result)[3] = f.read(); // MSB
  return result;
}
-
Subscribe
Subscribed
Have a WordPress.com account? Log in now.

