-
MakerGear M2: Slic3r Start G-Code for PETG / V4 / 24 V / Whatever
The already ponderous chunk of G-Code that slic3r prepends to the outgoing file got a bit more complex with all the changes going on around here.
As it stands now, the starting G-Code looks like this:
;-- Slic3r Start G-Code for M2 starts --
;  Ed Nisley KE4NZU - 2015-03-07
;  Makergear V4 hot end
; Z-min switch at platform, must move nozzle to X=135 to clear
M140 S[first_layer_bed_temperature]	; start bed heating
G90				; absolute coordinates
G21				; millimeters
M83				; relative extrusion distance
M17				; enable steppers
G4 P500			;  ... wait for power up
G92 Z0			; set Z to zero, wherever it might be now
G1 Z10 F1000	; move platform downward to clear nozzle; may crash at bottom
G28 Y0			; home Y to clear plate, origin in middle
G92 Y-127
G28 X0			; home X, origin in middle
G92 X-100
G1 X130 Y0 F15000	; move off platform to right side, center Y
G28 Z0			; home Z to platform switch, with measured offset
G92 Z-2.10
G0 Z2.0			; get air under switch
G0 Y-127 F10000	; set up for priming, zig around corner
G0 X0			;  center X
G0 Y-125.0		; just over platform edge
G0 Z0 F500	; exactly at platform
M109 S[first_layer_temperature]	; set extruder temperature and wait
M190 S[first_layer_bed_temperature]	; wait for bed to finish heating
G1 E20 F300		; prime to get pressure, generate blob on edge
G0 Y-123 F500		; shear off blob
G1 X15 F15000	; jerk away from blob, move over surface
G4 P500			; pause to attach
G1 X45 F500		; slowly smear snot to clear nozzle
G1 Z1.0 F2000	; clear bed for travel
;-- Slic3r Start G-Code ends --
The blow-by-blow description…
Lines 9-10: Manually enable stepper drivers and wait half a second
Changing to a 24 V power supply for the motors doesn’t affect the winding current (because the drivers control that), but it does increase the current’s rate-of-change (because inductor voltage = L di/dt and the applied voltage is 26% higher) during each microstep. That means the motors snap to a whole-step position a bit faster when the Marlin firmware enables the drivers and the higher di/dt induces more glitch voltage in, say, the endstop cable, triggering a false contact sense (as the circuit depends on the Arduino’s 20+ kΩ internal pullup resistor). In any event, a half-second snooze avoids the problem.
Lines 18-19: Home Z-axis & set platform switch offset
The only way to set the offset accurately is to compare the actual height of a printed object (or the skirt around it) with the nominal value. I use 5 mm tall thinwall open boxes and, after setting the Extrusion Multiplier properly, they’re good test objects.
Lines 22-24: Extruder final heating
PETG tends to stick to the nozzle, so the nozzle now sits just over the edge of the glass plate and flush with the top surface, so that the initial drool forms a glob anchored to the side of the plate. It looks like this:
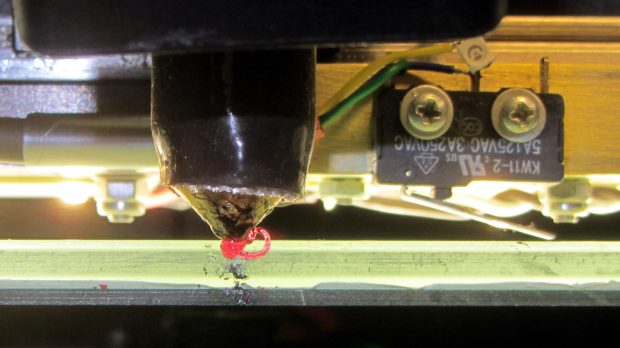
V4 PETG – preheat position Notice the curl attached to the nozzle: I generally pick those off with a tweezer, but let this one remain to show how this mess works.
Line 31: Prime the extruder
With the hot end and platform temperatures stabilized, I ram 20 mm of filament into the extruder to refill it and stabilize its internal pressure. Because it’s been drooling ever since the plastic melted, not very much plastic comes out, but what does emerge enlarges the blob and bonds with the plastic stuck on the nozzle, thusly:
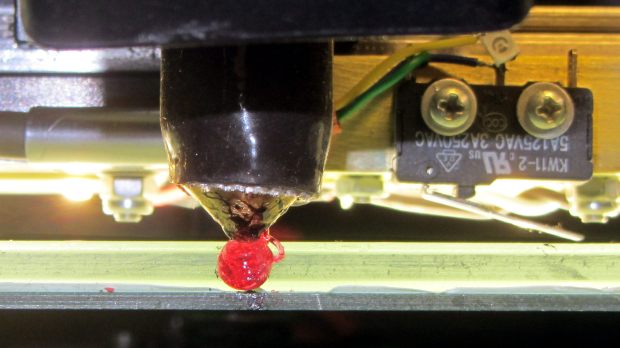
V4 PETG – extruder priming Lines 28-29: Detach the blob
Moving 2 mm onto the platform leaves most of the snot hanging on the edge of the glass, with just a bit on the far side of the nozzle. Doing that relatively slowly gives the plastic time to flow around the nozzle and remain with the blob, then zipping to X=15 encourages it to detach.
Lines 30-31: Wipe away what’s left
Pause for half a second to allow whatever’s left to attach to the platform, then slowly move to X=45, and watch the remaining snot leave a trail on the platform as it oozes off the nozzle.
Then hop up 1 mm to clear the platform and pass control to the rest of the G-Code with a clean nozzle!
That’s the ideal outcome, of course. Sometimes a recalcitrant blob hangs on, but it generally oozes off while the nozzle trudges around three skirt outlines…


-
Subscribe
Subscribed
Have a WordPress.com account? Log in now.

