-
KeyboardIO Atreus: RGB LED Firmware
Having wired a WS2812 RGB LED into my KeyboardIO Atreus, lighting it up requires some QMK firmware configuration. It’s easiest to set up a “new” keymap based on the QMK Atreus files, as described in the QMK startup doc:
qmk new-keymap -kb keyboardio/atreus -km ednisleyObviously, you’ll pick a different keymap name than I did. All the files mentioned below will reside in the new subdirectory, which starts out with only a
keymap.cfile copied from thedefaultlayout.The
rules.mkfile enables RGB Lighting, as well as Auto Shift and Tap Dance:AUTO_SHIFT_ENABLE = yes # allow automagic shifting TAP_DANCE_ENABLE = yes # allow multi-tap keys RGBLIGHT_ENABLE = yes # addressable LEDs
If you had different hardware, you could specify the driver with a
WS2812_DRIVERoption.QMK can also control single-color LEDs with PWM (a.k.a. backlighting), and per-key RGB LEDs (a.k.a. RGB Matrix). These functions, their configuration / controls / data, and their documentation overlap and intermingle to the extent that I spent most of my time figuring out what not to include.
Some configuration happens in the
config.hfile:#define RGB_DI_PIN B2 #define RGBLED_NUM 1 // https://github.com/qmk/qmk_firmware/blob/master/docs/ws2812_driver.md //#define WS2812_TRST_US 280 //#define WS2812_BYTE_ORDER WS2812_BYTE_ORDER_GRB #define RGBLIGHT_LAYERS #define RGBLIGHT_EFFECT_RGB_TEST #define RGBLIGHT_LIMIT_VAL 63 #define NO_DEBUG #define NO_PRINT
The first two lines describe a single WS2812 RGB LED wired to pin
B2(a.k.a.MOSI) of the Atmel 32U4 microcontroller. The default Reset duration and Byte Order values work for the LED I usedProtip: swapping the order from GRB to RGB is a quick way to discover if the firmware actually writes to the LED, even before you get anything else working: it’ll be red with the proper setting and green with the wrong one.
Dialing the maximum intensity down works well with a bright LED shining directly at your face from a foot away.
Turning on
RGBLIGHT_LAYERSis what makes this whole thing happen. TheRGBLIGHT_EFFECT_RGB_TESToption enables a simple test animation at the cost of a few hundred bytes of code space; remove that line after everything works.The last two lines remove the debugging facilities; as always with microcontroller projects, there’s enough room for either your code or the debugger required to get it running, but not both.
With those files set up, the
keymap.cfile does the heavy lifting:// Modified from the KeyboardIO layout // Ed Nisley - KE4ZNU #include QMK_KEYBOARD_H enum layer_names { _BASE, _SHIFTS, _FUNCS, _NLAYERS }; // Tap Dance enum { TD_SPC_ENT, }; qk_tap_dance_action_t tap_dance_actions[] = { [TD_SPC_ENT] = ACTION_TAP_DANCE_DOUBLE(KC_SPC, KC_ENT), }; // Layer lighting // Undefine this to enable simple test mode // Also put #define RGBLIGHT_EFFECT_RGB_TEST in config.h #define LED_LL #ifdef LED_LL const rgblight_segment_t PROGMEM ll_0[] = RGBLIGHT_LAYER_SEGMENTS( {0,1,HSV_WHITE} ); const rgblight_segment_t PROGMEM ll_1[] = RGBLIGHT_LAYER_SEGMENTS( {0,1,HSV_MAGENTA} ); const rgblight_segment_t PROGMEM ll_2[] = RGBLIGHT_LAYER_SEGMENTS( {0,1,HSV_CYAN} ); const rgblight_segment_t PROGMEM ll_3[] = RGBLIGHT_LAYER_SEGMENTS( {0,1,HSV_BLUE} ); const rgblight_segment_t PROGMEM ll_4[] = RGBLIGHT_LAYER_SEGMENTS( {0,1,HSV_GREEN} ); const rgblight_segment_t PROGMEM ll_5[] = RGBLIGHT_LAYER_SEGMENTS( {0,1,HSV_RED} ); const rgblight_segment_t PROGMEM ll_6[] = RGBLIGHT_LAYER_SEGMENTS( {0,1,HSV_YELLOW} ); const rgblight_segment_t* const PROGMEM ll_layers[] = RGBLIGHT_LAYERS_LIST( ll_0,ll_1,ll_2,ll_3,ll_4,ll_5,ll_6 ); #endif void keyboard_post_init_user(void) { #ifdef LED_LL rgblight_layers = ll_layers; rgblight_set_layer_state(0, 1); #else rgblight_enable_noeeprom(); rgblight_mode_noeeprom(RGBLIGHT_MODE_RGB_TEST); // rgblight_mode_noeeprom(RGBLIGHT_MODE_BREATHING + 3); #endif } #ifdef LED_LL layer_state_t layer_state_set_user(layer_state_t state) { for (uint8_t i=0 ; i < _NLAYERS; i++) rgblight_set_layer_state(i, layer_state_cmp(state, i)); return state; } #endif // Key maps const uint16_t PROGMEM keymaps[][MATRIX_ROWS][MATRIX_COLS] = { [_BASE] = LAYOUT( // base layer for typing KC_Q, KC_W, KC_E, KC_R, KC_T, KC_Y, KC_U, KC_I, KC_O, KC_P , KC_A, KC_S, KC_D, KC_F, KC_G, KC_H, KC_J, KC_K, KC_L, KC_SCLN , KC_Z, KC_X, KC_C, KC_V, KC_B, KC_GRV, KC_LALT, KC_N, KC_M, KC_COMM, KC_DOT, KC_SLSH , LT(_FUNCS,KC_ESC), KC_TAB, KC_LGUI, KC_BSPC, KC_LSFT, KC_LCTL, KC_ENT , TD(TD_SPC_ENT), MO(_SHIFTS), KC_MINS, KC_QUOT, KC_BSLS), [_SHIFTS] = LAYOUT( // shifted chars and numpad KC_EXLM, KC_AT, KC_UP, KC_DLR, KC_PERC, KC_PGUP, KC_7, KC_8, KC_9, KC_HOME, KC_LPRN, KC_LEFT, KC_DOWN, KC_RGHT, KC_RPRN, KC_PGDN, KC_4, KC_5, KC_6, KC_END, KC_LBRC, KC_RBRC, KC_HASH, KC_LCBR, KC_RCBR, KC_CIRC, KC_AMPR,KC_ASTR, KC_1, KC_2, KC_3, KC_PLUS, KC_NO , KC_INS, KC_LGUI, KC_DEL , KC_BSPC, KC_LCTL, KC_LALT,KC_SPC, KC_TRNS, KC_DOT, KC_0, KC_EQL ), [_FUNCS] = LAYOUT( // function keys KC_INS, KC_HOME, KC_UP, KC_END, KC_PGUP, KC_UP, KC_F7, KC_F8, KC_F9, KC_F10 , KC_DEL, KC_LEFT, KC_DOWN, KC_RGHT, KC_PGDN, KC_DOWN, KC_F4, KC_F5, KC_F6, KC_F11 , KC_NO, KC_VOLU, KC_NO, KC_NO, RESET, _______, _______, KC_NO, KC_F1, KC_F2, KC_F3, KC_F12 , KC_NO, KC_VOLD, KC_LGUI, KC_LSFT, KC_BSPC, KC_LCTL, KC_LALT, KC_SPC, TO(_BASE), KC_PSCR, KC_SLCK, KC_PAUS ) };Undefine
LED_LLto enable the test mode, compile, flash, and the LED should cycle red / green / blue forever; you also need theRGB_TESToption in theconfig.hfile.Define
LED_LLand layer lighting should then Just Work™, with the LED glowing:- White for the basic layer with all the letters
- Magenta with the Fun key pressed
- Cyan with the Esc key pressed
The key map code defines colors for layers that don’t yet exist, but it should get you started.
For convenience, I wadded all three QMK files into a GitHub Gist.
The LED is kinda subtle:
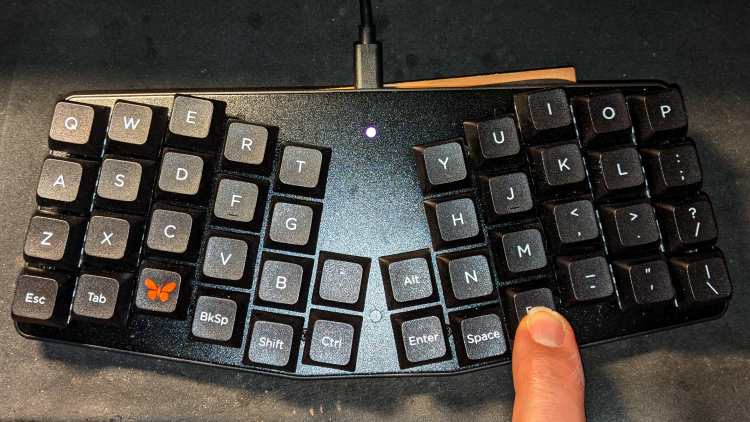
Atreus keyboard – LED installed As you might expect, figuring all that out took much longer than for you to read about it, but now I have a chance of remembering what I did.
-
Subscribe
Subscribed
Have a WordPress.com account? Log in now.

